display Lancia Flavia 2012 Owner handbook (in English)
[x] Cancel search | Manufacturer: LANCIA, Model Year: 2012, Model line: Flavia, Model: Lancia Flavia 2012Pages: 233, PDF Size: 2.61 MB
Page 116 of 233
dual brake system is indicated by the
Brake Warning Light which will turn
on when the brake fluid level in the
master cylinder has dropped below a
specified level.
The light will remain on until the
cause is corrected.
NOTE:
The light may flash momentarily
during sharp cornering maneuvers
which change fluid level condi-
tions. The vehicle should have ser-
vice performed, and the brake
fluid level checked.
If brake failure is indicated, immedi-
ate repair is necessary.WARNING!
Driving a vehicle with the brake
light on is dangerous. Part of the
brake system may have failed. It will
take longer to stop the vehicle. You
could have a collision. Have the ve-
hicle checked immediately.Vehicles equipped with Anti-Lock
brakes (ABS), are also equipped with
Electronic Brake Force Distribution
(EBD). In the event of an EBD failure,
the Brake Warning Light will turn on
along with the ABS Light. Immediate
repair to the ABS system is required.
The operation of the Brake Warning
Light can be checked by turning the
ignition switch from the OFF position
to the ON/RUN position. The light
should illuminate for approximately
three seconds. The light should then
turn off unless the parking brake is
applied or a brake fault is detected. If
the light does not illuminate, have the
light inspected by an authorized
dealer.
The light also will turn on when the
parking brake is applied with the ig-
nition switch in the ON/RUN posi-
tion.
NOTE:
This light shows only that the
parking brake is applied. It does
not show the degree of brake ap-
plication. 12. Tachometer
The silver area of the scale shows the
permissible engine revolutions-per-
minute (RPM x 1000) for each gear
range. Before reaching the red area,
ease up on the accelerator to prevent
engine damage.
13. Shift Lever Indicator
The Shift Lever Indicator is self-
contained within the instrument clus-
ter. It displays the gear position of the
automatic transmission.
NOTE:
You must apply the brakes before
shifting from PARK.
14. Odometer Display/Trip
Odometer Display
The odometer display shows the total
distance the vehicle has been driven.
The two trip odometers show indi-
vidual trip mileage. To switch from
odometer to trip odometers, press and
release the Trip Odometer button. To
reset a trip odometer, display the de-
sired trip odometer to be reset then
push and hold the button until the
display resets (approximately 2 sec-
onds). Refer to “Trip Odometer But-
ton” for additional information.
109
Page 117 of 233
Vehicle Odometer Messages
When the appropriate conditions ex-
ist, the odometer will display the fol-
lowing messages:
LoW tirE. . . . . . Low Tire Pressure
HOTOIL . . Engine Oil Temperature
Exceeds Safe Threshold
gASCAP . . . . . . . . . Fuel Cap Fault
CHANgE OIL . Oil Change Required
noFUSE . . . . . IOD Fuse Is Missing
no buS . . . . Cluster Does Not Have
Communication With The CAN BUS.
NOTE:
Warnings such as ”Low Tire,”
“Door Ajar” and “Trunk Ajar” will
display in the EVIC. (Refer to
“Electronic Vehicle Information
Center (EVIC)” for specific mes-
sages).
LoW tirE
When the appropriate condition ex-
ists, the odometer display will toggle
between LoW and TirE for three
cycles. HOTOIL
When this message is displayed there
is a engine oil over-temperature con-
dition. When this condition occurs,
the “HOTOIL” message will be dis-
played in the odometer along with a
chime.
Refer to “If Your Engine Overheats”
in “What To Do In Emergencies”.
CHAngE OIL
Your vehicle is equipped with an en-
gine oil change indicator system. The
“CHAngE OIL” message will flash in
the instrument cluster odometer for
approximately 12 seconds after a
single chime has sounded to indicate
the next scheduled oil change inter-
val. The engine oil change indicator
system is duty cycle based, which
means the engine oil change interval
may fluctuate dependent upon your
personal driving style.
Unless reset, this message will con-
tinue to display each time you turn the
ignition switch to the “ON/RUN” po-
sition. To turn off the message tempo-
rarily, press and release the Trip
Odometer button on the instrumentcluster. To reset the oil change indica-
tor system (after performing the
scheduled maintenance) perform the
following procedure:
1. Turn the ignition switch to the
ON/RUN position (do not start the
engine).
2. Fully depress the accelerator
pedal slowly 3 times within 10 sec-
onds.
3. Turn the ignition switch to the
LOCK position.
NOTE:
If the indicator message illumi-
nates when you start the vehicle,
the oil change indicator system did
not reset. If necessary, repeat this
procedure. 4. For vehicles equipped with the
Electronic Vehicle Information
Center (EVIC), refer to “Electronic
Vehicle Information Center
(EVIC)”.
110
Page 118 of 233
15. Cruise IndicatorThis indicator shows that
the Electronic Speed Con-
trol System is ON.
16. Odometer/Trip Odometer Reset
Button
Trip Odometer
Press and release this button to
change the display from odometer to
“Trip A.” Press and release it a second
time to change the display to “Trip
B.” Press and release it a third time to
change the display back to the odom-
eter.
To reset the trip odometer, first dis-
play the trip mileage that you want to
reset, “Trip A” or “Trip B.” Then push
and hold the button (approximately
2 seconds) until the display resets to
0 miles (km). The odometer must be
in Trip Mode to reset the trip odom-
eter. 17. Electronic Throttle Control
(ETC) Indicator Light
This light informs you of a
problem with the Electronic
Throttle Control (ETC)
system. If a problem is de-
tected, the light will come on while the
engine is running. If the light remains
lit with the engine running, your ve-
hicle will usually be drivable and not
need towing, however see your autho-
rized dealer for service as soon as pos-
sible.
If the light is flashing when the engine
is running you may experience power
loss, an elevated/rough idle, and in-
creased brake pedal effort, and your
vehicle may require towing. Immedi-
ate service is required.
The light will come on when the igni-
tion switch is first turned on and re-
main on approximately 15 seconds as
a bulb check. This is normal. If the
light does not come on during start-
ing, have the system checked by an
authorized dealer. 18. Park/Headlight ON Indicator
This indicator will illumi-
nate when the park lights or
headlights are turned on.
19. Electronic Stability Control
(ESC) OFF Indicator Light This light indicates the
Electronic Stability Control
system (ESC) has been
turned off by the driver.
20. Turn Signal Indicators The arrows will flash in uni-
son with the exterior turn
signal, when using the turn
signal lever. A chime will
sound if the vehicle is driven more
than 1.6 km with either turn signal
on.
NOTE:
If either indicator flashes at a
rapid rate, check for a defective
outside light bulb.
111
Page 122 of 233
29. Electronic Vehicle Information
Center (EVIC) Display
This display shows the EVIC mes-
sages when the appropriate condi-
tions exist. Refer to “Electronic Ve-
hicle Information Center (EVIC)” for
further information.
30. Rear Fog Light IndicatorThis indicator will illuminate
when the rear fog lights are
on.
ELECTRONIC VEHICLE
INFORMATION CENTER
(EVIC)
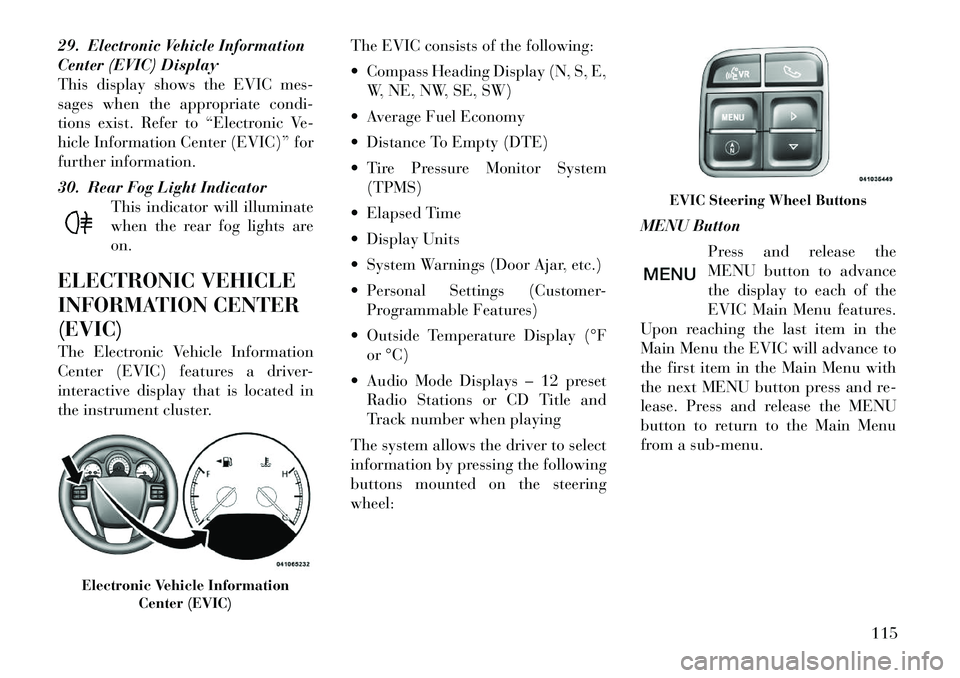
The Electronic Vehicle Information
Center (EVIC) features a driver-
interactive display that is located in
the instrument cluster. The EVIC consists of the following:
Compass Heading Display (N, S, E,
W, NE, NW, SE, SW)
Average Fuel Economy
Distance To Empty (DTE)
Tire Pressure Monitor System (TPMS)
Elapsed Time
Display Units
System Warnings (Door Ajar, etc.)
Personal Settings (Customer- Programmable Features)
Outside Temperature Display (°F or °C)
Audio Mode Displays – 12 preset Radio Stations or CD Title and
Track number when playing
The system allows the driver to select
information by pressing the following
buttons mounted on the steering
wheel: MENU Button
Press and release the
MENU button to advance
the display to each of the
EVIC Main Menu features.
Upon reaching the last item in the
Main Menu the EVIC will advance to
the first item in the Main Menu with
the next MENU button press and re-
lease. Press and release the MENU
button to return to the Main Menu
from a sub-menu.
Electronic Vehicle Information Center (EVIC)
EVIC Steering Wheel Buttons
115
Page 123 of 233
DOWN ButtonPress and release the
DOWN button to advance
the display through the
various Trip Functions or
Personal Settings.
COMPASS Button
Press and release the COM-
PASS button to display the
compass heading, the outside
temperature, and Audio Info
(when the radio is on) screen
when the current screen is not the com-
pass, outside temp, audio info screen.
SELECT Button
Press and release the SE-
LECT Button to accept a
selection. The SELECT
Button also resets various
Trip Functions.
ELECTRONIC VEHICLE
INFORMATION CENTER
(EVIC) DISPLAYS
When the appropriate conditions ex-
ist, the EVIC displays the following
messages:
Turn Signal On (with a continuous
warning chime after one mile traveled)
Left Front Turn Signal Lamp Out (with a single chime)
Left Rear Turn Signal Lamp Out (with a single chime)
Right Front Turn Signal Lamp Out (with a single chime)
Right Rear Turn Signal Lamp Out (with a single chime)
RKE (Remote Keyless Entry) Bat- tery Low (with a single chime)
Personal Settings Not Avail – Ve- hicle Not in Park
Personal Settings Not Avail – Ve- hicle in Motion
Door Ajar (with vehicle graphic showing which door is open. A
single chime sounds if the vehicle is
in motion).
Doors Ajar (with vehicle graphic showing which doors are open. A
single chime sounds if the vehicle is
in motion).
Trunk Open (with vehicle graphic showing and open trunk and A
single chime )
Lights On Key In Ignition
Remote start aborted — Door ajar
Remote start aborted — Hood ajar
Remote start aborted — Trunk ajar
Remote start aborted — Fuel low
Remote start disabled — System
fault
Convertible Top Not Secured (with a single chime)
Convertible Top Complete (with a single chime)
Secure Cargo Shield (with a single chime)
Speed Too High (with a single chime)
Convertible Top Malfunction (with a single chime)
Oil Change Required (with a single chime)
Low Tire (with a graphic of the car showing which tire(s) is/are low -
with a single chime). Refer to "Tire
Pressure Monitoring System" in
"Starting and Operating".
116
Page 124 of 233
Check TPM System (with a singlechime) Refer to "Tire Pressure
Monitoring System" in "Starting
and Operating".
OIL CHANGE REQUIRED
Your vehicle is equipped with an en-
gine oil change indicator system. The
“Oil Change Required” message will
flash in the EVIC display for approxi-
mately five seconds after a single
chime has sounded to indicate the
next scheduled oil change interval.
The engine oil change indicator sys-
tem is duty cycle based, which means
the engine oil change interval may
fluctuate dependent upon your per-
sonal driving style.
Unless reset, this message will con-
tinue to display each time you cycle
the ignition to the ON/RUN position.
EVIC MAIN MENU
To step to each main menu feature
press and release the MENU button
once for each step. A step from the last
item in the list will cause the first item
in the feature list to be displayed. The
following features are in the Main
menu: Compass, Outside Temperature,
Audio Information (if radio is on)
display
Average Fuel Economy
Distance to Empty
Tire Pressure Status display
Elapsed Time
EVIC Units Selection
System Status
Personal Settings
NOTE:
For features in the EVIC that can
be reset (Average Fuel Economy
and Elapsed Time), the EVIC
prompts a reset with a SELECT
button graphic and the word RE-
SET next to it.
When the SELECT button is
pressed, the selected feature will
reset and RESET ALL will display
next to the SELECT button
graphic. Pressing SELECT a sec-
ond time will reset both Average
Fuel Economy and Elapsed Time.
After three seconds without press-
ing SELECT, RESET ALL will re- turn to RESET and only the se-
lected feature will have been reset.
COMPASS DISPLAY
COMPASS Button
The compass heading indi-
cates the direction the ve-
hicle is facing. Press and re-
lease the compass button to
display one of eight compass head-
ings, the outside temperature, and au-
dio information (if the radio is on) if
the EVIC display is not already dis-
playing this screen.
NOTE:
The system will display the last
known outside temperature when
starting the vehicle and may need
to be driven several minutes before
the updated temperature is dis-
played. Engine temperature can
also affect the displayed tempera-
ture; therefore, temperature read-
ings are not updated when the ve-
hicle is not moving.
117
Page 125 of 233
If the vehicle is equipped with the
manufacturers gps (Navigation Ra-
dio), the NAV system will provide the
compass direction, and the variance
and calibration menus will be un-
available. The compass will perform
accurately, based on GPS signals in-
stead of the Earth’s magnetic field.
Automatic Compass Calibration
This compass is self-calibrating,
which eliminates the need to calibrate
the compass manually. When the ve-
hicle is new, the compass may appear
erratic and the EVIC will flash the
“CAL” indicator until the compass is
calibrated. You may calibrate the
compass by completing one or more
360–degree turns (in an area free
from large metal or metallic objects)
until the CAL indicator in the EVIC
turns off. The compass will now func-
tion normally.
NOTE:
A good calibration requires a level
surface and an environment free
from large metallic objects such as
buildings, bridges, underground
cables, railroad tracks, etc.Manual Compass Calibration
If the compass appears erratic or in-
accurate, and the variance has been
properly set, you may wish to manu-
ally recalibrate the compass. To
manually calibrate the compass:
1. Start the engine. Leave the shift
lever in PARK in order to enter the
EVIC Programming Menus.
2. Press and release the MENU but-
ton until “Personal Settings” displays
in the EVIC.
3. Press and release the DOWN but-
ton until “Calibrate Compass Yes”
displays in the EVIC.
4. Press and release the SELECT
button and the “CAL” indicator will
start flashing.
5. Drive the vehicle slowly (under
5 mph / 8 km/h), completing one or
more circles (in an area free from
large metal or metallic objects) until
the “CAL” indicator turns off. The
compass will now function normally.
Compass Variance
Compass Variance is the difference
between Magnetic North and Geo-
graphic North. To compensate for the
differences, the variance should be set
for the zone where the vehicle is
driven, per the zone map. Once prop-
erly set, the compass will automati-
cally compensate for the differences
and provide the most accurate com-
pass heading.
NOTE:
Magnetic and battery powered de-
vices, (such as cell phones, iPod's,
radar detectors, PDA's and lap-
tops) should be kept away from the
top of the instrument panel. This is
where the compass module is lo-
cated and such devices may inter-
fere and cause false compass read-
ings.
118
Page 126 of 233
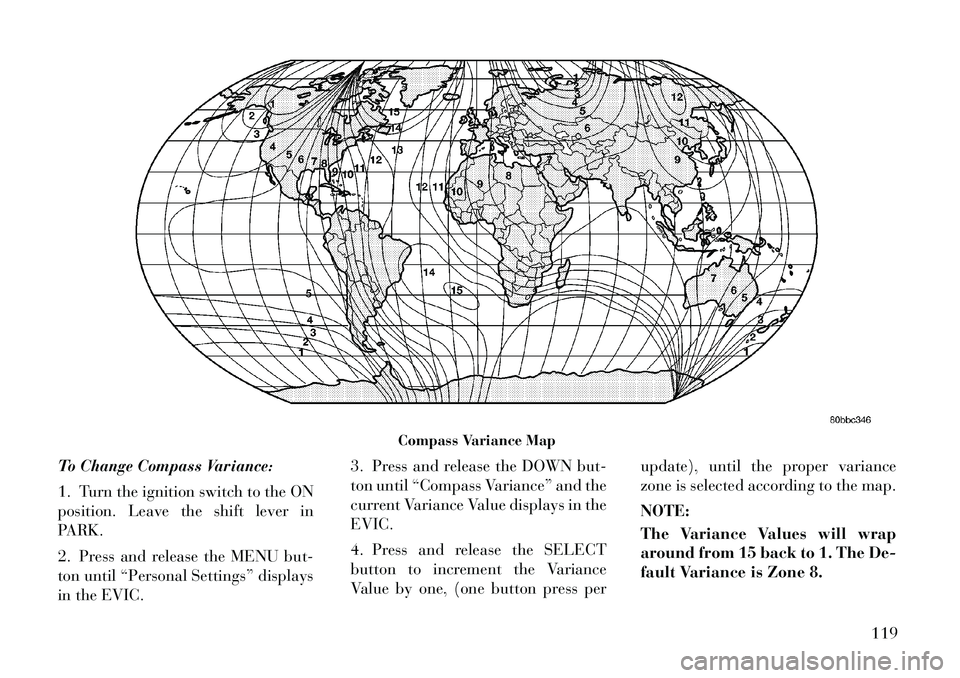
To Change Compass Variance:
1. Turn the ignition switch to the ON
position. Leave the shift lever in
PARK.
2. Press and release the MENU but-
ton until “Personal Settings” displays
in the EVIC.3. Press and release the DOWN but-
ton until “Compass Variance” and the
current Variance Value displays in the
EVIC.
4. Press and release the SELECT
button to increment the Variance
Value by one, (one button press per
update), until the proper variance
zone is selected according to the map.
NOTE:
The Variance Values will wrap
around from 15 back to 1. The De-
fault Variance is Zone 8.
Compass Variance Map
119
Page 127 of 233
AVERAGE FUEL ECONOMY
(L/100KM)
Shows the average fuel economy since
the last reset. Average Fuel Economy
can be reset by pressing and holding
the SELECT button (as prompted in
the EVIC display). Upon reset, the
history information will be erased,
and the averaging will continue from
the last fuel average reading before
the reset.
DISTANCE TO EMPTY
(DTE)
Shows the estimated distance that can
be traveled with the fuel remaining in
the tank. This estimated distance is
determined by a weighted average of
the instantaneous and average fuel
economy, according to the current
fuel tank level. DTE cannot be reset.
NOTE:
Significant changes in driving
style or vehicle loading will greatly
affect the actual drivable distance
of the vehicle, regardless of the
DTE display value.When the DTE value is less than
48 km estimated driving distance, the
DTE display will change to a text
display of "LOW FUEL”. This dis-
play will continue until the vehicle
runs out of fuel. Adding a significant
amount of fuel to the vehicle will turn
off the LOW FUEL text and a new
DTE value will display.
TIRE BAR
Press and release the MENU button
until "Tire BAR" is displayed.
Tire pressure information is displayed
as follows:
If tire pressure is OK for all tires,
TIRE and a vehicle graphic are dis-
played with tire pressure values in
each corner or the graphic.
If one or more tires have low pres- sure, LOW TIRE and a vehicle
graphic are displayed with tire
pressure values in each corner of
the graphic. Tire pressure values
that are too low will be flashing.
If the Tire Pressure System requires
service, "Check TPM System" is dis-
played. Tire BAR is an information
only function and cannot be reset.
ELAPSED TIME
Shows the total elapsed time of travel
since the last reset. Elapsed time will
increment when the ignition switch is
in the RUN or START position.
Elapsed time is displayed as follows:
hours:minutes:seconds
Elapsed time can be reset by pressing
and holding the SELECT button (as
prompted in the EVIC display). Upon
reset all digits will change to zeros and
time will start incrementing again if
the ignition switch is in RUN or
START.
DISPLAY UNITS IN
Displays the units used for the Out-
side Temperature, Average Fuel
Economy, Distance to Empty and Tire
Pressure features. Press and Release
the SELECT button to toggle units
between "U.S." and "METRIC".
120
Page 128 of 233
SYSTEM STATUS
Displays SYSTEM OK if there are no
active Warning Messages stored.
Pressing and releasing the DOWN
button when SYSTEM OK is dis-
played will do nothing. Displays SYS-
TEM WARNINGS PRESENT if there
are active Warning Messages stored.
Pressing and releasing the DOWN
button when SYSTEM WARNINGS
PRESENT is displayed will display
each stored warning for each button
press. Press and Release the MENU
button to return to the Main Menu.
PERSONAL SETTINGS
(CUSTOMER-
PROGRAMMABLE
FEATURES)
Personal Settings allows the driver to
set and recall features when the auto-
matic transaxle is in PARK.
Press and release the MENU button
until “Personal Settings” displays in
the EVIC.
Press and release the DOWN button
to display the following program-
mable features:Language
When in this display you may select
different languages for all display no-
menclature, including the trip func-
tions. Pressing the SELECT button
while in this display selects English,
Spanish, French, German, Italian, or
Dutch depending on availability. As
you continue, the displayed informa-
tion will be shown in the selected lan-
guage.
Auto Unlock On Exit
When ON is selected and the transaxle
is in the PARK or NEUTRAL position,
all doors will unlock when the
driver's
door is opened. To make your selec-
tion, press the SELECT button until
ON or OFF appears.
RKE Unlock
When “Driver Door 1st Press” is se-
lected, only the driver's door will un-
lock on the first press of the Remote
Keyless Entry (RKE) transmitter UN-
LOCK button. When Driver Door 1st
Press is selected, you must press the
RKE transmitter UNLOCK button
twice to unlock the passenger's doors.
When “All Doors 1st Press” is se-
lected, all of the doors will unlock on the first press of the RKE transmitter
UNLOCK button. To make your se-
lection, press and release the SELECT
button until “Driver Door 1st Press”
or “All Doors 1st Press” appears.
Flash Lamp with LOCK
When ON is selected, the front and
rear turn signals will flash when the
doors are locked or unlocked with the
RKE transmitter. This feature may be
selected with or without the Sound
Horn with LOCK feature selected. To
make your selection, press and release
the SELECT button until ON or OFF
appears.
Headlamp Off Delay
When this feature is selected, the
driver can choose to have the head-
lights remain on for 0, 30, 60, or
90 seconds when exiting the vehicle.
To make your selection, press the SE-
LECT button until 0, 30, 60, or 90
appears.
Headlamps With Wipers
(Available with Auto Headlights
Only)
When ON is selected, and the head-
light switch is in the AUTO position,
121