steering Lancia Flavia 2012 Owner handbook (in English)
[x] Cancel search | Manufacturer: LANCIA, Model Year: 2012, Model line: Flavia, Model: Lancia Flavia 2012Pages: 233, PDF Size: 2.61 MB
Page 11 of 233
INTRODUCTION
Congratulations on selecting your
new LANCIA vehicle. Be assured that
it represents precision workmanship,
distinctive styling, and high quality -
all essentials that are traditional to
our vehicles.
Before you start to drive this vehicle,
read this Owner's Manual and all the
supplements. Be sure you are familiar
with all vehicle controls, particularly
those used for braking, steering, and
transmission shifting. Learn how your
vehicle handles on different road sur-
faces. Your driving skills will improve
with experience, but as in driving any
vehicle, take it easy as you begin. Al-
ways observe local laws wherever you
drive.
NOTE:
After reviewing the owner infor-
mation, it should be stored in the
vehicle for convenient referencing
and remain with the vehicle when
sold.
Failure to operate this vehicle cor-
rectly may result in loss of control or a
collision.Operating this vehicle at excessive
speeds or while intoxicated may result
in loss of control, collision with other
vehicles or objects, going off the road,
or overturning; any of which may lead
to serious injury or death. Also, failure
to use seat belts subjects the driver
and passengers to a greater risk of
injury or death.
To keep your vehicle running at its
best, have your vehicle serviced at
recommended intervals by an autho-
rized dealer who has the qualified per-
sonnel, special tools, and equipment
to perform all service.
The manufacturer and its distributors
are vitally interested in your complete
satisfaction with this vehicle. If you
encounter a service or warranty prob-
lem, which is not resolved to your
satisfaction, discuss the matter with
your dealer's management.
Your authorized dealer will be happy
to assist you with any questions about
your vehicle.
IMPORTANT NOTICE
ALL MATERIAL CONTAINED IN
THIS PUBLICATION IS BASED ON
THE LATEST INFORMATION
AVAILABLE AT TIME OF PUBLI-
CATION APPROVAL. THE RIGHT
IS RESERVED TO PUBLISH REVI-
SIONS AT ANY TIME.
This Owner's Manual has been pre-
pared with the assistance of service
and engineering specialists to ac-
quaint you with the operation and
maintenance of your new vehicle. It is
supplemented by a Warranty Infor-
mation Booklet and various
customer-oriented documents. You
are urged to read these publications
carefully. Following the instructions
and recommendations in this Owner's
Manual will help assure safe and en-
joyable operation of your vehicle.
After you have read the Owner’s
Manual, it should be stored in the
vehicle for convenient reference and
remain with the vehicle when sold.
4
Page 27 of 233
To open the window part way, push
the window switch to the first detent
and release it when you want the win-
dow to stop.To cancel the Auto-Down movement,
operate the switch either in the up or
down direction and release the switch.
The power window switches will re-
main active for up to 10 minutes after
the ignition switch is turned to the
LOCK position. Opening either door
will cancel this feature. The time for
this feature is programmable. Refer to
“Electronic Vehicle Information Center
(EVIC)/Personal Settings (Customer-
Programmable Features)” in “Under-
standing Your Instrument Panel” for
further information.Reset Window Smart Glass
Feature for Opening/Closing the
Door
If the vehicle battery goes dead, the
window Smart Glass Feature for
opening and closing the door will be
disabled. To reactivate the window
Smart Glass Feature, perform the fol-
lowing steps after vehicle power is
restored.1. Lowering all four windows to the
full open position.
2. Press and hold the Power Top
Switch in the Close direction. Once
the Power Top becomes fully closed,
all four windows will start closing.
3. Continue to hold the Power Top
Switch an additional two seconds af-
ter the windows are fully closed.
4. Push all the window switches
down firmly to open the windows
completely and continue to hold the
switch down for an additional two
seconds after the window is fully
open.
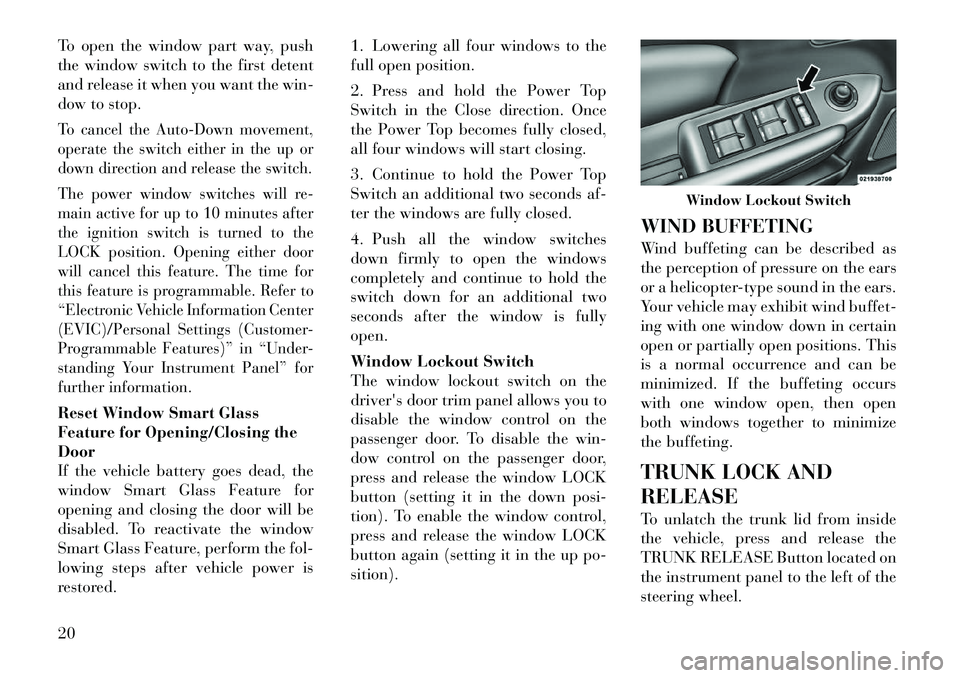
Window Lockout Switch
The window lockout switch on the
driver's door trim panel allows you to
disable the window control on the
passenger door. To disable the win-
dow control on the passenger door,
press and release the window LOCK
button (setting it in the down posi-
tion). To enable the window control,
press and release the window LOCK
button again (setting it in the up po-
sition).
WIND BUFFETING
Wind buffeting can be described as
the perception of pressure on the ears
or a helicopter-type sound in the ears.
Your vehicle may exhibit wind buffet-
ing with one window down in certain
open or partially open positions. This
is a normal occurrence and can be
minimized. If the buffeting occurs
with one window open, then open
both windows together to minimize
the buffeting.
TRUNK LOCK AND
RELEASE
To unlatch the trunk lid from inside
the vehicle, press and release the
TRUNK RELEASE Button located on
the instrument panel to the left of the
steering wheel.
Window Lockout Switch
20
Page 29 of 233
An energy-absorbing steering col-umn and steering wheel
Knee bolsters/blockers for front seat occupants
Front seat belts incorporate preten- sioners that may enhance occupant
protection by managing occupant
energy during an impact event
Rear passenger seat belts include Automatic Locking Retractors
(ALRs), which lock the seat belt
webbing into position by extending
the belt all the way out and then
adjusting the belt to the desired
length to restrain a child seat or
secure a large item in a seat.
Please pay close attention to the infor-
mation in this section. It tells you how
to use your restraint system properly,
to keep you and your passengers as
safe as possible.
If you will be carrying children too
small for adult-sized seat belts, the
seat belts or the ISOFIX feature also
can be used to hold infant and child
restraint systems. For more informa-
tion, refer to ISOFIX — Child Seat
Anchorage System. NOTE:
The Advanced Front Air Bags have
a multistage inflator design. This
allows the air bag to have different
rates of inflation based on several
factors, including the severity and
type of collision.
Here are some simple steps you can
take to minimize the risk of harm
from a deploying air bag:
1.
Children 12 years old and un-
der should always ride buckled up
in a rear seat.
WARNING!
Infants in rear facing child restraints
should never ride in the front seat of
a vehicle with a passenger Advanced
Front Air Bag. An air bag deploy-
ment can cause severe injury or
death to infants in that position.
Children that are not big enough to
wear the vehicle seat belt properly
(see section on Child Restraints)
should be secured in the rear seat in
child restraints or belt-positioning
booster seats. Older children who do
not use child restraints or belt- positioning booster seats should ride
properly buckled up in the rear seat.
Never allow children to slide the
shoulder belt behind them or under
their arm.
You should read the instructions pro-
vided with your child restraint to
make sure that you are using it prop-
erly.
2.
All occupants should always
wear their lap and shoulder belts
properly.
3. The driver and front passenger
seats should be moved back as far
as practical to allow the Advanced
Front Air Bags room to inflate.
4. Do not lean against the door or
window. If your vehicle has side
air bags, and deployment occurs,
the side air bags will inflate force-
fully into the space between you
and the door.
5. If the air bag system in this ve-
hicle needs to be modified to ac-
commodate a disabled person,
contact the Customer Center.
22
Page 30 of 233

WARNING!
Relying on the air bags alonecould lead to more severe injuries
in a collision. The air bags work
with your seat belt to restrain you
properly. In some collisions, the
air bags won't deploy at all. Al-
ways wear your seat belts even
though you have air bags.
Being too close to the steering
wheel or instrument panel during
Advanced Front Air Bag deploy-
ment could cause serious injury,
including death. Air Bags need
room to inflate. Sit back, comfort-
ably extending your arms to reach
the steering wheel or instrument
panel.
Seat-Mounted Side Air Bags
(SAB) need room to inflate. Do
not lean against the door or win-
dow. Sit upright in the center of
the seat.
(Continued)
WARNING!(Continued)
In a collision, you and your pas-
sengers can suffer much greater
injuries if you are not properly
buckled up. You can strike the
interior of your vehicle or other
passengers, or you can be thrown
out of the vehicle. Always be sure
you and others in your vehicle are
buckled up properly.
Buckle up even though you are an
excellent driver, even on short trips.
Someone on the road may be a poor
driver and cause a collision that in-
cludes you. This can happen far away
from home or on your own street.
Research has shown that seat belts
save lives, and they can reduce the
seriousness of injuries in a collision.
Some of the worst injuries happen
when people are thrown from the ve-
hicle. Seat belts reduce the possibility
of ejection and the risk of injury
caused by striking the inside of the
vehicle. Everyone in a motor vehicle
should be belted at all times. LAP/SHOULDER BELTS
All seating positions in your vehicle
are equipped with lap/shoulder belts.
The belt webbing retractor is de-
signed to lock during very sudden
stops or collisions. This feature allows
the shoulder part of the belt to move
freely with you under normal condi-
tions. However, in a collision, the belt
will lock and reduce the risk of you
striking the inside of the vehicle or
being thrown out.
WARNING!
Be sure everyone in your vehicle is
in a seat and using a seat belt
properly.
It is dangerous to ride in a cargo
area, inside or outside of a vehicle.
In a collision, people riding in
these areas are more likely to be
seriously injured or killed.
Do not allow people to ride in any
area of your vehicle that is not
equipped with seats and seat
belts.
(Continued)
23
Page 37 of 233
SUPPLEMENTAL
RESTRAINT SYSTEM (SRS)
— AIR BAGS
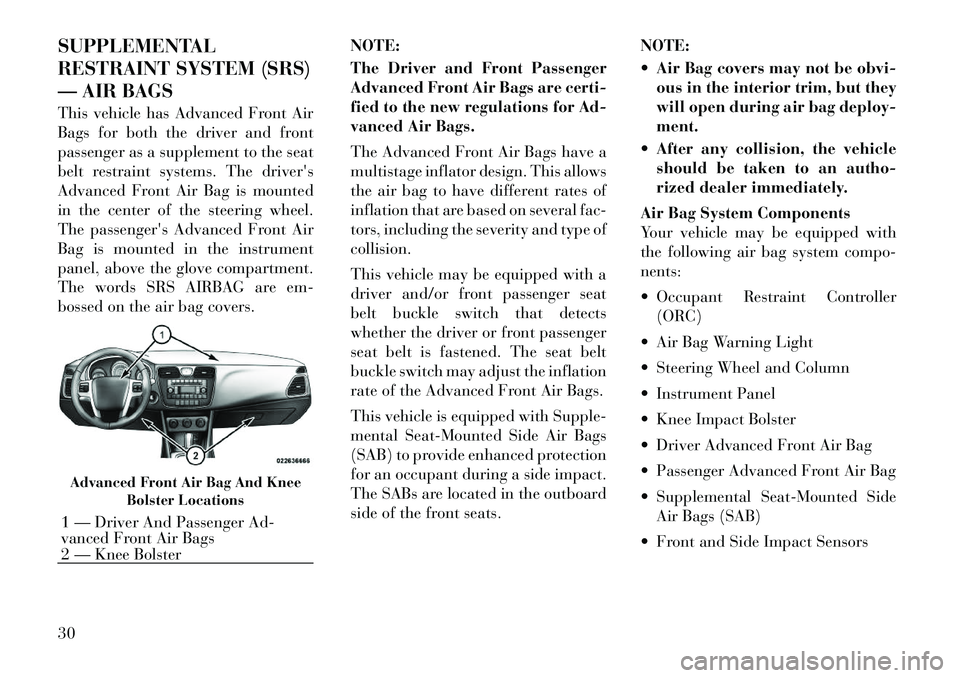
This vehicle has Advanced Front Air
Bags for both the driver and front
passenger as a supplement to the seat
belt restraint systems. The driver's
Advanced Front Air Bag is mounted
in the center of the steering wheel.
The passenger's Advanced Front Air
Bag is mounted in the instrument
panel, above the glove compartment.
The words SRS AIRBAG are em-
bossed on the air bag covers.NOTE:
The Driver and Front Passenger
Advanced Front Air Bags are certi-
fied to the new regulations for Ad-
vanced Air Bags.
The Advanced Front Air Bags have a
multistage inflator design. This allows
the air bag to have different rates of
inflation that are based on several fac-
tors, including the severity and type of
collision.
This vehicle may be equipped with a
driver and/or front passenger seat
belt buckle switch that detects
whether the driver or front passenger
seat belt is fastened. The seat belt
buckle switch may adjust the inflation
rate of the Advanced Front Air Bags.
This vehicle is equipped with Supple-
mental Seat-Mounted Side Air Bags
(SAB) to provide enhanced protection
for an occupant during a side impact.
The SABs are located in the outboard
side of the front seats.NOTE:
Air Bag covers may not be obvi-
ous in the interior trim, but they
will open during air bag deploy-
ment.
After any collision, the vehicle should be taken to an autho-
rized dealer immediately.
Air Bag System Components
Your vehicle may be equipped with
the following air bag system compo-
nents:
Occupant Restraint Controller (ORC)
Air Bag Warning Light
Steering Wheel and Column
Instrument Panel
Knee Impact Bolster
Driver Advanced Front Air Bag
Passenger Advanced Front Air Bag
Supplemental Seat-Mounted Side Air Bags (SAB)
Front and Side Impact SensorsAdvanced Front Air Bag And Knee Bolster Locations1 — Driver And Passenger Ad-
vanced Front Air Bags
2 — Knee Bolster
30
Page 40 of 233
check, the Air Bag Warning Light will
turn off. If the ORC detects a mal-
function in any part of the system, it
turns on the Air Bag Warning Light,
either momentarily or continuously. A
single chime will sound if the light
comes on again after initial startup.
It also includes diagnostics that will
illuminate the instrument cluster Air
Bag Warning Light if a malfunction is
noted that could affect the air bag
system. The diagnostics also record
the nature of the malfunction.WARNING!
Ignoring the Air Bag Warning Light
in your instrument panel could
mean you won't have the air bags to
protect you in a collision. If the light
does not come on as a bulb check
when the ignition is first turned on,
stays on after you start the vehicle,
or if it comes on as you drive, have
an authorized dealer service the air
bag system immediately.Driver And Passenger Advanced
Front Air Bag Inflator Units
The Driver and Passenger Advanced
Front Air Bag Inflator Units are lo-
cated in the center of the steering
wheel and on the right side of the
instrument panel. When the ORC de-
tects a collision requiring the Ad-
vanced Front Air Bags, it signals the
inflator units. A large quantity of non-
toxic gas is generated to inflate the
Advanced Front Air Bags. Different
air bag inflation rates are possible,
based on the collision type and sever-
ity. The steering wheel hub trim cover
and the upper right side of the instru-
ment panel separate and fold out of
the way as the air bags inflate to their
full size. The air bags fully inflate in
about 50 to 70 milliseconds. This is
about half of the time it takes to blink
your eyes. The air bags then quickly
deflate while helping to restrain the
driver and front passenger.
The Advanced Front Air Bag gas is
vented through the vent holes in the
sides of the air bag. In this way, the air
bags do not interfere with your con-
trol of the vehicle. Supplemental Seat-Mounted Side
Air Bag (SAB) Inflator Units
The Supplemental Seat-Mounted
Side Air Bags (SAB) are designed to
activate only in certain side collisions.
The ORC determines if a side collision
requires the side air bags to inflate,
based on several factors, including the
severity and type of collision.
Based on several factors, including
the severity and type of collision, the
side air bag inflator on the crash side
of the vehicle may be triggered, re-
leasing a quantity of non-toxic gas.
The inflating SAB exits through the
seat seam into the space between the
occupant and the door. The SAB fully
inflate in about 10 milliseconds. The
side air bag moves at a very high
speed and with such a high force that
it could injure you if you are not
seated properly, or if items are posi-
tioned in the area where the side air
bag inflates. This especially applies to
children.
33
Page 42 of 233
As the air bags deflate, you may seesome smoke-like particles. The
particles are a normal by-product
of the process that generates the
non-toxic gas used for air bag infla-
tion. These airborne particles may
irritate the skin, eyes, nose, or
throat. If you have skin or eye irri-
tation, rinse the area with cool wa-
ter. For nose or throat irritation,
move to fresh air. If the irritation
continues, see your doctor. If these
particles settle on your clothing,
follow the garment manufacturer's
instructions for cleaning.
Do not drive your vehicle after the air
bags have deployed. If you are in-
volved in another collision, the air
bags will not be in place to protect
you.
WARNING!
Deployed air bags and seat belt pre-
tensioners cannot protect you in an-
other collision. Have the air bags,
seat belt pretensioners, and the front
seat belt retractor assemblies re-
placed by an authorized dealer im-
mediately. Also, have the Occupant
Restraint Controller System serviced
as well.
Maintaining Your Air Bag SystemWARNING!
Modifications to any part of the air bag system could cause it to
fail when you need it. You could
be injured if the air bag system is
not there to protect you. Do not
modify the components or wiring,
including adding any kind of
badges or stickers to the steering
wheel hub trim cover or the upper
right side of the instrument panel.
Do not modify the front bumper,
vehicle body structure, or add af-
termarket side steps or running
boards.
(Continued)
WARNING!(Continued)
It is dangerous to try to repair any
part of the air bag system your-
self. Be sure to tell anyone who
works on your vehicle that it has
an air bag system.
Do not attempt to modify any part
of your air bag system. The air
bag may inflate accidentally or
may not function properly if
modifications are made. Take
your vehicle to an authorized
dealer for any air bag system ser-
vice. If your seat including your
trim cover and cushion needs to
be serviced in any way (including
removal or loosening/tightening
of seat attachment bolts), take the
vehicle to your authorized dealer.
Only manufacturer approved seat
accessories may be used. If it is
necessary to modify the air bag
system for persons with disabili-
ties, contact your authorized
dealer.
35
Page 54 of 233
Periodic Safety Checks You
Should Make Outside The
Vehicle
Tires
Examine tires for excessive tread wear
and uneven wear patterns. Check for
stones, nails, glass, or other objects
lodged in the tread or sidewall. In-
spect the tread for cuts and cracks.
Inspect sidewalls for cuts, cracks and
bulges. Check the wheel nuts for
tightness. Check the tires (including
spare) for proper cold inflation pres-
sure.Lights
Have someone observe the operation
of exterior lights while you work the
controls. Check turn signal and high
beam indicator lights on the instru-
ment panel.
Door Latches
Check for positive closing, latching,
and locking.
Fluid Leaks
Check area under vehicle after over-
night parking for fuel, engine coolant,
oil, or other fluid leaks. Also, if gaso-
line fumes are detected or if fuel,
power steering fluid, or brake fluid
leaks are suspected, the cause should
be located and corrected immediately.
47
Page 58 of 233
INSTRUMENT PANEL DIMMER . . . . . . . . . . . 92
FOG LIGHTS . . . . . . . . . . . . . . . . . . . . . . . . . . 92
Rear Fog Lights . . . . . . . . . . . . . . . . . . . . . . . . 93
TURN SIGNALS . . . . . . . . . . . . . . . . . . . . . . . . 93
LANE CHANGE ASSIST . . . . . . . . . . . . . . . . . . 93
HIGH/LOW BEAM SWITCH . . . . . . . . . . . . . . . 93
FLASH-TO-PASS . . . . . . . . . . . . . . . . . . . . . . . 93
INTERIOR LIGHTS . . . . . . . . . . . . . . . . . . . . . 93
Headlight Leveling System . . . . . . . . . . . . . . . . 94
BATTERY SAVER FEATURE . . . . . . . . . . . . . . 94
WINDSHIELD WIPERS AND WASHERS . . . . . . . 94 INTERMITTENT WIPER SYSTEM . . . . . . . . . . 95
WINDSHIELD WASHERS . . . . . . . . . . . . . . . . 95
MIST FEATURE . . . . . . . . . . . . . . . . . . . . . . . . 96
HEADLIGHTS WITH WIPERS FEATURE(AVAILABLE WITH AUTOMATIC
HEADLIGHTS ONLY) . . . . . . . . . . . . . . . . . . . . 96
TILT/TELESCOPING STEERING COLUMN . . . . . 96
ELECTRONIC SPEED CONTROL . . . . . . . . . . . . . 97 TO ACTIVATE . . . . . . . . . . . . . . . . . . . . . . . . . 97
TO SET A DESIRED SPEED . . . . . . . . . . . . . . 97
TO DEACTIVATE . . . . . . . . . . . . . . . . . . . . . . . 98
TO RESUME SPEED . . . . . . . . . . . . . . . . . . . . 98
TO VARY THE SPEED SETTING . . . . . . . . . . . 98
TO ACCELERATE FOR PASSING . . . . . . . . . . . 98
ELECTRICAL POWER OUTLETS . . . . . . . . . . . . 98
51
Page 72 of 233
UCONNECT™ PHONE
NOTE:
For Uconnect™ Phone with Navi-
gation or Multimedia radio, refer
to the Navigation or Multimedia
radio's User's Manual (separate
booklet) Uconnect™ Phone sec-
tion.
Uconnect™ Phone is a voice-
activated, hands-free, in-vehicle com-
munications system. Uconnect™
Phone allows you to dial a phone
number with your mobile phone* us-
ing simple voice commands (e.g.,
“Call”…“Jim”… “Work” or
“Dial”…“151-1234 -5555”). Your
mobile phone's audio is transmitted
through your vehicle's audio system;
the system will automatically mute
your radio when using the
Uconnect™ Phone.
Uconnect™ Phone allows you to
transfer calls between the Uconnect™
Phone and your mobile phone as you
enter or exit your vehicle and enables
you to mute the Uconnect™ Phone's
microphone for private conversation.The Uconnect™ Phone is driven
through your Bluetooth® “Hands-
Free profile” mobile phone.
Uconnect™ Phone features
Bluetooth® technology - the global
standard that enables different elec-
tronic devices to connect to each other
without wires or a docking station, so
Uconnect™ Phone works no matter
where you stow your mobile phone
(be it your purse, pocket, or brief-
case), as long as your phone is turned
on and has been paired to the vehicle's
Uconnect™ Phone. The Uconnect™
Phone allows up to seven mobile
phones to be linked to the system.
Only one linked (or paired) mobile
phone can be used with the
Uconnect™ Phone at a time. The
Uconnect™ Phone is available in
English, Dutch, French, German,
Italian or Spanish languages (as
equipped).
WARNING!
Any voice commanded system
should be used only in safe driving
conditions following local laws and
phone use. All attention should be
kept on the roadway ahead. Failure
to do so may result in a collision
causing serious injury or death.
Uconnect™ Phone Button The radio or steering wheel
controls will contain the
two control buttons
(Uconnect™ Phonebutton and Voice Commandbutton) that will enable you to access
the system. When you press the but-
ton you will hear the word
Uconnect™ followed by a BEEP. The
beep is your signal to give a com-
mand.
65