technical specifications Lancia Musa 2008 Owner handbook (in English)
[x] Cancel search | Manufacturer: LANCIA, Model Year: 2008, Model line: Musa, Model: Lancia Musa 2008Pages: 218, PDF Size: 3.68 MB
Page 138 of 218

WARNING
137
WARNING
LIGHTS AND
MESSAGES
MAINTENANCE
AND CARE
TECHNICALSPECIFICATIONS
INDEX
DASHBOARD
AND CONTROLS
SAFETY
DEVICES
STARTING
AND
DRIVING
IN AN
EMERGENCY
❒using a second cable connect the
negative terminal (–) of the auxil-
iary battery to the ground E
on the
engine or on the gearbox of the car
to be started;
❒Start the engine;
❒when the engine has been started,
remove the leads reversing the or-
der above.
If after various attempts the engine
does not start, do not persist in vain.
Contact a Lancia Dealership.
IMPORTANT Do not connect the neg-
ative terminals of the two batteries di-
rectly: sparks could ignite explosive
gas released from the battery. If the
auxiliary battery is installed on an-
other car, prevent accidental contact
between metallic parts of the two cars.Never use a quick battery
charger for the emergency
start: this could damage the
electronic systems and the
engine fuel feed and ignition control
units.
This starting procedure
must be carried out by
expert personnel as incorrect ma-
noeuvres can cause electric dis-
charges of considerable intensity.
Furthermore, battery fluid is poi-
sonous and corrosive: avoid con-
tact with your skin and eyes. Keep
naked flames away from the bat-
tery. No smoking. Do not cause
sparks.
fig. 2L0D0396m
135-164 MUSA 3ed GB 12-11-2007 11:38 Pagina 137
Page 139 of 218
138
WARNING
LIGHTS AND
MESSAGES
MAINTENANCE
AND CARE
TECHNICALSPECIFICATIONS
INDEX
DASHBOARD
AND CONTROLS
SAFETY
DEVICES
STARTING
AND
DRIVING
IN AN
EMERGENCY
Indicate that the car is sta-
tionary according to the
laws in force: emergency lights, re-
fracting warning triangle, etc. Pas-
sengers should leave the car, partic-
ularly if it is very loaded and wait
for the wheel to be changed away
from on-coming traffic. In case of
steep slopes or rough slopes, place
wedges or other materials suitable
to stop the vehicle under the wheels.
WARNINGQUICK TYRE
REPAIR KIT FIX
& GO automatic
(if provided for)
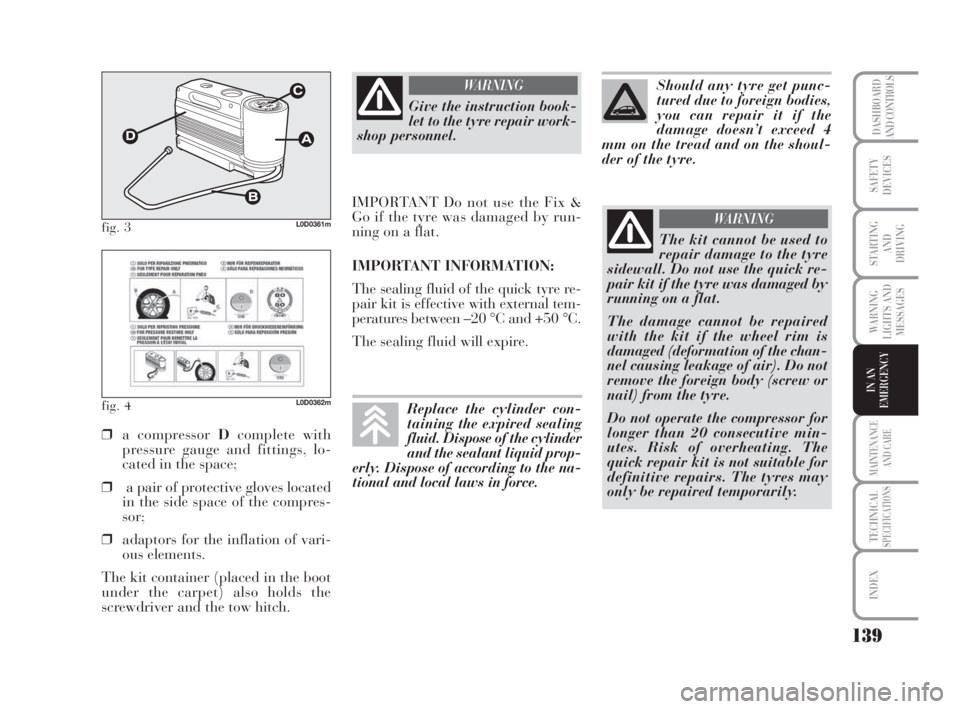
The quick tyre repair kit Fix & Go
automaticfig. 3is placed in the boot.
The kit includes:
❒cylinderAcontaining sealing liq-
uid and fitted with:
– filling pipe B;
– adhesive label Cbearing the
words “max. 80 km/h”, to be at-
tached in a position easily visi-
ble to the driver (on the dash-
board) after tyre repair;
❒informative leaflet fig. 4, used to
ensure the correct use of the quick
tyre repair kit and then given to
the personnel who will handle the
treated tyre; BUMP STARTING
Never jump start the engine by push-
ing, towing or driving downhill. This
could cause a flow of fuel into the cat-
alytic converter and damage it beyond
repair.
IMPORTANT Remember that the
brake booster and the power steering
system are not operating until the en-
gine is started, a greater effort will
therefore be required to press the
brake pedal or turn the steering
wheel.
135-164 MUSA 3ed GB 12-11-2007 11:38 Pagina 138
Page 140 of 218
139
WARNING
LIGHTS AND
MESSAGES
MAINTENANCE
AND CARE
TECHNICALSPECIFICATIONS
INDEX
DASHBOARD
AND CONTROLS
SAFETY
DEVICES
STARTING
AND
DRIVING
IN AN
EMERGENCY
fig. 3L0D0361m
fig. 4L0D0362m
❒a compressor Dcomplete with
pressure gauge and fittings, lo-
cated in the space;
❒a pair of protective gloves located
in the side space of the compres-
sor;
❒adaptors for the inflation of vari-
ous elements.
The kit container (placed in the boot
under the carpet) also holds the
screwdriver and the tow hitch.
Give the instruction book-
let to the tyre repair work-
shop personnel.
WARNING
IMPORTANT Do not use the Fix &
Go if the tyre was damaged by run-
ning on a flat.
IMPORTANT INFORMATION:
The sealing fluid of the quick tyre re-
pair kit is effective with external tem-
peratures between –20 °C and +50 °C.
The sealing fluid will expire.
The kit cannot be used to
repair damage to the tyre
sidewall. Do not use the quick re-
pair kit if the tyre was damaged by
running on a flat.
The damage cannot be repaired
with the kit if the wheel rim is
damaged (deformation of the chan-
nel causing leakage of air). Do not
remove the foreign body (screw or
nail) from the tyre.
Do not operate the compressor for
longer than 20 consecutive min-
utes. Risk of overheating. The
quick repair kit is not suitable for
definitive repairs. The tyres may
only be repaired temporarily.
WARNING
Should any tyre get punc-
tured due to foreign bodies,
you can repair it if the
damage doesn’t exceed 4
mm on the tread and on the shoul-
der of the tyre.
Replace the cylinder con-
taining the expired sealing
fluid. Dispose of the cylinder
and the sealant liquid prop-
erly. Dispose of according to the na-
tional and local laws in force.
135-164 MUSA 3ed GB 12-11-2007 11:38 Pagina 139
Page 141 of 218
140
WARNING
LIGHTS AND
MESSAGES
MAINTENANCE
AND CARE
TECHNICALSPECIFICATIONS
INDEX
DASHBOARD
AND CONTROLS
SAFETY
DEVICES
STARTING
AND
DRIVING
IN AN
EMERGENCY
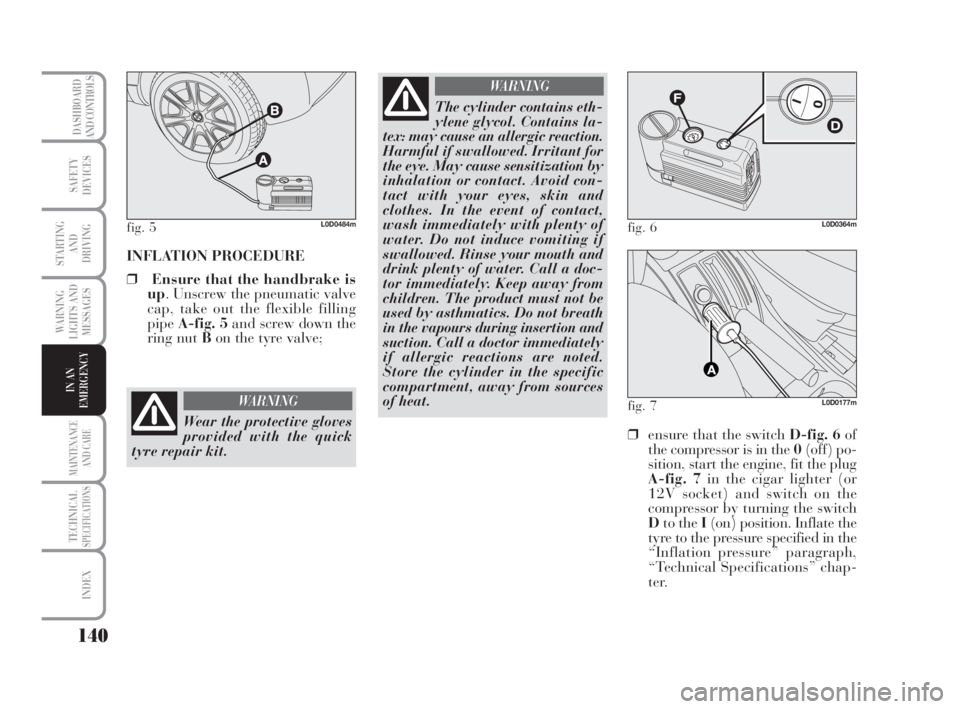
INFLATION PROCEDURE
❒Ensure that the handbrake is
up. Unscrew the pneumatic valve
cap, take out the flexible filling
pipeA-fig. 5and screw down the
ring nut Bon the tyre valve;
fig. 5L0D0484m
Wear the protective gloves
provided with the quick
tyre repair kit.
WARNING
The cylinder contains eth-
ylene glycol. Contains la-
tex: may cause an allergic reaction.
Harmful if swallowed. Irritant for
the eye. May cause sensitization by
inhalation or contact. Avoid con-
tact with your eyes, skin and
clothes. In the event of contact,
wash immediately with plenty of
water. Do not induce vomiting if
swallowed. Rinse your mouth and
drink plenty of water. Call a doc-
tor immediately. Keep away from
children. The product must not be
used by asthmatics. Do not breath
in the vapours during insertion and
suction. Call a doctor immediately
if allergic reactions are noted.
Store the cylinder in the specific
compartment, away from sources
of heat.
WARNING
❒ensure that the switch D-fig. 6of
the compressor is in the 0(off) po-
sition, start the engine, fit the plug
A-fig. 7in the cigar lighter (or
12V socket) and switch on the
compressor by turning the switch
Dto the I(on) position. Inflate the
tyre to the pressure specified in the
“Inflation pressure” paragraph,
“Technical Specifications” chap-
ter.
fig. 6L0D0364m
fig. 7L0D0177m
135-164 MUSA 3ed GB 12-11-2007 11:38 Pagina 140
Page 142 of 218
141
WARNING
LIGHTS AND
MESSAGES
MAINTENANCE
AND CARE
TECHNICALSPECIFICATIONS
INDEX
DASHBOARD
AND CONTROLS
SAFETY
DEVICES
STARTING
AND
DRIVING
IN AN
EMERGENCY
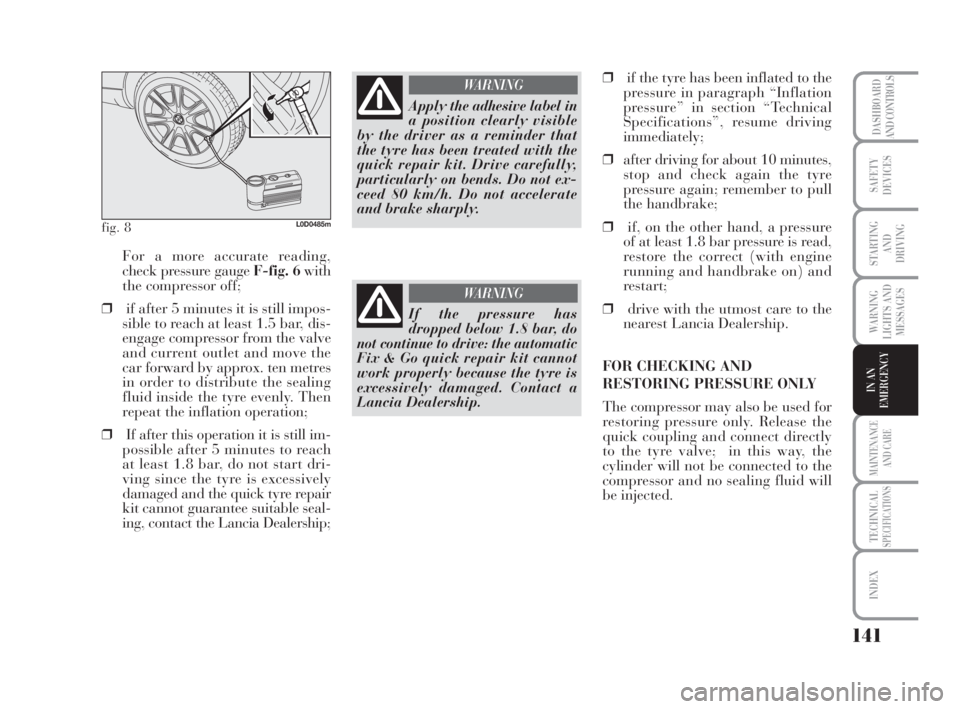
For a more accurate reading,
check pressure gauge F-fig. 6with
the compressor off;
❒if after 5 minutes it is still impos-
sible to reach at least 1.5 bar, dis-
engage compressor from the valve
and current outlet and move the
car forward by approx. ten metres
in order to distribute the sealing
fluid inside the tyre evenly. Then
repeat the inflation operation;
❒If after this operation it is still im-
possible after 5 minutes to reach
at least 1.8 bar, do not start dri-
ving since the tyre is excessively
damaged and the quick tyre repair
kit cannot guarantee suitable seal-
ing, contact the Lancia Dealership;
fig. 8L0D0485m
Apply the adhesive label in
a position clearly visible
by the driver as a reminder that
the tyre has been treated with the
quick repair kit. Drive carefully,
particularly on bends. Do not ex-
ceed 80 km/h. Do not accelerate
and brake sharply.
WARNING
If the pressure has
dropped below 1.8 bar, do
not continue to drive: the automatic
Fix & Go quick repair kit cannot
work properly because the tyre is
excessively damaged. Contact a
Lancia Dealership.
WARNING
❒if the tyre has been inflated to the
pressure in paragraph “Inflation
pressure” in section “Technical
Specifications”, resume driving
immediately;
❒after driving for about 10 minutes,
stop and check again the tyre
pressure again; remember to pull
the handbrake;
❒if, on the other hand, a pressure
of at least 1.8 bar pressure is read,
restore the correct (with engine
running and handbrake on) and
restart;
❒drive with the utmost care to the
nearest Lancia Dealership.
FOR CHECKING AND
RESTORING PRESSURE ONLY
The compressor may also be used for
restoring pressure only. Release the
quick coupling and connect directly
to the tyre valve; in this way, the
cylinder will not be connected to the
compressor and no sealing fluid will
be injected.
135-164 MUSA 3ed GB 12-11-2007 11:38 Pagina 141
Page 143 of 218
142
WARNING
LIGHTS AND
MESSAGES
MAINTENANCE
AND CARE
TECHNICALSPECIFICATIONS
INDEX
DASHBOARD
AND CONTROLS
SAFETY
DEVICES
STARTING
AND
DRIVING
IN AN
EMERGENCY
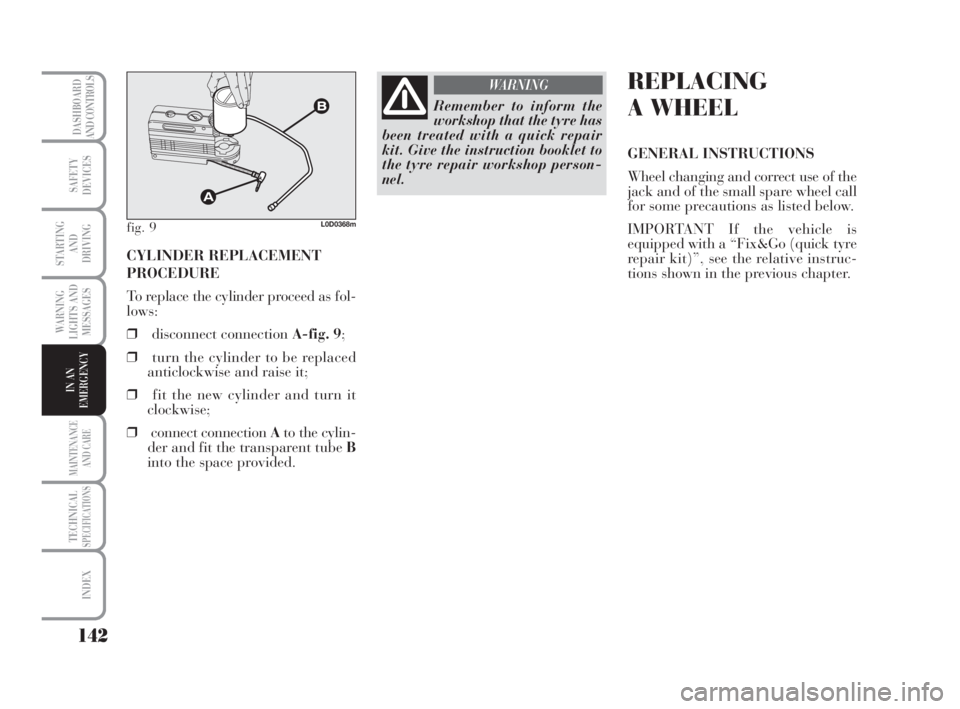
CYLINDER REPLACEMENT
PROCEDURE
To replace the cylinder proceed as fol-
lows:
❒disconnect connection A-fig. 9;
❒turn the cylinder to be replaced
anticlockwise and raise it;
❒fit the new cylinder and turn it
clockwise;
❒connect connection Ato the cylin-
der and fit the transparent tube B
into the space provided.
fig. 9L0D0368m
Remember to inform the
workshop that the tyre has
been treated with a quick repair
kit. Give the instruction booklet to
the tyre repair workshop person-
nel.
WARNINGREPLACING
A WHEEL
GENERAL INSTRUCTIONS
Wheel changing and correct use of the
jack and of the small spare wheel call
for some precautions as listed below.
IMPORTANT If the vehicle is
equipped with a “Fix&Go (quick tyre
repair kit)”, see the relative instruc-
tions shown in the previous chapter.
135-164 MUSA 3ed GB 12-11-2007 11:38 Pagina 142
Page 144 of 218
143
WARNING
LIGHTS AND
MESSAGES
MAINTENANCE
AND CARE
TECHNICALSPECIFICATIONS
INDEX
DASHBOARD
AND CONTROLS
SAFETY
DEVICES
STARTING
AND
DRIVING
IN AN
EMERGENCY
The small spare wheel is
specific for your car. Do
not use it on cars of different mod-
els. Do not use spare wheels of dif-
ferent models on your car. The
small spare wheel must only be
used in an emergency. Never use it
for more than strictly necessary
and never exceed 80 km/h. On the
small spare wheel there is an or-
ange label, summarizing the main
warnings regarding small spare
wheel usage restrictions. Never re-
move or cover the label. Never ap-
ply any hub cap on the small spare
wheel. The label contains the fol-
lowing indications in four lan-
guages: Warning! For temporary
use only! 80 km/h max! Replace
the standard wheel as soon as pos-
sible. Do not cover this instruction.
WARNING
The driving characteristics
of the car are different
when the small spare wheel is in-
stalled. Avoid violent accelerations
and braking, sharp steering and
fast bending. The overall duration
of the small spare wheel is of about
3000 km, after which the relevant
tyre must be replaced with another
one of the same type. Never install
a traditional tyre on a rim de-
signed to be used as a small spare
wheel. Repair and refit the stan-
dard wheel as soon as possible.
Using two or more small spare
wheels at the same time is forbid-
den. Do not apply grease to the bolt
threading before assembly: they
might come unscrewed.
WARNING
The jack may only be used
to replace wheels on the
car which it equips or other cars of
the same model. Never use the jack
for other purposes, such as lifting
other car models. Never use the
jack to carry out repairs under the
car. Incorrect positioning of the
jack may cause the car to fall. Do
not use the jack for loads higher
than those shown on the label.
Never install snow chains on the
small spare wheel; if a front tyre
(driving wheel) is punctured and
you need to use snow chains, use a
standard wheel from the rear axle
and install the small spare wheel
on the rear axle. This way, with
two normal front driving wheels,
you can install the snow chains on
them, thus resolving the emergency.
WARNING
135-164 MUSA 3ed GB 12-11-2007 11:39 Pagina 143
Page 145 of 218
144
WARNING
LIGHTS AND
MESSAGES
MAINTENANCE
AND CARE
TECHNICALSPECIFICATIONS
INDEX
DASHBOARD
AND CONTROLS
SAFETY
DEVICES
STARTING
AND
DRIVING
IN AN
EMERGENCY
If the hub cap is not in-
stalled properly, it can de-
tach itself when the vehicle is run-
ning. Never tamper with the infla-
tion valve. Never introduce tools of
any kind between rim and tyre.
Check tyre and small spare wheel
pressure regularly referring to the
values shown in the “Technical
Specifications” chapter.
WARNINGImportant notes:
❒the jack cannot be repaired: re-
place with an original spare part if
damaged;
❒no tool other than its cranking de-
vice may be fitted on the jack.
To change a wheel proceed as follows:
❒stop the car in a position so that
it is not a danger for on-coming
traffic and where you can replace
the wheel safely. The ground must
be flat and compact;
❒turn the engine off and pull the
handbrake;
❒engage first gear or reverse;
❒raise the mat on the floor of the
baggage compartment;
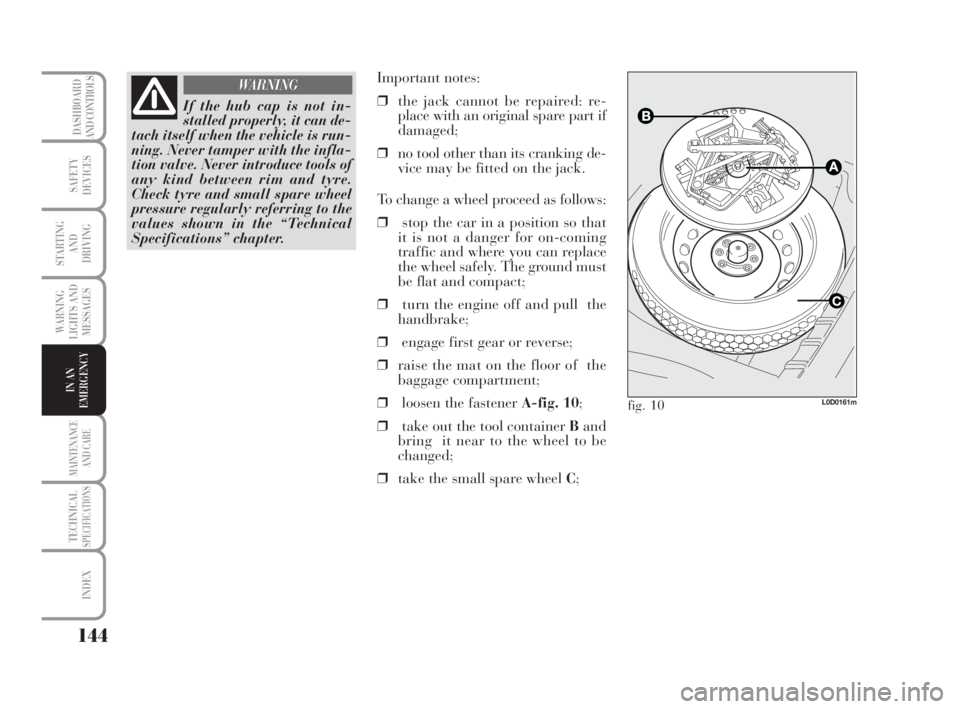
❒loosen the fastener A-fig. 10;
❒take out the tool container Band
bring it near to the wheel to be
changed;
❒take the small spare wheel C;
L0D0161mfig. 10
135-164 MUSA 3ed GB 12-11-2007 11:39 Pagina 144
Page 146 of 218
145
WARNING
LIGHTS AND
MESSAGES
MAINTENANCE
AND CARE
TECHNICALSPECIFICATIONS
INDEX
DASHBOARD
AND CONTROLS
SAFETY
DEVICES
STARTING
AND
DRIVING
IN AN
EMERGENCY
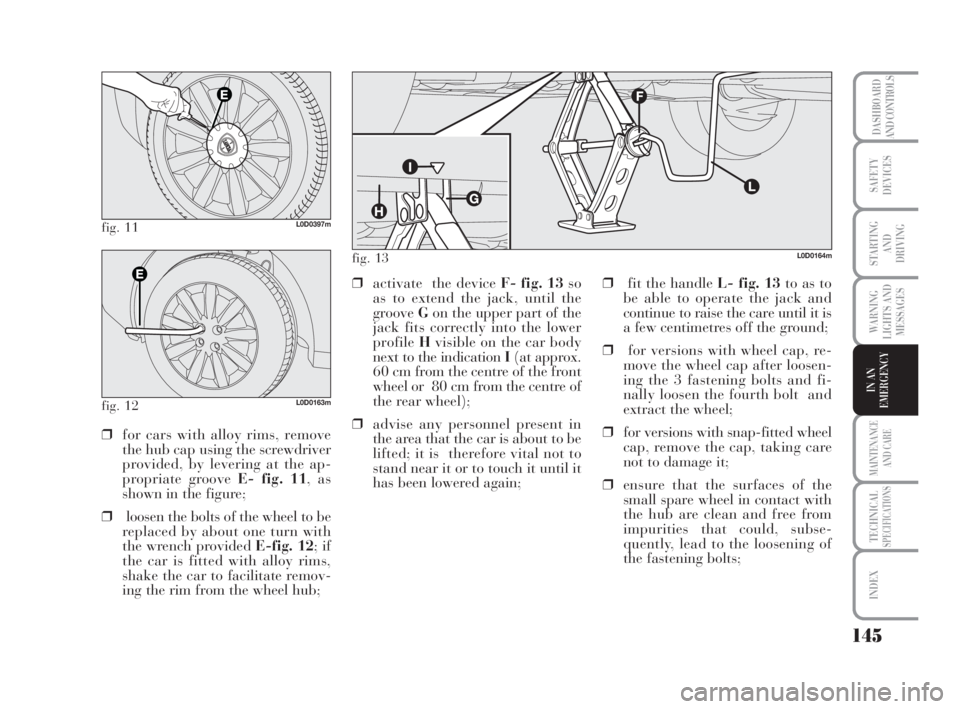
fig. 11L0D0397m
fig. 12L0D0163m
❒for cars with alloy rims, remove
the hub cap using the screwdriver
provided, by levering at the ap-
propriate groove E- fig. 11, as
shown in the figure;
❒loosen the bolts of the wheel to be
replaced by about one turn with
the wrench provided E-fig. 12; if
the car is fitted with alloy rims,
shake the car to facilitate remov-
ing the rim from the wheel hub;❒activate the device F- fig. 13so
as to extend the jack, until the
groove Gon the upper part of the
jack fits correctly into the lower
profile Hvisible on the car body
next to the indication I(at approx.
60 cm from the centre of the front
wheel or 80 cm from the centre of
the rear wheel);
❒advise any personnel present in
the area that the car is about to be
lifted; it is therefore vital not to
stand near it or to touch it until it
has been lowered again;❒fit the handle L- fig. 13to as to
be able to operate the jack and
continue to raise the care until it is
a few centimetres off the ground;
❒for versions with wheel cap, re-
move the wheel cap after loosen-
ing the 3 fastening bolts and fi-
nally loosen the fourth bolt and
extract the wheel;
❒for versions with snap-fitted wheel
cap, remove the cap, taking care
not to damage it;
❒ensure that the surfaces of the
small spare wheel in contact with
the hub are clean and free from
impurities that could, subse-
quently, lead to the loosening of
the fastening bolts;
L0D0164mfig. 13
135-164 MUSA 3ed GB 12-11-2007 11:39 Pagina 145
Page 147 of 218
146
WARNING
LIGHTS AND
MESSAGES
MAINTENANCE
AND CARE
TECHNICALSPECIFICATIONS
INDEX
DASHBOARD
AND CONTROLS
SAFETY
DEVICES
STARTING
AND
DRIVING
IN AN
EMERGENCY
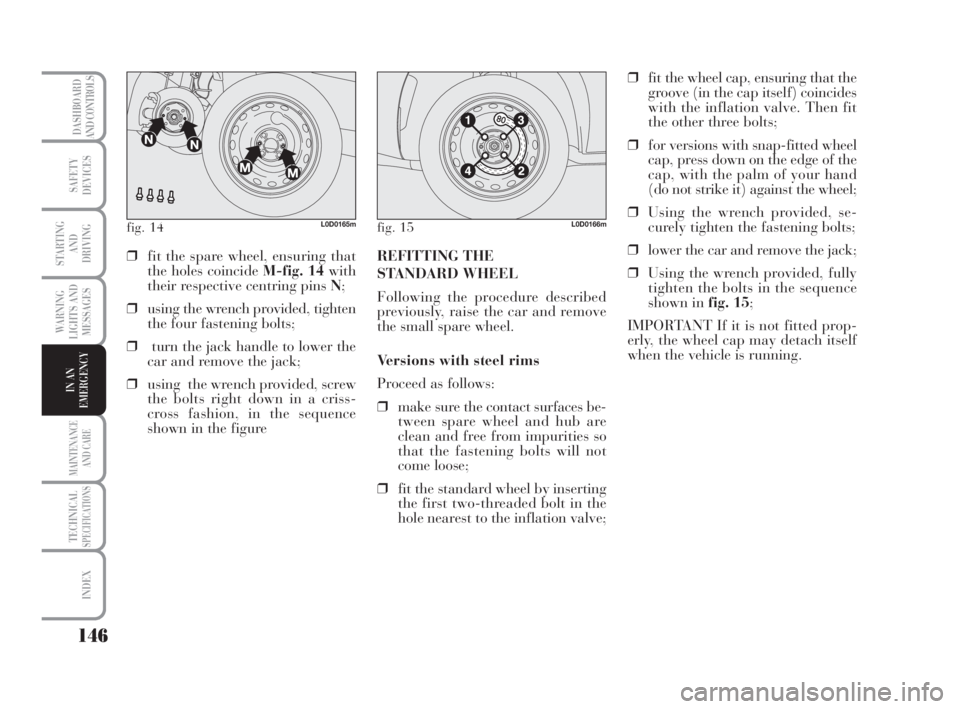
fig. 14L0D0165mfig. 15L0D0166m
❒fit the spare wheel, ensuring that
the holes coincide M-fig. 14with
their respective centring pins N;
❒using the wrench provided, tighten
the four fastening bolts;
❒turn the jack handle to lower the
car and remove the jack;
❒using the wrench provided, screw
the bolts right down in a criss-
cross fashion, in the sequence
shown in the figureREFITTING THE
STANDARD WHEEL
Following the procedure described
previously, raise the car and remove
the small spare wheel.
Versions with steel rims
Proceed as follows:
❒make sure the contact surfaces be-
tween spare wheel and hub are
clean and free from impurities so
that the fastening bolts will not
come loose;
❒fit the standard wheel by inserting
the first two-threaded bolt in the
hole nearest to the inflation valve;❒fit the wheel cap, ensuring that the
groove (in the cap itself) coincides
with the inflation valve. Then fit
the other three bolts;
❒for versions with snap-fitted wheel
cap, press down on the edge of the
cap, with the palm of your hand
(do not strike it) against the wheel;
❒Using the wrench provided, se-
curely tighten the fastening bolts;
❒lower the car and remove the jack;
❒Using the wrench provided, fully
tighten the bolts in the sequence
shown in fig. 15;
IMPORTANT If it is not fitted prop-
erly, the wheel cap may detach itself
when the vehicle is running.
135-164 MUSA 3ed GB 12-11-2007 11:39 Pagina 146