headlight Lancia Musa 2008 Owner handbook (in English)
[x] Cancel search | Manufacturer: LANCIA, Model Year: 2008, Model line: Musa, Model: Lancia Musa 2008Pages: 218, PDF Size: 3.68 MB
Page 148 of 218
147
WARNING
LIGHTS AND
MESSAGES
MAINTENANCE
AND CARE
TECHNICALSPECIFICATIONS
INDEX
DASHBOARD
AND CONTROLS
SAFETY
DEVICES
STARTING
AND
DRIVING
IN AN
EMERGENCY
Versions with alloy rims
❒Ensure that the surfaces in contact
with the hub are clean;
❒install the standard wheel by fit-
ting it on the centring pins. Fit the
fastening bolts and screw them
down using the wrench provided;
❒lower the car and remove the jack;
❒using the wrench provided, fully
tighten the bolts in the sequence
shown in fig. 15for the small
spare wheel;
❒refit the snap-fitted hub cap.When you have finished
❒stow the spare wheel in the space
provided in the boot;
❒ fit the jack partially open in its
box, forcing it lightly to prevent it
from vibrating when travelling;
❒put the tools back into their places
in the container;
❒stow the container, complete with
tools, into the spare wheel, screw-
ing in the locking device;
❒put the boot’s stiff preformed in-
sulating mat back in position.WHEN NEEDING
TO CHANGE
A BULB
GENERAL INSTRUCTIONS
❒When a bulb is not working, check
that the corresponding fuse is in-
tact before replacing it: refer to the
“If a fuse blows” paragraph in this
chapter for fuse location;
❒Before changing a bulb check the
contacts for oxidation;
❒burnt bulbs must be replaced by
others of the same type and power;
❒For safety reasons, always check
the height of the headlight beam
after changing a bulb.
Halogen lamps must be
handled holding the metal-
lic part only. Touching the
transparent part of the bulb
with your fingers may reduce the in-
tensity of the emitted light and even
compromise duration of the lamp it-
self. In the event of accidental con-
tact, rub the bulb with a cloth
dampened with alcohol and allow to
dry.
135-164 MUSA 3ed GB 12-11-2007 11:39 Pagina 147
Page 149 of 218

148
WARNING
LIGHTS AND
MESSAGES
MAINTENANCE
AND CARE
TECHNICALSPECIFICATIONS
INDEX
DASHBOARD
AND CONTROLS
SAFETY
DEVICES
STARTING
AND
DRIVING
IN AN
EMERGENCY
Changes or repairs to the
electrical system (electric
control units) carried out incor-
rectly and without due considera-
tion for the technical specifications
of the system can lead to malfunc-
tioning and generate a fire hazard.
WARNING
Halogen lamps contain gas
under pressure. Their
breaking can cause scattering of
glass fragments.
WARNING
BULB TYPES fig. 16
Various types of bulbs are fitted to
your car:
A All glass bulb: clipped into place.
Pull to extract.
B Bayonet bulbs: to remove this type
of bulb from its holder, press the
bulb and turn it anticlockwise.
C Cylindrical bulbs: release from the
contacts to extract.
D-E Halogen bulbs: release the fas
tening clip from the correspond
ing seat to remove the lamp.
L0D0178mfig. 16
The rear sidelights and
brake lights and the third
brake light are LEDs so in the
event of malfunctioning, contact a
Lancia Dealership.
WARNING
IMPORTANT A slight misting may ap-
pear on the internal surface of the
headlight: this does not indicate a fault
and is caused by low temperature and
the degree of humidity in the air. Mist-
ing will rapidly disappear when the
headlights are switched on. The pres-
ence of drops inside the headlights in-
dicates infiltration of water. Contact a
Lancia Dealership
135-164 MUSA 3ed GB 12-11-2007 11:39 Pagina 148
Page 150 of 218

149
WARNING
LIGHTS AND
MESSAGES
MAINTENANCE
AND CARE
TECHNICALSPECIFICATIONS
INDEX
DASHBOARD
AND CONTROLS
SAFETY
DEVICES
STARTING
AND
DRIVING
IN AN
EMERGENCY
Bulb Ref. figure Type Power
Main beam headlightsEH3 55W
Dipped beam headlights DH7LL 55W
Front sidelights AW5WLL 5W
Front fog lights (where provided)EH1 55W
Front direction indicators (orange)BPY21W 21W
Side direction indicators AWY5W 5W
Rear direction indicatorsBPY21W 21W
Reversing lights BP21W 21W
Rear fog lights BP21W 21W
Number plate lights CC5W 5W
Front light AW5W 10W
Rear lightAW5W 10W
Rear lights (in presence of sun roof)AW5W 5W
Boot light AW5W 5W
135-164 MUSA 3ed GB 12-11-2007 11:39 Pagina 149
Page 151 of 218
150
WARNING
LIGHTS AND
MESSAGES
MAINTENANCE
AND CARE
TECHNICALSPECIFICATIONS
INDEX
DASHBOARD
AND CONTROLS
SAFETY
DEVICES
STARTING
AND
DRIVING
IN AN
EMERGENCY
IF AN EXTERIOR
LIGHT BURNS OUT
For the type of bulb and power rat-
ing, see “When needing to change a
bulb”.
FRONT LIGHT CLUSTERS
The front light clusters contain side-
lights, dipped beam, main beam and
direction indicator bulbs.
To replace the bulbs in the sidelights,
dipped beam and main beam lights,
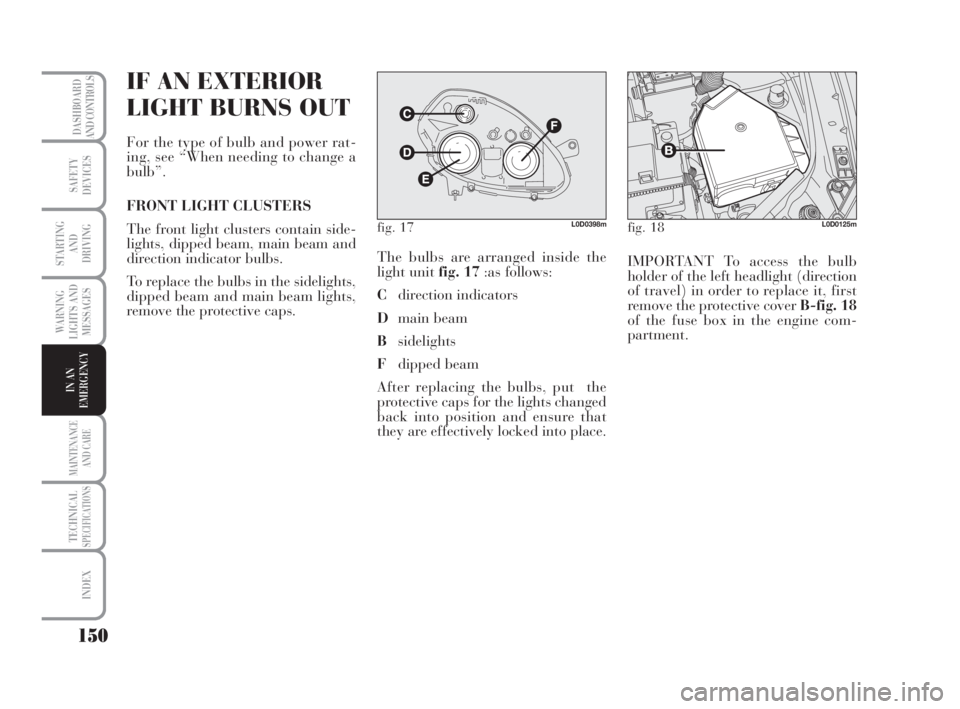
remove the protective caps.The bulbs are arranged inside the
light unit fig. 17:as follows:
Cdirection indicators
Dmain beam
Bsidelights
Fdipped beam
After replacing the bulbs, put the
protective caps for the lights changed
back into position and ensure that
they are effectively locked into place.IMPORTANT To access the bulb
holder of the left headlight (direction
of travel) in order to replace it, first
remove the protective cover B-fig. 18
of the fuse box in the engine com-
partment.
fig. 17L0D0398mfig. 18L0D0125m
135-164 MUSA 3ed GB 12-11-2007 11:39 Pagina 150
Page 152 of 218

151
WARNING
LIGHTS AND
MESSAGES
MAINTENANCE
AND CARE
TECHNICALSPECIFICATIONS
INDEX
DASHBOARD
AND CONTROLS
SAFETY
DEVICES
STARTING
AND
DRIVING
IN AN
EMERGENCY
DIPPED BEAM HEADLIGHTS
fig. 19-20
To change the bulb, proceed as fol-
lows:
❒remove the protective caps;
❒turn the bulb holder unit Ain an
anticlockwise direction and re-
move it from its seat;
❒disengage the two tabs Bfrom the
retaining device, remove the bulb
Cand replace it;❒remount the bulb holder unit Ain
its seat and turn it in a clockwise
direction;
❒after replacing the bulbs, put the
protective caps back into position;MAIN BEAM LIGHTS fig. 21
To change the bulb, proceed as fol-
lows:
❒remove the protective caps;
❒release the bulb holding clip A;
❒disconnect the electric connector
B;
❒remove the bulb Cand replace it;
❒fit the new bulb, ensuring that the
outline of the metal part coincides
with the grooves on the curve of
the headlight. Then reconnect the
electrical connector Band reattach
the bulb holding clip A;
❒after replacing the bulbs, put the
protective caps back into position.
fig. 20L0D0401mfig. 21L0D0402mfig. 19L0D0400m
135-164 MUSA 3ed GB 12-11-2007 11:39 Pagina 151
Page 154 of 218

153
WARNING
LIGHTS AND
MESSAGES
MAINTENANCE
AND CARE
TECHNICALSPECIFICATIONS
INDEX
DASHBOARD
AND CONTROLS
SAFETY
DEVICES
STARTING
AND
DRIVING
IN AN
EMERGENCY
FRONT FOG LIGHTS
(where provided) fig. 25
To replace a fog light bulb, contact a
Lancia Dealership.
fig. 25L0D0406m
REAR LIGHT CLUSTERS
The rear headlights use LED lighting
technology for the sidelights and
brake lights. In the event of malfunc-
tioning, contact a Lancia Dealership.
To change the bulb in the direction in-
dicators, proceed as follows:
❒open the tailgate;
❒turn the fastening device Ain an
anticlockwise direction (for the
left-hand door) or in a clockwise
direction (for the right-hand door)
and remove the covering door;
❒disconnect the electric connector
C;
❒unscrew the two fastening nuts B;
❒to remove the headlight, pull it up
perpendicularly using the handle
on the body of the headlight itself;
❒press down the bulb holder lock-
ing tabs and extract it from its
seat;
❒remove the bulb by pushing it
slightly and turning it in an anti-
clockwise direction;
❒reinstall the bulb holder ensuring
that the two locking tabs are effec-
tively engaged; fit the light unit in
its housing and hook up the elec-
trical connector C; tighten the two
fastening nuts B; refit the coveringdoor taking care to insert the tabs
in their seat and turning the fas-
tening device Ain an anticlockwise
direction (for the left-hand door) or
in a clockwise direction (for the
right-hand door) in order to engage
it.
fig. 26L0D0187m
fig. 27L0D0188m
135-164 MUSA 3ed GB 12-11-2007 11:39 Pagina 153
Page 168 of 218
167
WARNING
LIGHTS AND
MESSAGES
TECHNICALSPECIFICATIONS
INDEX
DASHBOARD
AND CONTROLS
SAFETY
DEVICES
STARTING
AND
DRIVING
IN AN
EMERGENCY
MAINTENANCE
AND CARE
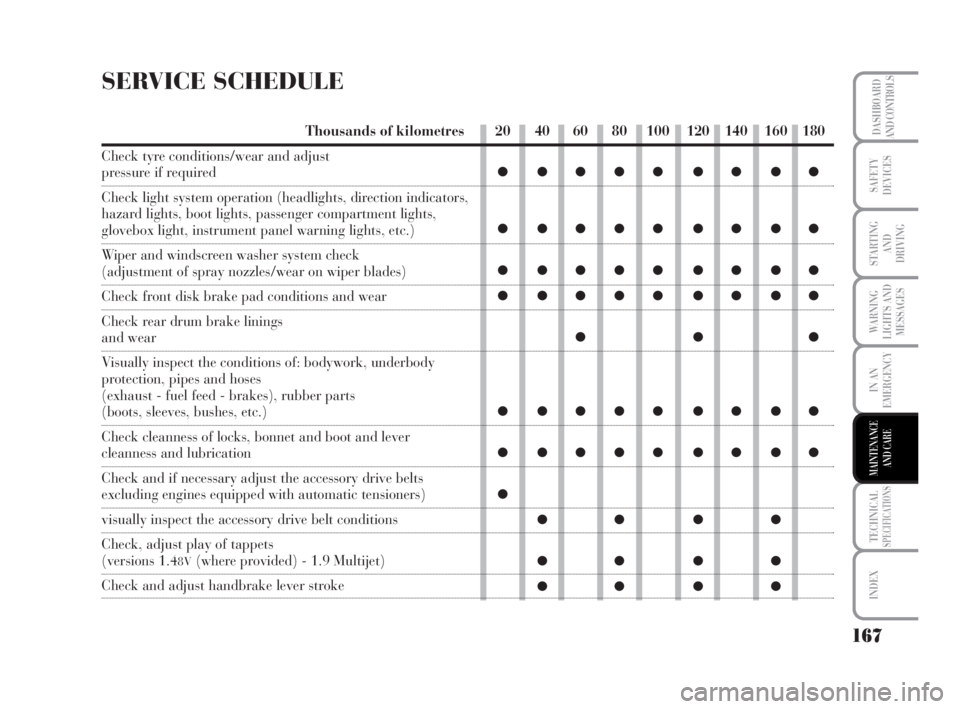
SERVICE SCHEDULE
Thousands of kilometres
Check tyre conditions/wear and adjust
pressure if required
Check light system operation (headlights, direction indicators,
hazard lights, boot lights, passenger compartment lights,
glovebox light, instrument panel warning lights, etc.)
Wiper and windscreen washer system check
(adjustment of spray nozzles/wear on wiper blades)
Check front disk brake pad conditions and wear
Check rear drum brake linings
and wear
Visually inspect the conditions of: bodywork, underbody
protection, pipes and hoses
(exhaust - fuel feed - brakes), rubber parts
(boots, sleeves, bushes, etc.)
Check cleanness of locks, bonnet and boot and lever
cleanness and lubrication
Check and if necessary adjust the accessory drive belts
excluding engines equipped with automatic tensioners)
visually inspect the accessory drive belt conditions
Check, adjust play of tappets
(versions 1.48V(where provided) - 1.9 Multijet)
Check and adjust handbrake lever stroke
20 40 60 80 100 120 140 160 180
●●●●● ●●●●
●●●●● ●●●●
●●●●● ●●●●
●●●●● ●●●●
●●●
●●●●● ●●●●
●●●●● ●●●●
●
●● ● ●
●● ● ●
●● ● ●
165-186 MUSA 3ed GB 12-11-2007 11:39 Pagina 167
Page 170 of 218
169
WARNING
LIGHTS AND
MESSAGES
TECHNICALSPECIFICATIONS
INDEX
DASHBOARD
AND CONTROLS
SAFETY
DEVICES
STARTING
AND
DRIVING
IN AN
EMERGENCY
MAINTENANCE
AND CARE
ANNUAL
INSPECTION
SCHEDULE
For cars with an annual mileage of
below 20,000 km (for example about
15.000 km) the following yearly in-
spection programme is advised:
❒check tyre conditions/wear and
adjust pressure if required (in-
cluding the spare wheel);
❒check light system operation
(headlights, direction indicators,
hazard lights, boot lights, passen-
ger compartment lights, warning
lights, etc.);
❒wiper and windscreen washer sys-
tem check (adjustment of spray
nozzles/wear on wiper blades)
❒check front disk brake pad condi-
tions and wear;
❒visually inspect the conditions of:
engine, gearbox, transmission,
pipes and hoses (exhaust - fuel
feed - brakes), rubber parts
(boots, sleeves, bushes, etc.);❒check cleanness of bonnet and
boot locks and lever cleanness and
lubrication;
❒check battery charge;
❒visual check on various drive belt
conditions;
❒check and top up, if required, fluid
levels (engine coolant, brake fluid,
windscreen washer fluid, battery
fluid, etc);
❒replace engine oil;
❒replace engine oil filter;
❒replace pollen filter (where pro-
vided).
ADDITIONAL
CHECKS
Every 1,000 km or before long jour-
neys, check and top up if required:
❒engine coolant fluid level;
❒brake fluid level;
❒windscreen washer fluid level;
❒tyre pressure and conditions.
Every 3,000 km check the following
and top-up, if required: engine oil
level.
You are recommended to use FL Se-
lenia products, designed and pro-
duced specifically for Lancia cars (see
table “Capacities” in section “Techni-
cal specifications”).
IMPORTANT - Engine oil
Should prevailing use of the car be
under one of the following specially
heavy conditions:
❒trailer or caravan towing;
❒dusty roads;
❒short distances (less than 7-8 km)
repeated and with external tem-
peratures below zero;
165-186 MUSA 3ed GB 12-11-2007 11:39 Pagina 169
Page 185 of 218

184
WARNING
LIGHTS AND
MESSAGES
TECHNICALSPECIFICATIONS
INDEX
DASHBOARD
AND CONTROLS
SAFETY
DEVICES
STARTING
AND
DRIVING
IN AN
EMERGENCY
MAINTENANCE
AND CARE
To correctly wash the car:
❒remove the aerial from the roof to
prevent damage to it if the car is
washed in an automatic system;
❒wash the body using a low pres-
sure jet of water;
❒wipe a sponge with a slightly
soapy solution over the bodywork,
frequently rinsing the sponge;
❒rinse well with water and dry with
a jet of air or a chamois leather.
Dry the less visible parts particularly
carefully, such as the door frames,
bonnet and the headlight frames,
where water may stagnate more eas-
ily. It is a good idea to leave the car in
the open for a while after washing it
to give time for the water to evapo-
rate.
Do not wash the car after it has been
parked in the sun or when the engine
is bonnet is hot: this can alter the
gloss of the paint.Exterior plastic parts must be cleaned
in the same way as the rest of the car.
Where possible, do not park under
trees; the resinous substance many
species release give the paint a dull
appearance and increase the possibil-
ity of triggering rust processes.
IMPORTANT Bird droppings must be
washed off immediately and thor-
oughly as the acid they contain is par-
ticularly aggressive.Windows
Use specific window cleaner products.
Use also clean cloths to avoid scratch-
ing the glass or damaging the trans-
parency.
IMPORTANT The inside of the rear
window should be wiped gently with
a cloth in the direction of the fila-
ments to avoid damaging the heating
device.
Front headlights
IMPORTANT Never use aromatic
substances (e.g.: petrol) or ketenes
(e.g.: acetone) for cleaning front
headlight plastic lens.Detergents cause water pol-
lution. The car should be
washed in areas equipped
for collecting and purifying
the liquid used in the washing
process.
165-186 MUSA 3ed GB 12-11-2007 11:39 Pagina 184
Page 207 of 218
206
STARTING
AND
DRIVING
DASHBOARD
AND CONTROLS
SAFETY
DEVICES
STARTING
AND
DRIVING
IN AN
EMERGENCY
MAINTENANCE
AND CARE
TECHNICALSPECIFICATIONS
INDEX
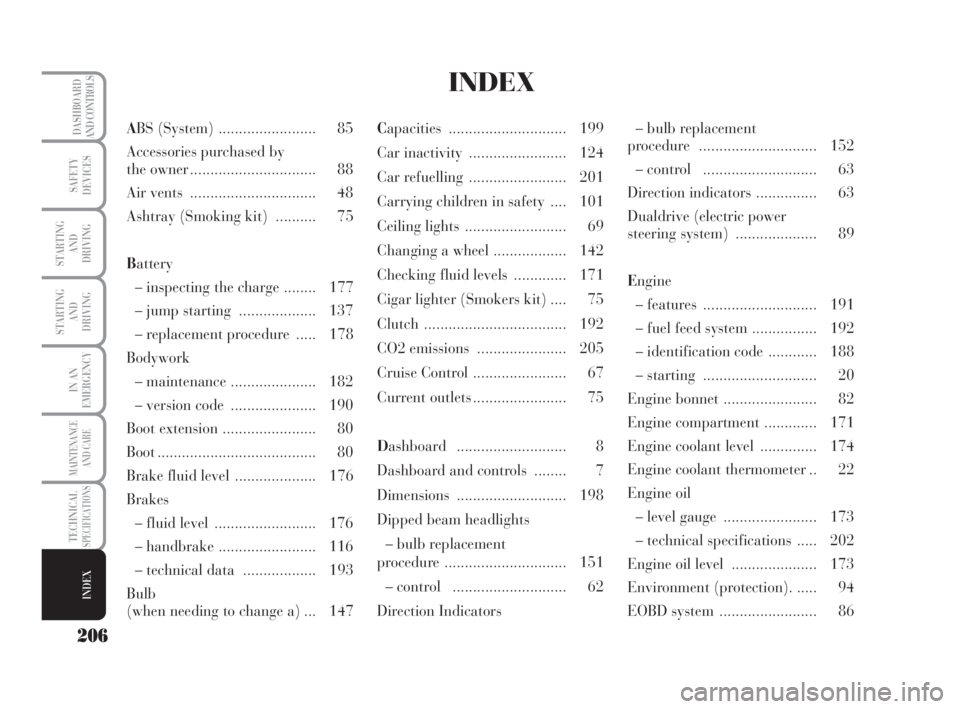
ABS (System) ........................ 85
Accessories purchased by
the owner ............................... 88
Air vents ............................... 48
Ashtray (Smoking kit) .......... 75
Battery
– inspecting the charge ........ 177
– jump starting ................... 137
– replacement procedure ..... 178
Bodywork
– maintenance ..................... 182
– version code ..................... 190
Boot extension ....................... 80
Boot ....................................... 80
Brake fluid level .................... 176
Brakes
– fluid level ......................... 176
– handbrake ........................ 116
– technical data .................. 193
Bulb
(when needing to change a) ... 147Capacities ............................. 199
Car inactivity ........................ 124
Car refuelling ........................ 201
Carrying children in safety .... 101
Ceiling lights ......................... 69
Changing a wheel .................. 142
Checking fluid levels ............. 171
Cigar lighter (Smokers kit) .... 75
Clutch ................................... 192
CO2 emissions ...................... 205
Cruise Control ....................... 67
Current outlets ....................... 75
Dashboard ........................... 8
Dashboard and controls ........ 7
Dimensions ........................... 198
Dipped beam headlights
– bulb replacement
procedure .............................. 151
– control ............................ 62
Direction Indicators– bulb replacement
procedure ............................. 152
– control ............................ 63
Direction indicators ............... 63
Dualdrive (electric power
steering system) .................... 89
Engine
– features ............................ 191
– fuel feed system ................ 192
– identification code ............ 188
– starting ............................ 20
Engine bonnet ....................... 82
Engine compartment ............. 171
Engine coolant level .............. 174
Engine coolant thermometer .. 22
Engine oil
– level gauge ....................... 173
– technical specifications ..... 202
Engine oil level ..................... 173
Environment (protection). ..... 94
EOBD system ........................ 86
INDEX
206-216 MUSA 3ed GB 12-11-2007 11:40 Pagina 206