stop start Lancia Musa 2008 Owner handbook (in English)
[x] Cancel search | Manufacturer: LANCIA, Model Year: 2008, Model line: Musa, Model: Lancia Musa 2008Pages: 218, PDF Size: 3.68 MB
Page 133 of 218
132
IN AN
EMERGENCY
MAINTENANCE
AND CARE
TECHNICALSPECIFICATIONS
INDEX
DASHBOARD
AND CONTROLS
SAFETY
DEVICES
STARTING
AND
DRIVING
WARNING
LIGHTS AND
MESSAGES
GENERAL FAILURE
INDICATION
(amber)
The warning light turns on in
the following circumstances.
Externallight failure
The warning light comes on (on some
versions only) when a failure is de-
tected in one of the following lights:
– tail lights
– stop lights (excluding 3
rdstop)
– rear fog lights
– direction indicators
– plate lights.
The fault identified in the lights above
may be due to: one or more burnt
lamps, a blown protection fuse or in-
terruption of the electrical connection.
The display will show the dedicated
message.
è
Fresh air filter clogged
(where provided)
The warning light turns on when the
particulate filter is clogged and the
driving conditions do not enable au-
tomatic activation of the regeneration
procedure.
To allow the regeneration procedure,
keep the car running until the warn-
ing light turns off.
The display will show the dedicated
message.
Engine oil pressure sensor
failure
The warning light turns on when a
failure is detected in the engine oil
pressure sensor. Go to a Lancia Deal-
ership as soon as possible.Twilight/rain sensor failure
The warning light turns on when a
failure is detected in the twilight/rain
sensors. Go to a Lancia Dealership as
soon as possible.
The display will show the dedicated
message.
Fuel cut-off switch tripped
The warning light comes on when the
fuel cut-off switch trips.
The display will show the dedicated
message.
Speed limit exceeded
The display shows the dedicated mes-
sage when the car exceeds the set
speed limit (see “Multifunction Dis-
play” in section “Dashboard and con-
trols”).
125-134 MUSA 3ed GB 12-11-2007 11:38 Pagina 132
Page 139 of 218
138
WARNING
LIGHTS AND
MESSAGES
MAINTENANCE
AND CARE
TECHNICALSPECIFICATIONS
INDEX
DASHBOARD
AND CONTROLS
SAFETY
DEVICES
STARTING
AND
DRIVING
IN AN
EMERGENCY
Indicate that the car is sta-
tionary according to the
laws in force: emergency lights, re-
fracting warning triangle, etc. Pas-
sengers should leave the car, partic-
ularly if it is very loaded and wait
for the wheel to be changed away
from on-coming traffic. In case of
steep slopes or rough slopes, place
wedges or other materials suitable
to stop the vehicle under the wheels.
WARNINGQUICK TYRE
REPAIR KIT FIX
& GO automatic
(if provided for)
The quick tyre repair kit Fix & Go
automaticfig. 3is placed in the boot.
The kit includes:
❒cylinderAcontaining sealing liq-
uid and fitted with:
– filling pipe B;
– adhesive label Cbearing the
words “max. 80 km/h”, to be at-
tached in a position easily visi-
ble to the driver (on the dash-
board) after tyre repair;
❒informative leaflet fig. 4, used to
ensure the correct use of the quick
tyre repair kit and then given to
the personnel who will handle the
treated tyre; BUMP STARTING
Never jump start the engine by push-
ing, towing or driving downhill. This
could cause a flow of fuel into the cat-
alytic converter and damage it beyond
repair.
IMPORTANT Remember that the
brake booster and the power steering
system are not operating until the en-
gine is started, a greater effort will
therefore be required to press the
brake pedal or turn the steering
wheel.
135-164 MUSA 3ed GB 12-11-2007 11:38 Pagina 138
Page 142 of 218
141
WARNING
LIGHTS AND
MESSAGES
MAINTENANCE
AND CARE
TECHNICALSPECIFICATIONS
INDEX
DASHBOARD
AND CONTROLS
SAFETY
DEVICES
STARTING
AND
DRIVING
IN AN
EMERGENCY
For a more accurate reading,
check pressure gauge F-fig. 6with
the compressor off;
❒if after 5 minutes it is still impos-
sible to reach at least 1.5 bar, dis-
engage compressor from the valve
and current outlet and move the
car forward by approx. ten metres
in order to distribute the sealing
fluid inside the tyre evenly. Then
repeat the inflation operation;
❒If after this operation it is still im-
possible after 5 minutes to reach
at least 1.8 bar, do not start dri-
ving since the tyre is excessively
damaged and the quick tyre repair
kit cannot guarantee suitable seal-
ing, contact the Lancia Dealership;
fig. 8L0D0485m
Apply the adhesive label in
a position clearly visible
by the driver as a reminder that
the tyre has been treated with the
quick repair kit. Drive carefully,
particularly on bends. Do not ex-
ceed 80 km/h. Do not accelerate
and brake sharply.
WARNING
If the pressure has
dropped below 1.8 bar, do
not continue to drive: the automatic
Fix & Go quick repair kit cannot
work properly because the tyre is
excessively damaged. Contact a
Lancia Dealership.
WARNING
❒if the tyre has been inflated to the
pressure in paragraph “Inflation
pressure” in section “Technical
Specifications”, resume driving
immediately;
❒after driving for about 10 minutes,
stop and check again the tyre
pressure again; remember to pull
the handbrake;
❒if, on the other hand, a pressure
of at least 1.8 bar pressure is read,
restore the correct (with engine
running and handbrake on) and
restart;
❒drive with the utmost care to the
nearest Lancia Dealership.
FOR CHECKING AND
RESTORING PRESSURE ONLY
The compressor may also be used for
restoring pressure only. Release the
quick coupling and connect directly
to the tyre valve; in this way, the
cylinder will not be connected to the
compressor and no sealing fluid will
be injected.
135-164 MUSA 3ed GB 12-11-2007 11:38 Pagina 141
Page 145 of 218
144
WARNING
LIGHTS AND
MESSAGES
MAINTENANCE
AND CARE
TECHNICALSPECIFICATIONS
INDEX
DASHBOARD
AND CONTROLS
SAFETY
DEVICES
STARTING
AND
DRIVING
IN AN
EMERGENCY
If the hub cap is not in-
stalled properly, it can de-
tach itself when the vehicle is run-
ning. Never tamper with the infla-
tion valve. Never introduce tools of
any kind between rim and tyre.
Check tyre and small spare wheel
pressure regularly referring to the
values shown in the “Technical
Specifications” chapter.
WARNINGImportant notes:
❒the jack cannot be repaired: re-
place with an original spare part if
damaged;
❒no tool other than its cranking de-
vice may be fitted on the jack.
To change a wheel proceed as follows:
❒stop the car in a position so that
it is not a danger for on-coming
traffic and where you can replace
the wheel safely. The ground must
be flat and compact;
❒turn the engine off and pull the
handbrake;
❒engage first gear or reverse;
❒raise the mat on the floor of the
baggage compartment;
❒loosen the fastener A-fig. 10;
❒take out the tool container Band
bring it near to the wheel to be
changed;
❒take the small spare wheel C;
L0D0161mfig. 10
135-164 MUSA 3ed GB 12-11-2007 11:39 Pagina 144
Page 165 of 218
164
WARNING
LIGHTS AND
MESSAGES
MAINTENANCE
AND CARE
TECHNICALSPECIFICATIONS
INDEX
DASHBOARD
AND CONTROLS
SAFETY
DEVICES
STARTING
AND
DRIVING
IN AN
EMERGENCY
fig. 44L0D0251m
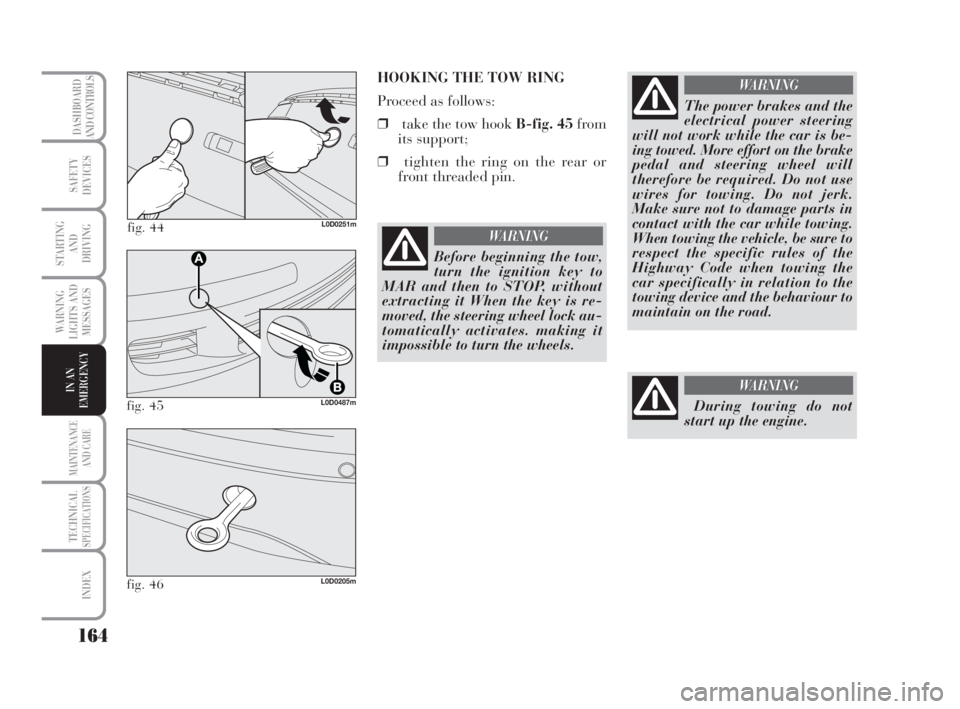
HOOKING THE TOW RING
Proceed as follows:
❒take the tow hook B-fig. 45from
its support;
❒tighten the ring on the rear or
front threaded pin.
fig. 45L0D0487m
fig. 46L0D0205m
The power brakes and the
electrical power steering
will not work while the car is be-
ing towed. More effort on the brake
pedal and steering wheel will
therefore be required. Do not use
wires for towing. Do not jerk.
Make sure not to damage parts in
contact with the car while towing.
When towing the vehicle, be sure to
respect the specific rules of the
Highway Code when towing the
car specifically in relation to the
towing device and the behaviour to
maintain on the road.
WARNING
Before beginning the tow,
turn the ignition key to
MAR and then to STOP, without
extracting it When the key is re-
moved, the steering wheel lock au-
tomatically activates. making it
impossible to turn the wheels.
WARNING
During towing do not
start up the engine.
WARNING
135-164 MUSA 3ed GB 12-11-2007 11:39 Pagina 164
Page 174 of 218
173
WARNING
LIGHTS AND
MESSAGES
TECHNICALSPECIFICATIONS
INDEX
DASHBOARD
AND CONTROLS
SAFETY
DEVICES
STARTING
AND
DRIVING
IN AN
EMERGENCY
MAINTENANCE
AND CARE
fig. 5 - 1.4 8V version(where provided)L0D0258mfig. 6 -1.416VversionL0D0208mfig. 7 - 1.3 Multijet versionL0D0209m
fig. 8 - 1.9 Multijet versionL0D0326m
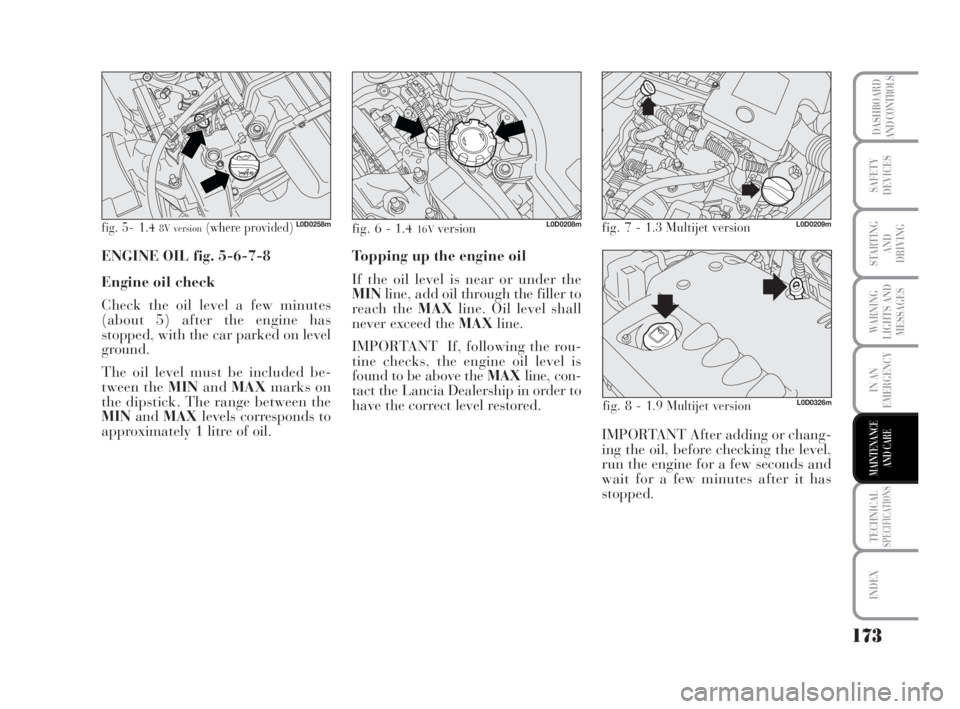
ENGINE OIL fig. 5-6-7-8
Engine oil check
Check the oil level a few minutes
(about 5) after the engine has
stopped, with the car parked on level
ground.
The oil level must be included be-
tween the MINandMAXmarks on
the dipstick. The range between the
MINandMAXlevels corresponds to
approximately 1 litre of oil.Topping up the engine oil
If the oil level is near or under the
MINline, add oil through the filler to
reach the MAXline. Oil level shall
never exceed the MAXline.
IMPORTANT If, following the rou-
tine checks, the engine oil level is
found to be above the MAXline, con-
tact the Lancia Dealership in order to
have the correct level restored.
IMPORTANT After adding or chang-
ing the oil, before checking the level,
run the engine for a few seconds and
wait for a few minutes after it has
stopped.
165-186 MUSA 3ed GB 12-11-2007 11:39 Pagina 173
Page 178 of 218
177
WARNING
LIGHTS AND
MESSAGES
TECHNICALSPECIFICATIONS
INDEX
DASHBOARD
AND CONTROLS
SAFETY
DEVICES
STARTING
AND
DRIVING
IN AN
EMERGENCY
MAINTENANCE
AND CARE
DIESEL FILTER
(green filter)
DISCHARGE OF THE
CONDENSATE (Multijet versions)
The presence of water in
the feeding circuit may
cause severe damage to the injec-
tion system and irregular engine
operation. If the warning lightc
on the display lights up (on some
versions with the message on the
reconfigurable multifunctional dis-
play), go to a Lancia Dealership as
soon as possible to have the system
bled. Water may have been intro-
duced in the tank if this appears
immediately after refuelling: in
this case, stop the engine immedi-
ately and contact a Lancia Deal-
ership.
WARNING
INSPECTING THE CHARGE
AND THE ELECTROLYTE
LEVEL
Inspection operations must be carried
out by specialised personnel, follow-
ing the prescriptions contained in the
Owner Handbook.
Any top-up operations must be carried
out exclusively by specialised person-
nel and by the Lancia Dealership.
Battery liquid is poisonous
and corrosive. Avoid con-
tact with the skin and eyes. Keep
naked flames or possible sources of
sparks away from the battery:
risk of explosion or fire.
WARNING
BATTERY
The battery is of the “Limited main-
tenance” type: under normal condi-
tions of use the electrolyte does not
need topping up with distilled water.
165-186 MUSA 3ed GB 12-11-2007 11:39 Pagina 177
Page 180 of 218
179
WARNING
LIGHTS AND
MESSAGES
TECHNICALSPECIFICATIONS
INDEX
DASHBOARD
AND CONTROLS
SAFETY
DEVICES
STARTING
AND
DRIVING
IN AN
EMERGENCY
MAINTENANCE
AND CARE
IMPORTANT If the charge level re-
mains for a long time under 50%, the
battery is damaged by sulphation, re-
ducing its capacity and starting atti-
tude.
The battery will also be more at risk
of freezing (e.g. already at –10°C).
Refer to the paragraph “Car inactiv-
ity” in “Starting and driving” if the
car is left parked for a long time.
If after buying the car, you want to in-
stall electric accessories which require
permanent electric supply (alarm,
etc.) contact the Lancia Dealership
whose qualified personnel, in addition
to suggesting the most suitable devices
beloning to the Lancia Lineaccessori
line, will evaluate the overall electric
absorption, checking whether the car’s
electric system is capable of with-
standing the load required, or whether
it should be integrated with a more
powerful battery.
Since these devices continue absorb-
ing energy even when the ignition key
is off, they gradually run down the
battery.WHEELS
AND TYRES
Check the pressure of each type, in-
cluding the spare, approximately once
every two weeks and before starting a
long journey: this check must be per-
formed with the tyre rested and cold.
It is normal for the pressure to in-
crease when the car is used; for the
correct tyre inflation pressure, see
“Wheels” in “Technical specifica-
tions” section.
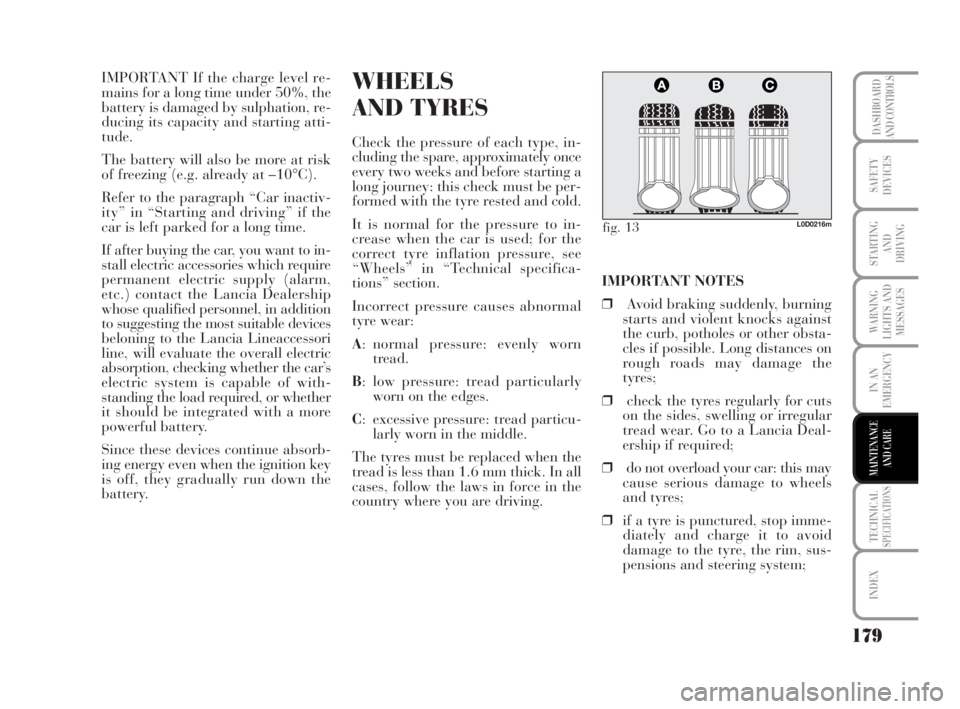
Incorrect pressure causes abnormal
tyre wear:
A: normal pressure: evenly worn
tread.
B: low pressure: tread particularly
worn on the edges.
C: excessive pressure: tread particu-
larly worn in the middle.
The tyres must be replaced when the
tread is less than 1.6 mm thick. In all
cases, follow the laws in force in the
country where you are driving.IMPORTANT NOTES
❒Avoid braking suddenly, burning
starts and violent knocks against
the curb, potholes or other obsta-
cles if possible. Long distances on
rough roads may damage the
tyres;
❒check the tyres regularly for cuts
on the sides, swelling or irregular
tread wear. Go to a Lancia Deal-
ership if required;
❒do not overload your car: this may
cause serious damage to wheels
and tyres;
❒if a tyre is punctured, stop imme-
diately and charge it to avoid
damage to the tyre, the rim, sus-
pensions and steering system;
fig. 13L0D0216m
165-186 MUSA 3ed GB 12-11-2007 11:39 Pagina 179
Page 186 of 218
185
WARNING
LIGHTS AND
MESSAGES
TECHNICALSPECIFICATIONS
INDEX
DASHBOARD
AND CONTROLS
SAFETY
DEVICES
STARTING
AND
DRIVING
IN AN
EMERGENCY
MAINTENANCE
AND CARE
Engine compartment
At the end of the winter the engine
compartment should be carefully
washed, without directing the jet
against electronic control units. Have
this operation performed at a spe-
cialised workshop.
IMPORTANT Perform this operation
on a cold engine and with the key at
STOP. After the washing operation,
make sure that the various protections
(e.g. rubber caps and guards) have
not been removed or damaged.
Never use flammable
products, such as petrol
ether or rectified petrol to clean in-
side the car. The electrostatic
charges which are generated by
rubbing during the cleaning oper-
ation may cause a fire.
WARNINGINTERIORS
Periodically check that water is not
trapped under the mats (due to water
dripping off shoes, umbrellas, etc.)
which could cause oxidisation of the
sheet metal.
CLEANING SEATS AND
FABRIC PARTS
Remove dust with a soft brush or a
vacuum cleaner. It is advisable to use
a moist brush on velvet upholstery.
Rub the seats with a sponge moist-
ened with a solution of water and
neutral detergent.
INTERIOR PLASTIC PARTS
It is advisable to clean interior parts
with a moist cloth and a solution of
water and mild soap. Use specific
products for cleaning plastic, without
solvents and specifically designed to
prevent damage to the appearance
and colour of the treated parts to re-
move grease and tough stains.
IMPORTANT Never use spirit or
petroL to clean the glass of the in-
strument panel or other plastic parts.
165-186 MUSA 3ed GB 12-11-2007 11:39 Pagina 185
Page 209 of 218
Plates ..................................... 188
Pretensioners ........................ 99
Protecting the environment ... 94
Rain sensor ........................... 65
Rear fog lights
– bulb replacement
procedure .............................. 154
– control button .................. 71
Rear screen washer
– control ............................ 64
– fluid level ......................... 175
Rear screen wiper
– blade ................................ 181
– control ............................ 64
– sprayers ........................... 182
Rearview mirrors .................. 46
Rev counter ........................... 21
Reversing light
– bulb replacement
procedure .............................. 154
Rims and wheels ................... 194
Roof bars ............................. 83
Rubber hoses ........................ 180Safety ................................... 95
Seat belts
– general information .......... 100
– height adjustment ............ 97
– maintenance ..................... 101
– S.B.R. system .................. 97
– use ................................... 96
Seats ..................................... 38
Side airbags ........................... 110
Sidelights
– bulb replacement
procedure .............................. 152
– control ............................ 63
Snow chains .......................... 123
Spark plugs............................ 191
Speedometer .......................... 21
Starting and driving .............. 113
Starting the engine
– bump starting ................... 137
– how to warm up the engine
after it has just started .......... 115
– ignition switch .................. 20
– jump starting ................... 138– procedure for Multijet
versions ................................. 114
– procedure for petrol
versions ................................. 114
– stopping the engine ........... 115
Steering ................................ 193
Steering wheel adjustment .... 45
Steering wheel lock ............... 20
Sun visors ............................. 76
Sunroof .................................. 76
Suspensions .......................... 193
Symbols ................................ 11
Technical data ...................... 187
Third brake light
– bulb replacement
procedure .............................. 154
Towing the car ...................... 163
Towing trailers ...................... 119
Transmission ......................... 192
Two-zone automatic climate control
system ................................... 52
Upper oddment compartments 73
208
STARTING
AND
DRIVING
DASHBOARD
AND CONTROLS
SAFETY
DEVICES
STARTING
AND
DRIVING
IN AN
EMERGENCY
MAINTENANCE
AND CARE
TECHNICALSPECIFICATIONS
INDEX
206-216 MUSA 3ed GB 12-11-2007 11:40 Pagina 208