spare wheel Lancia Musa 2008 Owner handbook (in English)
[x] Cancel search | Manufacturer: LANCIA, Model Year: 2008, Model line: Musa, Model: Lancia Musa 2008Pages: 218, PDF Size: 3.68 MB
Page 124 of 218

123
WARNING
LIGHTS AND
MESSAGES
IN AN
EMERGENCY
MAINTENANCE
AND CARE
TECHNICALSPECIFICATIONS
INDEX
DASHBOARD
AND CONTROLS
SAFETY
DEVICES
STARTING
AND
DRIVING
SNOW CHAINS
Use of snow chains should be in com-
pliance with local regulations.
The snow chains may be applied only
onto the front wheel tyres (drive
wheels). Use of Lineaccessori Lancia
snow chains is recommended.
Check the tension of the chains after
the first few metres have been driven.
IMPORTANT The spare wheel cannot
be fitted with snow chains. If the front
tyre has a puncture, replace a rear
wheel with the spare wheel and move
the rear wheel to the front axle. This
way, having two standard size wheels
on the front axle, is it possible to fit
the chains.
The tyres that can be fitted with snow chains and the respective
chain type for each version are shown in the above table; always
comply with the above specifications.
Keep your speed down when snow chains are fitted. Do not
exceed 50 km/h. Avoid potholes, steps and pavements and
avoid also to drive for long distances on roads not covered
with snow to prevent damaging the car and the roadbed.
Tyres that can be fitted with Type of snow snow chains chains to be used
185/65 R14 86T
195/60 R15 88T
205/50 R16 87V tyres
cannot be fitted with snow
chains.
WARNING
Standard size snow chains
with max. projection over the
tyre track of 12 mm.
113-124 MUSA 3ed GB 12-11-2007 11:37 Pagina 123
Page 143 of 218
142
WARNING
LIGHTS AND
MESSAGES
MAINTENANCE
AND CARE
TECHNICALSPECIFICATIONS
INDEX
DASHBOARD
AND CONTROLS
SAFETY
DEVICES
STARTING
AND
DRIVING
IN AN
EMERGENCY
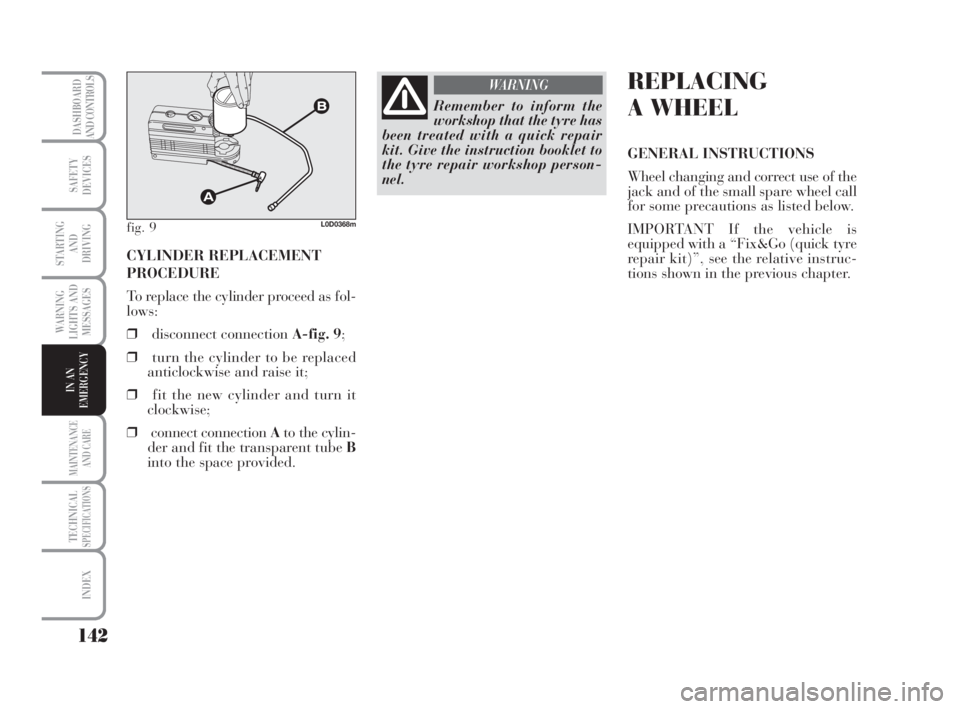
CYLINDER REPLACEMENT
PROCEDURE
To replace the cylinder proceed as fol-
lows:
❒disconnect connection A-fig. 9;
❒turn the cylinder to be replaced
anticlockwise and raise it;
❒fit the new cylinder and turn it
clockwise;
❒connect connection Ato the cylin-
der and fit the transparent tube B
into the space provided.
fig. 9L0D0368m
Remember to inform the
workshop that the tyre has
been treated with a quick repair
kit. Give the instruction booklet to
the tyre repair workshop person-
nel.
WARNINGREPLACING
A WHEEL
GENERAL INSTRUCTIONS
Wheel changing and correct use of the
jack and of the small spare wheel call
for some precautions as listed below.
IMPORTANT If the vehicle is
equipped with a “Fix&Go (quick tyre
repair kit)”, see the relative instruc-
tions shown in the previous chapter.
135-164 MUSA 3ed GB 12-11-2007 11:38 Pagina 142
Page 144 of 218
143
WARNING
LIGHTS AND
MESSAGES
MAINTENANCE
AND CARE
TECHNICALSPECIFICATIONS
INDEX
DASHBOARD
AND CONTROLS
SAFETY
DEVICES
STARTING
AND
DRIVING
IN AN
EMERGENCY
The small spare wheel is
specific for your car. Do
not use it on cars of different mod-
els. Do not use spare wheels of dif-
ferent models on your car. The
small spare wheel must only be
used in an emergency. Never use it
for more than strictly necessary
and never exceed 80 km/h. On the
small spare wheel there is an or-
ange label, summarizing the main
warnings regarding small spare
wheel usage restrictions. Never re-
move or cover the label. Never ap-
ply any hub cap on the small spare
wheel. The label contains the fol-
lowing indications in four lan-
guages: Warning! For temporary
use only! 80 km/h max! Replace
the standard wheel as soon as pos-
sible. Do not cover this instruction.
WARNING
The driving characteristics
of the car are different
when the small spare wheel is in-
stalled. Avoid violent accelerations
and braking, sharp steering and
fast bending. The overall duration
of the small spare wheel is of about
3000 km, after which the relevant
tyre must be replaced with another
one of the same type. Never install
a traditional tyre on a rim de-
signed to be used as a small spare
wheel. Repair and refit the stan-
dard wheel as soon as possible.
Using two or more small spare
wheels at the same time is forbid-
den. Do not apply grease to the bolt
threading before assembly: they
might come unscrewed.
WARNING
The jack may only be used
to replace wheels on the
car which it equips or other cars of
the same model. Never use the jack
for other purposes, such as lifting
other car models. Never use the
jack to carry out repairs under the
car. Incorrect positioning of the
jack may cause the car to fall. Do
not use the jack for loads higher
than those shown on the label.
Never install snow chains on the
small spare wheel; if a front tyre
(driving wheel) is punctured and
you need to use snow chains, use a
standard wheel from the rear axle
and install the small spare wheel
on the rear axle. This way, with
two normal front driving wheels,
you can install the snow chains on
them, thus resolving the emergency.
WARNING
135-164 MUSA 3ed GB 12-11-2007 11:39 Pagina 143
Page 145 of 218
144
WARNING
LIGHTS AND
MESSAGES
MAINTENANCE
AND CARE
TECHNICALSPECIFICATIONS
INDEX
DASHBOARD
AND CONTROLS
SAFETY
DEVICES
STARTING
AND
DRIVING
IN AN
EMERGENCY
If the hub cap is not in-
stalled properly, it can de-
tach itself when the vehicle is run-
ning. Never tamper with the infla-
tion valve. Never introduce tools of
any kind between rim and tyre.
Check tyre and small spare wheel
pressure regularly referring to the
values shown in the “Technical
Specifications” chapter.
WARNINGImportant notes:
❒the jack cannot be repaired: re-
place with an original spare part if
damaged;
❒no tool other than its cranking de-
vice may be fitted on the jack.
To change a wheel proceed as follows:
❒stop the car in a position so that
it is not a danger for on-coming
traffic and where you can replace
the wheel safely. The ground must
be flat and compact;
❒turn the engine off and pull the
handbrake;
❒engage first gear or reverse;
❒raise the mat on the floor of the
baggage compartment;
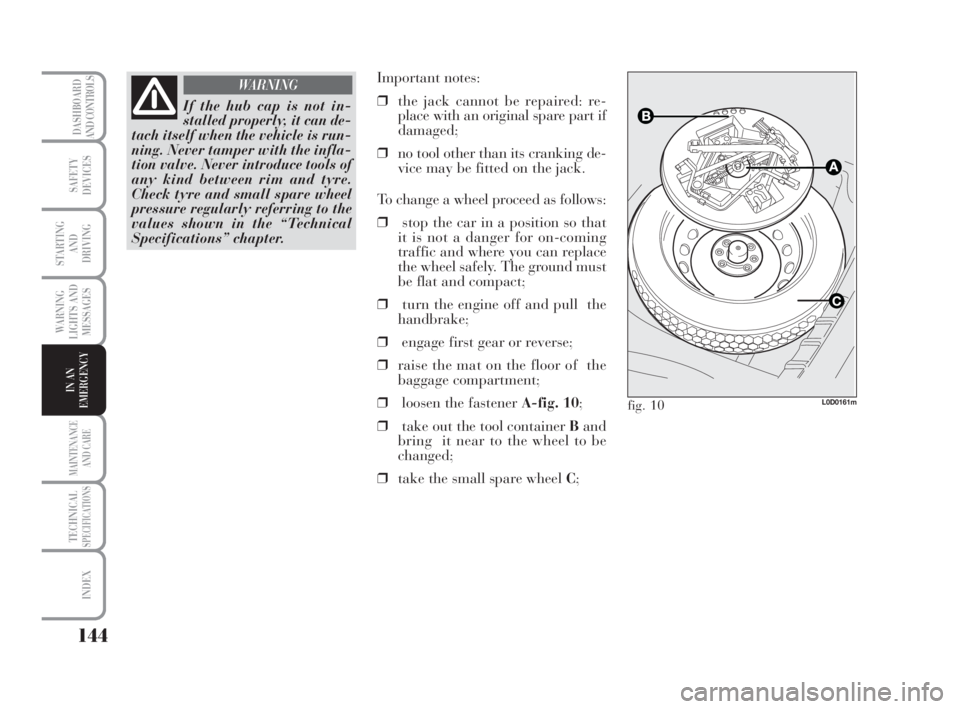
❒loosen the fastener A-fig. 10;
❒take out the tool container Band
bring it near to the wheel to be
changed;
❒take the small spare wheel C;
L0D0161mfig. 10
135-164 MUSA 3ed GB 12-11-2007 11:39 Pagina 144
Page 146 of 218
145
WARNING
LIGHTS AND
MESSAGES
MAINTENANCE
AND CARE
TECHNICALSPECIFICATIONS
INDEX
DASHBOARD
AND CONTROLS
SAFETY
DEVICES
STARTING
AND
DRIVING
IN AN
EMERGENCY
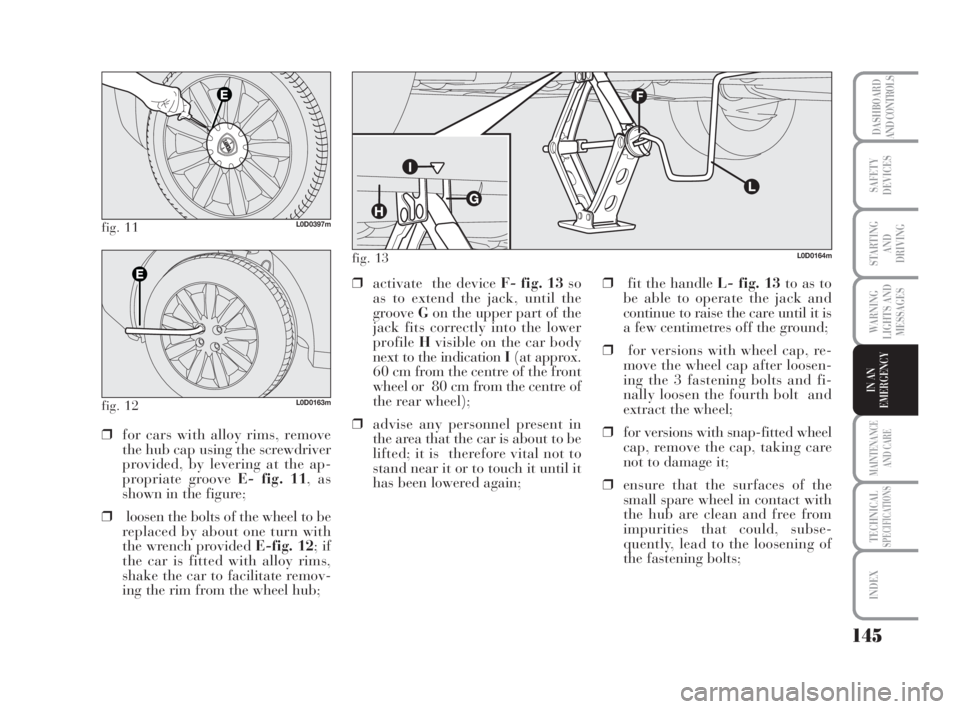
fig. 11L0D0397m
fig. 12L0D0163m
❒for cars with alloy rims, remove
the hub cap using the screwdriver
provided, by levering at the ap-
propriate groove E- fig. 11, as
shown in the figure;
❒loosen the bolts of the wheel to be
replaced by about one turn with
the wrench provided E-fig. 12; if
the car is fitted with alloy rims,
shake the car to facilitate remov-
ing the rim from the wheel hub;❒activate the device F- fig. 13so
as to extend the jack, until the
groove Gon the upper part of the
jack fits correctly into the lower
profile Hvisible on the car body
next to the indication I(at approx.
60 cm from the centre of the front
wheel or 80 cm from the centre of
the rear wheel);
❒advise any personnel present in
the area that the car is about to be
lifted; it is therefore vital not to
stand near it or to touch it until it
has been lowered again;❒fit the handle L- fig. 13to as to
be able to operate the jack and
continue to raise the care until it is
a few centimetres off the ground;
❒for versions with wheel cap, re-
move the wheel cap after loosen-
ing the 3 fastening bolts and fi-
nally loosen the fourth bolt and
extract the wheel;
❒for versions with snap-fitted wheel
cap, remove the cap, taking care
not to damage it;
❒ensure that the surfaces of the
small spare wheel in contact with
the hub are clean and free from
impurities that could, subse-
quently, lead to the loosening of
the fastening bolts;
L0D0164mfig. 13
135-164 MUSA 3ed GB 12-11-2007 11:39 Pagina 145
Page 147 of 218
146
WARNING
LIGHTS AND
MESSAGES
MAINTENANCE
AND CARE
TECHNICALSPECIFICATIONS
INDEX
DASHBOARD
AND CONTROLS
SAFETY
DEVICES
STARTING
AND
DRIVING
IN AN
EMERGENCY
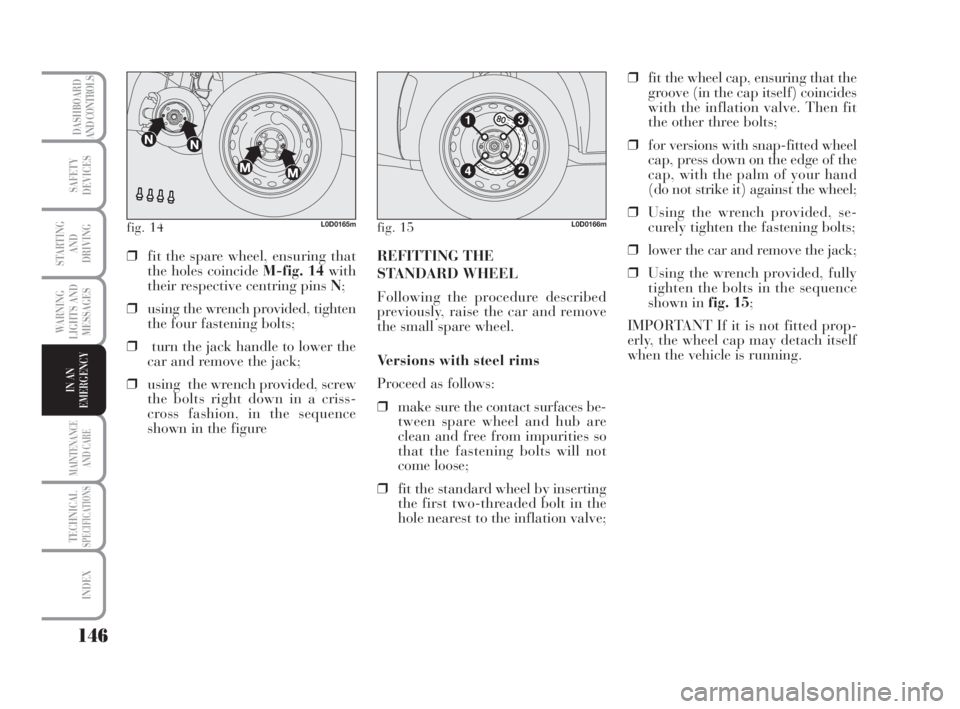
fig. 14L0D0165mfig. 15L0D0166m
❒fit the spare wheel, ensuring that
the holes coincide M-fig. 14with
their respective centring pins N;
❒using the wrench provided, tighten
the four fastening bolts;
❒turn the jack handle to lower the
car and remove the jack;
❒using the wrench provided, screw
the bolts right down in a criss-
cross fashion, in the sequence
shown in the figureREFITTING THE
STANDARD WHEEL
Following the procedure described
previously, raise the car and remove
the small spare wheel.
Versions with steel rims
Proceed as follows:
❒make sure the contact surfaces be-
tween spare wheel and hub are
clean and free from impurities so
that the fastening bolts will not
come loose;
❒fit the standard wheel by inserting
the first two-threaded bolt in the
hole nearest to the inflation valve;❒fit the wheel cap, ensuring that the
groove (in the cap itself) coincides
with the inflation valve. Then fit
the other three bolts;
❒for versions with snap-fitted wheel
cap, press down on the edge of the
cap, with the palm of your hand
(do not strike it) against the wheel;
❒Using the wrench provided, se-
curely tighten the fastening bolts;
❒lower the car and remove the jack;
❒Using the wrench provided, fully
tighten the bolts in the sequence
shown in fig. 15;
IMPORTANT If it is not fitted prop-
erly, the wheel cap may detach itself
when the vehicle is running.
135-164 MUSA 3ed GB 12-11-2007 11:39 Pagina 146
Page 148 of 218
147
WARNING
LIGHTS AND
MESSAGES
MAINTENANCE
AND CARE
TECHNICALSPECIFICATIONS
INDEX
DASHBOARD
AND CONTROLS
SAFETY
DEVICES
STARTING
AND
DRIVING
IN AN
EMERGENCY
Versions with alloy rims
❒Ensure that the surfaces in contact
with the hub are clean;
❒install the standard wheel by fit-
ting it on the centring pins. Fit the
fastening bolts and screw them
down using the wrench provided;
❒lower the car and remove the jack;
❒using the wrench provided, fully
tighten the bolts in the sequence
shown in fig. 15for the small
spare wheel;
❒refit the snap-fitted hub cap.When you have finished
❒stow the spare wheel in the space
provided in the boot;
❒ fit the jack partially open in its
box, forcing it lightly to prevent it
from vibrating when travelling;
❒put the tools back into their places
in the container;
❒stow the container, complete with
tools, into the spare wheel, screw-
ing in the locking device;
❒put the boot’s stiff preformed in-
sulating mat back in position.WHEN NEEDING
TO CHANGE
A BULB
GENERAL INSTRUCTIONS
❒When a bulb is not working, check
that the corresponding fuse is in-
tact before replacing it: refer to the
“If a fuse blows” paragraph in this
chapter for fuse location;
❒Before changing a bulb check the
contacts for oxidation;
❒burnt bulbs must be replaced by
others of the same type and power;
❒For safety reasons, always check
the height of the headlight beam
after changing a bulb.
Halogen lamps must be
handled holding the metal-
lic part only. Touching the
transparent part of the bulb
with your fingers may reduce the in-
tensity of the emitted light and even
compromise duration of the lamp it-
self. In the event of accidental con-
tact, rub the bulb with a cloth
dampened with alcohol and allow to
dry.
135-164 MUSA 3ed GB 12-11-2007 11:39 Pagina 147
Page 164 of 218

163
WARNING
LIGHTS AND
MESSAGES
MAINTENANCE
AND CARE
TECHNICALSPECIFICATIONS
INDEX
DASHBOARD
AND CONTROLS
SAFETY
DEVICES
STARTING
AND
DRIVING
IN AN
EMERGENCY
TOWING THE CAR
There are two two hooks provided:
the shorter one is used for the front
and the longer one for the rear.
The tow hooks are kept in the tool
box.
Fig. 41 andfig. 42 alongside, show
the positioning of the rear ring (long)
with respect to the inside of the small
spare wheel and in the Fix & Go au-
tomatic quick tyre repair kit.
If the Dual FuNction System gearbox
is installed in the car, ensure that the
gearbox is in neutral N(by checking
that the car moves when pushed) and
proceed as per the towing of a normal
car with mechanical gearbox.
If it is not possible to put the gearbox
in neutral, do not tow the vehicle and
contact a Lancia Dealership.
fig. 41L0D0342m
fig. 42L0D0369m
DISASSEMBLY OF TOW HOOK
CAPS
In order to avoid damage to the cap
A-fig. 43, perform th
efollowing steps
to disassemble:
❒take the screwdriver provided
from the tool box;
❒insert the screwdriver in the slot B
on the cap;
❒place your thumb on the cap to
safeguard against damage (see fig-
ure);
❒extract the cap (without turning
it) by pulling at an angle that is
perpendicular to the supporting
surfacefig. 44.
fig. 43L0D0250m
135-164 MUSA 3ed GB 12-11-2007 11:39 Pagina 163
Page 170 of 218
169
WARNING
LIGHTS AND
MESSAGES
TECHNICALSPECIFICATIONS
INDEX
DASHBOARD
AND CONTROLS
SAFETY
DEVICES
STARTING
AND
DRIVING
IN AN
EMERGENCY
MAINTENANCE
AND CARE
ANNUAL
INSPECTION
SCHEDULE
For cars with an annual mileage of
below 20,000 km (for example about
15.000 km) the following yearly in-
spection programme is advised:
❒check tyre conditions/wear and
adjust pressure if required (in-
cluding the spare wheel);
❒check light system operation
(headlights, direction indicators,
hazard lights, boot lights, passen-
ger compartment lights, warning
lights, etc.);
❒wiper and windscreen washer sys-
tem check (adjustment of spray
nozzles/wear on wiper blades)
❒check front disk brake pad condi-
tions and wear;
❒visually inspect the conditions of:
engine, gearbox, transmission,
pipes and hoses (exhaust - fuel
feed - brakes), rubber parts
(boots, sleeves, bushes, etc.);❒check cleanness of bonnet and
boot locks and lever cleanness and
lubrication;
❒check battery charge;
❒visual check on various drive belt
conditions;
❒check and top up, if required, fluid
levels (engine coolant, brake fluid,
windscreen washer fluid, battery
fluid, etc);
❒replace engine oil;
❒replace engine oil filter;
❒replace pollen filter (where pro-
vided).
ADDITIONAL
CHECKS
Every 1,000 km or before long jour-
neys, check and top up if required:
❒engine coolant fluid level;
❒brake fluid level;
❒windscreen washer fluid level;
❒tyre pressure and conditions.
Every 3,000 km check the following
and top-up, if required: engine oil
level.
You are recommended to use FL Se-
lenia products, designed and pro-
duced specifically for Lancia cars (see
table “Capacities” in section “Techni-
cal specifications”).
IMPORTANT - Engine oil
Should prevailing use of the car be
under one of the following specially
heavy conditions:
❒trailer or caravan towing;
❒dusty roads;
❒short distances (less than 7-8 km)
repeated and with external tem-
peratures below zero;
165-186 MUSA 3ed GB 12-11-2007 11:39 Pagina 169
Page 180 of 218
179
WARNING
LIGHTS AND
MESSAGES
TECHNICALSPECIFICATIONS
INDEX
DASHBOARD
AND CONTROLS
SAFETY
DEVICES
STARTING
AND
DRIVING
IN AN
EMERGENCY
MAINTENANCE
AND CARE
IMPORTANT If the charge level re-
mains for a long time under 50%, the
battery is damaged by sulphation, re-
ducing its capacity and starting atti-
tude.
The battery will also be more at risk
of freezing (e.g. already at –10°C).
Refer to the paragraph “Car inactiv-
ity” in “Starting and driving” if the
car is left parked for a long time.
If after buying the car, you want to in-
stall electric accessories which require
permanent electric supply (alarm,
etc.) contact the Lancia Dealership
whose qualified personnel, in addition
to suggesting the most suitable devices
beloning to the Lancia Lineaccessori
line, will evaluate the overall electric
absorption, checking whether the car’s
electric system is capable of with-
standing the load required, or whether
it should be integrated with a more
powerful battery.
Since these devices continue absorb-
ing energy even when the ignition key
is off, they gradually run down the
battery.WHEELS
AND TYRES
Check the pressure of each type, in-
cluding the spare, approximately once
every two weeks and before starting a
long journey: this check must be per-
formed with the tyre rested and cold.
It is normal for the pressure to in-
crease when the car is used; for the
correct tyre inflation pressure, see
“Wheels” in “Technical specifica-
tions” section.
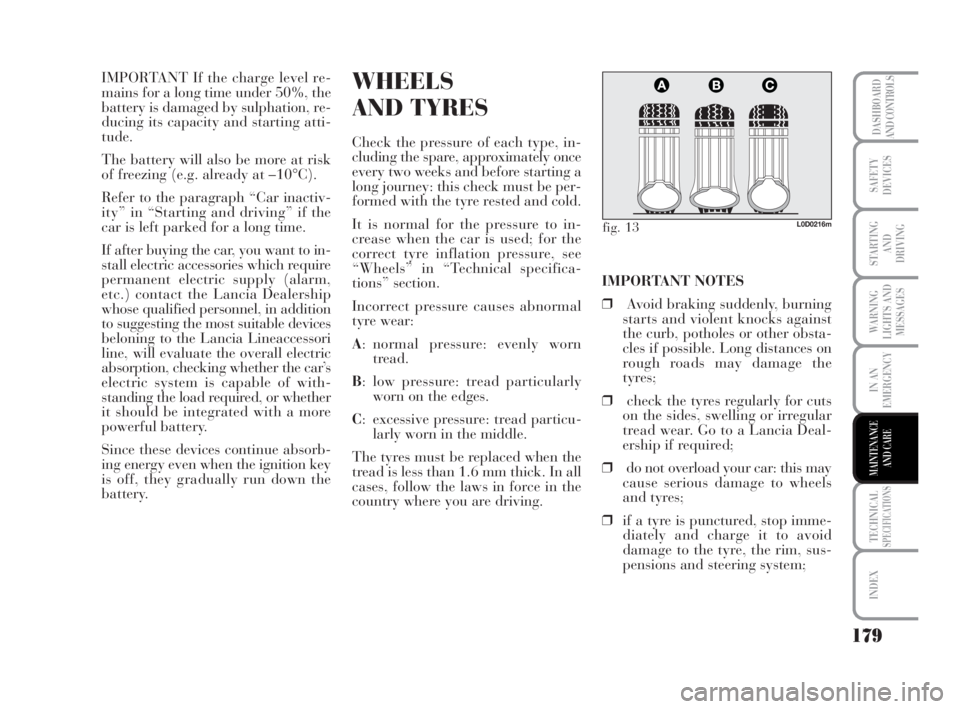
Incorrect pressure causes abnormal
tyre wear:
A: normal pressure: evenly worn
tread.
B: low pressure: tread particularly
worn on the edges.
C: excessive pressure: tread particu-
larly worn in the middle.
The tyres must be replaced when the
tread is less than 1.6 mm thick. In all
cases, follow the laws in force in the
country where you are driving.IMPORTANT NOTES
❒Avoid braking suddenly, burning
starts and violent knocks against
the curb, potholes or other obsta-
cles if possible. Long distances on
rough roads may damage the
tyres;
❒check the tyres regularly for cuts
on the sides, swelling or irregular
tread wear. Go to a Lancia Deal-
ership if required;
❒do not overload your car: this may
cause serious damage to wheels
and tyres;
❒if a tyre is punctured, stop imme-
diately and charge it to avoid
damage to the tyre, the rim, sus-
pensions and steering system;
fig. 13L0D0216m
165-186 MUSA 3ed GB 12-11-2007 11:39 Pagina 179