brake light Lancia Musa 2009 Owner handbook (in English)
[x] Cancel search | Manufacturer: LANCIA, Model Year: 2009, Model line: Musa, Model: Lancia Musa 2009Pages: 218, PDF Size: 3.7 MB
Page 142 of 218
141
WARNING
LIGHTS AND
MESSAGES
MAINTENANCE
AND CARE
TECHNICALSPECIFICATIONS
INDEX
DASHBOARD
AND CONTROLS
SAFETY
DEVICES
STARTING
AND
DRIVING
IN AN
EMERGENCY
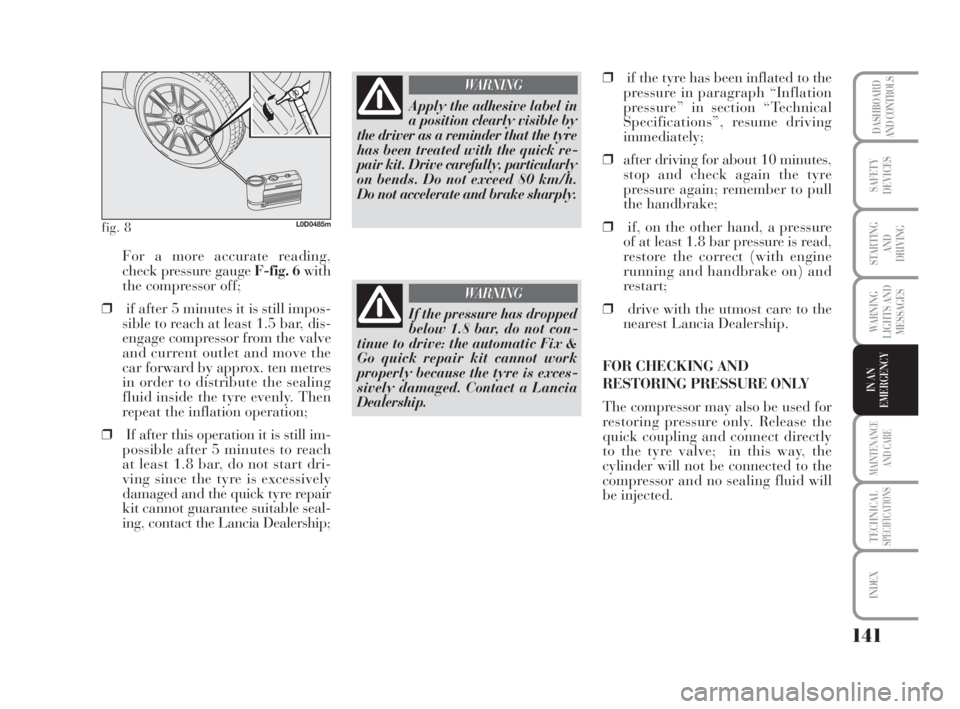
For a more accurate reading,
check pressure gauge F-fig. 6with
the compressor off;
❒if after 5 minutes it is still impos-
sible to reach at least 1.5 bar, dis-
engage compressor from the valve
and current outlet and move the
car forward by approx. ten metres
in order to distribute the sealing
fluid inside the tyre evenly. Then
repeat the inflation operation;
❒If after this operation it is still im-
possible after 5 minutes to reach
at least 1.8 bar, do not start dri-
ving since the tyre is excessively
damaged and the quick tyre repair
kit cannot guarantee suitable seal-
ing, contact the Lancia Dealership;
fig. 8L0D0485m
Apply the adhesive label in
a position clearly visible by
the driver as a reminder that the tyre
has been treated with the quick re-
pair kit. Drive carefully, particularly
on bends. Do not exceed 80 km/h.
Do not accelerate and brake sharply.
WARNING
If the pressure has dropped
below 1.8 bar, do not con-
tinue to drive: the automatic Fix &
Go quick repair kit cannot work
properly because the tyre is exces-
sively damaged. Contact a Lancia
Dealership.
WARNING
❒if the tyre has been inflated to the
pressure in paragraph “Inflation
pressure” in section “Technical
Specifications”, resume driving
immediately;
❒after driving for about 10 minutes,
stop and check again the tyre
pressure again; remember to pull
the handbrake;
❒if, on the other hand, a pressure
of at least 1.8 bar pressure is read,
restore the correct (with engine
running and handbrake on) and
restart;
❒drive with the utmost care to the
nearest Lancia Dealership.
FOR CHECKING AND
RESTORING PRESSURE ONLY
The compressor may also be used for
restoring pressure only. Release the
quick coupling and connect directly
to the tyre valve; in this way, the
cylinder will not be connected to the
compressor and no sealing fluid will
be injected.
135-164 MUSA 1ed GB 10-07-2008 9:38 Pagina 141
Page 145 of 218
144
WARNING
LIGHTS AND
MESSAGES
MAINTENANCE
AND CARE
TECHNICALSPECIFICATIONS
INDEX
DASHBOARD
AND CONTROLS
SAFETY
DEVICES
STARTING
AND
DRIVING
IN AN
EMERGENCY
If the hub cap is not in-
stalled properly, it can de-
tach itself when the vehicle is run-
ning. Never tamper with the infla-
tion valve. Never introduce tools of
any kind between rim and tyre.
Check tyre and small spare wheel
pressure regularly referring to the
values shown in the “Technical
Specifications” chapter.
WARNINGImportant notes:
❒the jack cannot be repaired: re-
place with an original spare part if
damaged;
❒no tool other than its cranking de-
vice may be fitted on the jack.
To change a wheel proceed as follows:
❒stop the car in a position so that
it is not a danger for on-coming
traffic and where you can replace
the wheel safely. The ground must
be flat and compact;
❒turn the engine off and pull the
handbrake;
❒engage first gear or reverse;
❒raise the mat on the floor of the
baggage compartment;
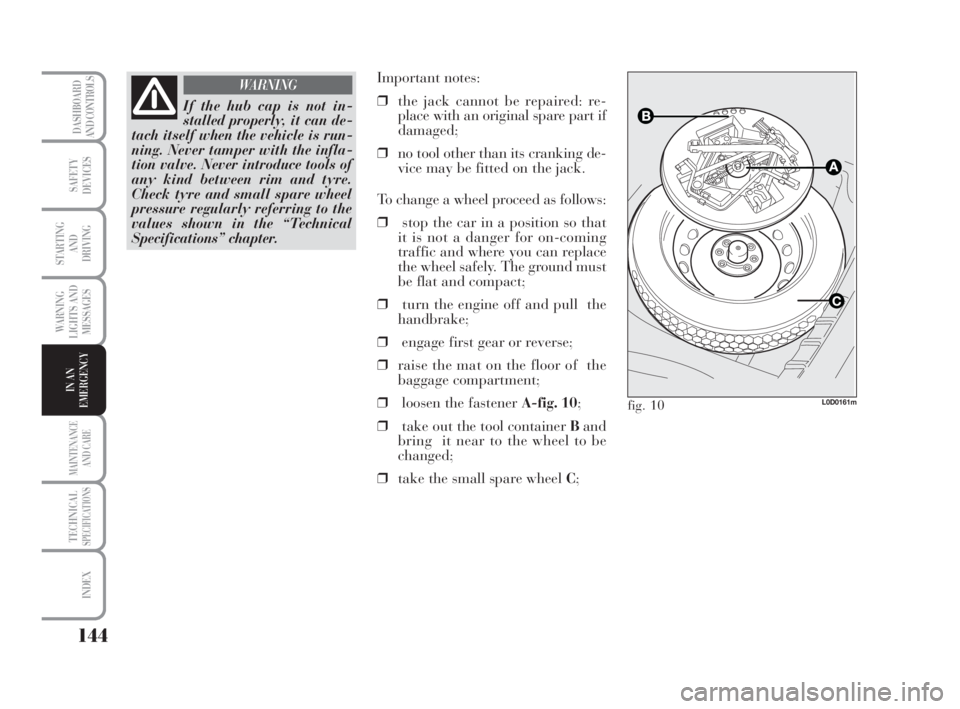
❒loosen the fastener A-fig. 10;
❒take out the tool container Band
bring it near to the wheel to be
changed;
❒take the small spare wheel C;
L0D0161mfig. 10
135-164 MUSA 1ed GB 10-07-2008 9:38 Pagina 144
Page 149 of 218
148
WARNING
LIGHTS AND
MESSAGES
MAINTENANCE
AND CARE
TECHNICALSPECIFICATIONS
INDEX
DASHBOARD
AND CONTROLS
SAFETY
DEVICES
STARTING
AND
DRIVING
IN AN
EMERGENCY
Changes or repairs to the
electrical system (electric
control units) carried out incorrectly
and without due consideration for
the technical specifications of the
system can lead to malfunctioning
and generate a fire hazard.
WARNING
Halogen lamps contain gas
under pressure. Their
breaking can cause scattering of
glass fragments.
WARNING
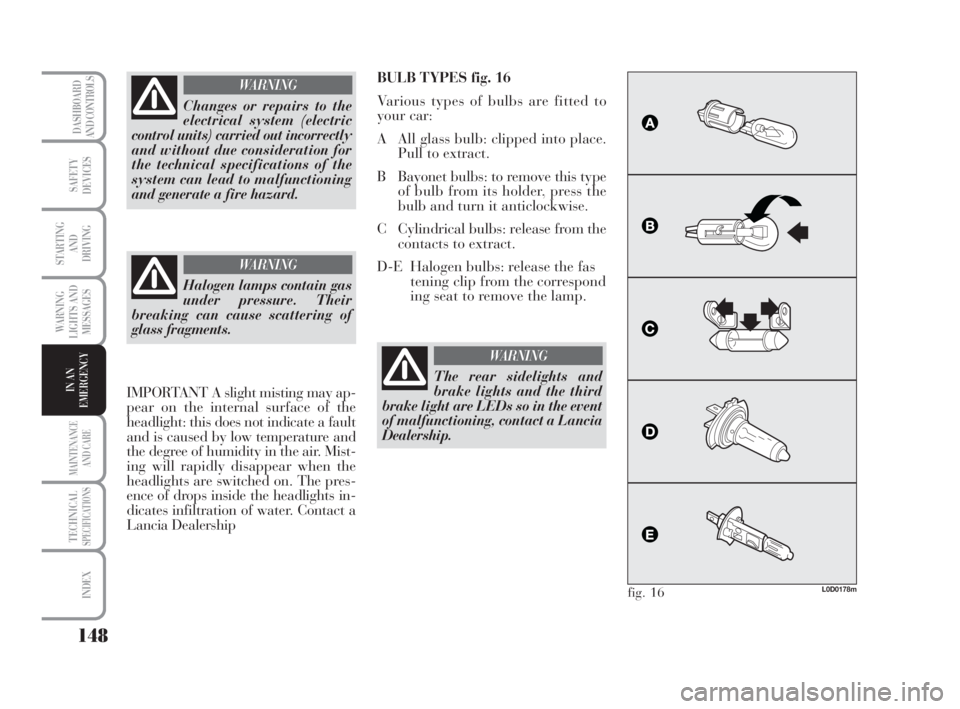
BULB TYPES fig. 16
Various types of bulbs are fitted to
your car:
A All glass bulb: clipped into place.
Pull to extract.
B Bayonet bulbs: to remove this type
of bulb from its holder, press the
bulb and turn it anticlockwise.
C Cylindrical bulbs: release from the
contacts to extract.
D-E Halogen bulbs: release the fas
tening clip from the correspond
ing seat to remove the lamp.
L0D0178mfig. 16
The rear sidelights and
brake lights and the third
brake light are LEDs so in the event
of malfunctioning, contact a Lancia
Dealership.
WARNING
IMPORTANT A slight misting may ap-
pear on the internal surface of the
headlight: this does not indicate a fault
and is caused by low temperature and
the degree of humidity in the air. Mist-
ing will rapidly disappear when the
headlights are switched on. The pres-
ence of drops inside the headlights in-
dicates infiltration of water. Contact a
Lancia Dealership
135-164 MUSA 1ed GB 10-07-2008 9:38 Pagina 148
Page 154 of 218
153
WARNING
LIGHTS AND
MESSAGES
MAINTENANCE
AND CARE
TECHNICALSPECIFICATIONS
INDEX
DASHBOARD
AND CONTROLS
SAFETY
DEVICES
STARTING
AND
DRIVING
IN AN
EMERGENCY
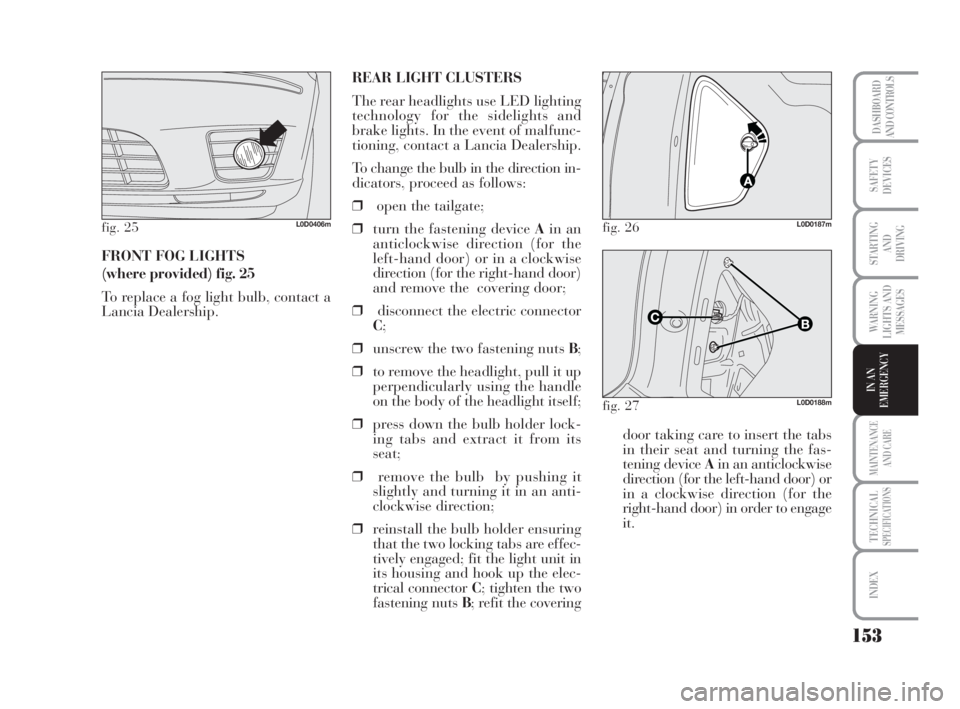
FRONT FOG LIGHTS
(where provided) fig. 25
To replace a fog light bulb, contact a
Lancia Dealership.
fig. 25L0D0406m
REAR LIGHT CLUSTERS
The rear headlights use LED lighting
technology for the sidelights and
brake lights. In the event of malfunc-
tioning, contact a Lancia Dealership.
To change the bulb in the direction in-
dicators, proceed as follows:
❒open the tailgate;
❒turn the fastening device Ain an
anticlockwise direction (for the
left-hand door) or in a clockwise
direction (for the right-hand door)
and remove the covering door;
❒disconnect the electric connector
C;
❒unscrew the two fastening nuts B;
❒to remove the headlight, pull it up
perpendicularly using the handle
on the body of the headlight itself;
❒press down the bulb holder lock-
ing tabs and extract it from its
seat;
❒remove the bulb by pushing it
slightly and turning it in an anti-
clockwise direction;
❒reinstall the bulb holder ensuring
that the two locking tabs are effec-
tively engaged; fit the light unit in
its housing and hook up the elec-
trical connector C; tighten the two
fastening nuts B; refit the coveringdoor taking care to insert the tabs
in their seat and turning the fas-
tening device Ain an anticlockwise
direction (for the left-hand door) or
in a clockwise direction (for the
right-hand door) in order to engage
it.
fig. 26L0D0187m
fig. 27L0D0188m
135-164 MUSA 1ed GB 10-07-2008 9:38 Pagina 153
Page 155 of 218
154
WARNING
LIGHTS AND
MESSAGES
MAINTENANCE
AND CARE
TECHNICALSPECIFICATIONS
INDEX
DASHBOARD
AND CONTROLS
SAFETY
DEVICES
STARTING
AND
DRIVING
IN AN
EMERGENCY
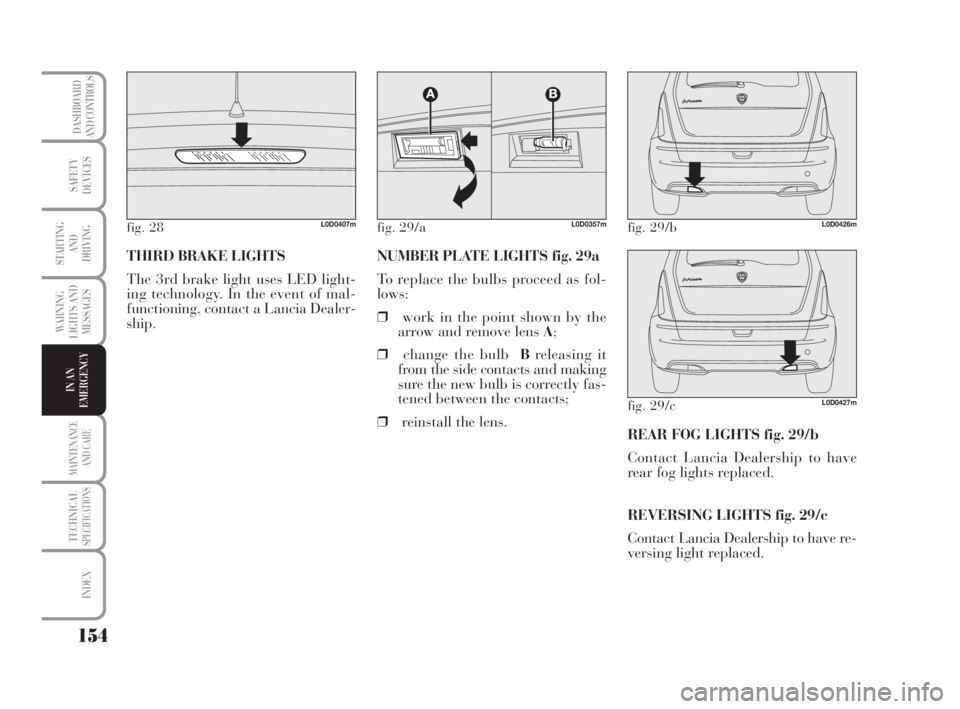
THIRD BRAKE LIGHTS
The 3rd brake light uses LED light-
ing technology. In the event of mal-
functioning, contact a Lancia Dealer-
ship.
fig. 28L0D0407m
NUMBER PLATE LIGHTS fig. 29a
To replace the bulbs proceed as fol-
lows:
❒work in the point shown by the
arrow and remove lens A;
❒change the bulbBreleasing it
from the side contacts and making
sure the new bulb is correctly fas-
tened between the contacts;
❒reinstall the lens.
fig. 29/aL0D0357mfig. 29/bL0D0426m
fig. 29/cL0D0427m
REAR FOG LIGHTS fig. 29/b
Contact Lancia Dealership to have
rear fog lights replaced.
REVERSING LIGHTS fig. 29/c
Contact Lancia Dealership to have re-
versing light replaced.
135-164 MUSA 1ed GB 10-07-2008 9:38 Pagina 154
Page 160 of 218
159
WARNING
LIGHTS AND
MESSAGES
MAINTENANCE
AND CARE
TECHNICALSPECIFICATIONS
INDEX
DASHBOARD
AND CONTROLS
SAFETY
DEVICES
STARTING
AND
DRIVING
IN AN
EMERGENCY
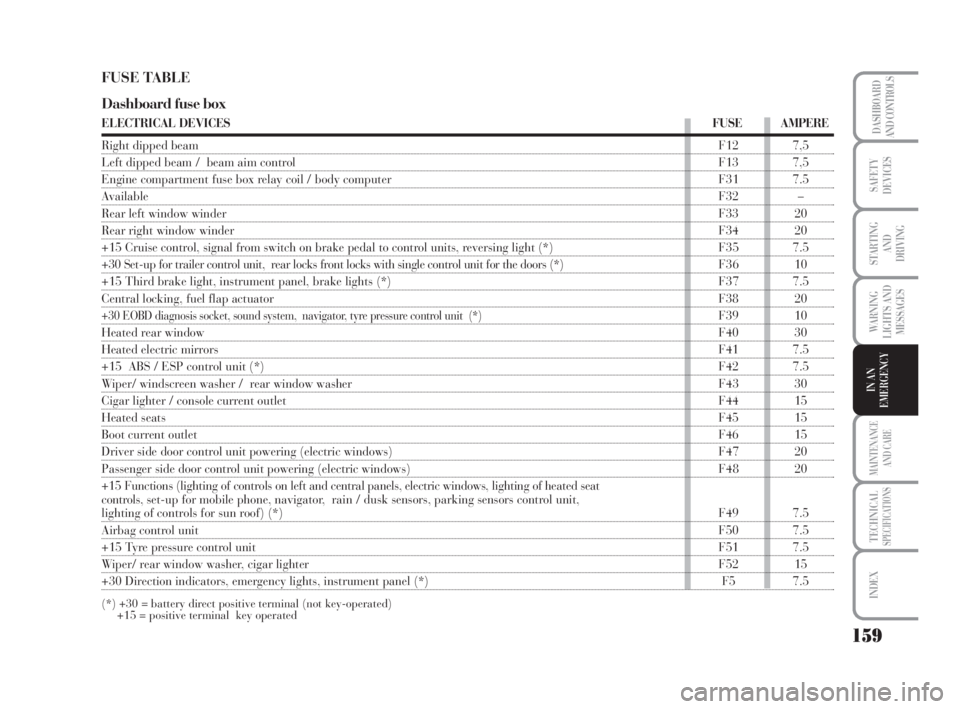
FUSE TABLE
Dashboard fuse box
ELECTRICAL DEVICESFUSE AMPERE
Right dipped beam F12 7,5
Left dipped beam / beam aim controlF13 7,5
Engine compartment fuse box relay coil / body computer F31 7.5
AvailableF32 –
Rear left window winderF33 20
Rear right window winderF34 20
+15 Cruise control, signal from switch on brake pedal to control units, reversing light (*) F35 7.5
+30 Set-up for trailer control unit, rear locks front locks with single control unit for the doors (*) F36 10
+15 Third brake light, instrument panel, brake lights (*) F37 7.5
Central locking, fuel flap actuatorF38 20
+30 EOBD diagnosis socket, sound system, navigator, tyre pressure control unit (*)F39 10
Heated rear window F40 30
Heated electric mirrors F41 7.5
+15 ABS / ESP control unit (*)F42 7.5
Wiper/ windscreen washer / rear window washer F43 30
Cigar lighter / console current outletF44 15
Heated seats F45 15
Boot current outletF46 15
Driver side door control unit powering (electric windows) F47 20
Passenger side door control unit powering (electric windows) F48 20
+15 Functions (lighting of controls on left and central panels, electric windows, lighting of heated seat
controls,set-up for mobile phone, navigator, rain / dusk sensors, parking sensors control unit,
lighting of controls for sun roof) (*)F49 7.5
Airbag control unit F50 7.5
+15 Tyre pressure control unitF51 7.5
Wiper/ rear window washer, cigar lighter F52 15
+30 Direction indicators, emergency lights, instrument panel (*) F5 7.5
(*) +30 = battery direct positive terminal (not key-operated)
+15 = positive terminal key operated
135-164 MUSA 1ed GB 10-07-2008 9:38 Pagina 159
Page 165 of 218
164
WARNING
LIGHTS AND
MESSAGES
MAINTENANCE
AND CARE
TECHNICALSPECIFICATIONS
INDEX
DASHBOARD
AND CONTROLS
SAFETY
DEVICES
STARTING
AND
DRIVING
IN AN
EMERGENCY
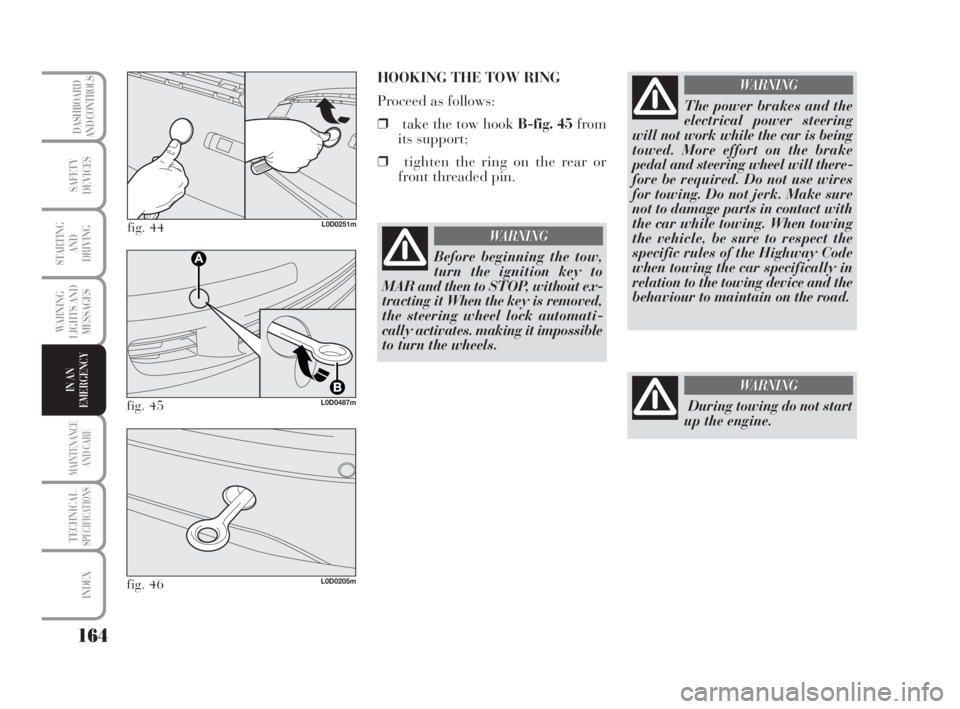
fig. 44L0D0251m
HOOKING THE TOW RING
Proceed as follows:
❒take the tow hook B-fig. 45from
its support;
❒tighten the ring on the rear or
front threaded pin.
fig. 45L0D0487m
fig. 46L0D0205m
The power brakes and the
electrical power steering
will not work while the car is being
towed. More effort on the brake
pedal and steering wheel will there-
fore be required. Do not use wires
for towing. Do not jerk. Make sure
not to damage parts in contact with
the car while towing. When towing
the vehicle, be sure to respect the
specific rules of the Highway Code
when towing the car specifically in
relation to the towing device and the
behaviour to maintain on the road.
WARNING
Before beginning the tow,
turn the ignition key to
MAR and then to STOP, without ex-
tracting it When the key is removed,
the steering wheel lock automati-
cally activates. making it impossible
to turn the wheels.
WARNING
During towing do not start
up the engine.
WARNING
135-164 MUSA 1ed GB 10-07-2008 9:38 Pagina 164
Page 168 of 218
167
WARNING
LIGHTS AND
MESSAGES
TECHNICALSPECIFICATIONS
INDEX
DASHBOARD
AND CONTROLS
SAFETY
DEVICES
STARTING
AND
DRIVING
IN AN
EMERGENCY
MAINTENANCE
AND CARE
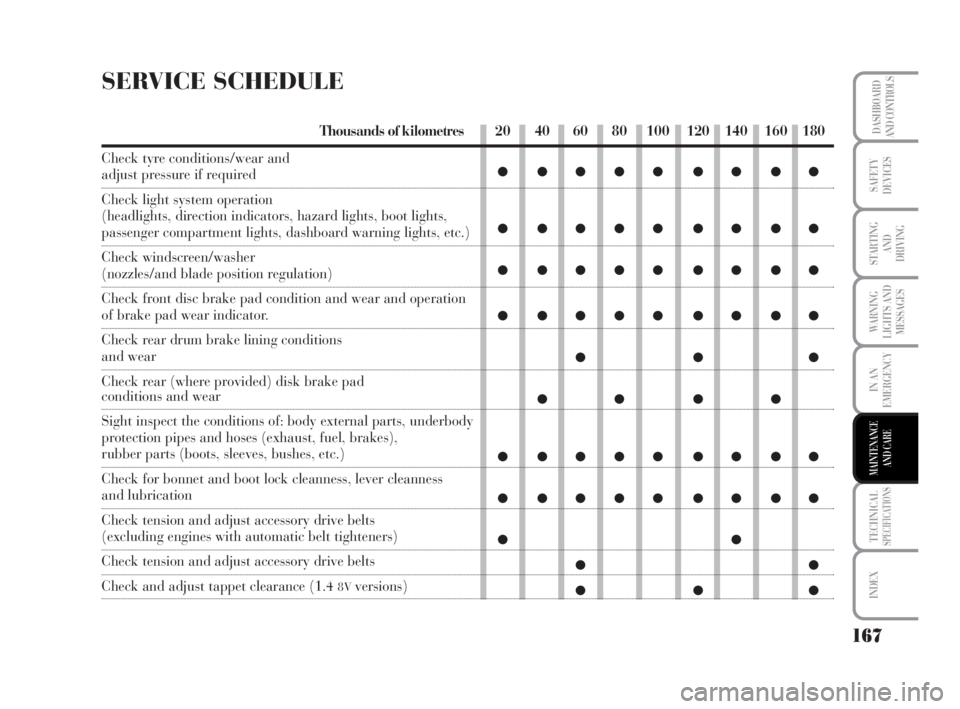
SERVICE SCHEDULE
Thousands of kilometres
Check tyre conditions/wear and
adjust pressure if required
Check light system operation
(headlights, direction indicators, hazard lights, boot lights,
passenger compartment lights, dashboard warning lights, etc.)
Check windscreen/washer
(nozzles/and blade position regulation)
Check front disc brake pad condition and wear and operation
of brake pad wear indicator.
Check rear drum brake lining conditions
and wear
Check rear (where provided) disk brake pad
conditions and wear
Sight inspect the conditions of: body external parts, underbody
protection pipes and hoses (exhaust, fuel, brakes),
rubber parts (boots, sleeves, bushes, etc.)
Check for bonnet and boot lock cleanness, lever cleanness
and lubrication
Check tension and adjust accessory drive belts
(excluding engines with automatic belt tighteners)
Check tension and adjust accessory drive belts
Check and adjust tappet clearance (1.4 8Vversions)
20 40 60 80 100 120 140 160 180
●●●●● ●●●●
●●●●● ●●●●
●●●●● ●●●●
●●●●● ●●●●
●●●
●● ● ●
●●●●● ●●●●
●●●●● ●●●●
●●
●●
●●●
165-186 MUSA 1ed GB 10-07-2008 9:39 Pagina 167
Page 169 of 218
168
WARNING
LIGHTS AND
MESSAGES
TECHNICALSPECIFICATIONS
INDEX
DASHBOARD
AND CONTROLS
SAFETY
DEVICES
STARTING
AND
DRIVING
IN AN
EMERGENCY
MAINTENANCE
AND CARE
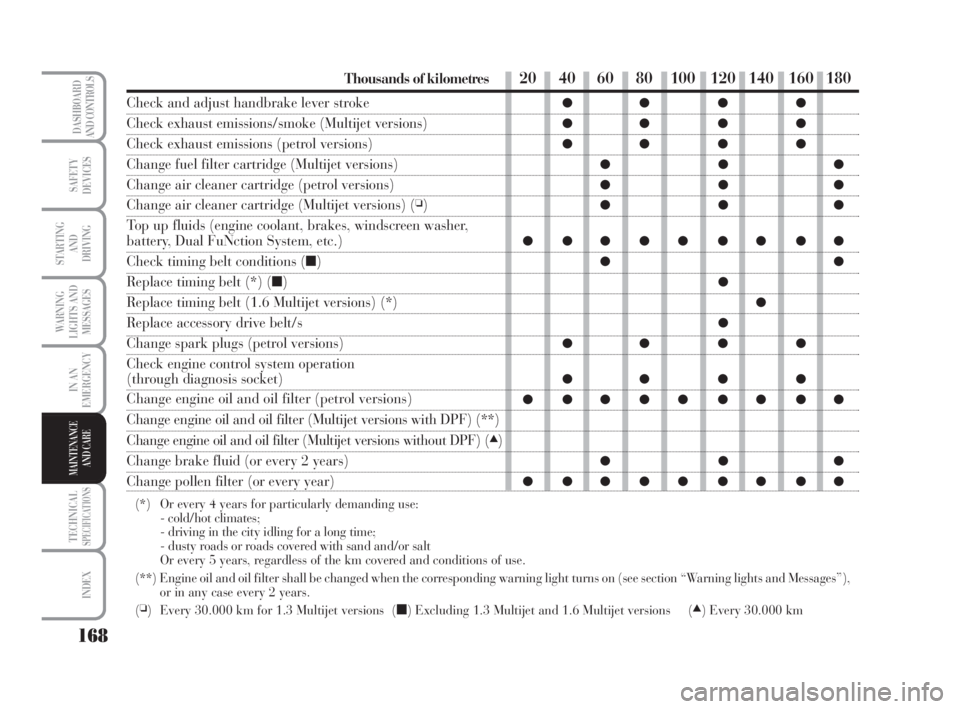
Thousands of kilometres
Check and adjust handbrake lever stroke
Check exhaust emissions/smoke (Multijet versions)
Check exhaust emissions (petrol versions)
Change fuel filter cartridge (Multijet versions)
Change air cleaner cartridge (petrol versions)
Change air cleaner cartridge (Multijet versions) (❏)
Top up fluids (engine coolant, brakes, windscreen washer,
battery, Dual FuNction System, etc.)
Check timing belt conditions (■)
Replace timing belt (*) (■)
Replace timing belt (1.6 Multijet versions) (*)
Replace accessory drive belt/s
Change spark plugs (petrol versions)
Check engine control system operation
(through diagnosis socket)
Change engine oil and oil filter (petrol versions)
Change engine oil and oil filter (Multijet versions with DPF) (**)
Change engine oil and oil filter (Multijet versions without DPF) (▲)
Change brake fluid (or every 2 years)
Change pollen filter (or every year)
(*) Or every 4 years for particularly demanding use:
- cold/hot climates;
- driving in the city idling for a long time;
- dusty roads or roads covered with sand and/or salt
Or every 5 years, regardless of the km covered and conditions of use.
(**) Engine oil and oil filter shall be changed when the corresponding warning light turns on (see section “Warning lights and Messages”),
or in any case every 2 years.
(
❏) Every 30.000 km for 1.3 Multijet versions (■) Excluding 1.3 Multijet and 1.6 Multijet versions (▲) Every 30.000 km
20 40 60 80 100 120 140 160 180
●● ● ●
●● ● ●
●● ● ●
●●●
●●●
●●●
●●●●● ●●●●
●●
●
●
●
●● ● ●
●● ● ●
●●●●● ●●●●
●●●
●●●●● ●●●●
165-186 MUSA 1ed GB 10-07-2008 9:39 Pagina 168
Page 170 of 218
169
WARNING
LIGHTS AND
MESSAGES
TECHNICALSPECIFICATIONS
INDEX
DASHBOARD
AND CONTROLS
SAFETY
DEVICES
STARTING
AND
DRIVING
IN AN
EMERGENCY
MAINTENANCE
AND CARE
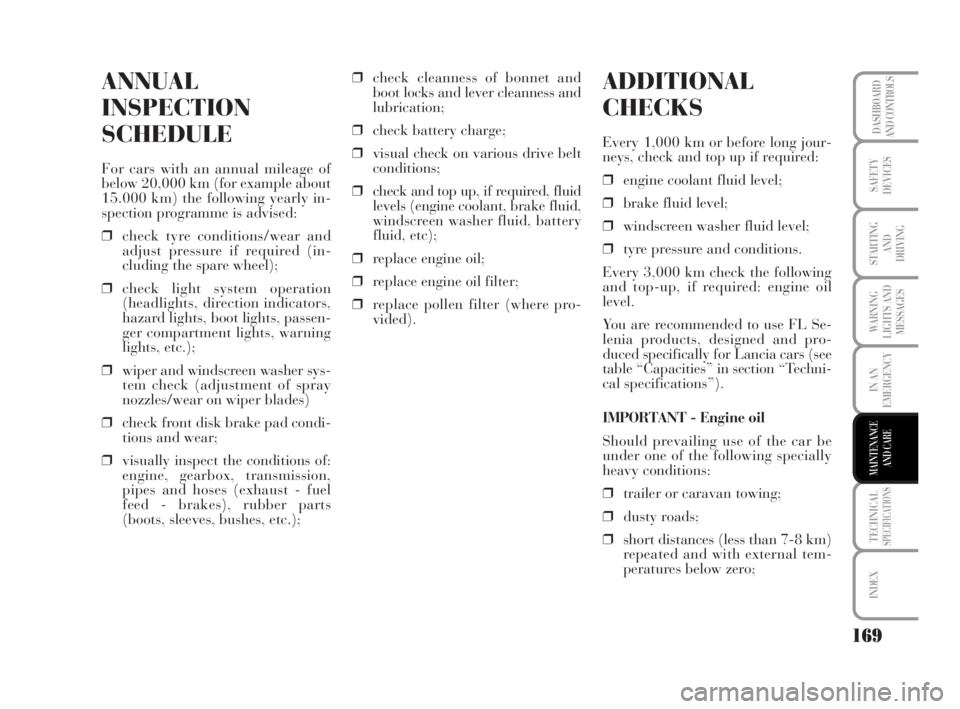
ANNUAL
INSPECTION
SCHEDULE
For cars with an annual mileage of
below 20,000 km (for example about
15.000 km) the following yearly in-
spection programme is advised:
❒check tyre conditions/wear and
adjust pressure if required (in-
cluding the spare wheel);
❒check light system operation
(headlights, direction indicators,
hazard lights, boot lights, passen-
ger compartment lights, warning
lights, etc.);
❒wiper and windscreen washer sys-
tem check (adjustment of spray
nozzles/wear on wiper blades)
❒check front disk brake pad condi-
tions and wear;
❒visually inspect the conditions of:
engine, gearbox, transmission,
pipes and hoses (exhaust - fuel
feed - brakes), rubber parts
(boots, sleeves, bushes, etc.);❒check cleanness of bonnet and
boot locks and lever cleanness and
lubrication;
❒check battery charge;
❒visual check on various drive belt
conditions;
❒check and top up, if required, fluid
levels (engine coolant, brake fluid,
windscreen washer fluid, battery
fluid, etc);
❒replace engine oil;
❒replace engine oil filter;
❒replace pollen filter (where pro-
vided).
ADDITIONAL
CHECKS
Every 1,000 km or before long jour-
neys, check and top up if required:
❒engine coolant fluid level;
❒brake fluid level;
❒windscreen washer fluid level;
❒tyre pressure and conditions.
Every 3,000 km check the following
and top-up, if required: engine oil
level.
You are recommended to use FL Se-
lenia products, designed and pro-
duced specifically for Lancia cars (see
table “Capacities” in section “Techni-
cal specifications”).
IMPORTANT - Engine oil
Should prevailing use of the car be
under one of the following specially
heavy conditions:
❒trailer or caravan towing;
❒dusty roads;
❒short distances (less than 7-8 km)
repeated and with external tem-
peratures below zero;
165-186 MUSA 1ed GB 10-07-2008 9:39 Pagina 169