fuse box Lancia Musa 2009 Owner handbook (in English)
[x] Cancel search | Manufacturer: LANCIA, Model Year: 2009, Model line: Musa, Model: Lancia Musa 2009Pages: 218, PDF Size: 3.7 MB
Page 148 of 218
147
WARNING
LIGHTS AND
MESSAGES
MAINTENANCE
AND CARE
TECHNICALSPECIFICATIONS
INDEX
DASHBOARD
AND CONTROLS
SAFETY
DEVICES
STARTING
AND
DRIVING
IN AN
EMERGENCY
Versions with alloy rims
❒Ensure that the surfaces in contact
with the hub are clean;
❒install the standard wheel by fit-
ting it on the centring pins. Fit the
fastening bolts and screw them
down using the wrench provided;
❒lower the car and remove the jack;
❒using the wrench provided, fully
tighten the bolts in the sequence
shown in fig. 15for the small
spare wheel;
❒refit the snap-fitted hub cap.When you have finished
❒stow the spare wheel in the space
provided in the boot;
❒ fit the jack partially open in its
box, forcing it lightly to prevent it
from vibrating when travelling;
❒put the tools back into their places
in the container;
❒stow the container, complete with
tools, into the spare wheel, screw-
ing in the locking device;
❒put the boot’s stiff preformed in-
sulating mat back in position.WHEN NEEDING
TO CHANGE
A BULB
GENERAL INSTRUCTIONS
❒When a bulb is not working, check
that the corresponding fuse is in-
tact before replacing it: refer to the
“If a fuse blows” paragraph in this
chapter for fuse location;
❒Before changing a bulb check the
contacts for oxidation;
❒burnt bulbs must be replaced by
others of the same type and power;
❒For safety reasons, always check
the height of the headlight beam
after changing a bulb.
Halogen lamps must be han-
dled holding the metallic
part only. Touching the
transparent part of the bulb
with your fingers may reduce the in-
tensity of the emitted light and even
compromise duration of the lamp it-
self. In the event of accidental contact,
rub the bulb with a cloth dampened
with alcohol and allow to dry.
135-164 MUSA 1ed GB 10-07-2008 9:38 Pagina 147
Page 151 of 218
150
WARNING
LIGHTS AND
MESSAGES
MAINTENANCE
AND CARE
TECHNICALSPECIFICATIONS
INDEX
DASHBOARD
AND CONTROLS
SAFETY
DEVICES
STARTING
AND
DRIVING
IN AN
EMERGENCY
IF AN EXTERIOR
LIGHT BURNS OUT
For the type of bulb and power rat-
ing, see “When needing to change a
bulb”.
FRONT LIGHT CLUSTERS
The front light clusters contain side-
lights, dipped beam, main beam and
direction indicator bulbs.
To replace the bulbs in the sidelights,
dipped beam and main beam lights,
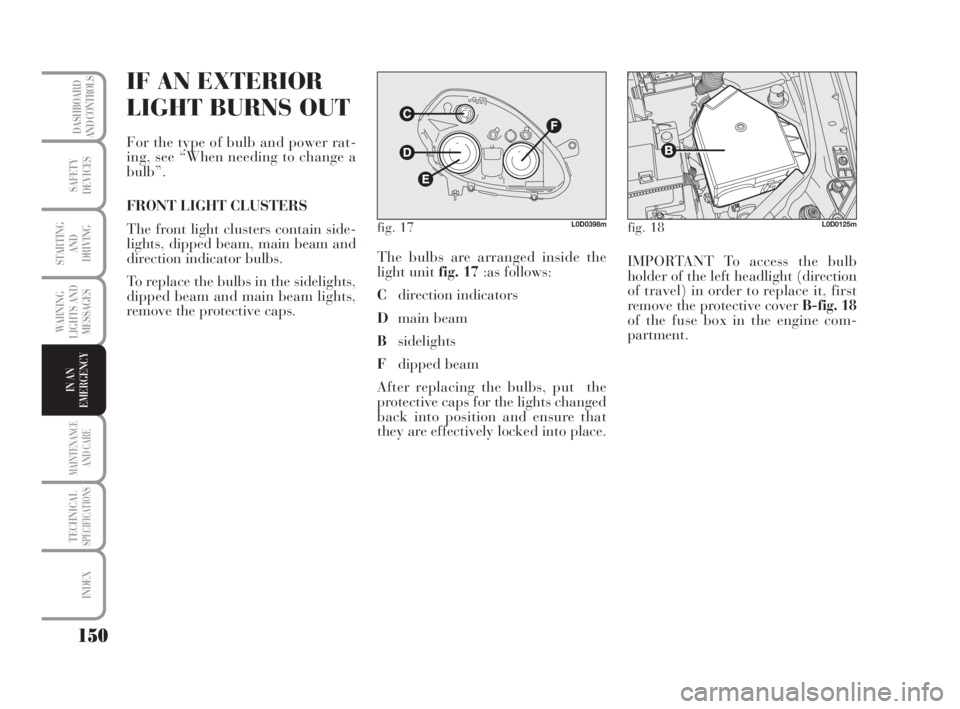
remove the protective caps.The bulbs are arranged inside the
light unit fig. 17:as follows:
Cdirection indicators
Dmain beam
Bsidelights
Fdipped beam
After replacing the bulbs, put the
protective caps for the lights changed
back into position and ensure that
they are effectively locked into place.IMPORTANT To access the bulb
holder of the left headlight (direction
of travel) in order to replace it, first
remove the protective cover B-fig. 18
of the fuse box in the engine com-
partment.
fig. 17L0D0398mfig. 18L0D0125m
135-164 MUSA 1ed GB 10-07-2008 9:38 Pagina 150
Page 157 of 218

156
WARNING
LIGHTS AND
MESSAGES
MAINTENANCE
AND CARE
TECHNICALSPECIFICATIONS
INDEX
DASHBOARD
AND CONTROLS
SAFETY
DEVICES
STARTING
AND
DRIVING
IN AN
EMERGENCY
BOOT LIGHT fig. 34
To change the bulb, proceed as fol-
lows:
❒open the tailgate;
❒remove the light Alevering in the
point shown by the arrow.
❒open the protection Band replace
the snap-fitted bulb;
❒re-close the protective cover Bon
the lens;
❒refit the light Ainserting it in its
correct position firstly on one end
and then on the other until it
clicks into place.
fig. 34L0D0197m
IF A FUSE BLOWS
GENERALITIES fig. 35
The fuse is a protective device for the
electric system: it comes into action
(i.e. it cuts off) mainly due to a fault
or improper action on the system.
Check the efficiency of the corre-
sponding fuse when a device does not
work: the conducting element Amust
not be interrupted. If it is, replace the
blown fuse with another with the
same amperage (same colour).
B: intact fuse.
C: fuse with damaged filament.
To replace a fuse use the pliers Dat-
tached to the fuse box on the instru-
ment dashboard.
fig. 35L0D0198m
If the fuse should fail again,
contact a Lancia Dealer-
ship.
WARNING
Never change a fuse with an-
other with a higher amp rat-
ing; DANGER OF FIRE.
If a general fuse (MEGA-
FUSE,MIDI-FUSE, MAXI-
FUSE) cuts in, contact a Lancia Deal-
ership.
WARNING
Before changing a fuse,
check that the ignition key
has been removed and that all the
other electric devices have been
turned off/disabled.
WARNING
135-164 MUSA 1ed GB 10-07-2008 9:38 Pagina 156
Page 158 of 218
157
WARNING
LIGHTS AND
MESSAGES
MAINTENANCE
AND CARE
TECHNICALSPECIFICATIONS
INDEX
DASHBOARD
AND CONTROLS
SAFETY
DEVICES
STARTING
AND
DRIVING
IN AN
EMERGENCY
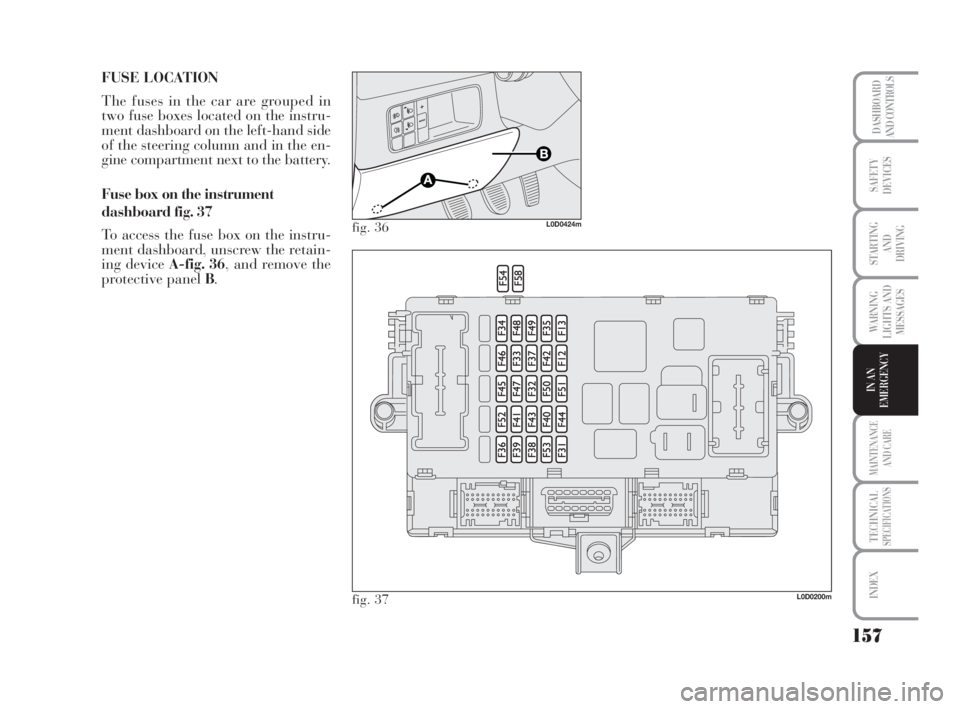
FUSE LOCATION
The fuses in the car are grouped in
two fuse boxes located on the instru-
ment dashboard on the left-hand side
of the steering column and in the en-
gine compartment next to the battery.
Fuse box on the instrument
dashboard fig. 37
To access the fuse box on the instru-
ment dashboard, unscrew the retain-
ing device A-fig. 36, and remove the
protective panel B.
L0D0200m
fig. 36L0D0424m
fig. 37
135-164 MUSA 1ed GB 10-07-2008 9:38 Pagina 157
Page 159 of 218
158
WARNING
LIGHTS AND
MESSAGES
MAINTENANCE
AND CARE
TECHNICALSPECIFICATIONS
INDEX
DASHBOARD
AND CONTROLS
SAFETY
DEVICES
STARTING
AND
DRIVING
IN AN
EMERGENCY
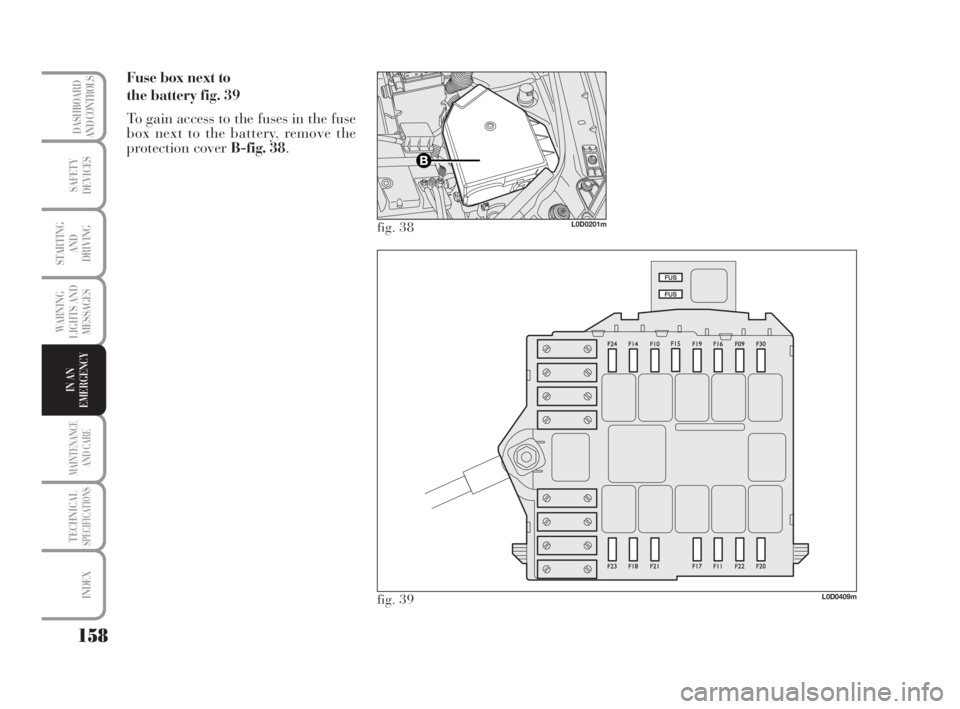
Fuse box next to
the battery fig. 39
To gain access to the fuses in the fuse
box next to the battery, remove the
protection cover B-fig. 38.
L0D0409m
fig. 38L0D0201m
fig. 39
135-164 MUSA 1ed GB 10-07-2008 9:38 Pagina 158
Page 160 of 218
159
WARNING
LIGHTS AND
MESSAGES
MAINTENANCE
AND CARE
TECHNICALSPECIFICATIONS
INDEX
DASHBOARD
AND CONTROLS
SAFETY
DEVICES
STARTING
AND
DRIVING
IN AN
EMERGENCY
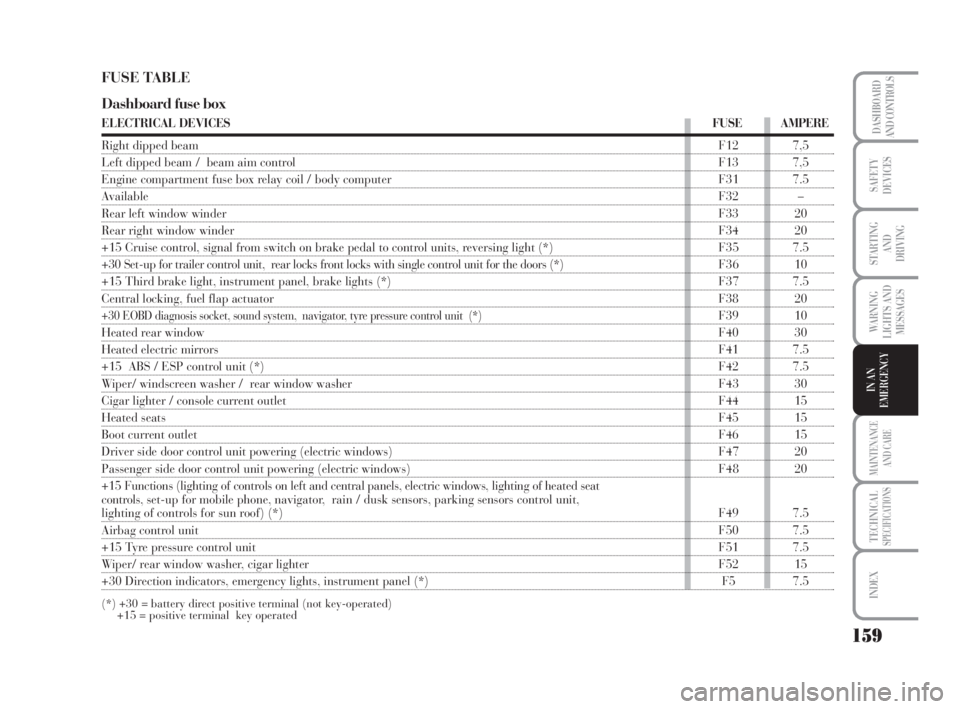
FUSE TABLE
Dashboard fuse box
ELECTRICAL DEVICESFUSE AMPERE
Right dipped beam F12 7,5
Left dipped beam / beam aim controlF13 7,5
Engine compartment fuse box relay coil / body computer F31 7.5
AvailableF32 –
Rear left window winderF33 20
Rear right window winderF34 20
+15 Cruise control, signal from switch on brake pedal to control units, reversing light (*) F35 7.5
+30 Set-up for trailer control unit, rear locks front locks with single control unit for the doors (*) F36 10
+15 Third brake light, instrument panel, brake lights (*) F37 7.5
Central locking, fuel flap actuatorF38 20
+30 EOBD diagnosis socket, sound system, navigator, tyre pressure control unit (*)F39 10
Heated rear window F40 30
Heated electric mirrors F41 7.5
+15 ABS / ESP control unit (*)F42 7.5
Wiper/ windscreen washer / rear window washer F43 30
Cigar lighter / console current outletF44 15
Heated seats F45 15
Boot current outletF46 15
Driver side door control unit powering (electric windows) F47 20
Passenger side door control unit powering (electric windows) F48 20
+15 Functions (lighting of controls on left and central panels, electric windows, lighting of heated seat
controls,set-up for mobile phone, navigator, rain / dusk sensors, parking sensors control unit,
lighting of controls for sun roof) (*)F49 7.5
Airbag control unit F50 7.5
+15 Tyre pressure control unitF51 7.5
Wiper/ rear window washer, cigar lighter F52 15
+30 Direction indicators, emergency lights, instrument panel (*) F5 7.5
(*) +30 = battery direct positive terminal (not key-operated)
+15 = positive terminal key operated
135-164 MUSA 1ed GB 10-07-2008 9:38 Pagina 159
Page 161 of 218
160
WARNING
LIGHTS AND
MESSAGES
MAINTENANCE
AND CARE
TECHNICALSPECIFICATIONS
INDEX
DASHBOARD
AND CONTROLS
SAFETY
DEVICES
STARTING
AND
DRIVING
IN AN
EMERGENCY
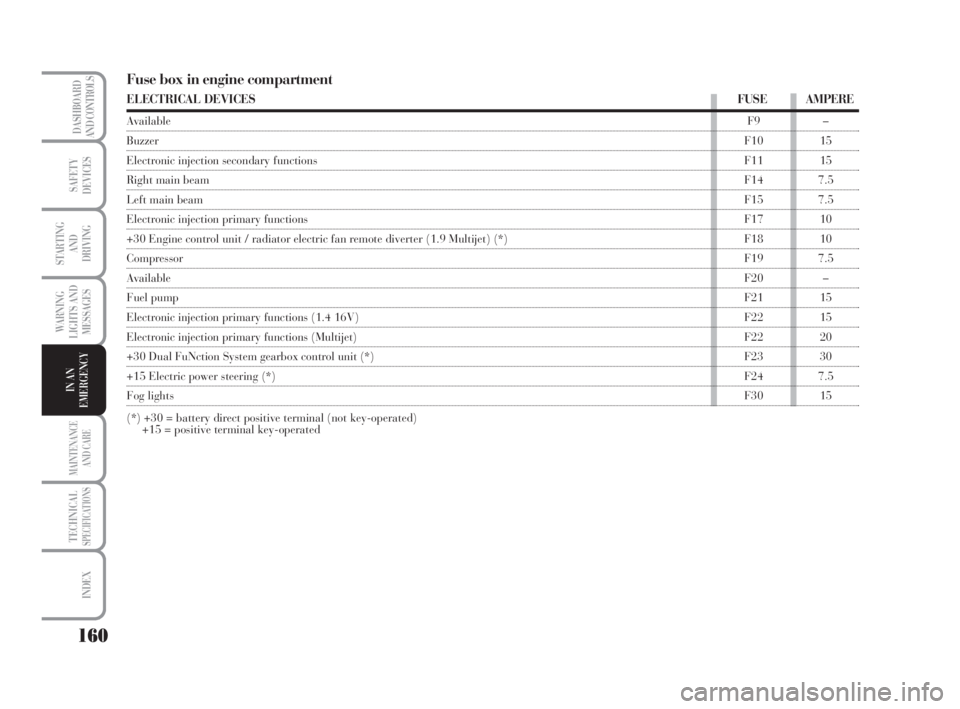
Fuse box in engine compartment
ELECTRICAL DEVICESFUSEAMPERE
AvailableF9 –
BuzzerF10 15
Electronic injection secondary functionsF11 15
Right main beam F14 7.5
Left main beam F15 7.5
Electronic injection primary functionsF17 10
+30 Engine control unit / radiator electric fan remote diverter (1.9 Multijet) (*) F18 10
CompressorF19 7.5
AvailableF20 –
Fuel pump F21 15
Electronic injection primary functions (1.4 16V)F22 15
Electronic injection primary functions (Multijet)F22 20
+30 Dual FuNction System gearbox control unit (*)F23 30
+15 Electric power steering (*)F24 7.5
Fog lightsF30 15
(*) +30 = battery direct positive terminal (not key-operated)
+15 = positive terminal key-operated
135-164 MUSA 1ed GB 10-07-2008 9:38 Pagina 160
Page 162 of 218
161
WARNING
LIGHTS AND
MESSAGES
MAINTENANCE
AND CARE
TECHNICALSPECIFICATIONS
INDEX
DASHBOARD
AND CONTROLS
SAFETY
DEVICES
STARTING
AND
DRIVING
IN AN
EMERGENCY
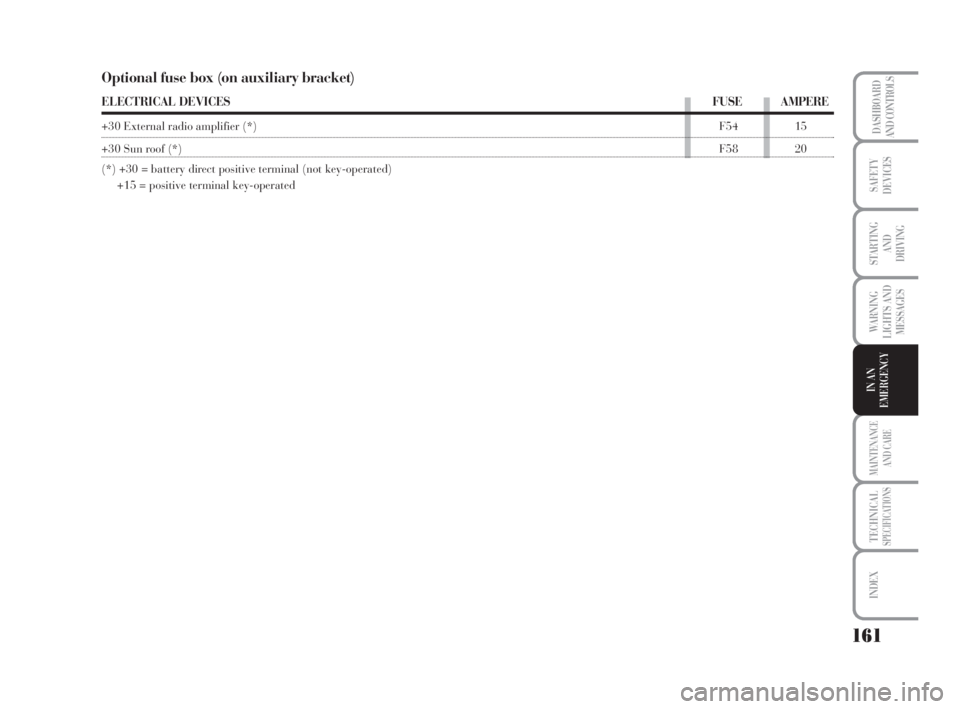
Optional fuse box (on auxiliary bracket)
ELECTRICAL DEVICESFUSE AMPERE
+30 External radio amplifier (*)F54 15
+30 Sun roof (*)F58 20
(*) +30 = battery direct positive terminal (not key-operated)
+15 = positive terminal key-operated
135-164 MUSA 1ed GB 10-07-2008 9:38 Pagina 161
Page 208 of 218
207
WARNING
LIGHTS AND
MESSAGES
DASHBOARD
AND CONTROLS
SAFETY
DEVICES
STARTING
AND
DRIVING
IN AN
EMERGENCY
MAINTENANCE
AND CARE
TECHNICALSPECIFICATIONS
INDEX
External lights ...................... 62
Fix&Go
(quick tyre repair kit) ........... 138
Fluids and lubricants ............ 202
Fog lights
– bulb replacement
procedure ..........................153-154
– control button .................. 71
FPS (inertial cut-off switch) .. 72
Front airbags ........................ 108
– driver’s front airbag .......... 108
– manual disabling front
air bag passenger side ........... 110
– passenger’s front airbag .... 109
Fuel
– consumption ..................... 204
– gauge ............................... 21
– inertial cut-off switch ....... 72
Fuel filler cap......................... 92
Fuses .................................... 156
Hazard lights
– control ............................ 71Head restraints ...................... 44
Headlights ............................ 84
Identification data.................. 188
Ignition device ...................... 20
In an emergency .................... 135
Instrument panel ................... 10
Instruments ........................... 21
Interior equipment
– card recess ....................... 74
– current outlets ................... 75
– glass recess / can recess ..... 74
– oddment compartments..... 73
– oddment shelf
on roof panel.......................... 74
– rear CD holder compartment
with can recess ....................... 75
– upper oddments drawers ... 73
Interiors ................................. 185
Isofix child seat ..................... 105
Jack ...................................... 144Key and door closing kits ....... 13
Lancia CODE (system) ......... 11
Levels
– check/control .................... 171
Lifting the car ....................... 162
Lubricants (specifications) ..... 202
Maintenance and care ........... 165
– scheduled servicing .......... 167
Manual climate control system 48
Mechanical gearbox (use)....... 117
Multifunctional display .........22-25
Multifunctional display
control buttons.......................22-25
Number plate light
– bulb replacement
procedure .............................. 154
Oddment compartments ........ 8
Parking sensors ..................... 90
Performance ......................... 199
206-216 MUSA 1ed GB 10-07-2008 11:08 Pagina 207