headlight bulb Lancia Musa 2009 Owner handbook (in English)
[x] Cancel search | Manufacturer: LANCIA, Model Year: 2009, Model line: Musa, Model: Lancia Musa 2009Pages: 218, PDF Size: 3.7 MB
Page 148 of 218
147
WARNING
LIGHTS AND
MESSAGES
MAINTENANCE
AND CARE
TECHNICALSPECIFICATIONS
INDEX
DASHBOARD
AND CONTROLS
SAFETY
DEVICES
STARTING
AND
DRIVING
IN AN
EMERGENCY
Versions with alloy rims
❒Ensure that the surfaces in contact
with the hub are clean;
❒install the standard wheel by fit-
ting it on the centring pins. Fit the
fastening bolts and screw them
down using the wrench provided;
❒lower the car and remove the jack;
❒using the wrench provided, fully
tighten the bolts in the sequence
shown in fig. 15for the small
spare wheel;
❒refit the snap-fitted hub cap.When you have finished
❒stow the spare wheel in the space
provided in the boot;
❒ fit the jack partially open in its
box, forcing it lightly to prevent it
from vibrating when travelling;
❒put the tools back into their places
in the container;
❒stow the container, complete with
tools, into the spare wheel, screw-
ing in the locking device;
❒put the boot’s stiff preformed in-
sulating mat back in position.WHEN NEEDING
TO CHANGE
A BULB
GENERAL INSTRUCTIONS
❒When a bulb is not working, check
that the corresponding fuse is in-
tact before replacing it: refer to the
“If a fuse blows” paragraph in this
chapter for fuse location;
❒Before changing a bulb check the
contacts for oxidation;
❒burnt bulbs must be replaced by
others of the same type and power;
❒For safety reasons, always check
the height of the headlight beam
after changing a bulb.
Halogen lamps must be han-
dled holding the metallic
part only. Touching the
transparent part of the bulb
with your fingers may reduce the in-
tensity of the emitted light and even
compromise duration of the lamp it-
self. In the event of accidental contact,
rub the bulb with a cloth dampened
with alcohol and allow to dry.
135-164 MUSA 1ed GB 10-07-2008 9:38 Pagina 147
Page 149 of 218
148
WARNING
LIGHTS AND
MESSAGES
MAINTENANCE
AND CARE
TECHNICALSPECIFICATIONS
INDEX
DASHBOARD
AND CONTROLS
SAFETY
DEVICES
STARTING
AND
DRIVING
IN AN
EMERGENCY
Changes or repairs to the
electrical system (electric
control units) carried out incorrectly
and without due consideration for
the technical specifications of the
system can lead to malfunctioning
and generate a fire hazard.
WARNING
Halogen lamps contain gas
under pressure. Their
breaking can cause scattering of
glass fragments.
WARNING
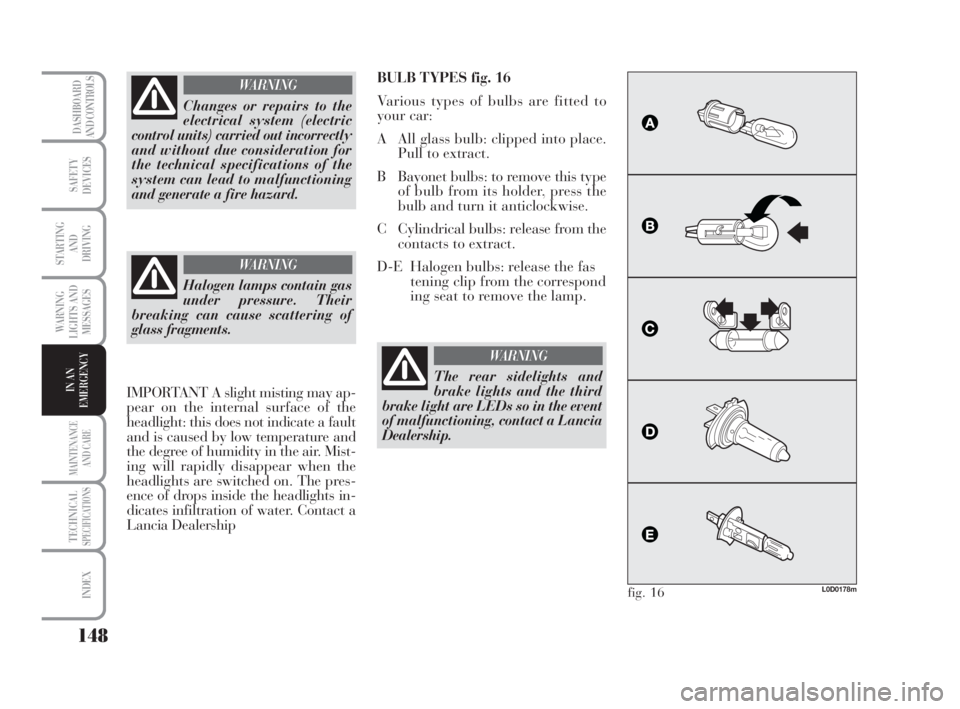
BULB TYPES fig. 16
Various types of bulbs are fitted to
your car:
A All glass bulb: clipped into place.
Pull to extract.
B Bayonet bulbs: to remove this type
of bulb from its holder, press the
bulb and turn it anticlockwise.
C Cylindrical bulbs: release from the
contacts to extract.
D-E Halogen bulbs: release the fas
tening clip from the correspond
ing seat to remove the lamp.
L0D0178mfig. 16
The rear sidelights and
brake lights and the third
brake light are LEDs so in the event
of malfunctioning, contact a Lancia
Dealership.
WARNING
IMPORTANT A slight misting may ap-
pear on the internal surface of the
headlight: this does not indicate a fault
and is caused by low temperature and
the degree of humidity in the air. Mist-
ing will rapidly disappear when the
headlights are switched on. The pres-
ence of drops inside the headlights in-
dicates infiltration of water. Contact a
Lancia Dealership
135-164 MUSA 1ed GB 10-07-2008 9:38 Pagina 148
Page 150 of 218
149
WARNING
LIGHTS AND
MESSAGES
MAINTENANCE
AND CARE
TECHNICALSPECIFICATIONS
INDEX
DASHBOARD
AND CONTROLS
SAFETY
DEVICES
STARTING
AND
DRIVING
IN AN
EMERGENCY
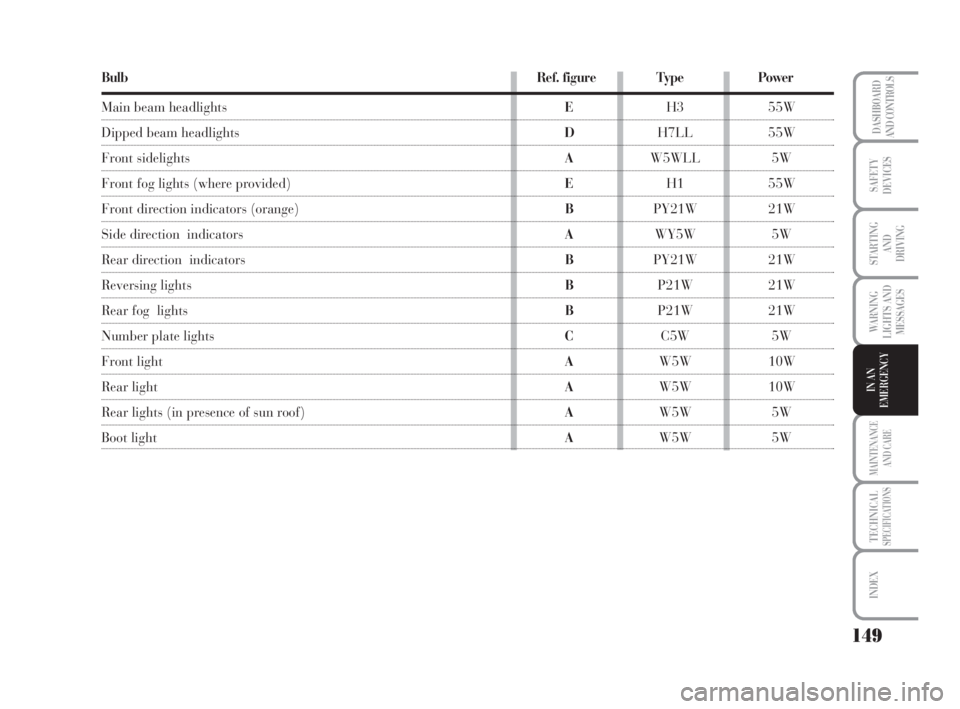
BulbRef. figure TypePower
Main beam headlightsEH3 55W
Dipped beam headlights DH7LL 55W
Front sidelights AW5WLL 5W
Front fog lights (where provided)EH1 55W
Front direction indicators (orange)BPY21W 21W
Side direction indicators AWY5W 5W
Rear direction indicatorsBPY21W 21W
Reversing lights BP21W 21W
Rear fog lights BP21W 21W
Number plate lights CC5W 5W
Front light AW5W 10W
Rear lightAW5W 10W
Rear lights (in presence of sun roof)AW5W 5W
Boot light AW5W 5W
135-164 MUSA 1ed GB 10-07-2008 9:38 Pagina 149
Page 151 of 218
150
WARNING
LIGHTS AND
MESSAGES
MAINTENANCE
AND CARE
TECHNICALSPECIFICATIONS
INDEX
DASHBOARD
AND CONTROLS
SAFETY
DEVICES
STARTING
AND
DRIVING
IN AN
EMERGENCY
IF AN EXTERIOR
LIGHT BURNS OUT
For the type of bulb and power rat-
ing, see “When needing to change a
bulb”.
FRONT LIGHT CLUSTERS
The front light clusters contain side-
lights, dipped beam, main beam and
direction indicator bulbs.
To replace the bulbs in the sidelights,
dipped beam and main beam lights,
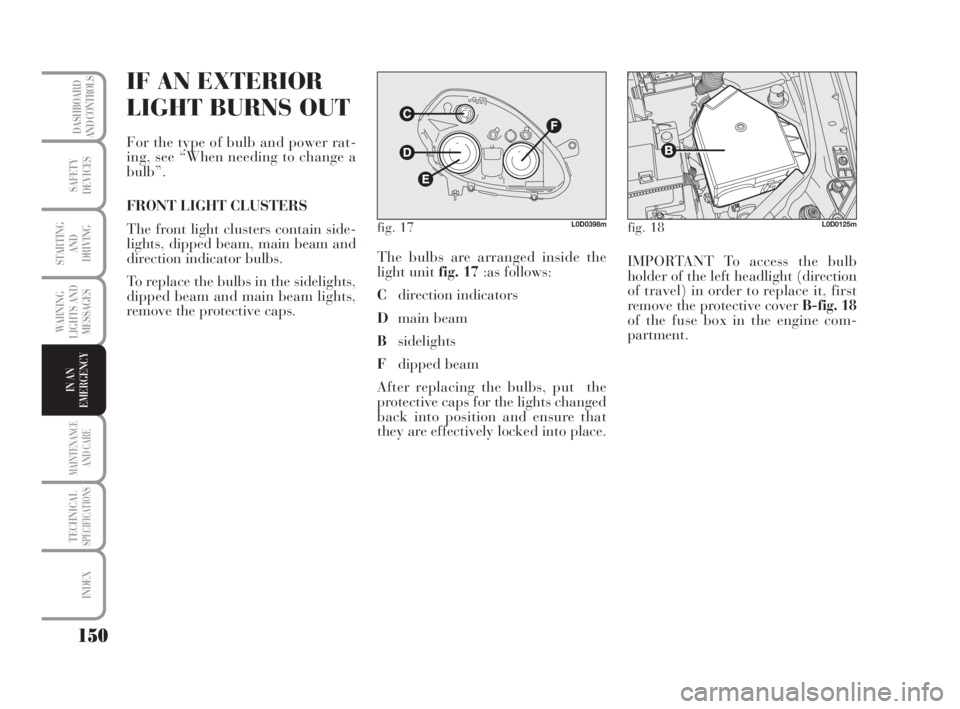
remove the protective caps.The bulbs are arranged inside the
light unit fig. 17:as follows:
Cdirection indicators
Dmain beam
Bsidelights
Fdipped beam
After replacing the bulbs, put the
protective caps for the lights changed
back into position and ensure that
they are effectively locked into place.IMPORTANT To access the bulb
holder of the left headlight (direction
of travel) in order to replace it, first
remove the protective cover B-fig. 18
of the fuse box in the engine com-
partment.
fig. 17L0D0398mfig. 18L0D0125m
135-164 MUSA 1ed GB 10-07-2008 9:38 Pagina 150
Page 152 of 218
151
WARNING
LIGHTS AND
MESSAGES
MAINTENANCE
AND CARE
TECHNICALSPECIFICATIONS
INDEX
DASHBOARD
AND CONTROLS
SAFETY
DEVICES
STARTING
AND
DRIVING
IN AN
EMERGENCY
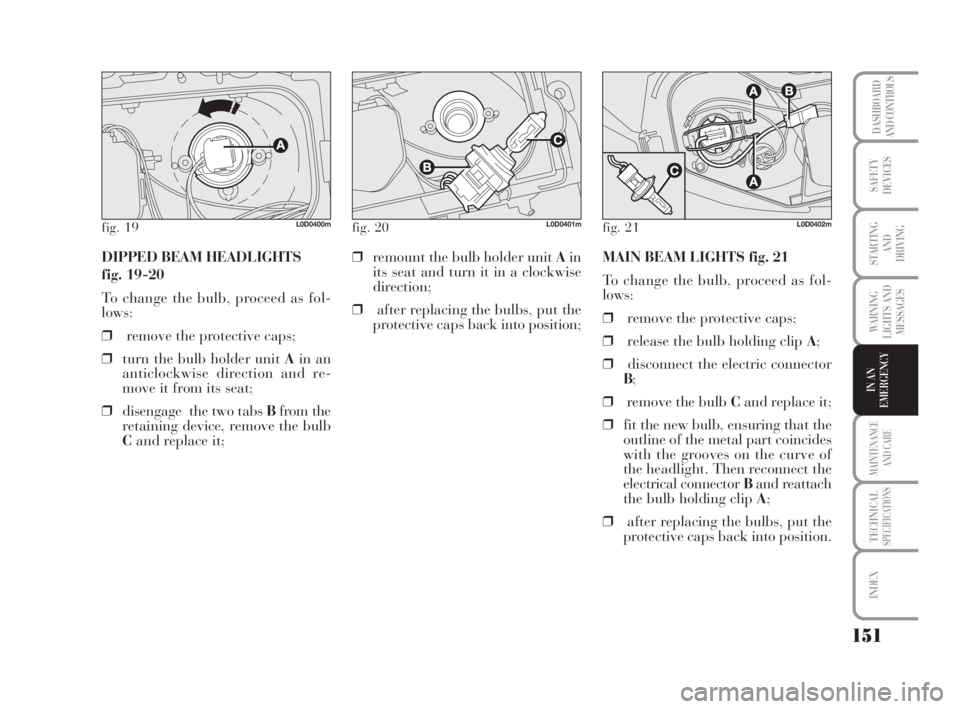
DIPPED BEAM HEADLIGHTS
fig. 19-20
To change the bulb, proceed as fol-
lows:
❒remove the protective caps;
❒turn the bulb holder unit Ain an
anticlockwise direction and re-
move it from its seat;
❒disengage the two tabs Bfrom the
retaining device, remove the bulb
Cand replace it;❒remount the bulb holder unit Ain
its seat and turn it in a clockwise
direction;
❒after replacing the bulbs, put the
protective caps back into position;MAIN BEAM LIGHTS fig. 21
To change the bulb, proceed as fol-
lows:
❒remove the protective caps;
❒release the bulb holding clip A;
❒disconnect the electric connector
B;
❒remove the bulb Cand replace it;
❒fit the new bulb, ensuring that the
outline of the metal part coincides
with the grooves on the curve of
the headlight. Then reconnect the
electrical connector Band reattach
the bulb holding clip A;
❒after replacing the bulbs, put the
protective caps back into position.
fig. 20L0D0401mfig. 21L0D0402mfig. 19L0D0400m
135-164 MUSA 1ed GB 10-07-2008 9:38 Pagina 151
Page 154 of 218
153
WARNING
LIGHTS AND
MESSAGES
MAINTENANCE
AND CARE
TECHNICALSPECIFICATIONS
INDEX
DASHBOARD
AND CONTROLS
SAFETY
DEVICES
STARTING
AND
DRIVING
IN AN
EMERGENCY
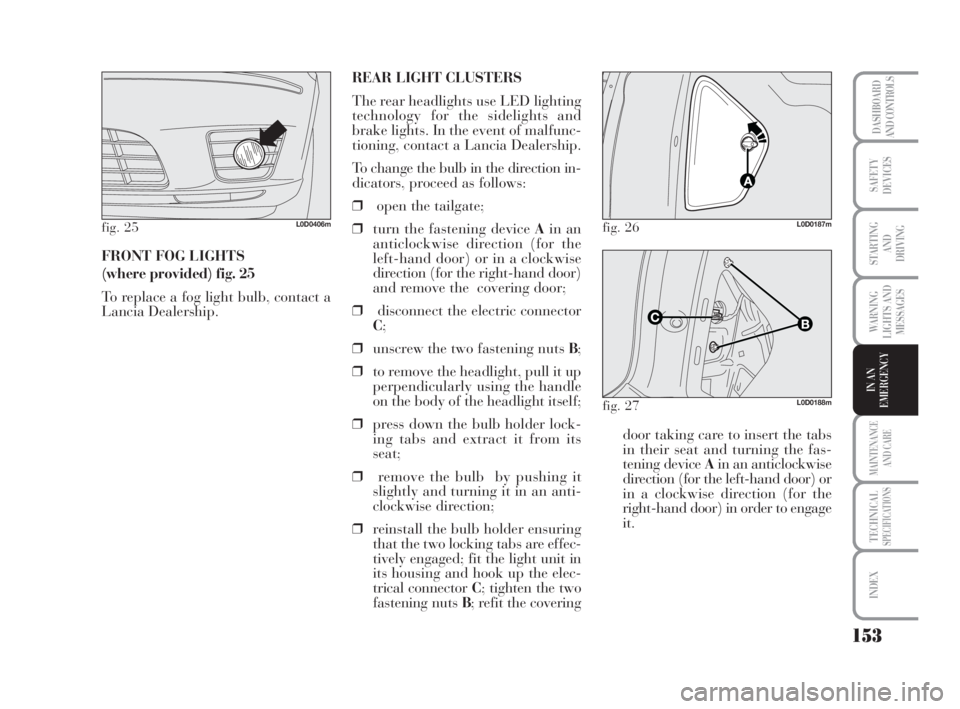
FRONT FOG LIGHTS
(where provided) fig. 25
To replace a fog light bulb, contact a
Lancia Dealership.
fig. 25L0D0406m
REAR LIGHT CLUSTERS
The rear headlights use LED lighting
technology for the sidelights and
brake lights. In the event of malfunc-
tioning, contact a Lancia Dealership.
To change the bulb in the direction in-
dicators, proceed as follows:
❒open the tailgate;
❒turn the fastening device Ain an
anticlockwise direction (for the
left-hand door) or in a clockwise
direction (for the right-hand door)
and remove the covering door;
❒disconnect the electric connector
C;
❒unscrew the two fastening nuts B;
❒to remove the headlight, pull it up
perpendicularly using the handle
on the body of the headlight itself;
❒press down the bulb holder lock-
ing tabs and extract it from its
seat;
❒remove the bulb by pushing it
slightly and turning it in an anti-
clockwise direction;
❒reinstall the bulb holder ensuring
that the two locking tabs are effec-
tively engaged; fit the light unit in
its housing and hook up the elec-
trical connector C; tighten the two
fastening nuts B; refit the coveringdoor taking care to insert the tabs
in their seat and turning the fas-
tening device Ain an anticlockwise
direction (for the left-hand door) or
in a clockwise direction (for the
right-hand door) in order to engage
it.
fig. 26L0D0187m
fig. 27L0D0188m
135-164 MUSA 1ed GB 10-07-2008 9:38 Pagina 153
Page 207 of 218
206
STARTING
AND
DRIVING
DASHBOARD
AND CONTROLS
SAFETY
DEVICES
STARTING
AND
DRIVING
IN AN
EMERGENCY
MAINTENANCE
AND CARE
TECHNICALSPECIFICATIONS
INDEX
ABS (System) ........................ 85
Accessories purchased by
the owner ............................... 88
Air vents ............................... 48
Ashtray (Smoking kit) .......... 75
Battery
– inspecting the charge ........ 177
– jump starting ................... 137
– replacement procedure ..... 178
Bodywork
– maintenance ..................... 182
– version code ..................... 190
Boot extension ....................... 80
Boot ....................................... 80
Brake fluid level .................... 176
Brakes
– fluid level ......................... 176
– handbrake ........................ 116
– technical data .................. 193
Bulb
(when needing to change a) ... 147Capacities ............................. 199
Car inactivity ........................ 124
Car refuelling ........................ 201
Carrying children in safety .... 101
Ceiling lights ......................... 69
Changing a wheel .................. 142
Checking fluid levels ............. 171
Cigar lighter (Smokers kit) .... 75
Clutch ................................... 192
CO2 emissions ...................... 205
Cruise Control ....................... 67
Current outlets ....................... 75
Dashboard ........................... 8
Dashboard and controls ........ 7
Dimensions ........................... 198
Dipped beam headlights
– bulb replacement
procedure .............................. 151
– control ............................ 62
Direction Indicators– bulb replacement
procedure ............................. 152
– control ............................ 63
Direction indicators ............... 63
Dualdrive (electric power
steering system) .................... 89
Engine
– features ............................ 191
– fuel feed system ................ 192
– identification code ............ 188
– starting ............................ 20
Engine bonnet ....................... 82
Engine compartment ............. 171
Engine coolant level .............. 174
Engine coolant thermometer .. 22
Engine oil
– level gauge ....................... 173
– technical specifications ..... 202
Engine oil level ..................... 173
Environment (protection). ..... 94
EOBD system ........................ 86
INDEX
206-216 MUSA 1ed GB 10-07-2008 11:08 Pagina 206
Page 208 of 218
207
WARNING
LIGHTS AND
MESSAGES
DASHBOARD
AND CONTROLS
SAFETY
DEVICES
STARTING
AND
DRIVING
IN AN
EMERGENCY
MAINTENANCE
AND CARE
TECHNICALSPECIFICATIONS
INDEX
External lights ...................... 62
Fix&Go
(quick tyre repair kit) ........... 138
Fluids and lubricants ............ 202
Fog lights
– bulb replacement
procedure ..........................153-154
– control button .................. 71
FPS (inertial cut-off switch) .. 72
Front airbags ........................ 108
– driver’s front airbag .......... 108
– manual disabling front
air bag passenger side ........... 110
– passenger’s front airbag .... 109
Fuel
– consumption ..................... 204
– gauge ............................... 21
– inertial cut-off switch ....... 72
Fuel filler cap......................... 92
Fuses .................................... 156
Hazard lights
– control ............................ 71Head restraints ...................... 44
Headlights ............................ 84
Identification data.................. 188
Ignition device ...................... 20
In an emergency .................... 135
Instrument panel ................... 10
Instruments ........................... 21
Interior equipment
– card recess ....................... 74
– current outlets ................... 75
– glass recess / can recess ..... 74
– oddment compartments..... 73
– oddment shelf
on roof panel.......................... 74
– rear CD holder compartment
with can recess ....................... 75
– upper oddments drawers ... 73
Interiors ................................. 185
Isofix child seat ..................... 105
Jack ...................................... 144Key and door closing kits ....... 13
Lancia CODE (system) ......... 11
Levels
– check/control .................... 171
Lifting the car ....................... 162
Lubricants (specifications) ..... 202
Maintenance and care ........... 165
– scheduled servicing .......... 167
Manual climate control system 48
Mechanical gearbox (use)....... 117
Multifunctional display .........22-25
Multifunctional display
control buttons.......................22-25
Number plate light
– bulb replacement
procedure .............................. 154
Oddment compartments ........ 8
Parking sensors ..................... 90
Performance ......................... 199
206-216 MUSA 1ed GB 10-07-2008 11:08 Pagina 207