engine Lancia Musa 2010 Owner handbook (in English)
[x] Cancel search | Manufacturer: LANCIA, Model Year: 2010, Model line: Musa, Model: Lancia Musa 2010Pages: 218, PDF Size: 3.71 MB
Page 145 of 218
144
WARNING
LIGHTS AND
MESSAGES
MAINTENANCE
AND CARE
TECHNICAL
SPECIFICA-
TIONS
INDEX
DASHBOARD
AND
CONTROLS
SAFETY
STARTING
AND DRIVING
IN AN
EMERGENCY
Incorrect wheel cup as-
sembly may cause it to
come off when the car is travelling.
Never tamper with the inflation
valve. Never introduce tools of any
kind between rim and tyre. Check
tyre and space saver spare wheel
pressure regularly referring to the
values shown in the “Technical
Specifications” chapter.
WARNINGImportant notes:
❒the jack cannot be repaired: replace
with an original spare part if dam-
aged;
❒no tool other than its cranking de-
vice may be fitted on the jack.
To change a wheel proceed as follows:
❒stop the car in a position so that it
is not a danger for on-coming traf-
fic and where you can replace the
wheel safely. The ground must be
flat and compact;
❒turn the engine off and pull up the
handbrake.
❒engage first gear or reverse;
❒lift the boot mat;
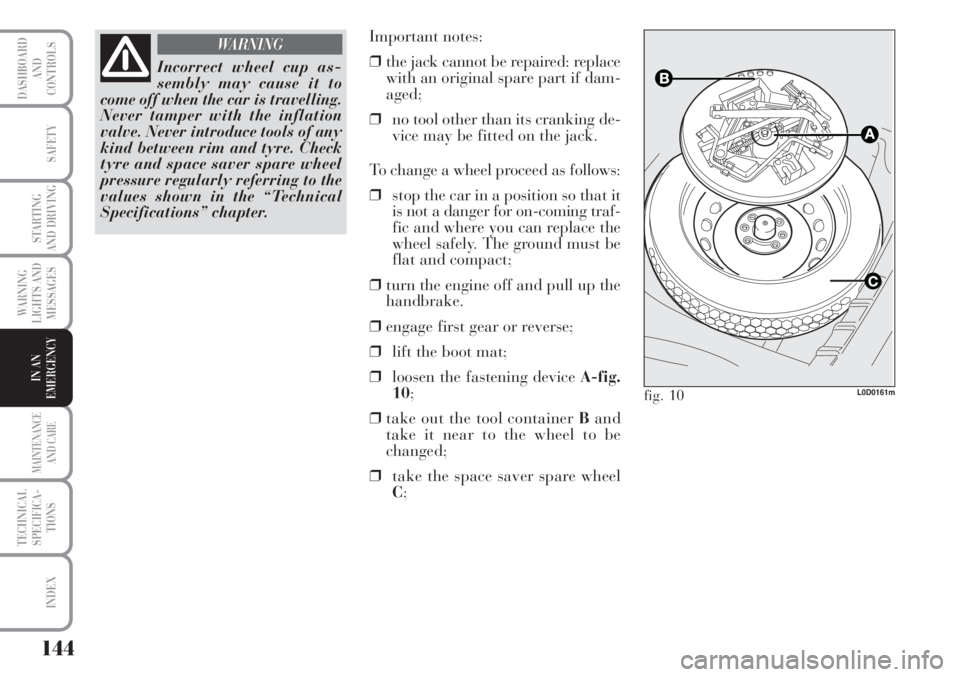
❒loosen the fastening device A-fig.
10;
❒take out the tool container Band
take it near to the wheel to be
changed;
❒take the space saver spare wheel
C;
L0D0161mfig. 10
Page 151 of 218
150
WARNING
LIGHTS AND
MESSAGES
MAINTENANCE
AND CARE
TECHNICAL
SPECIFICA-
TIONS
INDEX
DASHBOARD
AND
CONTROLS
SAFETY
STARTING
AND DRIVING
IN AN
EMERGENCY
REPLACING
EXTERIOR BULBS
For the type of bulb and power rat-
ing, see “When needing to change a
bulb”.
FRONT LIGHT CLUSTER
The front light clusters contain side
lights, dipped beam, main beam and
direction indicator bulbs.
Remove the protective caps to remove
the side lights, the dipped beam and
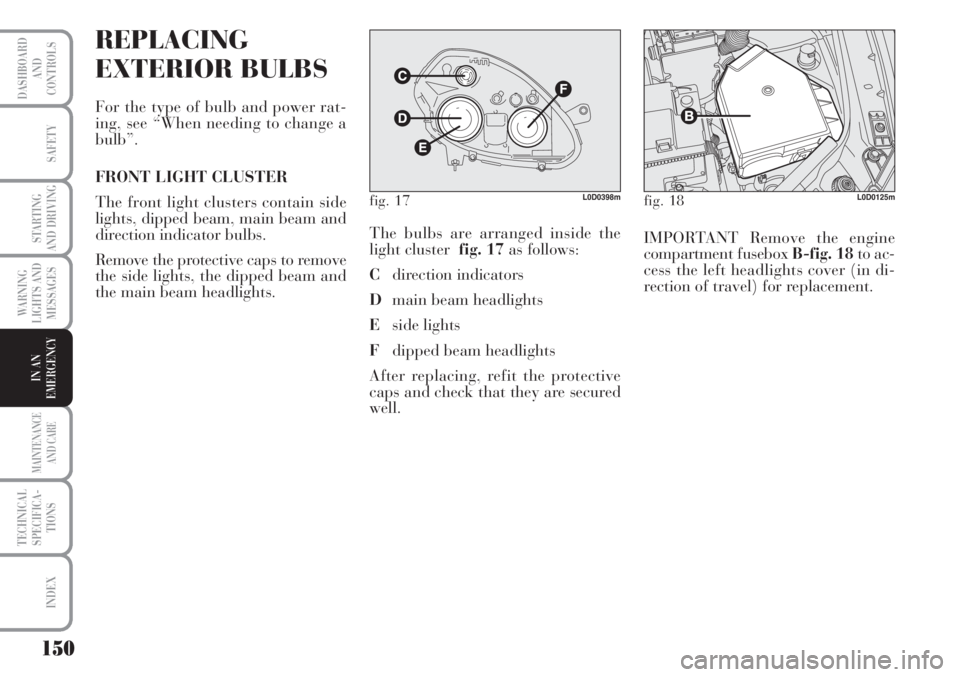
the main beam headlights.The bulbs are arranged inside the
light cluster fig. 17as follows:
Cdirection indicators
Dmain beam headlights
Eside lights
Fdipped beam headlights
After replacing, refit the protective
caps and check that they are secured
well.IMPORTANT Remove the engine
compartment fusebox B-fig. 18to ac-
cess the left headlights cover (in di-
rection of travel) for replacement.
fig. 17L0D0398mfig. 18L0D0125m
Page 157 of 218
156
WARNING
LIGHTS AND
MESSAGES
MAINTENANCE
AND CARE
TECHNICAL
SPECIFICA-
TIONS
INDEX
DASHBOARD
AND
CONTROLS
SAFETY
STARTING
AND DRIVING
IN AN
EMERGENCY
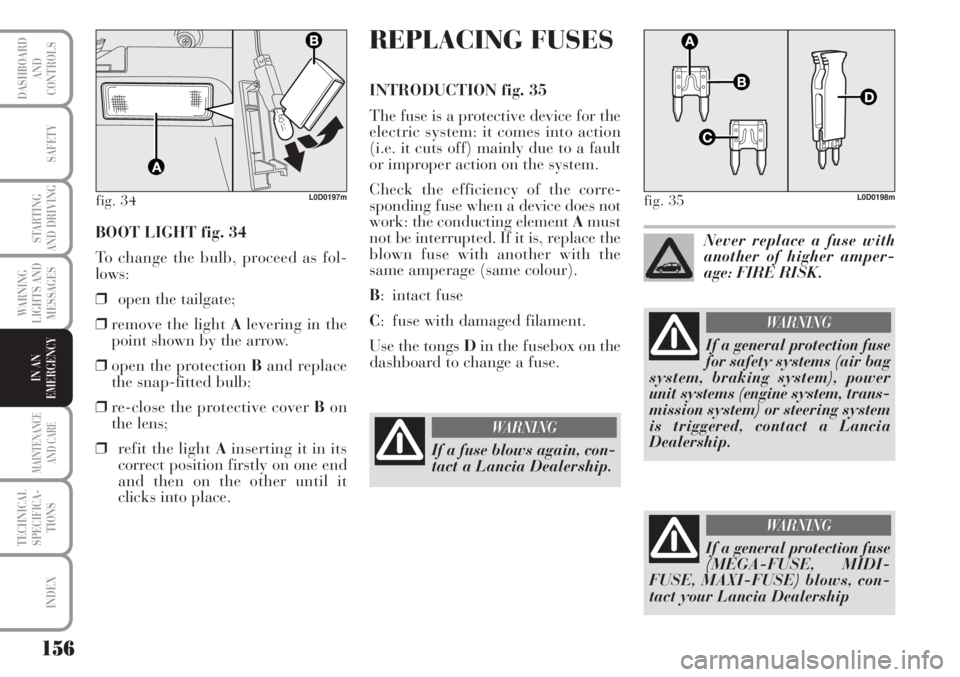
BOOT LIGHT fig. 34
To change the bulb, proceed as fol-
lows:
❒open the tailgate;
❒remove the light Alevering in the
point shown by the arrow.
❒open the protection Band replace
the snap-fitted bulb;
❒re-close the protective cover Bon
the lens;
❒refit the light Ainserting it in its
correct position firstly on one end
and then on the other until it
clicks into place.
fig. 34L0D0197m
REPLACING FUSES
INTRODUCTION fig. 35
The fuse is a protective device for the
electric system: it comes into action
(i.e. it cuts off) mainly due to a fault
or improper action on the system.
Check the efficiency of the corre-
sponding fuse when a device does not
work: the conducting element Amust
not be interrupted. If it is, replace the
blown fuse with another with the
same amperage (same colour).
B: intact fuse
C: fuse with damaged filament.
Use the tongs Din the fusebox on the
dashboard to change a fuse.
fig. 35L0D0198m
If a fuse blows again, con-
tact a Lancia Dealership.
WARNING
Never replace a fuse with
another of higher amper-
age: FIRE RISK.
If a general protection fuse
(MEGA-FUSE, MIDI-
FUSE, MAXI-FUSE) blows, con-
tact your Lancia Dealership
WARNING
If a general protection fuse
for safety systems (air bag
system, braking system), power
unit systems (engine system, trans-
mission system) or steering system
is triggered, contact a Lancia
Dealership.
WARNING
Page 158 of 218
157
WARNING
LIGHTS AND
MESSAGES
MAINTENANCE
AND CARE
TECHNICAL
SPECIFICA-
TIONS
INDEX
DASHBOARD
AND
CONTROLS
SAFETY
STARTING
AND DRIVING
IN AN
EMERGENCY
Remove the key from the
ignition switch and switch
off all loads before replacing a
fuse.
WARNING
FUSE LOCATION
The fuses are contained in two dash-
boards, one on the dashboard on the
left hand of the steering column and
one in the engine compartment next
to the battery.
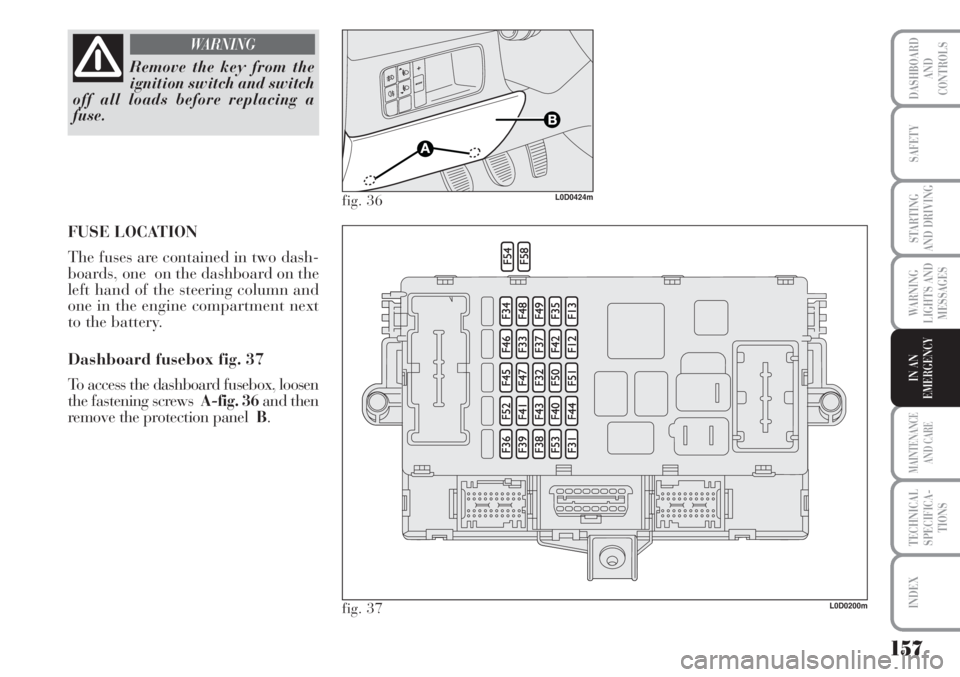
Dashboard fusebox fig. 37
To access the dashboard fusebox, loosen
the fastening screws A-fig. 36and then
remove the protection panel B.
L0D0200m
fig. 36L0D0424m
fig. 37
Page 160 of 218
159
WARNING
LIGHTS AND
MESSAGES
MAINTENANCE
AND CARE
TECHNICAL
SPECIFICA-
TIONS
INDEX
DASHBOARD
AND
CONTROLS
SAFETY
STARTING
AND DRIVING
IN AN
EMERGENCY
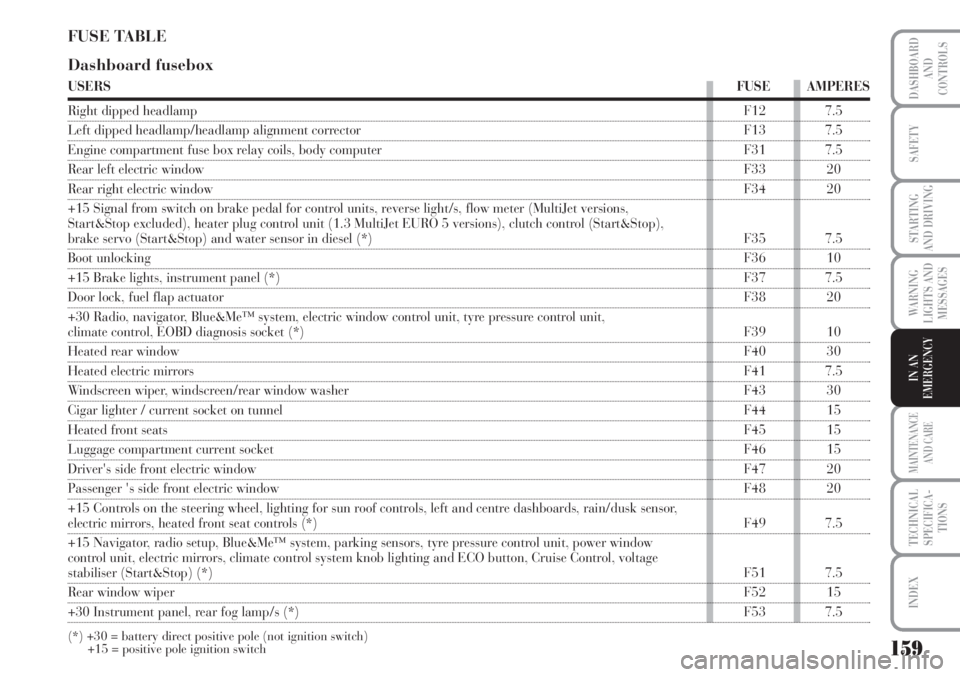
FUSE TABLE
Dashboard fusebox
USERSFUSE AMPERES
Right dipped headlampF12 7.5
Left dipped headlamp/headlamp alignment corrector F13 7.5
Engine compartment fuse box relay coils, body computer F31 7.5
Rear left electric windowF33 20
Rear right electric windowF34 20
+15 Signal from switch on brake pedal for control units, reverse light/s, flow meter (MultiJet versions,
Start&Stop excluded), heater plug control unit (1.3 MultiJet EURO 5 versions), clutch control (Start&Stop),
brake servo (Start&Stop) and water sensor in diesel (*) F35 7.5
Boot unlocking F36 10
+15 Brake lights, instrument panel (*)F37 7.5
Door lock, fuel flap actuatorF38 20
+30 Radio, navigator, Blue&Me™ system, electric window control unit, tyre pressure control unit,
climate control, EOBD diagnosis socket (*)F39 10
Heated rear window F40 30
Heated electric mirrorsF41 7.5
Windscreen wiper, windscreen/rear window washer F43 30
Cigar lighter / current socket on tunnelF44 15
Heated front seatsF45 15
Luggage compartment current socketF46 15
Driver's side front electric windowF47 20
Passenger 's side front electric windowF48 20
+15 Controls on the steering wheel, lighting for sun roof controls, left and centre dashboards, rain/dusk sensor,
electric mirrors, heated front seat controls (*)F49 7.5
+15 Navigator, radio setup, Blue&Me™ system, parking sensors, tyre pressure control unit, power window
control unit, electric mirrors, climate control system knob lighting and ECO button, Cruise Control, voltage
stabiliser (Start&Stop) (*)F51 7.5
Rear window wiperF52 15
+30 Instrument panel, rear fog lamp/s (*)F53 7.5
(*) +30 = battery direct positive pole (not ignition switch)
+15 = positive pole ignition switch
Page 161 of 218
160
WARNING
LIGHTS AND
MESSAGES
MAINTENANCE
AND CARE
TECHNICAL
SPECIFICA-
TIONS
INDEX
DASHBOARD
AND
CONTROLS
SAFETY
STARTING
AND DRIVING
IN AN
EMERGENCY
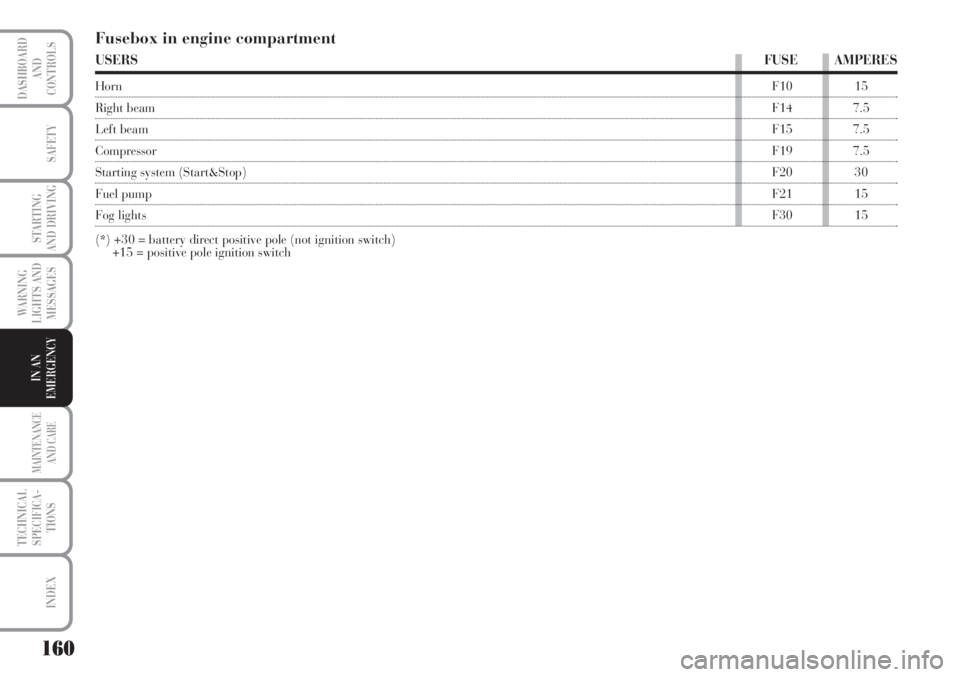
Fusebox in engine compartment
USERSFUSE AMPERES
HornF10 15
Right beamF14 7.5
Left beamF15 7.5
CompressorF19 7.5
Starting system (Start&Stop)F20 30
Fuel pumpF21 15
Fog lightsF30 15
(*) +30 = battery direct positive pole (not ignition switch)
+15 = positive pole ignition switch
Page 165 of 218
164
WARNING
LIGHTS AND
MESSAGES
MAINTENANCE
AND CARE
TECHNICAL
SPECIFICA-
TIONS
INDEX
DASHBOARD
AND
CONTROLS
SAFETY
STARTING
AND DRIVING
IN AN
EMERGENCY
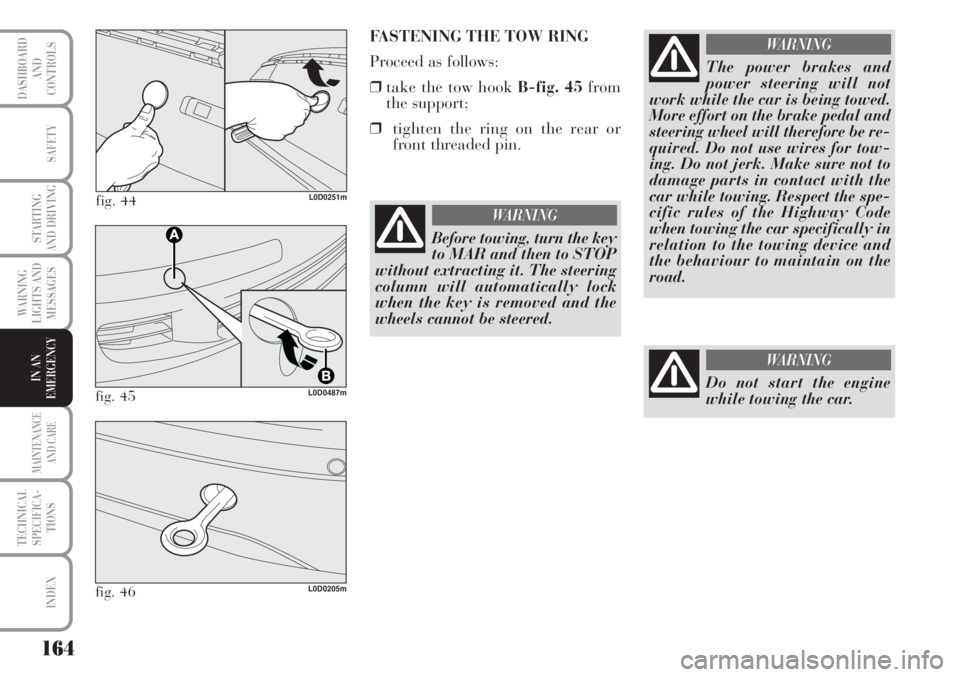
fig. 44L0D0251m
FASTENING THE TOW RING
Proceed as follows:
❒take the tow hook B-fig. 45from
the support;
❒tighten the ring on the rear or
front threaded pin.
fig. 45L0D0487m
fig. 46L0D0205m
The power brakes and
power steering will not
work while the car is being towed.
More effort on the brake pedal and
steering wheel will therefore be re-
quired. Do not use wires for tow-
ing. Do not jerk. Make sure not to
damage parts in contact with the
car while towing. Respect the spe-
cific rules of the Highway Code
when towing the car specifically in
relation to the towing device and
the behaviour to maintain on the
road.
WARNING
Before towing, turn the key
to MAR and then to STOP
without extracting it. The steering
column will automatically lock
when the key is removed and the
wheels cannot be steered.
WARNING
Do not start the engine
while towing the car.
WARNING
Page 168 of 218
167
WARNING
LIGHTS AND
MESSAGES
TECHNICAL
SPECIFICA-
TIONS
INDEX
DASHBOARD
AND
CONTROLS
SAFETY
STARTING
AND DRIVING
IN AN
EMERGENCY
MAINTENANCE
AND CARE
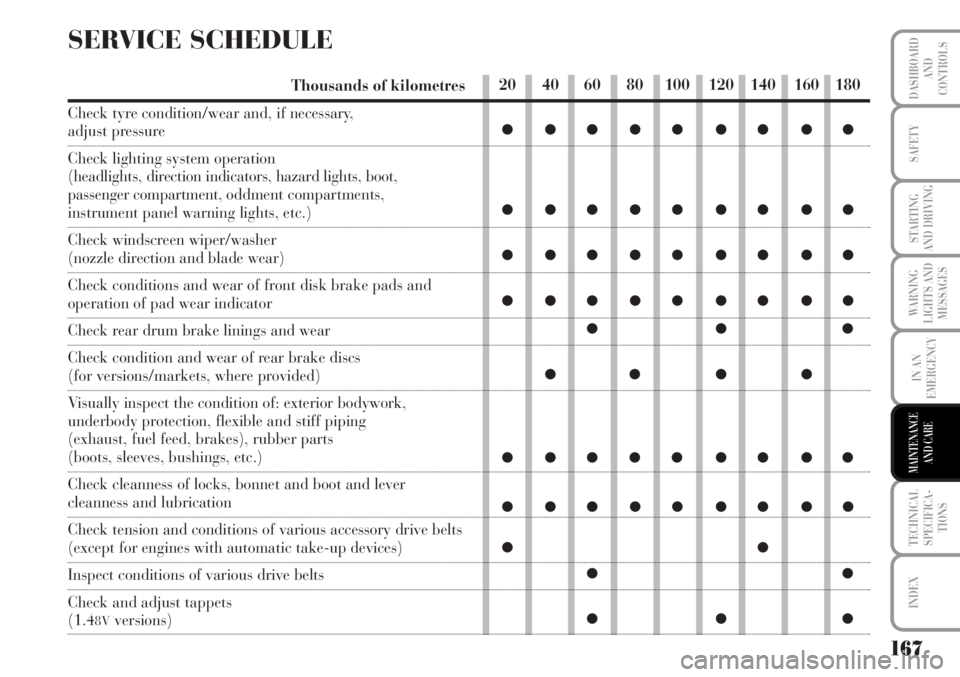
SERVICE SCHEDULE
Thousands of kilometres
Check tyre condition/wear and, if necessary,
adjust pressure
Check lighting system operation
(headlights, direction indicators, hazard lights, boot,
passenger compartment, oddment compartments,
instrument panel warning lights, etc.)
Check windscreen wiper/washer
(nozzle direction and blade wear)
Check conditions and wear of front disk brake pads and
operation of pad wear indicator
Check rear drum brake linings and wear
Check condition and wear of rear brake discs
(for versions/markets, where provided)
Visually inspect the condition of: exterior bodywork,
underbody protection, flexible and stiff piping
(exhaust, fuel feed, brakes), rubber parts
(boots, sleeves, bushings, etc.)
Check cleanness of locks, bonnet and boot and lever
cleanness and lubrication
Check tension and conditions of various accessory drive belts
(except for engines with automatic take-up devices)
Inspect conditions of various drive belts
Check and adjust tappets
(1.48Vversions)
20 40 60 80 100 120 140 160 180
●●●●● ●●●●
●●●●● ●●●●
●●●●● ●●●●
●●●●● ●●●●
●●●
●● ● ●
●●●●● ●●●●
●●●●● ●●●●
●●
●●
●●●
Page 169 of 218
168
WARNING
LIGHTS AND
MESSAGES
TECHNICAL
SPECIFICA-
TIONS
INDEX
DASHBOARD
AND
CONTROLS
SAFETY
STARTING
AND DRIVING
IN
EMERGENZA
MAINTENANCE
AND CARE
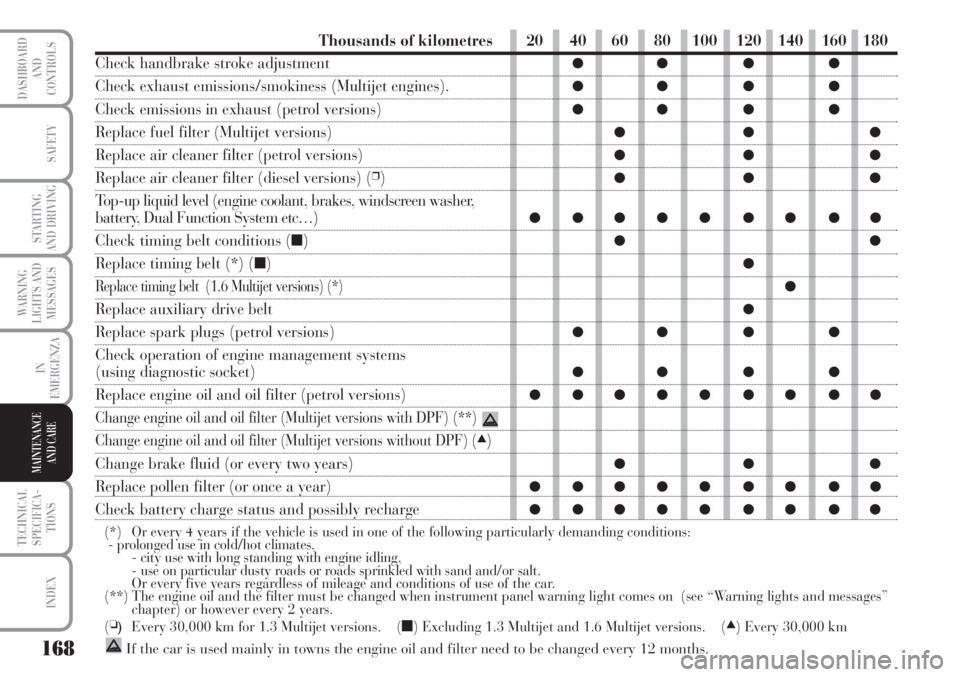
Thousands of kilometres
Check handbrake stroke adjustment
Check exhaust emissions/smokiness (Multijet engines).
Check emissions in exhaust (petrol versions)
Replace fuel filter (Multijet versions)
Replace air cleaner filter (petrol versions)
Replace air cleaner filter (diesel versions) (❒)
Top-up liquid level (engine coolant, brakes, windscreen washer,
battery, Dual Function System etc…)
Check timing belt conditions (■)
Replace timing belt (*) (■)
Replace timing belt (1.6 Multijet versions) (*)
Replace auxiliary drive belt
Replace spark plugs (petrol versions)
Check operation of engine management systems
(using diagnostic socket)
Replace engine oil and oil filter (petrol versions)
Change engine oil and oil filter (Multijet versions with DPF) (**)
Change engine oil and oil filter (Multijet versions without DPF) (▲)
Change brake fluid (or every two years)
Replace pollen filter (or once a year)
Check battery charge status and possibly recharge
(*) Or every 4 years if the vehicle is used in one of the following particularly demanding conditions:
- prolonged use in cold/hot climates,
- city use with long standing with engine idling,
- use on particular dusty roads or roads sprinkled with sand and/or salt.
Or every five years regardless of mileage and conditions of use of the car.
(**) The engine oil and the filter must be changed when instrument panel warning light comes on (see “Warning lights and messages”
chapter) or however every 2 years.
(
❏)Every 30,000 km for 1.3 Multijet versions. (■) Excluding 1.3 Multijet and 1.6 Multijet versions. (▲) Every 30,000 km
If the car is used mainly in towns the engine oil and filter need to be changed every 12 months.
20 40 60 80 100 120 140 160 180
●● ● ●
●● ● ●
●● ● ●
●●●
●●●
●●●
●●●●● ●●●●
●●
●
●
●
●● ● ●
●● ● ●
●●●●● ●●●●
●●●
●●●●● ●●●●
●●●●● ●●●●
Page 170 of 218
169
WARNING
LIGHTS AND
MESSAGES
TECHNICAL
SPECIFICA-
TIONS
INDEX
DASHBOARD
AND
CONTROLS
SAFETY
STARTING
AND DRIVING
IN AN
EMERGENCY
MAINTENANCE
AND CARE
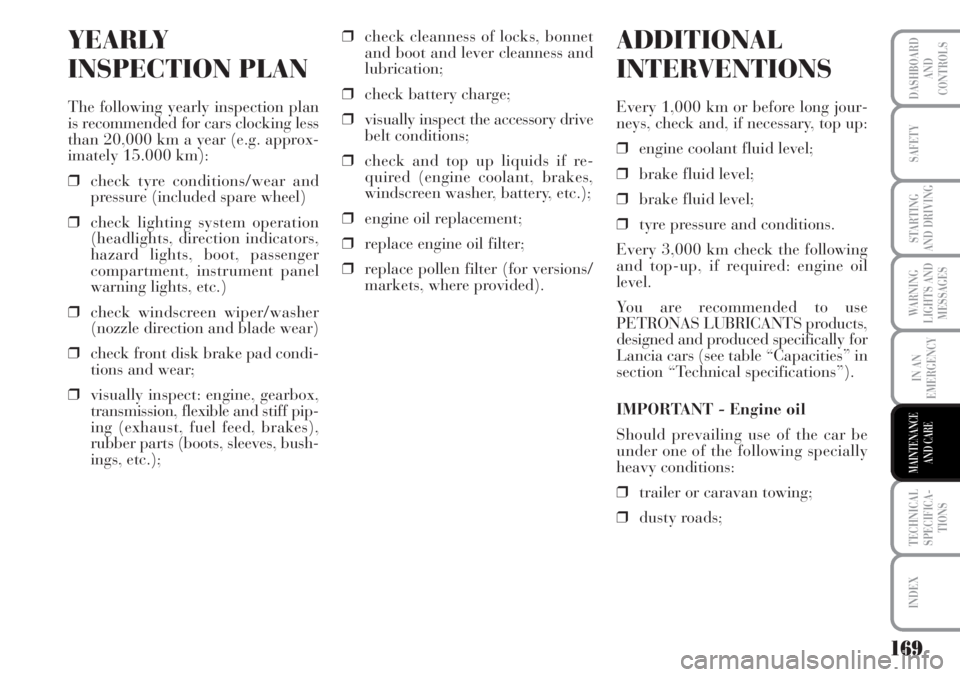
YEARLY
INSPECTION PLAN
The following yearly inspection plan
is recommended for cars clocking less
than 20,000 km a year (e.g. approx-
imately 15.000 km):
❒check tyre conditions/wear and
pressure (included spare wheel)
❒check lighting system operation
(headlights, direction indicators,
hazard lights, boot, passenger
compartment, instrument panel
warning lights, etc.)
❒check windscreen wiper/washer
(nozzle direction and blade wear)
❒check front disk brake pad condi-
tions and wear;
❒visually inspect: engine, gearbox,
transmission, flexible and stiff pip-
ing (exhaust, fuel feed, brakes),
rubber parts (boots, sleeves, bush-
ings, etc.);❒check cleanness of locks, bonnet
and boot and lever cleanness and
lubrication;
❒check battery charge;
❒visually inspect the accessory drive
belt conditions;
❒check and top up liquids if re-
quired (engine coolant, brakes,
windscreen washer, battery, etc.);
❒engine oil replacement;
❒replace engine oil filter;
❒replace pollen filter (for versions/
markets, where provided).
ADDITIONAL
INTERVENTIONS
Every 1,000 km or before long jour-
neys, check and, if necessary, top up:
❒engine coolant fluid level;
❒brake fluid level;
❒brake fluid level;
❒tyre pressure and conditions.
Every 3,000 km check the following
and top-up, if required: engine oil
level.
You are recommended to use
PETRONAS LUBRICANTS products,
designed and produced specifically for
Lancia cars (see table “Capacities” in
section “Technical specifications”).
IMPORTANT - Engine oil
Should prevailing use of the car be
under one of the following specially
heavy conditions:
❒trailer or caravan towing;
❒dusty roads;