service Lancia Thema 2012 Owner handbook (in English)
[x] Cancel search | Manufacturer: LANCIA, Model Year: 2012, Model line: Thema, Model: Lancia Thema 2012Pages: 316, PDF Size: 3.85 MB
Page 2 of 316

We really know your car because we invented, designed and built it: we really know every single detail. At
Lancia Service authorised workshops you can find
technicians directly trained by us, offering quality and professionalism for all service operations.
Lancia workshops are always close to you for the regular servicing operations, season checks and practical recommendations by our experts.
With Genuine Parts you keep the reliability,
comfort and performance features of your new car unchanged in time: that’s why you bought it for.Always ask for Genuine Parts for the components
used on our cars; we recommend them because they come from our steady commitment in research and development of highly innovative technologies.
For all these reasons: rely on Genuine Parts, because they are the only ones designed for your car.
WHY CHOOSING
GENUINE PARTS
Page 5 of 316
Dear Customer,
We would like to congratulate and thank you for choosing LANCIA.
We have written this handbook to help you get to know all the features of your car and use it in the best possible way.
You are recommended to read it right through before taking to the road for the first time.
It contains important information, advice and instructions for the use of the car which will help you get the very best out of
your LANCIA. This booklet also provides a description of special features, essential information for the correct care and
maintenance of your LANCIA as well as safe driving tips.
The enclosed Warranty Booklet lists the services that LANCIA offers to its Customers:
the Warranty Certificate with terms and conditions for maintaining its validity;
the range of additional services available to LANCIA Customers.
We are sure that these will help you get in touch with your new car and further appreciate it and the care provided by the
people at LANCIA.
Enjoy reading. Happy motoring!
This Owner Handbook describes all the versions of the LANCIA Thema. As a consequence, you should onlyconsider the information which is related to the trim level, engine and version that you have purchased.
All data contained in this publication are purely indicative. Fiat Group Automobiles can modify the specifi- cations of the vehicle model described in this publication at any time, for technical or marketing purposes.
For further information, contact a Lancia Dealership.
Page 10 of 316
INTRODUCTION
Congratulations on selecting your
new LANCIA vehicle. Be assured that
it represents precision workmanship,
distinctive styling, and high quality -
all essentials that are traditional to
our vehicles.
Before you start to drive this vehicle,
read this Owner's Manual and all the
supplements. Be sure you are familiar
with all vehicle controls, particularly
those used for braking, steering, and
transmission shifting. Learn how your
vehicle handles on different road sur-
faces. Your driving skills will improve
with experience, but as in driving any
vehicle, take it easy as you begin. Al-
ways observe local laws wherever you
drive.
NOTE:
After reviewing the owner infor-
mation, it should be stored in the
vehicle for convenient referencing
and remain with the vehicle when
sold.
Failure to operate this vehicle cor-
rectly may result in loss of control or a
collision.Operating this vehicle at excessive
speeds or while intoxicated may result
in loss of control, collision with other
vehicles or objects, going off the road,
or overturning; any of which may lead
to serious injury or death. Also, failure
to use seat belts subjects the driver
and passengers to a greater risk of
injury or death.
To keep your vehicle running at its
best, have your vehicle serviced at
recommended intervals by an autho-
rized dealer who has the qualified per-
sonnel, special tools, and equipment
to perform all service.
The manufacturer and its distributors
are vitally interested in your complete
satisfaction with this vehicle. If you
encounter a service or warranty prob-
lem, which is not resolved to your
satisfaction, discuss the matter with
your dealer's management.
Your authorized dealer will be happy
to assist you with any questions about
your vehicle.
IMPORTANT NOTICE
ALL MATERIAL CONTAINED IN
THIS PUBLICATION IS BASED ON
THE LATEST INFORMATION
AVAILABLE AT TIME OF PUBLI-
CATION APPROVAL. THE RIGHT
IS RESERVED TO PUBLISH REVI-
SIONS AT ANY TIME.
This Owner's Manual has been pre-
pared with the assistance of service
and engineering specialists to ac-
quaint you with the operation and
maintenance of your new vehicle. It is
supplemented by a Warranty Infor-
mation Booklet and various
customer-oriented documents. You
are urged to read these publications
carefully. Following the instructions
and recommendations in this Owner's
Manual will help assure safe and en-
joyable operation of your vehicle.
After you have read the Owner’s
Manual, it should be stored in the
vehicle for convenient reference and
remain with the vehicle when sold.
The manufacturer reserves the right
to make changes in design and speci-
fications, and/or to make additions to
4
Page 11 of 316

or improvements in its products with-
out imposing any obligations upon it-
self to install them on products previ-
ously manufactured.
The Owner's Manual illustrates and
describes the features that are stan-
dard or available as extra cost op-
tions. Therefore, some of the equip-
ment and accessories in this
publication may not appear on your
vehicle.
NOTE:
Be sure to read the Owner's
Manual first before driving your
vehicle and before attaching or in-
stalling parts/accessories or mak-
ing other modifications to the ve-
hicle.
In view of the many replacement parts
and accessories from various manu-
facturers available on the market, the
manufacturer cannot be certain that
the driving safety of your vehicle will
not be impaired by the attachment or
installation of such parts. Even if such
parts are officially-approved (for ex-
ample, by a general operating permit
for the part or by constructing thepart in an officially approved design),
or if an individual operating permit
was issued for the vehicle after the
attachment or installation of such
parts, it cannot be implicitly assumed
that the driving safety of your vehicle
is unimpaired. Therefore, neither ex-
perts nor official agencies are liable.
The manufacturer only assumes re-
sponsibility when parts, which are ex-
pressly authorized or recommended
by the manufacturer, are attached or
installed at an authorized dealer. The
same applies when modifications to
the original condition are subse-
quently made on the manufacturer's
vehicles.
Your warranties do not cover any part
that the manufacturer did not supply.
Nor do they cover the cost of any
repairs or adjustments that might be
caused or needed because of the in-
stallation or use of non-manufacturer
parts, components, equipment, mate-
rials, or additives. Nor do your war-
ranties cover the costs of repairing
damage or conditions caused by any
changes to your vehicle that do not
comply with the manufacturers speci-
fications.
Original parts and accessories and
other products approved by the
manufacturer, including qualified ad-
vice, are available at your authorized
dealer.
When it comes to service, remember
that your authorized dealer knows
your vehicle best, has the factory-
trained technicians and genuine
parts, and is interested in your satis-
faction.
Copyright
© 2012 FIAT Group Auto-
mobiles S.p.A.
HOW TO USE THIS
MANUAL
Consult the Table of Contents to de-
termine which section contains the in-
formation you desire.
Since the specification of your vehicle
depends on the items of equipment
ordered, certain descriptions and il-
lustrations may differ from your vehi-
cle's equipment.
5
Page 20 of 316
that there is a problem with the elec-
tronics. This condition will result in
the engine being shut off after two
seconds.
If the Vehicle Security Light turns on
during normal vehicle operation (ve-
hicle running for longer than 10 sec-
onds), it indicates that there is a fault
in the electronics. Should this occur,
have the vehicle serviced as soon as
possible by an authorized dealer.CAUTION!
The Sentry Key® Immobilizer sys-
tem is not compatible with some
after-market remote starting sys-
tems. Use of these systems may re-
sult in vehicle starting problems and
loss of security protection.
All of the Key Fobs provided with
your new vehicle have been pro-
grammed to the vehicle electronics.
REPLACEMENT KEYS
NOTE:
Only Key Fobs that are pro-
grammed to the vehicle electronics
can be used to start and operate
the vehicle. Once a Key Fob is pro- grammed to a vehicle, it cannot be
programmed to any other vehicle.
CAUTION!
Always remove the Key Fobs from
the vehicle and lock all doors
when leaving the vehicle unat-
tended.
For vehicles equipped with Key-
less Enter-N-Go, always remem-
ber to place the ignition in OFF.
At the time of purchase, the original
owner is provided with a four-digit
Personal Identification Number
(PIN). Keep the PIN in a secure loca-
tion. This number is required for au-
thorized dealer replacement of Key
Fobs. Duplication of Key Fobs may be
performed at an authorized dealer,
this procedure consists of program-
ming a blank Key Fob to the vehicle
electronics. A blank Key Fob is one
that has never been programmed.
NOTE:
When having the Sentry Key® Im-
mobilizer System serviced, bring
all vehicle Key Fobs with you to the
authorized dealer. CUSTOMER KEY
PROGRAMMING
Programming Key Fobs or RKE
transmitters may be performed at an
authorized dealer.
GENERAL INFORMATION
The Sentry Key® operates on a car-
rier frequency of 433.92 MHz. The
Sentry Key® Immobilizer system will
be used in the following European
countries, which apply Directive
1999/5/EC: Austria, Belgium, Czech
Republic, Denmark, Finland, France,
Germany, Greece, Hungary, Ireland,
Italy, Luxembourg, Netherlands, Nor-
way, Poland, Portugal, Romania,
Russian Federation, Slovenia, Spain,
Sweden, Switzerland, Yugoslavia,
and United Kingdom.
Operation is subject to the following
conditions:
This device may not cause harmful
interference.
This device must accept any inter- ference that may be received, in-
cluding interference that may cause
undesired operation.
14
Page 25 of 316
Therefore, make sure the Key Fob is
not inside the vehicle before closing
the door.WARNING!
For personal security and safetyin the event of an accident, lock
the vehicle doors before you drive
as well as when you park and
leave the vehicle.
When leaving the vehicle, always
remove the key fob and lock your
vehicle.
Never leave children alone in a
vehicle, or with access to an un-
locked vehicle.
Allowing children to be in a vehicle
unattended is dangerous for a
number of reasons. A child or oth-
ers could be seriously or fatally in-
jured. Children should be warned
not to touch the parking brake,
brake pedal or the shift lever. Do not leave the key fob in or near
the vehicle, and do not leave Key-
less Enter-N-Go in the ACC or
ON/RUN mode. A child could op-
erate power windows, other con-
trols, or move the vehicle. POWER DOOR LOCKS
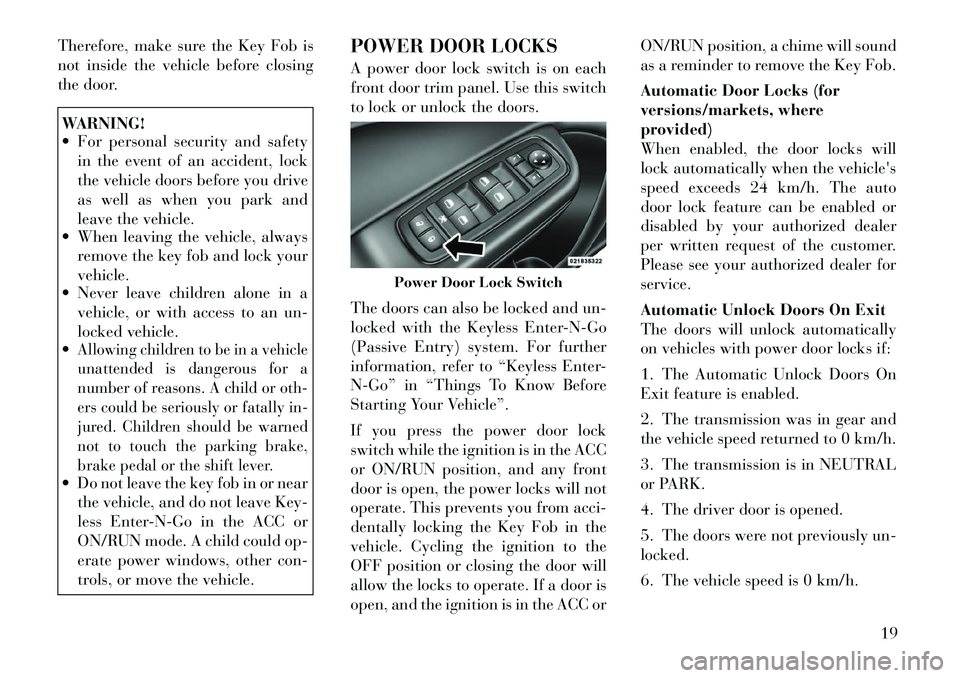
A power door lock switch is on each
front door trim panel. Use this switch
to lock or unlock the doors.
The doors can also be locked and un-
locked with the Keyless Enter-N-Go
(Passive Entry) system. For further
information, refer to “Keyless Enter-
N-Go” in “Things To Know Before
Starting Your Vehicle”.
If you press the power door lock
switch while the ignition is in the ACC
or ON/RUN position, and any front
door is open, the power locks will not
operate. This prevents you from acci-
dentally locking the Key Fob in the
vehicle. Cycling the ignition to the
OFF position or closing the door will
allow the locks to operate. If a door is
open, and the ignition is in the ACC or ON/RUN position, a chime will sound
as a reminder to remove the Key Fob.
Automatic Door Locks (for
versions/markets, where
provided)
When enabled, the door locks will
lock automatically when the vehicle's
speed exceeds 24 km/h. The auto
door lock feature can be enabled or
disabled by your authorized dealer
per written request of the customer.
Please see your authorized dealer for
service.
Automatic Unlock Doors On Exit
The doors will unlock automatically
on vehicles with power door locks if:
1. The Automatic Unlock Doors On
Exit feature is enabled.
2. The transmission was in gear and
the vehicle speed returned to 0 km/h.
3. The transmission is in NEUTRAL
or PARK.
4. The driver door is opened.
5. The doors were not previously un-
locked.
6. The vehicle speed is 0 km/h.
Power Door Lock Switch
19
Page 36 of 316

AUTOMATIC LOCKING
RETRACTOR MODE (ALR)
In this mode, the shoulder belt is au-
tomatically pre-locked. The belt will
still retract to remove any slack in the
shoulder belt. The Automatic Locking
Mode is available on all passenger-
seating positions with a combination
lap/shoulder belt. Use the Automatic
Locking Mode anytime a child safety
seat is installed in a seating position
that has a belt with this feature. Chil-
dren 12 years old and under should
always be properly restrained in the
rear seat.
How To Engage The Automatic
Locking Mode
1. Buckle the combination lap and
shoulder belt.
2. Grasp the shoulder portion and
pull downward until the entire belt is
extracted.
3. Allow the belt to retract. As the
belt retracts, you will hear a clicking
sound. This indicates the safety belt is
now in the Automatic Locking Mode.How To Disengage The Automatic
Locking Mode
Unbuckle the combination lap/
shoulder belt and allow it to retract
completely to disengage the Auto-
matic Locking Mode and activate the
vehicle sensitive (emergency) locking
mode.
WARNING!
The belt and retractor assembly
must be replaced if the seat belt
assembly Automatic Locking Re-
tractor (ALR) feature or any other
seat belt function is not working
properly when checked according
to the procedures in the Service
Manual.
Failure to replace the belt and re-
tractor assembly could increase
the risk of injury in collisions.
SEAT BELT
PRETENSIONERS
The seat belts for both front seating
positions are equipped with preten-
sioning devices that are designed to
remove slack from the seat belt in the
event of a collision. These devices may
improve the performance of the seat belt by assuring that the belt is tight
about the occupant early in a colli-
sion. Pretensioners work for all size
occupants, including those in child
restraints.
NOTE:
These devices are not a substitute
for proper seat belt placement by
the occupant. The seat belt still
must be worn snugly and posi-
tioned properly.
The pretensioners are triggered by the
Occupant Restraint Controller
(ORC). Like the air bags, the preten-
sioners are single use items. A de-
ployed pretensioner or a deployed air
bag must be replaced immediately.
ACTIVE HOOD SYSTEM
(for versions/markets,
where provided)
The Active Hood system is intended to
enhance pedestrian protection by el-
evating the vehicle’s hood upon an
impact with a pedestrian or other ob-
ject. The system is automatically acti-
vated when the vehicle is moving
within a specified vehicle speed range.
In order to detect a range of pedestri-
30
Page 37 of 316
ans, other objects that are impacted
may result in an Active Hood deploy-
ment.
Deployment Sensors And Controls
The Occupant Restraint Controller
(ORC) determines if deployment of
the actuators in a frontal impact is
required. Based on the impact sensors
signals, the ORC determines when to
deploy the actuators. The impact sen-
sors are located within the front bum-
per area.
The ORC monitors the readiness of
the electronic parts of the Active Hood
system whenever the ignition switch is
in the START or ON/RUN position. If
the key is in the LOCK position, in the
ACC position, or not in the ignition,
the Active Hood system is not on and
the Active Hood will not deploy.
The ORC contains a backup power
supply system that may deploy the
actuators even if the battery loses
power or it becomes disconnected
prior to deployment.
Service Active Hood System
If the ORC has deployed the Active
Hood, or if it detects a malfunction inany part of the system, it turns on the
Air Bag Warning Light and it will
display the “SERVICE ACTIVE
HOOD” message in the Electronic Ve-
hicle Information Center (EVIC), for
versions/markets, where provided. A
single chime will sound if the Air Bag
Warning Light comes on again after
initial startup. It also includes diag-
nostics that will illuminate the Air Bag
Warning Light if a malfunction is
noted that could affect the Active
Hood system. The diagnostics also re-
cord the nature of the malfunction. If
the Air Bag Warning Light is illumi-
nated, or if “SERVICE ACTIVE
HOOD” appears in the EVIC, see
your authorized dealer.
In the event of an Active Hood deploy-
ment, the vehicle should be serviced
by an authorized dealer. The hood
hinges must be serviced and the ac-
tuator assemblies replaced to restore
system functionality.
Following an Active Hood deploy-
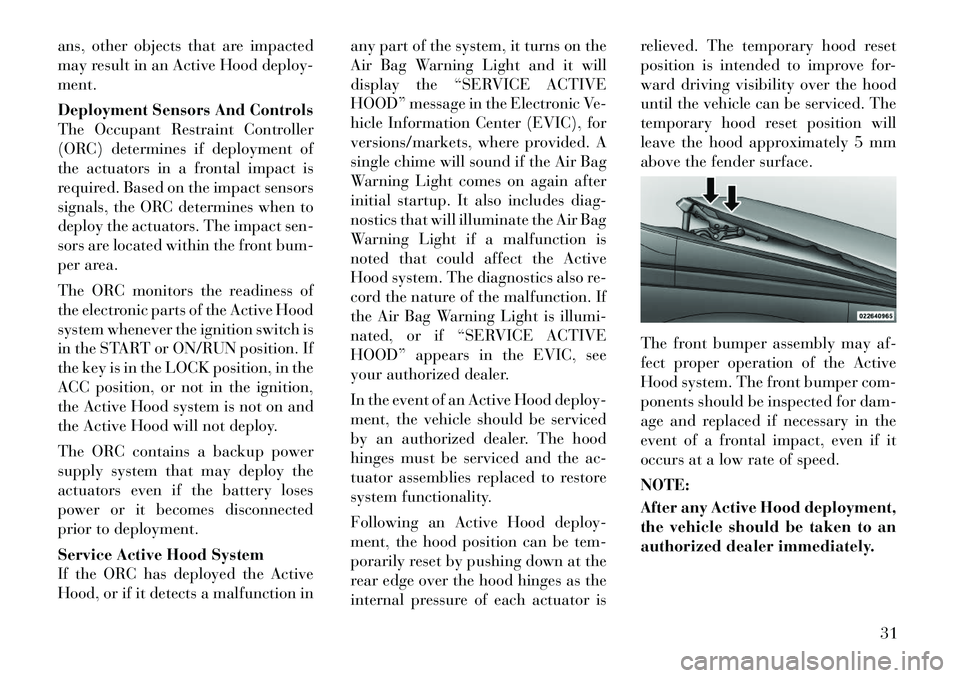
ment, the hood position can be tem-
porarily reset by pushing down at the
rear edge over the hood hinges as the
internal pressure of each actuator isrelieved. The temporary hood reset
position is intended to improve for-
ward driving visibility over the hood
until the vehicle can be serviced. The
temporary hood reset position will
leave the hood approximately 5 mm
above the fender surface.
The front bumper assembly may af-
fect proper operation of the Active
Hood system. The front bumper com-
ponents should be inspected for dam-
age and replaced if necessary in the
event of a frontal impact, even if it
occurs at a low rate of speed.
NOTE:
After any Active Hood deployment,
the vehicle should be taken to an
authorized dealer immediately.
31
Page 38 of 316

CAUTION!
To prevent possible damage, do not
slam the rear of the hood to reset it.
Press the rear of the hood down until
it is approximately 5 mm above the
fender. This should secure both hood
hinge reset mechanisms.WARNING!
Ignoring the Air Bag Warning
Light in your instrument panel or
the “SERVICE ACTIVE HOOD”
message in the EVIC could mean
you won’t have the Active Hood to
enhance pedestrian protection. If
the light does not come on as a bulb
check when the ignition is first
turned on, stays on after you start
the vehicle, or if it comes on as you
drive, see your authorized dealer.Modifications to any part of the
Active Hood system could cause it
to fail when you need it. Do not
modify the components or wiring.
Do not modify the front bumper,
vehicle body structure, or add an
aftermarket front bumper or cover.
(Continued)
WARNING!(Continued)
It is dangerous to try to repair any
part of the Active Hood system
yourself. Be sure to tell anyone
who works on your vehicle that it
has an Active Hood system.
Do not attempt to modify any part
of your Active Hood system. The
Active Hood may deploy acciden-
tally or may not function properly
if modifications are made. Take
your vehicle to an authorized
dealer for any hood service.
Drivers must be aware of pedestri-
ans. Always be sure to check for
pedestrians, animals, other ve-
hicles, and obstructions. You are
responsible for safety and must
continue to pay attention to your
surroundings. Failure to do so can
result in serious injury or death.
ENHANCED SEAT BELT
USE REMINDER SYSTEM
(BeltAlert®)BeltAlert® is a feature intended to re-
mind the driver and front passenger
(for versions/markets, where provided
with front passenger BeltAlert®) to fasten their seat belts. The feature is
active whenever the ignition is on. If
the driver or front seat passenger is
unbelted, the Seat Belt Reminder Light
will turn on and remain on until both
front seat belts are fastened.
The BeltAlert® warning sequence be-
gins after the vehicle speed is over
8 km/h, by blinking the Seat Belt
Reminder Light and sounding an in-
termittent chime. Once the sequence
starts, it will continue for the entire
duration or until the respective seat-
belts are fastened. After the sequence
completes, the Seat Belt Reminder
Light remains illuminated until the
respective seat belts are fastened. The
driver should instruct all other occu-
pants to fasten their seat belts. If a
front seat belt is unbuckled while
traveling at speeds greater than
8 km/h, BeltAlert® will provide both
audio and visual notification.
The front passenger seat BeltAlert® is
not active when the front passenger
seat is unoccupied. BeltAlert® may be
triggered when an animal or heavy
object is on the front passenger seat or
when the seat is folded flat (for
32
Page 44 of 316
ACC position, or not in the ignition,
the air bag system is not on and the air
bags will not inflate.
The ORC contains a backup power
supply system that may deploy the air
bags even if the battery loses power or
it becomes disconnected prior to de-
ployment.Also, the ORC turns on the
Air Bag Warning Light in
the instrument panel for
approximately four to eight
seconds for a self-check when the ig-
nition is first turned on. After the self-
check, the Air Bag Warning Light will
turn off. If the ORC detects a mal-
function in any part of the system, it
turns on the Air Bag Warning Light,
either momentarily or continuously. A
single chime will sound if the light
comes on again after initial startup.
It also includes diagnostics that will
illuminate the instrument cluster Air
Bag Warning Light if a malfunction is
noted that could affect the air bag
system. The diagnostics also record
the nature of the malfunction.
WARNING!
Ignoring the Air Bag Warning Light
in your instrument panel could
mean you won't have the air bags to
protect you in a collision. If the light
does not come on as a bulb check
when the ignition is first turned on,
stays on after you start the vehicle,
or if it comes on as you drive, have
an authorized dealer service the air
bag system immediately.
Driver And Passenger Advanced
Front Air Bag Inflator Units
The Driver and Passenger Advanced
Front Air Bag Inflator Units are lo-
cated in the center of the steering
wheel and on the right side of the
instrument panel. When the ORC de-
tects a collision requiring the Ad-
vanced Front Air Bags, it signals the
inflator units. A large quantity of non-
toxic gas is generated to inflate the
Advanced Front Air Bags. Different
air bag inflation rates are possible,
based on the collision type and sever-
ity. The steering wheel hub trim cover
and the upper right side of the instru-
ment panel separate and fold out of the way as the air bags inflate to their
full size. The air bags fully inflate in
about 50 to 70 milliseconds. This is
about half of the time it takes to blink
your eyes. The air bags then quickly
deflate while helping to restrain the
driver and front passenger.
The Advanced Front Air Bag gas is
vented through the vent holes in the
sides of the air bag. In this way, the air
bags do not interfere with your con-
trol of the vehicle.
Supplemental Driver Side Knee
Air Bag Inflator Unit (for
versions/markets, where
provided)
The Supplemental Driver Side Knee
Air Bag unit is located in the instru-
ment panel trim beneath the steering
column. When the ORC detects a col-
lision requiring the air bag, it signals
the inflator units. A large quantity of
non-toxic gas is generated to inflate
the Supplemental Driver Side Knee
Air Bag. The trim cover separates and
folds out of the way allowing the air
bag to inflate to the full size. The air
bag fully inflates in about 15 to 20
milliseconds. The Supplemental
38