keyless entry Lancia Thema 2013 Owner handbook (in English)
[x] Cancel search | Manufacturer: LANCIA, Model Year: 2013, Model line: Thema, Model: Lancia Thema 2013Pages: 336, PDF Size: 3.87 MB
Page 28 of 336

To Engage Or Disengage The
Child-Protection Door Lock
System
1. Open the rear door.
2. Insert the tip of the emergency key
into the lock and rotate to the LOCK
or UNLOCK position.
3. Repeat steps 1 and 2 for the oppo-
site rear door.WARNING!Avoid trapping anyone in a vehicle in
a collision. Remember that the rear
doors can only be opened from the
outside when the Child-Protection
locks are engaged (locked).
NOTE: For emergency exit from
the rear seats when the Child-
Protection Door Lock System is
engaged, manually raise the door
lock knob to the unlocked posi-
tion, roll down the window, and
open the door using the outside
door handle.KEYLESS ENTERNGO™The Passive Entry system is an en-
hancement to the vehicle’s Remote
Keyless Entry (RKE) system and a
feature of Keyless EnterNGo™.
This feature allows you to lock and
unlock the vehicle’s door(s) without
having to press the RKE transmitter
lock or unlock buttons.
NOTE:
Passive Entry may be pro-grammed ON/OFF; refer to
“Uconnect Touch™ Settings” in
“Understanding Your Instru-
ment Panel” for further infor-
mation.
If wearing gloves on your hands,
or if it has been raining on the
Passive Entry door handle, the unlock sensitivity can be affected,
resulting in a slower response
time.
If the vehicle is unlocked by
the RKE transmitter or Passive
Entry and no door goes ajar
within 60 seconds, the vehicle
will re-lock and will arm the
theft alarm.
To Unlock From The Driver's Side:
With a valid Passive Entry RKE
transmitter within 1.5 m of the driv-
er's door handle, grab the front driver
door handle to unlock the driver's
door automatically. The interior door
panel lock knob will raise when the
door is unlocked.
Child-Protection Door Lock Function
Grabbing The Driver's Door Handle
22
Page 32 of 336
Reset Auto-Up
Should the Auto Up feature stop
working, the window probably needs
to be reset. To reset Auto Up:
1.
Pull the window switch up to close
the window completely and continue
to hold the switch up for an additional
two seconds after the window is closed.
2. Push the window switch down
firmly to the second detent to open the
window completely and continue to
hold the switch down for an addi-
tional two seconds after the window is
fully open.
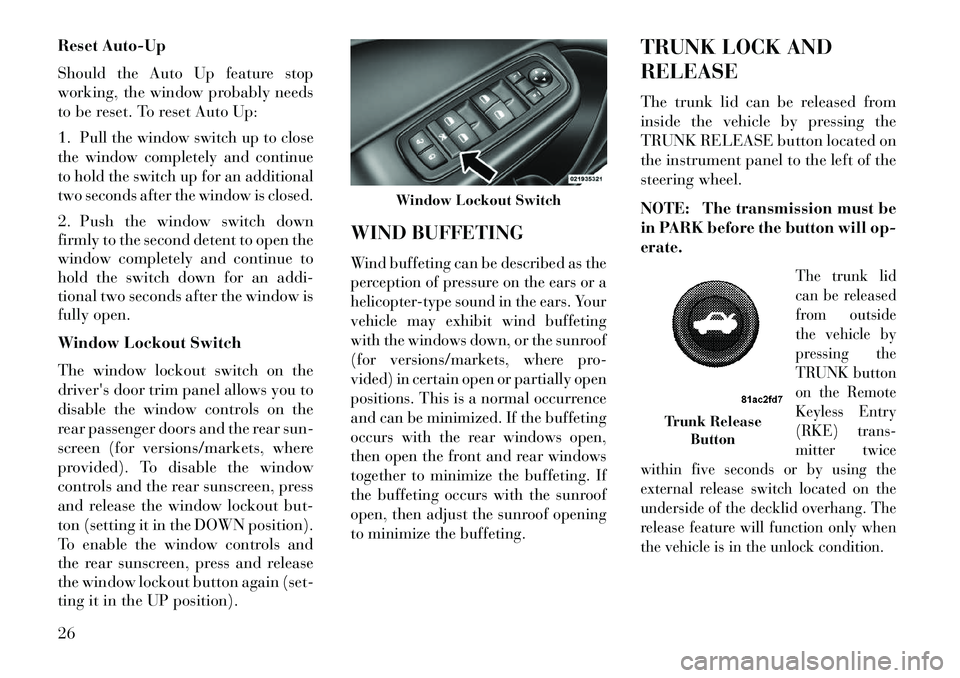
Window Lockout Switch
The window lockout switch on the
driver's door trim panel allows you to
disable the window controls on the
rear passenger doors and the rear sun-
screen (for versions/markets, where
provided). To disable the window
controls and the rear sunscreen, press
and release the window lockout but-
ton (setting it in the DOWN position).
To enable the window controls and
the rear sunscreen, press and release
the window lockout button again (set-
ting it in the UP position). WIND BUFFETING
Wind buffeting can be described as the
perception of pressure on the ears or a
helicopter-type sound in the ears. Your
vehicle may exhibit wind buffeting
with the windows down, or the sunroof
(for versions/markets, where pro-
vided) in certain open or partially open
positions. This is a normal occurrence
and can be minimized. If the buffeting
occurs with the rear windows open,
then open the front and rear windows
together to minimize the buffeting. If
the buffeting occurs with the sunroof
open, then adjust the sunroof opening
to minimize the buffeting.
TRUNK LOCK AND
RELEASE
The trunk lid can be released from
inside the vehicle by pressing the
TRUNK RELEASE button located on
the instrument panel to the left of the
steering wheel.
NOTE: The transmission must be
in PARK before the button will op-
erate.
The trunk lid
can be released
from outside
the vehicle by
pressing the
TRUNK button
on the Remote
Keyless Entry
(RKE) trans-
mitter twice
within five seconds or by using the
external release switch located on the
underside of the decklid overhang. The
release feature will function only when
the vehicle is in the unlock condition.
Window Lockout Switch
Trunk Release Button
26
Page 33 of 336
With the ignition in the ON/RUN po-
sition, the Trunk Open symbol will
display in the instrument cluster indi-
cating that the trunk is open. The
odometer display will reappear once
the trunk is closed.
With the ignition in the OFF position,
the Trunk Open symbol will display
until the trunk is closed.
Refer to “Keyless EnterNGo™” in
“Things To Know Before Starting
Your Vehicle” for more information
on trunk operation with the Passive
Entry feature.
TRUNK SAFETY
WARNINGWARNING!Do not allow children to have access
to the trunk, either by climbing into
the trunk from outside, or through
the inside of the vehicle. Always
close the trunk lid when your vehicle
is unattended. Once in the trunk,
young children may not be able to
(Continued)
WARNING!(Continued)escape, even if they entered through
the rear seat. If trapped in the trunk,
children can die from suffocation or
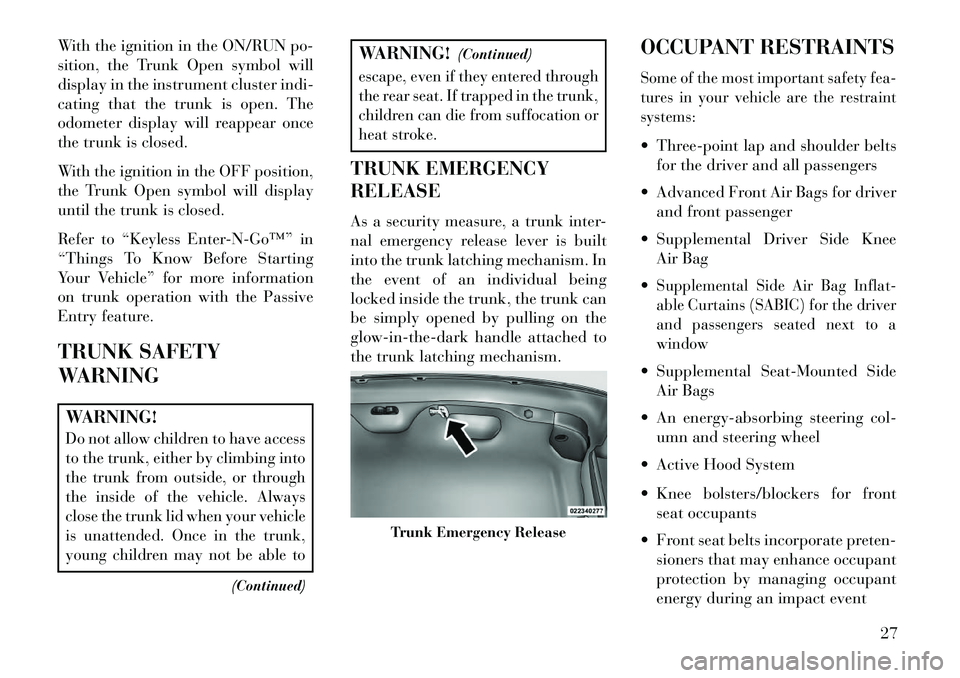
heat stroke.TRUNK EMERGENCY
RELEASE
As a security measure, a trunk inter-
nal emergency release lever is built
into the trunk latching mechanism. In
the event of an individual being
locked inside the trunk, the trunk can
be simply opened by pulling on the
glow-in-the-dark handle attached to
the trunk latching mechanism. OCCUPANT RESTRAINTS
Some of the most important safety fea-
tures in your vehicle are the restraint
systems: Three-point lap and shoulder belts
for the driver and all passengers
Advanced Front Air Bags for driver and front passenger
Supplemental Driver Side Knee Air Bag
Supplemental Side Air Bag Inflat-
able Curtains (SABIC) for the driver
and passengers seated next to a
window Supplemental Seat-Mounted Side Air Bags
An energy-absorbing steering col- umn and steering wheel
Active Hood System
Knee bolsters/blockers for front seat occupants
Front seat belts incorporate preten- sioners that may enhance occupant
protection by managing occupant
energy during an impact event
Trunk Emergency Release
27
Page 67 of 336
LINKING AND UNLINKING THE REMOTEKEYLESS ENTRY TRANSMITTER TO
MEMORY . . . . . . . . . . . . . . . . . . . . . . . . . . . . .107
MEMORY POSITION RECALL . . . . . . . . . . . . .107
EASY ENTRY/EXIT SEAT (Available With Memory Seat Only) . . . . . . . . .107
TO OPEN AND CLOSE THE HOOD . . . . . . . . . . . .108
LIGHTS . . . . . . . . . . . . . . . . . . . . . . . . . . . . . . . .109
HEADLIGHT SWITCH . . . . . . . . . . . . . . . . . . .109
AUTOMATIC HEADLIGHTS . . . . . . . . . . . . . .109
HEADLIGHTS ON WITH WIPERS(Available With Automatic Headlights Only) . . .109 HEADLIGHT TIME DELAY . . . . . . . . . . . . . . .110
SMARTBEAM™(for versions/markets, where provided) . . . . . .110
DAYTIME RUNNING LIGHTS (for versions/markets, where provided) . . . . . .111
ADAPTIVE BI-XENON HIGH INTENSITY DISCHARGE HEADLIGHTS . . . . . . . . . . . . . . .111
LIGHTS-ON REMINDER . . . . . . . . . . . . . . . . .111
FOG LIGHTS . . . . . . . . . . . . . . . . . . . . . . . . . .111
MULTIFUNCTION LEVER . . . . . . . . . . . . . . . .112
TURN SIGNALS . . . . . . . . . . . . . . . . . . . . . . . .112
LANE CHANGE ASSIST . . . . . . . . . . . . . . . . . .112
HIGH/LOW BEAM SWITCH . . . . . . . . . . . . . .112
FLASH-TO-PASS . . . . . . . . . . . . . . . . . . . . . . .112
61
Page 74 of 336
OUTSIDE MIRRORS
WITH TURN SIGNAL AND
APPROACH LIGHTING
(for versions/markets,
where provided)
Driver and passenger outside mirrors
with turn signals located within the
mirror housing and approach lighting
located within mirror glass contain
five LEDs.
Three of the LEDs are turn signal
indicators, which flash with the corre-
sponding turn signal lights in the
front and rear of the vehicle. Turning
on the Hazard Warning flashers will
also activate these LEDs.The other two LEDs supply illumi-
nated entry lighting, which turns on in
both mirrors when you use the Remote
Keyless Entry (RKE) transmitter or
open any door. These LEDs shine out-
ward to illuminate the front and rear
door handles. They also shine down-
ward to illuminate the area in front of
the doors.The Illuminated Entry lighting fades
to off after about 30 seconds or it willfade to off immediately once the igni-
tion is placed into the RUN position.
NOTE:
The approach lighting will
not function when the shift lever is
moved out of the PARK position.
TILT MIRRORS IN
REVERSE (for versions/
markets, where provided)Tilt Mirrors in Reverse provides auto-
matic outside mirror positioning which
will aid the driver’s view of the ground
rearward of the front doors. The out-
side mirrors will move slightly down-
ward from the present position when
the vehicle is shifted into REVERSE.
The outside mirrors will then return to
the original position when the vehicle is
shifted out of the REVERSE position.
Each stored memory setting will have
an associated Tilt Mirrors in Reverse
position.NOTE:
The Tilt Mirrors in Reverse fea- ture is not turned on when deliv-
ered from the factory. The Tilt
Mirrors in Reverse feature can
be turned on and off using the
Uconnect Touch™ System. Refer to “Uconnect Touch™ Set-
tings” in “Understanding Your
Instrument Panel” for further
information.
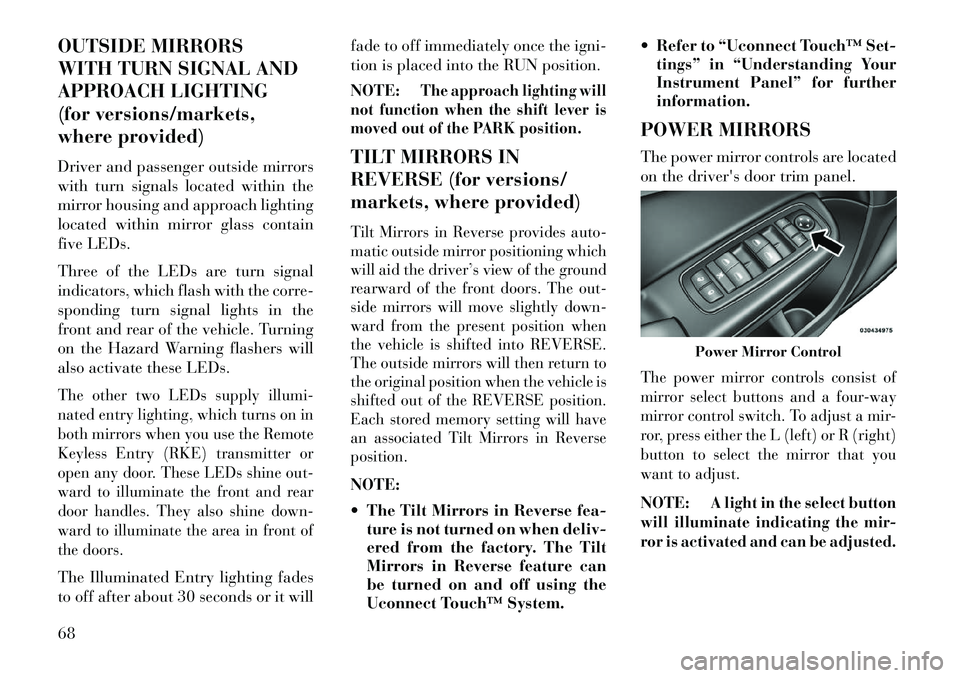
POWER MIRRORS
The power mirror controls are located
on the driver's door trim panel.
The power mirror controls consist of
mirror select buttons and a four-way
mirror control switch. To adjust a mir-
ror, press either the L (left) or R (right)
button to select the mirror that you
want to adjust.NOTE:
A light in the select button
will illuminate indicating the mir-
ror is activated and can be adjusted.Power Mirror Control
68
Page 112 of 336
desired position settings for the driver
seat, side mirrors, adjustable pedals
(for versions/markets, where pro-
vided), and power tilt and telescopic
steering column (for versions/
markets, where provided) and a set of
desired radio station presets. Your Re-
mote Keyless Entry (RKE) transmit-
ter can also be programmed to recall
the same positions when the UN-
LOCK button is pressed.
NOTE:
Only one RKE transmitter canbe linked to each of the memory
positions.
Passive Entry door handles can- not be linked to the memory
function. Use either the memory
recall switch or the RKE trans-
mitter (if linked to the memory
feature) to recall memory posi-
tions 1 or 2.
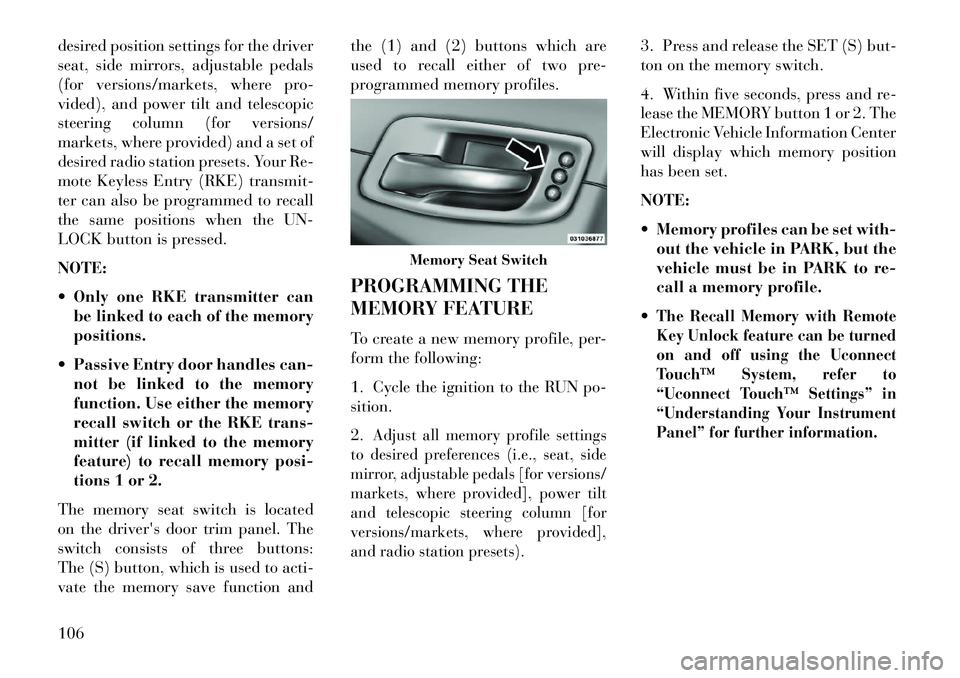
The memory seat switch is located
on the driver's door trim panel. The
switch consists of three buttons:
The (S) button, which is used to acti-
vate the memory save function and the (1) and (2) buttons which are
used to recall either of two pre-
programmed memory profiles.
PROGRAMMING THE
MEMORY FEATURE
To create a new memory profile, per-
form the following:
1. Cycle the ignition to the RUN po-
sition.
2.
Adjust all memory profile settings
to desired preferences (i.e., seat, side
mirror, adjustable pedals [for versions/
markets, where provided], power tilt
and telescopic steering column [for
versions/markets, where provided],
and radio station presets).
3. Press and release the SET (S) but-
ton on the memory switch.
4. Within five seconds, press and re-
lease the MEMORY button 1 or 2. The
Electronic Vehicle Information Center
will display which memory position
has been set.
NOTE:
Memory profiles can be set with- out the vehicle in PARK, but the
vehicle must be in PARK to re-
call a memory profile.
The Recall Memory with Remote
Key Unlock feature can be turned
on and off using the Uconnect
Touch™ System, refer to
“Uconnect Touch™ Settings” in
“Understanding Your Instrument
Panel” for further information.
Memory Seat Switch
106
Page 113 of 336
LINKING AND UNLINKING
THE REMOTE KEYLESS
ENTRY TRANSMITTER TO
MEMORY
Your RKE transmitters can be pro-
grammed to recall one of two pre-
programmed memory profiles by
pressing the UNLOCK button on the
RKE transmitter.
To program your RKE transmitters,
perform the following:
1. Cycle the ignition to the OFF posi-
tion.
2. Select desired memory profile (1)
or (2).
3. Once the profile has been recalled,
press and release the SET (S) button
on the memory switch, then press and
release button (1) or (2) accordingly.
“Memory Profile Set” (1 or 2) will
display in the instrument cluster on
vehicles equipped with the EVIC.
4. Press and release the LOCK but-
ton on the RKE transmitter within
10 seconds.NOTE: Your RKE transmitters
can be unlinked to your memory
settings by pressing the SET (S)
button followed by the UNLOCK
button on the RKE transmitter in
Step 4 above.
MEMORY POSITION
RECALL
NOTE: The vehicle must be in
PARK to recall memory positions.
If a recall is attempted when the
vehicle is not in PARK, a message
will display in the EVIC.
To recall the memory settings for
driver, press MEMORY button num-
ber (1) on the driver's door or the
UNLOCK button on the RKE trans-
mitter linked to memory position 1.
To recall the memory setting for
driver, press MEMORY button num-
ber (2) on the driver's door or the
UNLOCK button on the RKE trans-
mitter linked to memory position 2.
A recall can be cancelled by pressing
any of the MEMORY buttons (S, 1,
or 2) on the driver's door during a
recall. When a recall is cancelled, thedriver seat, side mirror, adjustable
pedals (for versions/markets, where
provided), and power tilt and tele-
scopic steering column (for versions/
markets, where provided) stop mov-
ing. A delay of one second will occur
before another recall can be selected.
EASY ENTRY/EXIT SEAT
(Available With Memory
Seat Only)
This feature provides automatic
driver seat positioning to enhance
driver mobility when entering and
exiting the vehicle.
The distance the driver seat moves
depends on where you have the driver
seat positioned when you place the
ignition to the OFF position.
When you cycle the ignition to the
OFF position, the driver seat will
move about 60 mm rearward if the
driver seat position is greater than
or equal to 68 mm forward of the
rear stop. The seat will return to its
previously set position when you
place the ignition into the ACC or
RUN position.
107
Page 123 of 336
TILT/TELESCOPING
STEERING COLUMN
This feature allows you to tilt the
steering column upward or down-
ward. It also allows you to lengthen or
shorten the steering column. The tilt/
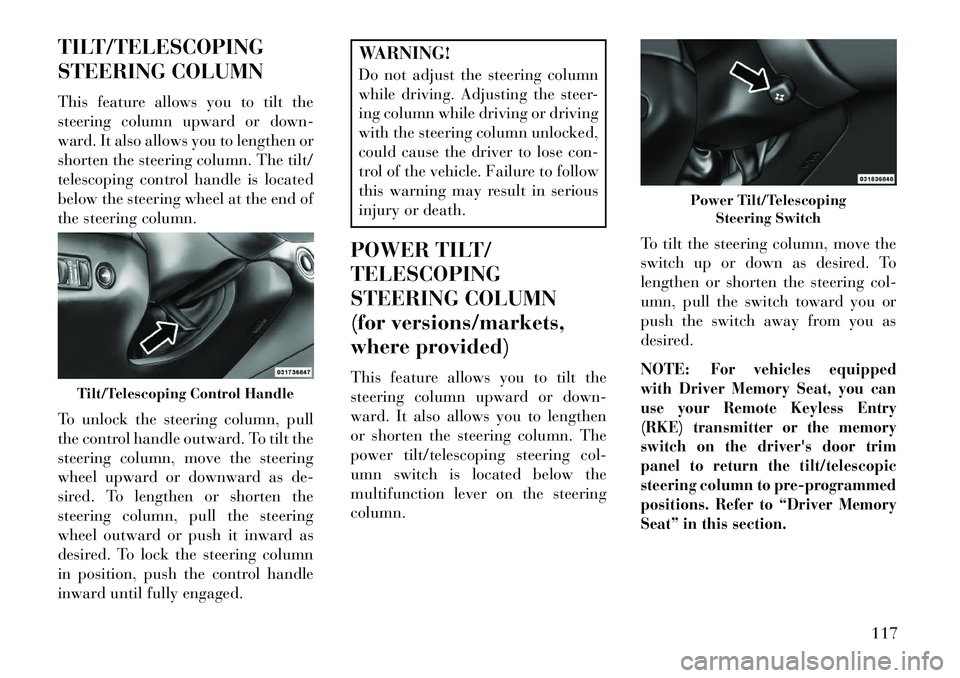
telescoping control handle is located
below the steering wheel at the end of
the steering column.
To unlock the steering column, pull
the control handle outward. To tilt the
steering column, move the steering
wheel upward or downward as de-
sired. To lengthen or shorten the
steering column, pull the steering
wheel outward or push it inward as
desired. To lock the steering column
in position, push the control handle
inward until fully engaged.
WARNING!
Do not adjust the steering column
while driving. Adjusting the steer-
ing column while driving or driving
with the steering column unlocked,
could cause the driver to lose con-
trol of the vehicle. Failure to follow
this warning may result in serious
injury or death.
POWER TILT/
TELESCOPING
STEERING COLUMN
(for versions/markets,
where provided)
This feature allows you to tilt the
steering column upward or down-
ward. It also allows you to lengthen
or shorten the steering column. The
power tilt/telescoping steering col-
umn switch is located below the
multifunction lever on the steering
column. To tilt the steering column, move the
switch up or down as desired. To
lengthen or shorten the steering col-
umn, pull the switch toward you or
push the switch away from you as
desired.
NOTE:
For vehicles equipped
with Driver Memory Seat, you can
use your Remote Keyless Entry
(RKE) transmitter or the memory
switch on the driver's door trim
panel to return the tilt/telescopic
steering column to pre-programmed
positions. Refer to “Driver Memory
Seat” in this section.
Tilt/Telescoping Control Handle
Power Tilt/Telescoping Steering Switch
117
Page 125 of 336
ADJUSTABLE PEDALS
(for versions/markets,
where provided)
The adjustable pedals system is de-
signed to allow a greater range of
driver comfort for steering wheel tilt
and seat position. This feature allows
the brake and accelerator pedals to
move toward or away from the driver
to provide improved position with the
steering wheel.
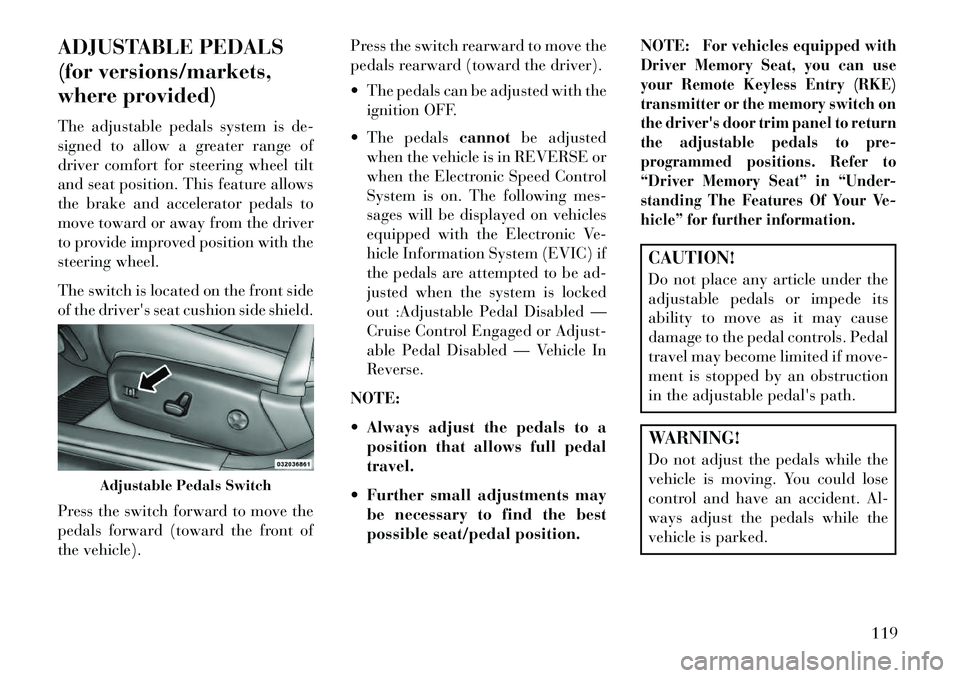
The switch is located on the front side
of the driver's seat cushion side shield.
Press the switch forward to move the
pedals forward (toward the front of
the vehicle).Press the switch rearward to move the
pedals rearward (toward the driver).
The pedals can be adjusted with the
ignition OFF.
The pedals cannotbe adjusted
when the vehicle is in REVERSE or
when the Electronic Speed Control
System is on. The following mes-
sages will be displayed on vehicles
equipped with the Electronic Ve-
hicle Information System (EVIC) if
the pedals are attempted to be ad-
justed when the system is locked
out :Adjustable Pedal Disabled —
Cruise Control Engaged or Adjust-
able Pedal Disabled — Vehicle In
Reverse.
NOTE:
Always adjust the pedals to a position that allows full pedal
travel.
Further small adjustments may be necessary to find the best
possible seat/pedal position. NOTE:
For vehicles equipped with
Driver Memory Seat, you can use
your Remote Keyless Entry (RKE)
transmitter or the memory switch on
the driver's door trim panel to return
the adjustable pedals to pre-
programmed positions. Refer to
“Driver Memory Seat” in “Under-
standing The Features Of Your Ve-
hicle” for further information.
CAUTION!
Do not place any article under the
adjustable pedals or impede its
ability to move as it may cause
damage to the pedal controls. Pedal
travel may become limited if move-
ment is stopped by an obstruction
in the adjustable pedal's path.WARNING!
Do not adjust the pedals while the
vehicle is moving. You could lose
control and have an accident. Al-
ways adjust the pedals while the
vehicle is parked.
Adjustable Pedals Switch
119
Page 146 of 336

TURNING PARKVIEW® ON
OR OFF — WITH TOUCH
SCREEN
Perform the following steps on the
touch screen to turn the Parkview®
Backup Camera ON or OFF:
1. Press the “More” soft-key (where
available).
2. Press the “Settings” soft-key.
3. Press the “Safety & Driving Assis-
tance” soft-key.
4. Press the check box soft key next
to “Parkview® Backup Camera” to
enable/disable.
OVERHEAD CONSOLE
The overhead console contains
courtesy/reading lights and storage
for sunglasses. Power sunroof
switches may also be included, (for
versions/markets, where provided).
Refer to your “Lights” section for
more information.SUNGLASS BIN DOOR
At the front of the console a compart-
ment is provided for the storage of a
pair of sunglasses. The storage com-
partment access is a “push/push” de-
sign. Push the chrome pad on the door
to open. Push the chrome pad on the
door to close.POWER SUNROOF
(for versions/markets,
where provided)
The power sunroof switch is located
between the sun visors on the over-
head console.
WARNING!
Never leave children in a vehicle
with the Remote Keyless Entry
(RKE) transmitter in the passen-
ger compartment. Occupants,
particularly unattended children,
can become entrapped by the
power sunroof while operating
the power sunroof switch. Such
entrapment may result in serious
injury or death.
(Continued)
Overhead ConsoleSunglass Bin Door
Power Sunroof Switch
140