ignition Lancia Thema 2013 Owner handbook (in English)
[x] Cancel search | Manufacturer: LANCIA, Model Year: 2013, Model line: Thema, Model: Lancia Thema 2013Pages: 336, PDF Size: 3.87 MB
Page 119 of 336
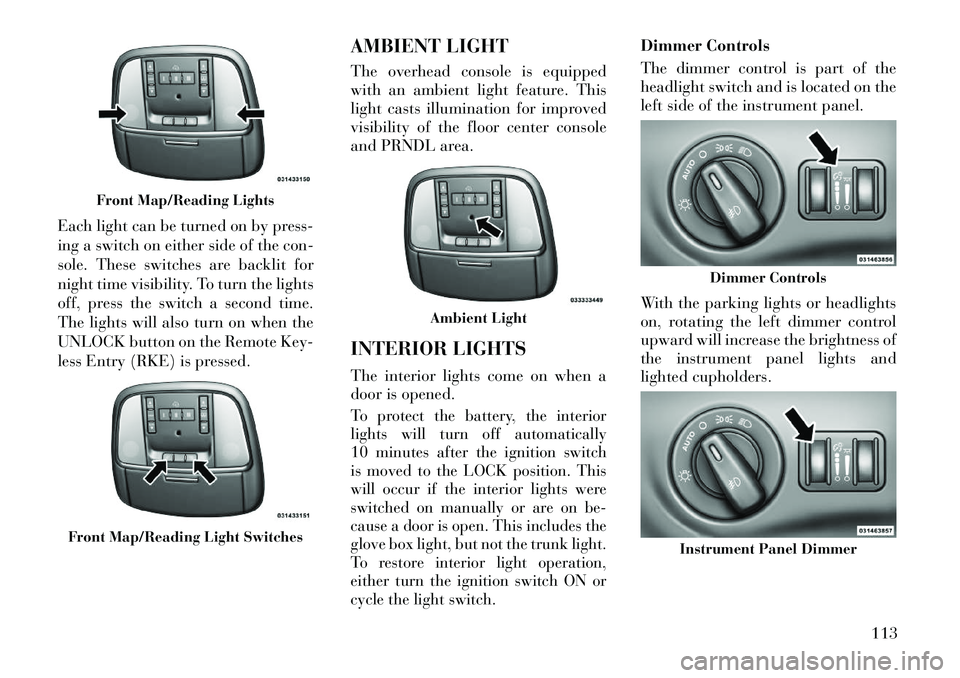
Each light can be turned on by press-
ing a switch on either side of the con-
sole. These switches are backlit for
night time visibility. To turn the lights
off, press the switch a second time.
The lights will also turn on when the
UNLOCK button on the Remote Key-
less Entry (RKE) is pressed.AMBIENT LIGHT
The overhead console is equipped
with an ambient light feature. This
light casts illumination for improved
visibility of the floor center console
and PRNDL area.
INTERIOR LIGHTS
The interior lights come on when a
door is opened.
To protect the battery, the interior
lights will turn off automatically
10 minutes after the ignition switch
is moved to the LOCK position. This
will occur if the interior lights were
switched on manually or are on be-
cause a door is open. This includes the
glove box light, but not the trunk light.
To restore interior light operation,
either turn the ignition switch ON or
cycle the light switch.
Dimmer Controls
The dimmer control is part of the
headlight switch and is located on the
left side of the instrument panel.
With the parking lights or headlights
on, rotating the left dimmer control
upward will increase the brightness of
the instrument panel lights and
lighted cupholders.
Front Map/Reading Lights
Front Map/Reading Light Switches
Ambient Light
Dimmer Controls
Instrument Panel Dimmer
113
Page 120 of 336
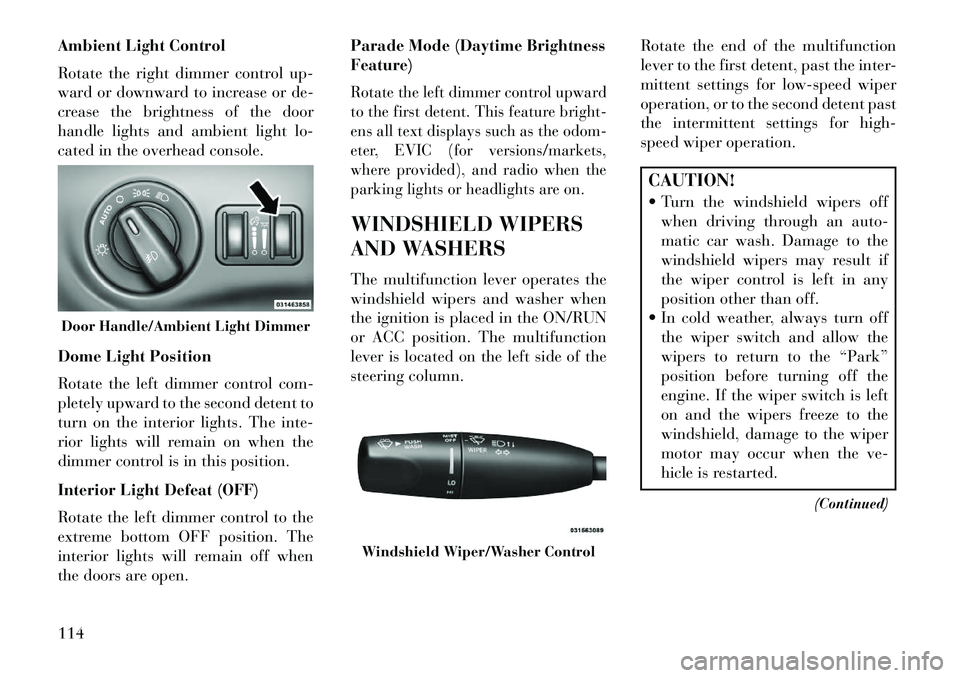
Ambient Light Control
Rotate the right dimmer control up-
ward or downward to increase or de-
crease the brightness of the door
handle lights and ambient light lo-
cated in the overhead console.
Dome Light Position
Rotate the left dimmer control com-
pletely upward to the second detent to
turn on the interior lights. The inte-
rior lights will remain on when the
dimmer control is in this position.
Interior Light Defeat (OFF)
Rotate the left dimmer control to the
extreme bottom OFF position. The
interior lights will remain off when
the doors are open.Parade Mode (Daytime Brightness
Feature)
Rotate the left dimmer control upward
to the first detent. This feature bright-
ens all text displays such as the odom-
eter, EVIC (for versions/markets,
where provided), and radio when the
parking lights or headlights are on.WINDSHIELD WIPERS
AND WASHERS
The multifunction lever operates the
windshield wipers and washer when
the ignition is placed in the ON/RUN
or ACC position. The multifunction
lever is located on the left side of the
steering column.
Rotate the end of the multifunction
lever to the first detent, past the inter-
mittent settings for low-speed wiper
operation, or to the second detent past
the intermittent settings for high-
speed wiper operation.
CAUTION!
Turn the windshield wipers off
when driving through an auto-
matic car wash. Damage to the
windshield wipers may result if
the wiper control is left in any
position other than off.
In cold weather, always turn off the wiper switch and allow the
wipers to return to the “Park”
position before turning off the
engine. If the wiper switch is left
on and the wipers freeze to the
windshield, damage to the wiper
motor may occur when the ve-
hicle is restarted.
(Continued)
Door Handle/Ambient Light Dimmer
Windshield Wiper/Washer Control
114
Page 122 of 336

The sensitivity of the system can be
adjusted with the multifunction lever.
Wiper delay position 1 is the least sen-
sitive, and wiper delay position 4 is the
most sensitive. Setting 3 should be used
for normal rain conditions. Settings 1
and 2 can be used if the driver desires
less wiper sensitivity. Settings 4 can be
used if the driver desires more sensitiv-
ity. The rain sense wipers will auto-
matically change between an intermit-
tent wipe, slow wipe and a fast wipe
depending on the amount of moisture
that is sensed on the windshield. Place
the wiper switch in the OFF position
when not using the system.The Rain Sensing feature can be
turned on and off using the Uconnect
Touch™ System, refer to “Uconnect
Touch™ Settings” in “Understanding
Your Instrument Panel” for further
information.
NOTE:
The Rain Sensing feature will not
operate when the wiper speed is
in the low or high position.
The Rain Sensing feature maynot function properly when ice
or dried salt water is present on
the windshield.
The use of products containing wax or silicone may reduce rain
sensor performance.
The Rain Sensing system has protec-
tive features for the wiper blades and
arms. It will not operate under the
following conditions:
Low Temperature Wipe Inhibit
— The Rain Sensing feature will
not operate when the ignition is
placed in the RUN position, the ve-
hicle is stationary and the outside
temperature is below 0°C, unless
the wiper control on the multifunc-
tion lever is moved, the vehicle
speed becomes greater than 0 km/h
or the outside temperature rises
above freezing.
Neutral Wipe Inhibit — The Rain
Sensing feature will not operate
when the ignition is placed in the
RUN position, the transmission
shift lever is in the NEUTRAL po-
sition and the vehicle speed is less than 8 km/h, unless the wiper con-
trol on the multifunction lever is
moved or the shift lever is moved
out of the NEUTRAL position.
HEADLIGHT WASHERS
The multifunction lever operates the
headlight washers when the ignition
switch is in the ON position and the
headlights are turned on. The multi-
function lever is located on the left
side of the steering column.
To use the headlight washers, push
the multifunction lever inward (to-
ward the steering column) to the sec-
ond detent and release it. The head-
light washers will spray a timed high-
pressure spray of washer fluid onto
each headlight lens. In addition, the
windshield washers will spray the
windshield and the windshield wipers
will cycle.
NOTE: After turning the ignition
switch and headlights ON, the
headlight washers will operate on
the first spray of the windshield
washer and then every eleventh
spray after that.
116
Page 125 of 336
ADJUSTABLE PEDALS
(for versions/markets,
where provided)
The adjustable pedals system is de-
signed to allow a greater range of
driver comfort for steering wheel tilt
and seat position. This feature allows
the brake and accelerator pedals to
move toward or away from the driver
to provide improved position with the
steering wheel.
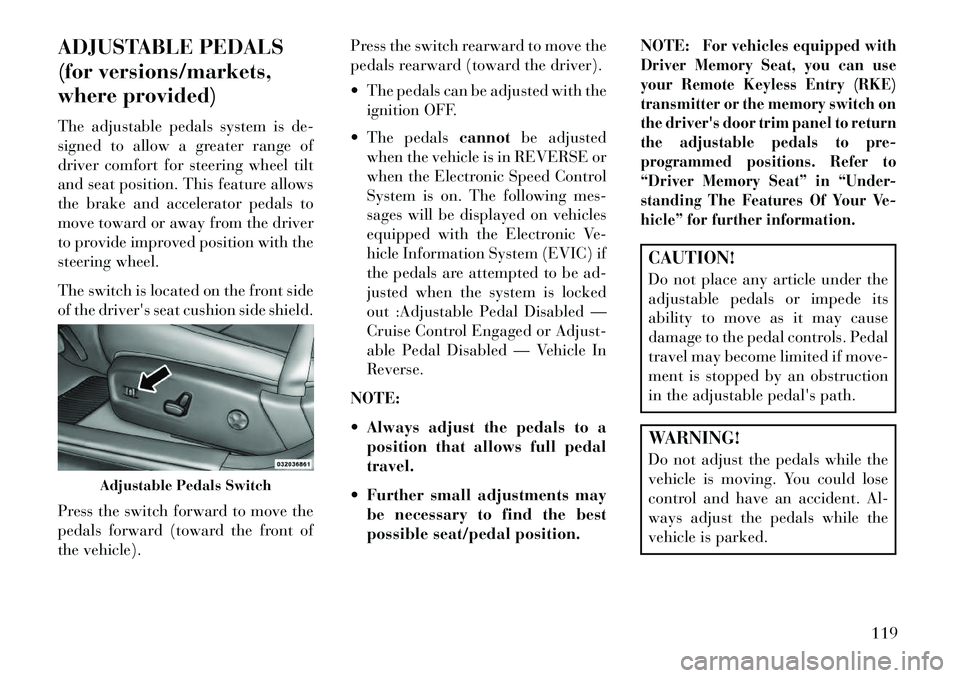
The switch is located on the front side
of the driver's seat cushion side shield.
Press the switch forward to move the
pedals forward (toward the front of
the vehicle).Press the switch rearward to move the
pedals rearward (toward the driver).
The pedals can be adjusted with the
ignition OFF.
The pedals cannotbe adjusted
when the vehicle is in REVERSE or
when the Electronic Speed Control
System is on. The following mes-
sages will be displayed on vehicles
equipped with the Electronic Ve-
hicle Information System (EVIC) if
the pedals are attempted to be ad-
justed when the system is locked
out :Adjustable Pedal Disabled —
Cruise Control Engaged or Adjust-
able Pedal Disabled — Vehicle In
Reverse.
NOTE:
Always adjust the pedals to a position that allows full pedal
travel.
Further small adjustments may be necessary to find the best
possible seat/pedal position. NOTE:
For vehicles equipped with
Driver Memory Seat, you can use
your Remote Keyless Entry (RKE)
transmitter or the memory switch on
the driver's door trim panel to return
the adjustable pedals to pre-
programmed positions. Refer to
“Driver Memory Seat” in “Under-
standing The Features Of Your Ve-
hicle” for further information.
CAUTION!
Do not place any article under the
adjustable pedals or impede its
ability to move as it may cause
damage to the pedal controls. Pedal
travel may become limited if move-
ment is stopped by an obstruction
in the adjustable pedal's path.WARNING!
Do not adjust the pedals while the
vehicle is moving. You could lose
control and have an accident. Al-
ways adjust the pedals while the
vehicle is parked.
Adjustable Pedals Switch
119
Page 126 of 336
ELECTRONIC SPEED
CONTROL
When engaged, the Electronic Speed
Control takes over accelerator opera-
tions at speeds greater than 40 km/h.
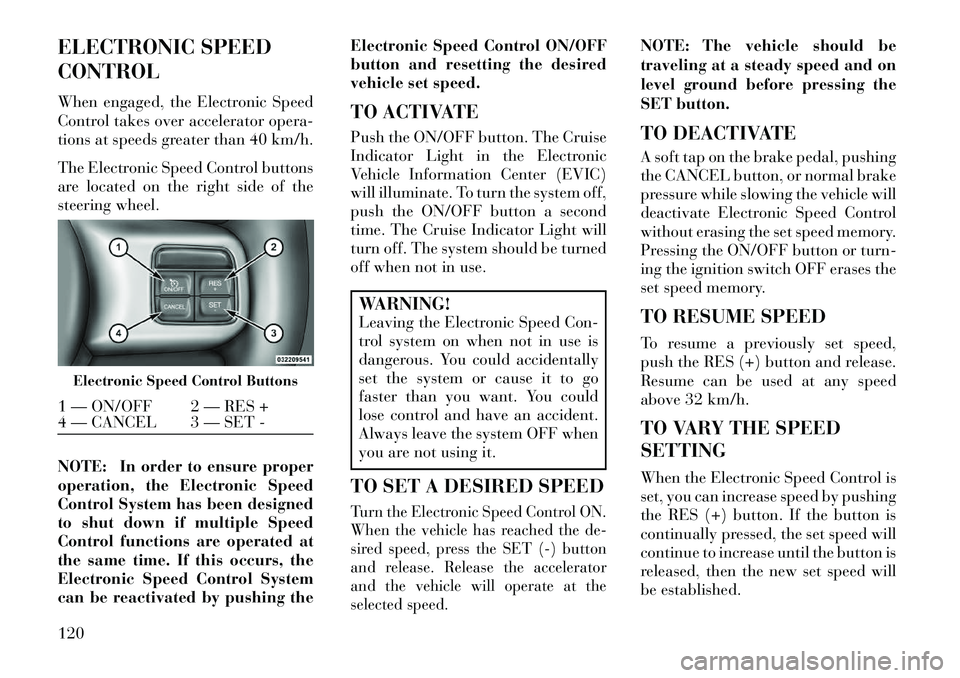
The Electronic Speed Control buttons
are located on the right side of the
steering wheel.
NOTE: In order to ensure proper
operation, the Electronic Speed
Control System has been designed
to shut down if multiple Speed
Control functions are operated at
the same time. If this occurs, the
Electronic Speed Control System
can be reactivated by pushing theElectronic Speed Control ON/OFF
button and resetting the desired
vehicle set speed.
TO ACTIVATE
Push the ON/OFF button. The Cruise
Indicator Light in the Electronic
Vehicle Information Center (EVIC)
will illuminate. To turn the system off,
push the ON/OFF button a second
time. The Cruise Indicator Light will
turn off. The system should be turned
off when not in use.
WARNING!
Leaving the Electronic Speed Con-
trol system on when not in use is
dangerous. You could accidentally
set the system or cause it to go
faster than you want. You could
lose control and have an accident.
Always leave the system OFF when
you are not using it.
TO SET A DESIRED SPEEDTurn the Electronic Speed Control ON.
When the vehicle has reached the de-
sired speed, press the SET (-) button
and release. Release the accelerator
and the vehicle will operate at the
selected speed.
NOTE: The vehicle should be
traveling at a steady speed and on
level ground before pressing the
SET button.
TO DEACTIVATE
A soft tap on the brake pedal, pushing
the CANCEL button, or normal brake
pressure while slowing the vehicle will
deactivate Electronic Speed Control
without erasing the set speed memory.
Pressing the ON/OFF button or turn-
ing the ignition switch OFF erases the
set speed memory.
TO RESUME SPEED
To resume a previously set speed,
push the RES (+) button and release.
Resume can be used at any speed
above 32 km/h.
TO VARY THE SPEED
SETTING
When the Electronic Speed Control is
set, you can increase speed by pushing
the RES (+) button. If the button is
continually pressed, the set speed will
continue to increase until the button is
released, then the new set speed will
be established.
Electronic Speed Control Buttons1 — ON/OFF 2 — RES +
4 — CANCEL 3 — SET -
120
Page 131 of 336

An Anti-Lock Brake System (ABS)event occurs.
If the transmission is shifted into NEUTRAL.
The Electronic Stability Control/
Traction Control System (ESC/TCS)
activates.NOTE: If ACC is resumed or set
with the ESC/TCS off, ESC will
automatically be re-engaged.
TO TURN OFF
The system will turn off and erase the
set speed in memory if:
You push and release the ON/OFF button.
You turn OFF the ignition. TO RESUME SPEED
Press the RES
+button and release.
Then remove your foot from the ac-
celerator pedal. The EVIC will dis-
play the last set speed.
NOTE:
You can resume ACC from
a minimum of 32 km/h.
WARNING!
The Resume function should only
be used if traffic and road condi-
tions permit. Resuming a set speed
that is too high or too low for pre-
vailing traffic and road conditions
could cause the vehicle to acceler-
ate or decelerate too sharply for
safe operation. Failure to follow
these warnings can result in a colli-
sion and death or serious personal
injury.
TO VARY THE SPEED
SETTING
While ACC is set, you can increase the
set speed by pressing and holding the
RES +button. The increase in set
speed is reflected in the EVIC display: While in US Mode, if the button is
continually pressed, the set speed will
continue to increase in 8 km/h incre-
ments. While in Metric Mode, if the
button is continually pressed, the set
speed will continue to increase in
10 km/h increments.
While in US Mode, pressing the RES
+
button once will result in a 1.6 km/h
increase in set speed. Each subse-
quent tap of the button results in in-
crease of 1.6 km/h. While in Metric
Mode, pressing the RES +button once
will result in a 1.0 km/h increase in set
speed. Each subsequent tap of the
button results in increase of 1.0 km/h.
While ACC is set, the set speed can be
decreased by pressing and holding the
SET -button.
If the button is held while in US Mode,
the set speed will continue to decrease
in 8 km/h increments.
If the button is held while in Metric
Mode, the set speed will continue to
decrease in 10 km/h increments.
Adaptive Cruise Control (ACC) Cancelled
125
Page 138 of 336

To Set A Desired Speed
When the vehicle reaches the speed
desired, press the SET-button and
release. The EVIC will display the set
speed.
NOTE: You must observe the
display when setting or changing
speed, not the speedometer.
To Vary The Speed Setting
There are two ways to change the set
speed:
Use the accelerator pedal to adjust the vehicle to the desired speed and
press the SET -button.
Tap the RES +or SET -button to
increase or decrease the set speed in
1 km/h increments respectively.
Hold the RES +or SET -button for
5 km/h increments.
To CancelThe system will disable normal Cruise
Control without erasing the memory if: You softly tap or depress the brake pedal. You press the CANCEL button.
The Electronic Stability Control/
Traction Control System (ESC/
TCS) activates.
To Resume
Press the RES +button and then re-
move your foot from the accelerator
pedal. The EVIC will display the last
set speed.
To Turn Off
The system will turn off and erase the
set speed in memory if:
You push and release the ON/OFF button.
You turn off the ignition.
You switch off ESC.
If the Cruise Control system is turned
off and reactivated, the system will
return to the last driver setting (ACC
or Normal Cruise Control). FORWARD COLLISION
WARNING (for versions/
markets, where provided)
Forward Collision Warning (FCW)
warns the driver of a potential colli-
sion with the vehicle in front of you
and prompts the driver to take action
in order to avoid the collision.
FCW monitors the information from
the forward looking sensor as well
as the Electronic Brake Controller
(EBC), wheel speed sensors, i.e., to
calculate a probable rear-end colli-
sion. When the system determines
that a rear-end collision is probable a
warning message (both audible and
visual) will be displayed on the EVIC.
When the system determines a colli-
sion with the vehicle in front of you is
no longer probable, the warning mes-
sage will be deactivated.
NOTE: The minimum speed for
FCW activation is 16 km/h.
132
Page 139 of 336

WARNING!
Forward Collision Warning (FCW)
is not intended to avoid a collision
on its own, nor can FCW detect
every type of potential collision.
The driver has the responsibility to
avoid a collision by controlling the
vehicle via braking and steering.
Failure to follow this warning could
lead to serious injury or death.
Changing FCW StatusThe FCW feature can be set to far, set
to near or turned off using the
Uconnect Touch™ System, refer to
“Uconnect Touch™ Settings” in “Un-
derstanding Your Instrument Panel”
for further information. The FCW Sta-
tus Off, Near or Far will be displayed
in the Uconnect Touch™ display.The default status of FCW is the
“Far” setting, this allows the system
to warn you of a possible collision
with the vehicle in front of you when
you are farther away. This gives you
the most reaction time. Changing the FCW status to the
“Near” setting, allows the system to
warn you of a possible collision with
the vehicle in front of you when you
are much closer. This setting provides
less reaction time than the “Far” set-
ting, which allows for a more dynamic
driving experience.
Changing the FCW status to “Off”
prevents the system from warning you
of a possible collision with the vehicle
in front of you.
NOTE:
In the “Off” setting FCW OFF will
be displayed on the Uconnect
Touch™ display.The system will retain the last
setting selected by the driver after
ignition shut down.FCW will not react to irrelevant
objects such as overhead objects,
ground reflections, objects not in
the path of the car, stationary ob-
jects that are far away, oncoming
traffic, or leading vehicles with
the same or higher rate of speed.
If the FCW becomes disabled
then a warning will display on
the EVIC screen.
FCW Unavailable Warning
If the system turns off, and the EVIC
displays “ACC/FCW Unavailable,
Service Required”, there may be a
temporary malfunction that limits
FCW functionality. Although the ve-
hicle is still drivable under normal
conditions, FCW will be temporarily
unavailable. If this occurs, try activat-
ing FCW again later, following a key
cycle. If the problem persists, see your
authorized dealer.
ACC/FCW Unavailable, Service Required Warning
133
Page 140 of 336
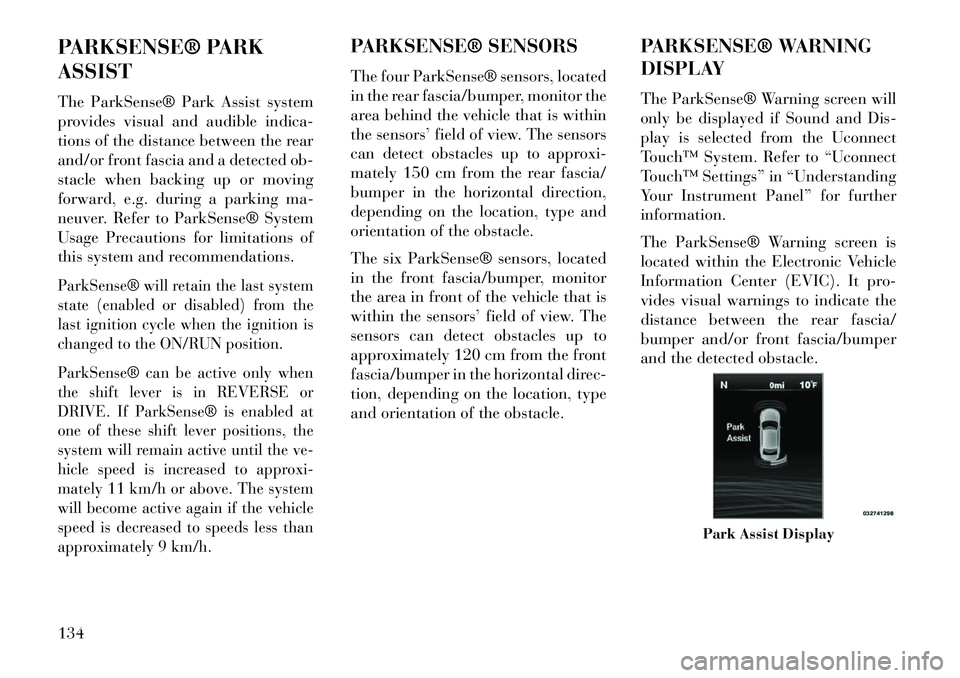
PARKSENSE® PARK
ASSIST
The ParkSense® Park Assist system
provides visual and audible indica-
tions of the distance between the rear
and/or front fascia and a detected ob-
stacle when backing up or moving
forward, e.g. during a parking ma-
neuver. Refer to ParkSense® System
Usage Precautions for limitations of
this system and recommendations.ParkSense® will retain the last system
state (enabled or disabled) from the
last ignition cycle when the ignition is
changed to the ON/RUN position.
ParkSense® can be active only when
the shift lever is in REVERSE or
DRIVE. If ParkSense® is enabled at
one of these shift lever positions, the
system will remain active until the ve-
hicle speed is increased to approxi-
mately 11 km/h or above. The system
will become active again if the vehicle
speed is decreased to speeds less than
approximately 9 km/h.
PARKSENSE® SENSORS
The four ParkSense® sensors, located
in the rear fascia/bumper, monitor the
area behind the vehicle that is within
the sensors’ field of view. The sensors
can detect obstacles up to approxi-
mately 150 cm from the rear fascia/
bumper in the horizontal direction,
depending on the location, type and
orientation of the obstacle.
The six ParkSense® sensors, located
in the front fascia/bumper, monitor
the area in front of the vehicle that is
within the sensors’ field of view. The
sensors can detect obstacles up to
approximately 120 cm from the front
fascia/bumper in the horizontal direc-
tion, depending on the location, type
and orientation of the obstacle.PARKSENSE® WARNING
DISPLAY
The ParkSense® Warning screen will
only be displayed if Sound and Dis-
play is selected from the Uconnect
Touch™ System. Refer to “Uconnect
Touch™ Settings” in “Understanding
Your Instrument Panel” for further
information.
The ParkSense® Warning screen is
located within the Electronic Vehicle
Information Center (EVIC). It pro-
vides visual warnings to indicate the
distance between the rear fascia/
bumper and/or front fascia/bumper
and the detected obstacle.
Park Assist Display
134
Page 142 of 336
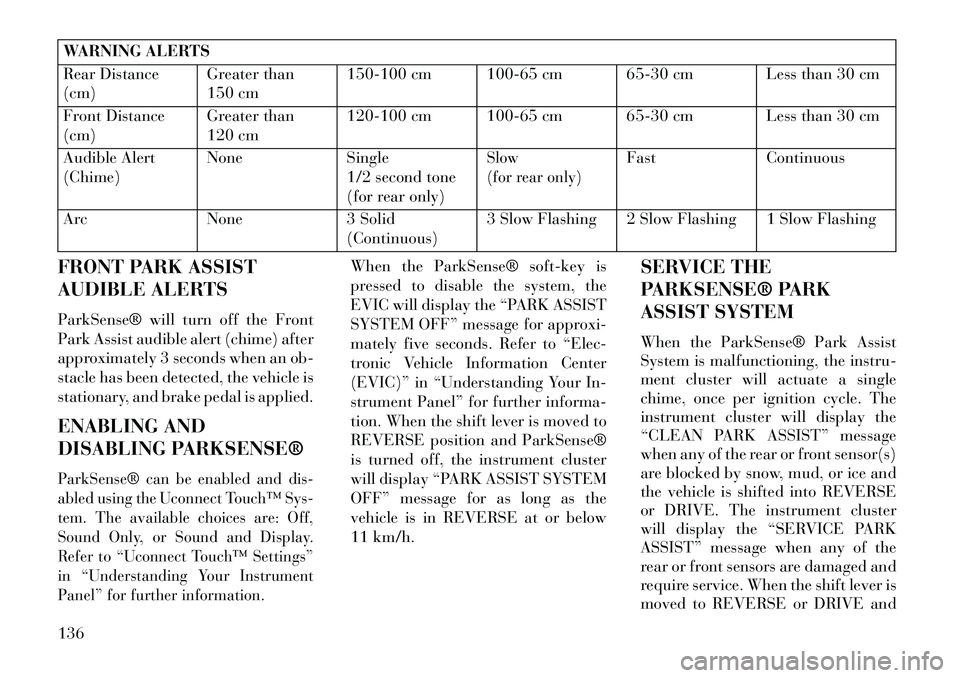
WARNING ALERTS
Rear Distance
(cm)Greater than
150 cm150-100 cm 100-65 cm 65-30 cm Less than 30 cm
Front Distance
(cm) Greater than
120 cm120-100 cm 100-65 cm 65-30 cm Less than 30 cm
Audible Alert
(Chime) None
Single
1/2 second tone
(for rear only)
Slow
(for rear only)
Fast Continuous
Arc None3 Solid
(Continuous) 3 Slow Flashing 2 Slow Flashing 1 Slow Flashing
FRONT PARK ASSIST
AUDIBLE ALERTS
ParkSense® will turn off the Front
Park Assist audible alert (chime) after
approximately 3 seconds when an ob-
stacle has been detected, the vehicle is
stationary, and brake pedal is applied.
ENABLING AND
DISABLING PARKSENSE®
ParkSense® can be enabled and dis-
abled using the Uconnect Touch™ Sys-
tem. The available choices are: Off,
Sound Only, or Sound and Display.
Refer to “Uconnect Touch™ Settings”
in “Understanding Your Instrument
Panel” for further information.
When the ParkSense® soft-key is
pressed to disable the system, the
EVIC will display the “PARK ASSIST
SYSTEM OFF” message for approxi-
mately five seconds. Refer to “Elec-
tronic Vehicle Information Center
(EVIC)” in “Understanding Your In-
strument Panel” for further informa-
tion. When the shift lever is moved to
REVERSE position and ParkSense®
is turned off, the instrument cluster
will display “PARK ASSIST SYSTEM
OFF” message for as long as the
vehicle is in REVERSE at or below
11 km/h. SERVICE THE
PARKSENSE® PARK
ASSIST SYSTEM
When the ParkSense® Park Assist
System is malfunctioning, the instru-
ment cluster will actuate a single
chime, once per ignition cycle. The
instrument cluster will display the
“CLEAN PARK ASSIST” message
when any of the rear or front sensor(s)
are blocked by snow, mud, or ice and
the vehicle is shifted into REVERSE
or DRIVE. The instrument cluster
will display the “SERVICE PARK
ASSIST” message when any of the
rear or front sensors are damaged and
require service. When the shift lever is
moved to REVERSE or DRIVE and
136