air condition Lancia Thesis 2006 Owner handbook (in English)
[x] Cancel search | Manufacturer: LANCIA, Model Year: 2006, Model line: Thesis, Model: Lancia Thesis 2006Pages: 386, PDF Size: 8.69 MB
Page 194 of 386

193
The following table summarizes warning light indications according to the different operating conditions.
Operating or failure conditions
Engine start up (key turned to MAR)
Driving in
normal
conditions
Driving inconditions which
might lead to
slipping
ASR fault
ESP fault
System condition
Warning light check
ASR on
ESP on
ASR off
ESP on
ASR active
ESP active
ASR off
ESP active
ASR and ESP off
ASR on
ESP off ASR on
ASR off
manually
ASR on
ASR off
manuallyASR button warning light
On for about 3 seconds
Off
On
Off
On
On
OffESP warning light on
instrument panel
On for about 4 seconds
Off
Off
Flashing
Flashing
On
On
INITIALISING THE ESP SYSTEM CONTROL UNIT
Whenever the battery is electrically connected again or it is reloaded after being completely flat or after replacing one of
the protection fuses, to restore the correct operation of the ESP system, of the door locking, and of the air conditioning, it
is necessary to perform the initialisation operations contained in the paragraph “If battery is to be disconnected” in the chap-
ter “In an emergency”.
Page 227 of 386
226
SOLAR CELLS
The upper part of the sunroof
incorporates 21 solar cells that pro-
duce a maximum power of 24 W to
feed the climate control system fan,
when the car is parked with the sun-
roof closed or in pivoting position.
Fan actuation is automatic and air
distribution corresponds to the latest
setting made before switching the
car off.
This function is useful especially on
summer days, since it greatly
reduces the temperature inside the
passenger compartment as well as
the duration of the cooling cycle
after car start-up, thus avoiding the
accumulation of warm air in the air-
conditioning unit lines.
In winter, the ventilation function
reduces dampness inside the passen-
ger compartment.EMERGENCY MANOEUVRE
In case the electric actuation device
fails to operate, the sunroof can be
actuated manually, proceeding as
follows:
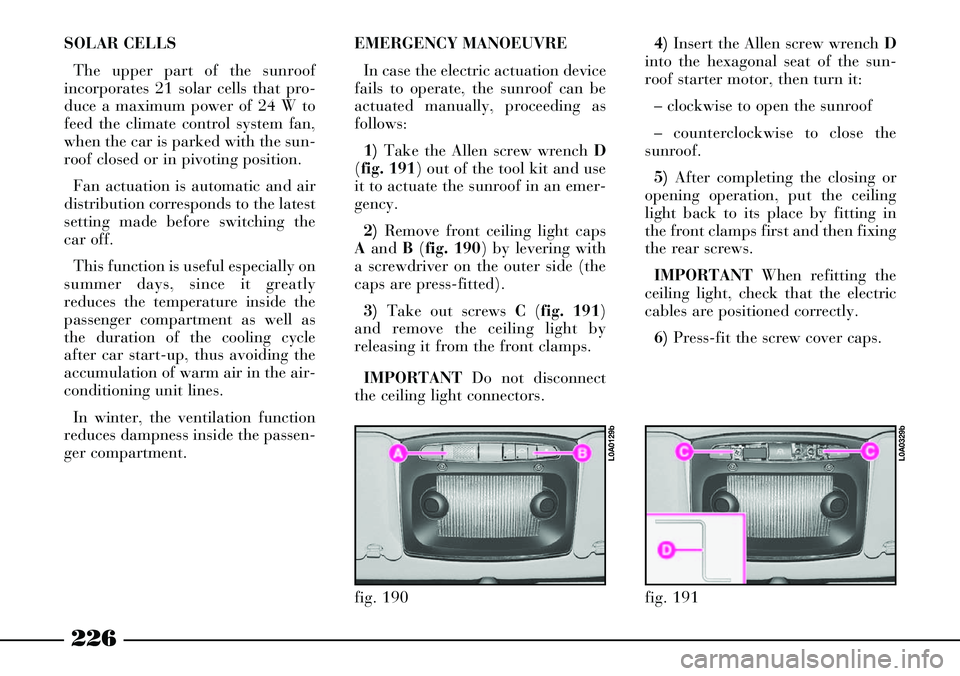
1)Take the Allen screw wrench D
(fig. 191) out of the tool kit and use
it to actuate the sunroof in an emer-
gency.
2)Remove front ceiling light caps
Aand B(fig. 190) by levering with
a screwdriver on the outer side (the
caps are press-fitted).
3)Take out screws C(fig. 191)
and remove the ceiling light by
releasing it from the front clamps.
IMPORTANTDo not disconnect
the ceiling light connectors.4)Insert the Allen screw wrench D
into the hexagonal seat of the sun-
roof starter motor, then turn it:
– clockwise to open the sunroof
– counterclockwise to close the
sunroof.
5)After completing the closing or
opening operation, put the ceiling
light back to its place by fitting in
the front clamps first and then fixing
the rear screws.
IMPORTANTWhen refitting the
ceiling light, check that the electric
cables are positioned correctly.
6)Press-fit the screw cover caps.
fig. 190
L0A0129b
fig. 191
L0A0329b
Page 258 of 386
257
– Keep a greater safety distance
from the cars in front of you than
during daylight hours: it is hard to
judge how fast other cars are going
when all you can see are their lights.
– Only use main beam headlights
when you are driving outside town
and when you are sure they do not
annoy other drivers.
– Dip your headlights as soon as
you see cars coming in the other
direction and pass them with the
headlights dipped.
– Keep all lights clean.
– Be careful of animals crossing the
road when driving in the country.
DRIVING IN THE RAIN
Rain and wet road surfaces spell
danger.
All manoeuvres are more difficult
on a wet road because the grip of the
wheels on the tarmac is greatly
reduced. This is why braking dis-
tances are much longer and road-
holding is lower.Here is some advice for driving in
the rain:
– Reduce speed and maintain a
greater safety distance from the cars
in front.
– If it is raining particularly heavi-
ly, visibility is also reduced. In these
cases, switch on the dipped head-
lights even if it is still daylight so you
can be seen more easily.
– Do not drive through puddles at
speed and hold on tightly to the
wheel if you do: a puddle taken at
high speed might cause you to lose
control of the car (“aquaplaning”).
– Move the ventilation controls to
the position for demisting the win-
dows (see the section “Getting to
know your car”), so to avoid visibil-
ity problems.
– Periodically check the condition
of the windscreen wiper blades. – Do not drive too many hours at a
time but stop at intervals to stretch
your legs and recoup your energy.
– Make sure the air in the car is
being changed continuously.
– Never coast downhill (i.e.: with
the engine off): if you do, you lose
the aid of engine braking and power
brakes so that braking requires
greater effort.
DRIVING AT NIGHT
There are the main rules to follow
when you are driving at night.
– Drive especially carefully: it is
harder to drive at night.
– Slow down especially if the road
is not lit.
– At the first signs of sleepiness,
stop: continuing would be a risk for
yourself and everybody else. Only
start driving again when you have
had enough rest.
Page 270 of 386
269
USING THE CAR AGAIN
Before using the car again after a
prolonged period of inactivity, the
following operations are recom-
mended:
– Do not dry-dust the car body.
– Check for fluid leaks (oil, brake
and clutch fluid, engine coolant
etc.).
– Change engine oil and filter.
– Check the level of:
– brake and clutch fluid
– engine coolant.
– Check the air cleaner and change
it, if required.
– Check the tyre pressure and the
tyres for signs of damage, cuts or
cracks. If this is the case, have them
replaced.
– Check the engine belt conditions.STORING THE CAR
The following precautions should
be taken if the car will not be used
for several months:
– Park the car in covered, dry and
if possible well-ventilated premises.
– Engage a gear.
– If the car is parked on flat
ground, disengage the electric park-
ing brake as described in the rele-
vant paragraph.
– Clean and protect the painted
parts using protective wax.
– Sprinkle talcum powder on the
rubber windscreen and rear window
wiper blades and lift them off the
glass.
– Slightly open the windows.
– Inflate the tyres to 0.5 bar above
the normal specified pressure, lean
them on wood boards, if possible
and check it at intervals.– Do not switch the electronic
alarm system on.
– Remove the negative cable (-)
from the battery terminal and check
the battery charge. This check
should be performed every month if
the car is to be stored for long peri-
ods. Recharge the battery if it falls
below 12.5V.
IMPORTANT Before opening the
luggage compartment bonnet to dis-
connect the battery, carefully read
and comply with instructions con-
tained in the paragraph “If battery is
to be disconnected” in the chapter
“In an emergency”.
– Do not drain the engine cooling
system.
– Cover the car with a cloth or per-
forated plastic sheet. Do not use
sheets of non-perforated plastic as
they do not allow moisture on the
body to evaporate.
Page 299 of 386

298
Devices and utilities
Horn
Windscreen wiper controls
Brake light control (NC)
Brake light control (NA)
Ignition switch
Air conditioner compressor
Cruise Control (satellite controls)
Cruise Control (Adaptive point)
Climate control system fan
Engine cooling electric fan (first)
Engine cooling electric fan (second)
Right-hand headlight (control unit)
Left-hand headlight (control unit)
Diesel fuel filter (PTC)
Electronic injection system
Injectors (diesel versions)
Driving position point interface
Automatic transmission point interface
Climate control system point interface
Fuse
11
23
20
14
7
12
20
20
5
3
4
10
10
16
13
19
14
15
23
6
15
Ampere
15
7.5
7.5
10
20
7.5
7.5
7.5
40
60
20
7.5
7.5
20
7.5
20
20
10
7.5
10
7.5
Location
fig. 75
fig. 73
fig. 73
fig. 73
fig. 75
fig. 75
fig. 73
fig. 73
fig. 75
fig. 75
fig. 78
fig. 78
fig. 78
fig. 75
fig. 75
fig. 75
fig. 78
fig. 78
fig. 73
fig. 73
fig. 73
Page 303 of 386

302
IF BATTERY IS TO BE DISCONNECTED
Battery is housed on the left side of
the luggage compartment, protected
by cover B(fig. 79). To remove cover
unscrew knob A.
DISCONNECTING THE
LOADED BATTERY
Should the charged battery be dis-
connected (e.g. during a car inactivity
time) perform these operations in the
given order:
1) Depress the push button on the
central console or on the remote con-
trol to open the boot. 2) Depress manually the inside hook
A (fig. 80) of the boot lock, and push
it back completely until the recall
electric travel is activated.
3) Remove the cover and disconnect
battery terminals.
4) Fully turn anti-clockwise the key
into the outside bonnet lock to pull
out the locking hook (fig. 81).
5) If necessary, it is now possible to
fully close the boot, leaving the bat-
tery disconnected.
6) When the battery it to be con-
nected again, to open the bonnet, fully
fig. 79
L0A0030b
fig. 80
L0A0332b
fig. 81
L0A0181b
turn the key anticlockwise in the lock,
and at the same time slightly press the
lower edge of the number plate holder
to reduce operation effort (fig. 81).
7) Connect battery terminals and as-
semble the cover again.
8) Depress push button A(fig. 81)
to restore normal lock operation.
9) Normally close the boot without
slamming it down; the lock electric
servo control will fully lock it.
10) Perform the initialisation of the
door lock, air conditioner and ESP
system control units, described below.
Page 304 of 386
303
DISCONNECTING THE
UNLOADED BATTERY
Should the discharged battery be
disconnected (to have it charged
again or to replace it) perform the fol-
lowing operations in the given order:
1) To open the boot from the out-
side, fully turn the key anticlockwise
in the lock (fig. 81), and at the same
time slightly press the lower edge of
the number plate holder to reduce op-
eration effort.
2) Remove the cover and disconnect
the battery terminals.
3) Fully charge the battery again or
replace it.4) Connect battery terminals and re-
assemble cover.
5) Depress push button A(fig. 81)
to restore normal lock operation.
6) Close boot normally without
slamming it down: lock electric servo
control will fully lock it.
7) Perform the initialisation proce-
dure of the door lock, air conditioner
and ESP system control units, here-
after described.INITIALISING THE CONTROL
UNITS OF THE DOOR LOCKS,
AIR CONDITIONER AND ESP
SYSTEM
Whenever the battery is connected
electrically or protection fuses are re-
placed, to restore correct door locking,
air conditioning and ESP system, per-
form the following operations (after
connection is performed or after re-
placing one of the fuses):
1) Enter key into the lock of one of
the front doors and perform a door
centralised opening/closing cycle.
2) Start the engine and turn on the
compressor of the conditioner, setting
a lower temperature value than that
of the environment and check
whether the led on the disconnection
push button of the conditioner com-
pressor òis lit.
3) Start running the car and drive it
for a few meters in a straight line (ac-
celerating), until the ESP warning
light is off
á. It is not possible to close
the boot when battery is
discharged or discon-
nected for the purpose of being re-
placed/ charged again: do not try
to close the boot by slamming it
down. The boot remains anyhow
hooked on and it must be re-
opened by turning the key in the
lock.
Page 312 of 386
311
SCHEDULED
SERVICING
Correct maintenance of the car is
essential for ensuring it stays in tip-
top condition for a long time to
come.
This is why LANCIA has pro-
grammed a number of service oper-
ations every 20,000 kilometres:
IMPORTANTThe Manufacturer
requires the Service Schedule
coupon related checks to be carried
out. Failure to do so could result in
the warranty being cancelled for
those defects that can be attributed
to such failure.Scheduled Servicing is performed
at all Lancia Dealershipsand
there is a set time scale for such
operations.
If it is seen that further replace-
ments or repairs are necessary in
addition to the work being carried
out, these will only be done after the
customer has given his/her consent.IMPORTANTYou are recom-
mended to get in touch with a
Lancia Dealershipimmediately if
any minor running problems crop
up without waiting for the next
coupon.
CAR MAINTENANCE
Page 313 of 386

312
SERVICE SCHEDULE
20 40 60 80 100 120 140 160 180 thousands of kilometres
ççççç çççç
ççççç çççç
ççççç çççç
çç çç
ççççç çççç
ççççç çççç
çç
çç çç
ççççç çççç
çç
çç çç
ççççç çççç
ççççç ççççCheck tyre conditions and wear; adjust pressure, if required
Check primary and secondary battery charge status
Check wear of windscreen/rear window blades
Check rear disc brake pad wear
Inspect conditions of: underbody protection and outside
bodywork, piping (exhaust - fuel lines - brake lines), rubber parts
(boots, sleeves, bushings, etc.), brake and fuel line hoses
Check for bonnet and boot lock cleanness, lever cleanness
and lubrication
Sight check for conditions of Poly-V accessory drive belt
Check diesel engine smokiness in exhaust
Replace fuel filter (JTD versions)
Check fuel evaporation system operation
Replace air cleaner cartridge (petrol versions)
Replace air cleaner cartridge (JTD versions)
Check and top up fluids (engine coolant, brakes,
hydraulic clutch, power steering, windscreen washer, battery, etc.)
Page 316 of 386
315
Do not smoke while
working in the engine
compartment: the pres-
ence of flammable gas and
vapour could cause a fire.
Be careful not to mix up
the various types of fluids
when you are topping up:
they are all mutually incompati-
ble and could damage the car.
Maintenance of your car
should be entrusted to a
Lancia Dealership. For
ordinary routine maintenance
operations which you are able to
carry out yourself, ensure that
you have the necessary tools and
original Lancia spare parts and
fluids available. Do not carry out
servicing operations if you have
no experience.IMPORTANT - Engine oil
If the car is normally driven in one
of the following particularly severe
conditions:
– towing a trailer
– on dirty roads
– for short, repeated trips (less
than 7-8 km) with outside tempera-
ture below zero
– with engine frequently idling or
for long distances at low speed (e.g.
taxi, door-to-door deliveries) or pro-
longed storage
change the engine oil more frequent-
ly than shown in the Service
Schedule.
IMPORTANT - Air cleaner
Replace the air cleaner more fre-
quently than shown in the Service
Schedule if the car is used on dusty
roads.
If you are in doubt about how often
the engine oil or the air cleaner
should be changed in relation to how
you use the car, contact a Lancia
Dealership.