heating Lancia Thesis 2006 Owner handbook (in English)
[x] Cancel search | Manufacturer: LANCIA, Model Year: 2006, Model line: Thesis, Model: Lancia Thesis 2006Pages: 386, PDF Size: 8.69 MB
Page 62 of 386
61
fig. 41- Electrically adjustable
seats, position memorization and
heating
A- Height and back and forth
adjustment, reclining
B- Back rest angle and head
restraint position
C- Lumbar adjustment
D- Seat position memorization
buttons
E- Heating.
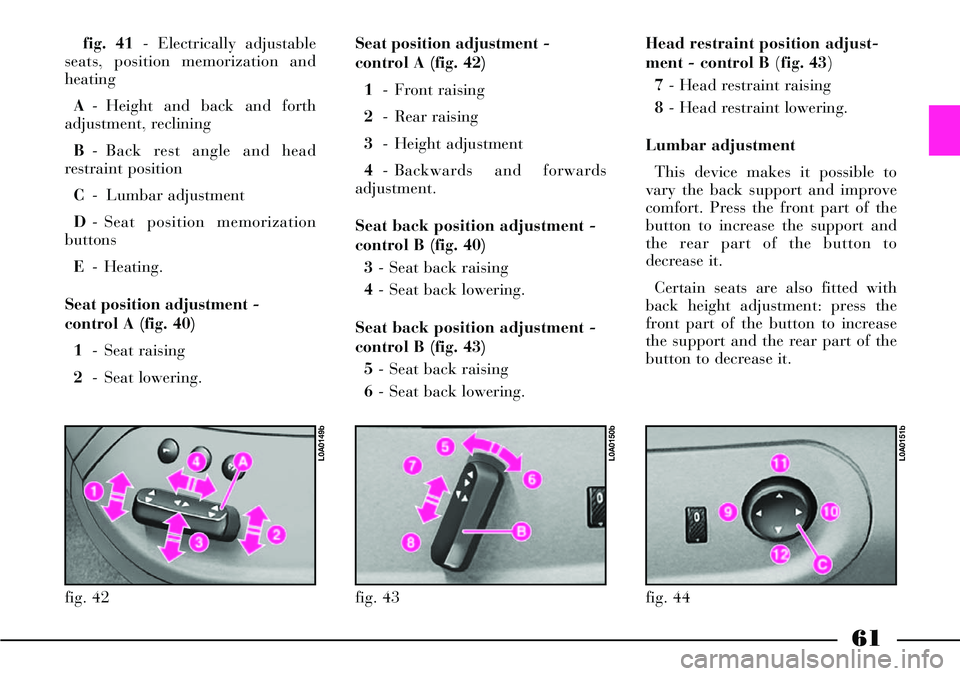
Seat position adjustment -
control A (fig. 40)
1- Seat raising
2- Seat lowering.Seat position adjustment -
control A (fig. 42)
1- Front raising
2- Rear raising
3- Height adjustment
4- Backwards and forwards
adjustment.
Seat back position adjustment -
control B (fig. 40)
3- Seat back raising
4- Seat back lowering.
Seat back position adjustment -
control B (fig. 43)
5- Seat back raising
6- Seat back lowering.
fig. 42
L0A0149b
fig. 43
L0A0150b
fig. 44
L0A0151b
Head restraint position adjust-
ment - control B (fig. 43)
7 - Head restraint raising
8- Head restraint lowering.
Lumbar adjustment
This device makes it possible to
vary the back support and improve
comfort. Press the front part of the
button to increase the support and
the rear part of the button to
decrease it.
Certain seats are also fitted with
back height adjustment: press the
front part of the button to increase
the support and the rear part of the
button to decrease it.
Page 63 of 386
62
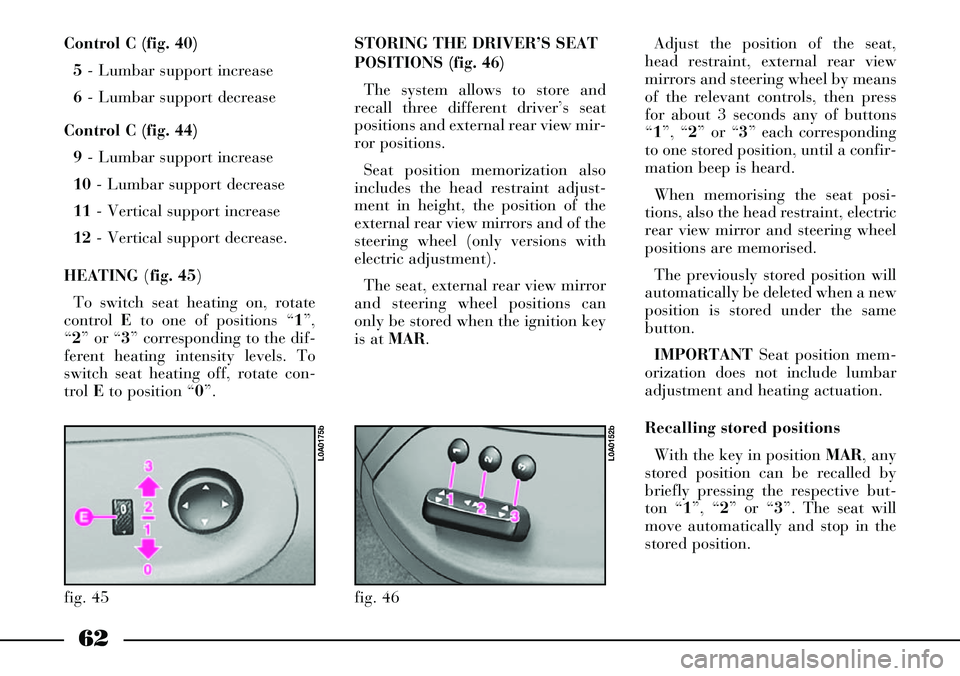
Control C (fig. 40)
5- Lumbar support increase
6- Lumbar support decrease
Control C (fig. 44)
9- Lumbar support increase
10- Lumbar support decrease
11- Vertical support increase
12- Vertical support decrease.
HEATING (fig. 45)
To switch seat heating on, rotate
control Eto one of positions “1”,
“2” or “3” corresponding to the dif-
ferent heating intensity levels. To
switch seat heating off, rotate con-
trol Eto position “0”.
fig. 45
L0A0175b
STORING THE DRIVER’S SEAT
POSITIONS (fig. 46)
The system allows to store and
recall three different driver’s seat
positions and external rear view mir-
ror positions.
Seat position memorization also
includes the head restraint adjust-
ment in height, the position of the
external rear view mirrors and of the
steering wheel (only versions with
electric adjustment).
The seat, external rear view mirror
and steering wheel positions can
only be stored when the ignition key
is at MAR.Adjust the position of the seat,
head restraint, external rear view
mirrors and steering wheel by means
of the relevant controls, then press
for about 3 seconds any of buttons
“1”, “2” or “3” each corresponding
to one stored position, until a confir-
mation beep is heard.
When memorising the seat posi-
tions, also the head restraint, electric
rear view mirror and steering wheel
positions are memorised.
The previously stored position will
automatically be deleted when a new
position is stored under the same
button.
IMPORTANTSeat position mem-
orization does not include lumbar
adjustment and heating actuation.
Recalling stored positions
With the key in position MAR, any
stored position can be recalled by
briefly pressing the respective but-
ton “1”, “2” or “3”. The seat will
move automatically and stop in the
stored position.
fig. 46
L0A0152b
Page 65 of 386
64
fig. 47
L0A0310b
Recalling the “parking” position
of the external rear view mirror
on passenger side
To automatically recall the “park-
ing” position of the external passen-
ger rear view mirror, proceed as fol-
lows:
– with the car stopped and the igni-
tion key at MAR, engage the reverse
gear; the mirror will be automatical-
ly brought back to the previously
stored position .
If no “parking” position has been
stored, when engaging reverse the
passenger mirror slightly lowers
than normally to a preset position to
facilitate the driver during parking.
The rear view mirror will automat-
ically return to its initial position
after about 10 seconds from reverse
gear disengagement, or immediately
after exceeding a speed of 10 km/h
with forward gear. IMPORTANTThe “parking” posi-
tion memorisation and recall can
only be performed with ignition key
at MAR.
Automatic realignment
of external rear view mirrors
Every time the ignition key is
turned to MAR, the external rear
view mirrors automatically return to
the latest position reached and/or
recalled before removing the key.
This enables rear view mirror
alignment if, when the car is parked,
one of the rear view mirror has been
manually and/or accidentally
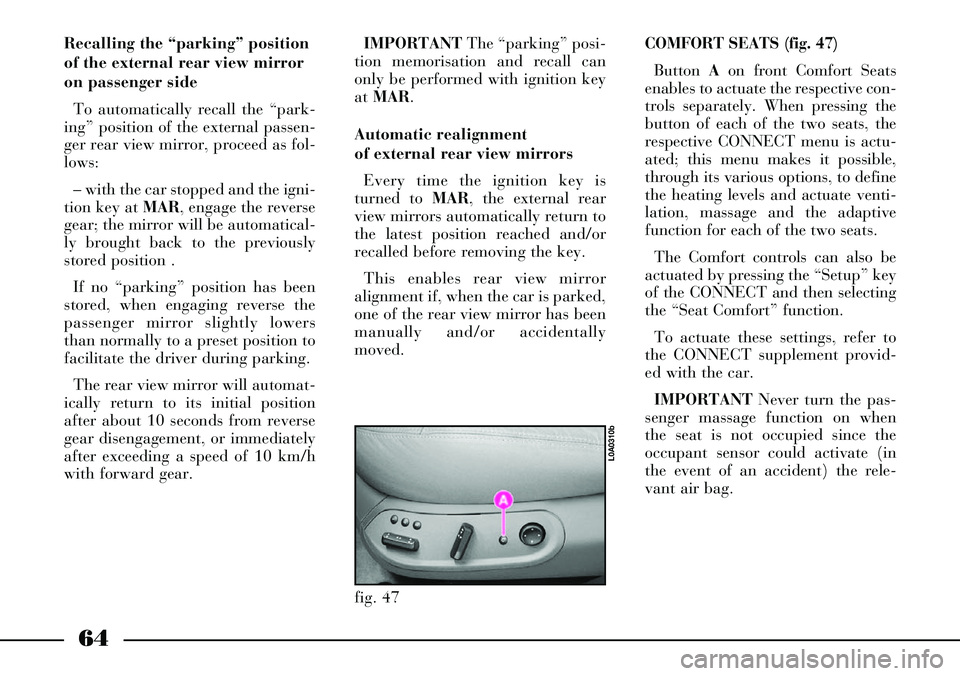
moved.COMFORT SEATS (fig. 47)
Button Aon front Comfort Seats
enables to actuate the respective con-
trols separately. When pressing the
button of each of the two seats, the
respective CONNECT menu is actu-
ated; this menu makes it possible,
through its various options, to define
the heating levels and actuate venti-
lation, massage and the adaptive
function for each of the two seats.
The Comfort controls can also be
actuated by pressing the “Setup” key
of the CONNECT and then selecting
the “Seat Comfort” function.
To actuate these settings, refer to
the CONNECT supplement provid-
ed with the car.
IMPORTANTNever turn the pas-
senger massage function on when
the seat is not occupied since the
occupant sensor could activate (in
the event of an accident) the rele-
vant air bag.
Page 68 of 386
67
ARMREST
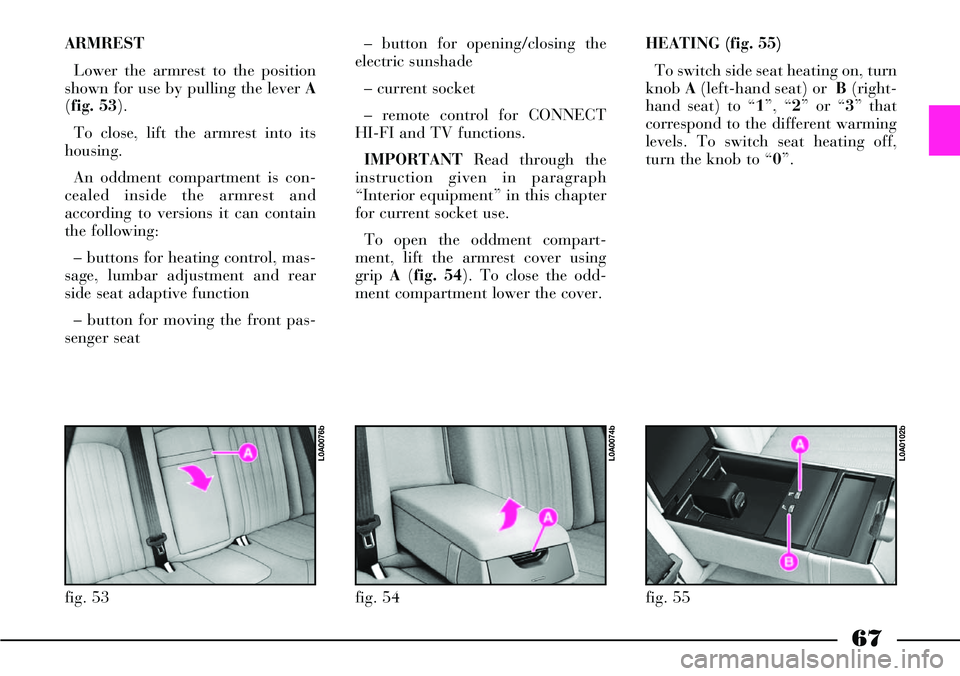
Lower the armrest to the position
shown for use by pulling the lever A
(fig. 53).
To close, lift the armrest into its
housing.
An oddment compartment is con-
cealed inside the armrest and
according to versions it can contain
the following:
– buttons for heating control, mas-
sage, lumbar adjustment and rear
side seat adaptive function
– button for moving the front pas-
senger seat– button for opening/closing the
electric sunshade
– current socket
– remote control for CONNECT
HI-FI and TV functions.
IMPORTANTRead through the
instruction given in paragraph
“Interior equipment” in this chapter
for current socket use.
To open the oddment compart-
ment, lift the armrest cover using
grip A(fig. 54). To close the odd-
ment compartment lower the cover. HEATING (fig. 55)
To switch side seat heating on, turn
knob A(left-hand seat) or B(right-
hand seat) to “1”, “2” or “3” that
correspond to the different warming
levels. To switch seat heating off,
turn the knob to “0”.
fig. 53
L0A0076b
fig. 54
L0A0074b
fig. 55
L0A0102b
Page 69 of 386
68
COMFORT SEATS
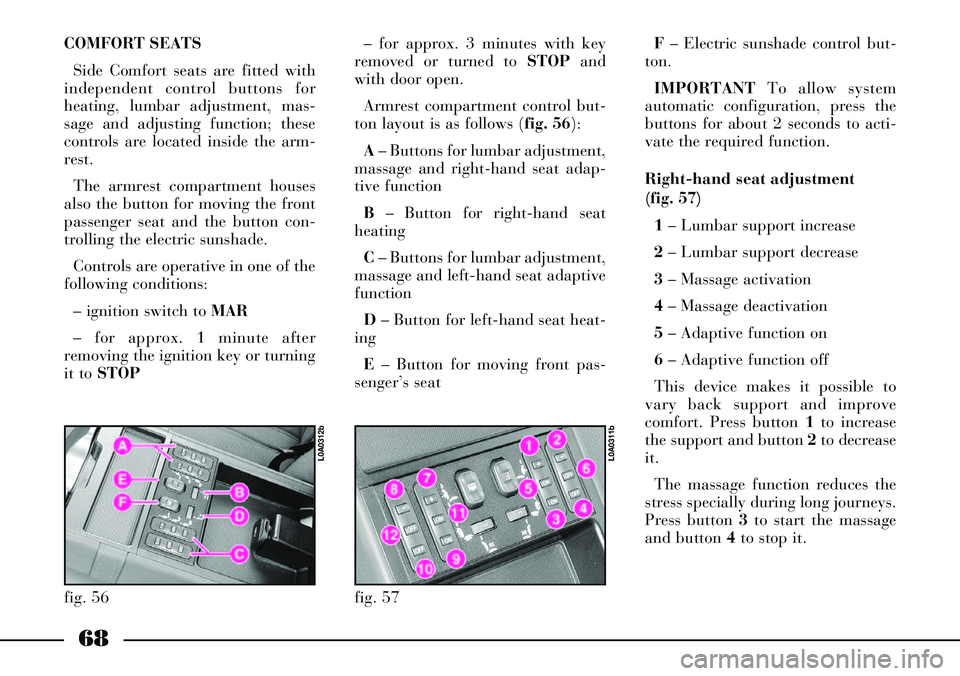
Side Comfort seats are fitted with
independent control buttons for
heating, lumbar adjustment, mas-
sage and adjusting function; these
controls are located inside the arm-
rest.
The armrest compartment houses
also the button for moving the front
passenger seat and the button con-
trolling the electric sunshade.
Controls are operative in one of the
following conditions:
– ignition switch to MAR
– for approx. 1 minute after
removing the ignition key or turning
it to STOP– for approx. 3 minutes with key
removed or turned to STOPand
with door open.
Armrest compartment control but-
ton layout is as follows (fig. 56):
A– Buttons for lumbar adjustment,
massage and right-hand seat adap-
tive function
B– Button for right-hand seat
heating
C– Buttons for lumbar adjustment,
massage and left-hand seat adaptive
function
D– Button for left-hand seat heat-
ing
E– Button for moving front pas-
senger’s seatF– Electric sunshade control but-
ton.
IMPORTANTTo allow system
automatic configuration, press the
buttons for about 2 seconds to acti-
vate the required function.
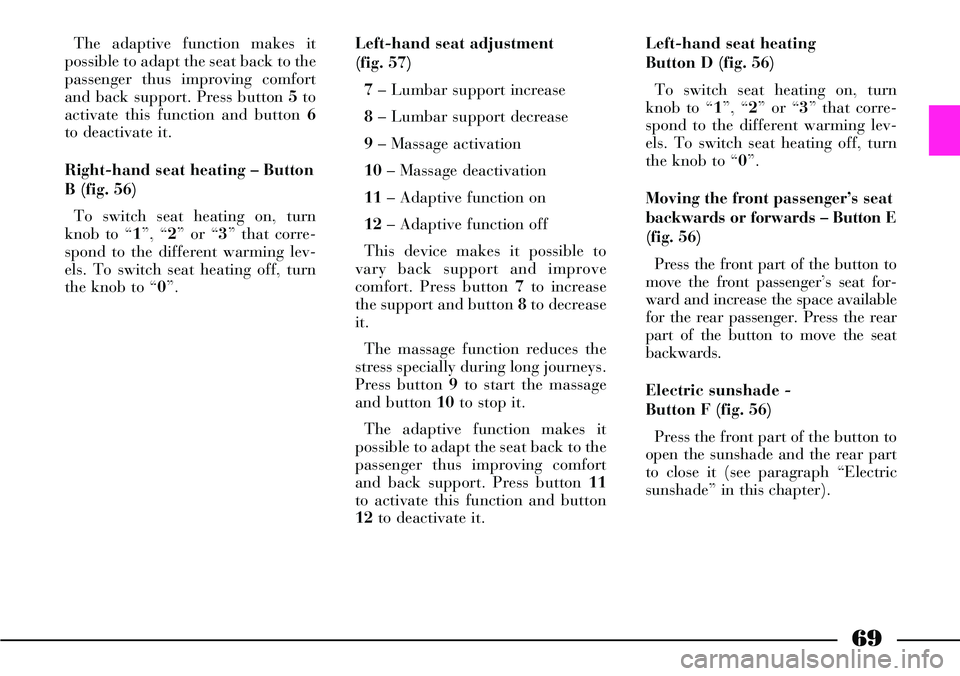
Right-hand seat adjustment
(fig. 57)
1 – Lumbar support increase
2– Lumbar support decrease
3– Massage activation
4– Massage deactivation
5– Adaptive function on
6– Adaptive function off
This device makes it possible to
vary back support and improve
comfort. Press button 1to increase
the support and button 2to decrease
it.
The massage function reduces the
stress specially during long journeys.
Press button 3to start the massage
and button 4to stop it.
fig. 56
L0A0312b
fig. 57
L0A0311b
Page 70 of 386
69
The adaptive function makes it
possible to adapt the seat back to the
passenger thus improving comfort
and back support. Press button 5to
activate this function and button 6
to deactivate it.
Right-hand seat heating – Button
B (fig. 56)
To switch seat heating on, turn
knob to “1”, “2” or “3” that corre-
spond to the different warming lev-
els. To switch seat heating off, turn
the knob to “0”.Left-hand seat adjustment
(fig. 57)
7– Lumbar support increase
8– Lumbar support decrease
9 – Massage activation
10– Massage deactivation
11– Adaptive function on
12– Adaptive function off
This device makes it possible to
vary back support and improve
comfort. Press button 7to increase
the support and button 8to decrease
it.
The massage function reduces the
stress specially during long journeys.
Press button 9to start the massage
and button 10to stop it.
The adaptive function makes it
possible to adapt the seat back to the
passenger thus improving comfort
and back support. Press button 11
to activate this function and button
12to deactivate it.Left-hand seat heating
Button D (fig. 56)
To switch seat heating on, turn
knob to “1”, “2” or “3” that corre-
spond to the different warming lev-
els. To switch seat heating off, turn
the knob to “0”.
Moving the front passenger’s seat
backwards or forwards – Button E
(fig. 56)
Press the front part of the button to
move the front passenger’s seat for-
ward and increase the space available
for the rear passenger. Press the rear
part of the button to move the seat
backwards.
Electric sunshade -
Button F (fig. 56)
Press the front part of the button to
open the sunshade and the rear part
to close it (see paragraph “Electric
sunshade” in this chapter).
Page 80 of 386

LOAD LIMITING DEVICES
In order to increase passive safety,
the front and rear seat belt reels
have a built-in load limiting device
which collapse in a controlled fash-
ion so to dose the force on the pas-
senger’s shoulder and chest during
the retaining operation. GENERAL INSTRUCTIONS FOR
THE USE OF THE SEAT BELTS
The driver must comply with (and
have the vehicle occupants follow)
all the local legal regulations con-
cerning the use of seat belts.
Always fasten the seat belts before
starting.The belt should not be
twisted, make sure that it
is taut and adheres to the
passenger’s body. The upper part
should pass over the shoulder
and cross the chest diagonally.
The lower part should adhere to
the pelvis and to the abdomen of
the passenger (fig. 73). Do not use
any objects (pegs, stoppers, etc.)
to keep the belts away from the
body.
For maximum safety,
keep the back of your seat
upright, lean back into it
and make sure the seat belt fits
closely across your chest and
hips.
Make sure that the seat belts of
the front and rear passengers are
fastened at all times! You
increase the risk of serious injury
or death in a collision if you trav-
el with the belts unfastened.
fig. 73
L0A0004b
Operations which lead
to knocks, vibrations or
localised heating (over
100°C for a maximum of 6 hours)
in the area around the preten-
sioners may cause damage or
trigger them. These devices are
not affected by vibrations caused
by irregularities of the road sur-
face or low obstacles such as
kerbs, etc. Contact a Lancia
Dealership for any assistance.
79
Page 106 of 386
INSTRUMENT PANEL
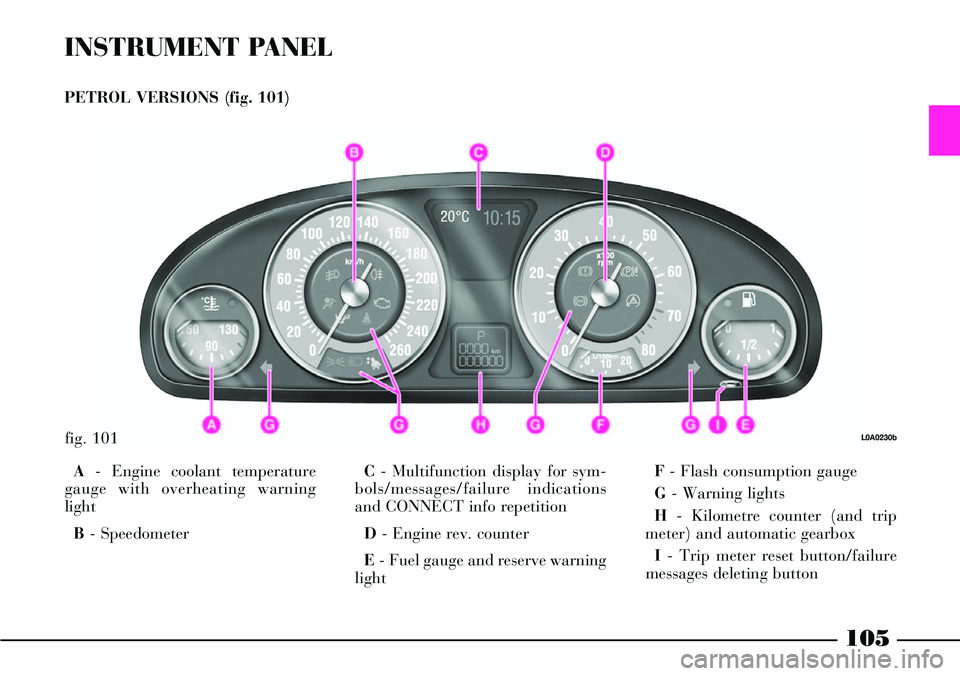
PETROL VERSIONS (fig. 101)
A- Engine coolant temperature
gauge with overheating warning
light
B- SpeedometerC- Multifunction display for sym-
bols/messages/failure indications
and CONNECT info repetition
D- Engine rev. counter
E- Fuel gauge and reserve warning
lightF- Flash consumption gauge
G- Warning lights
H- Kilometre counter (and trip
meter) and automatic gearbox
I- Trip meter reset button/failure
messages deleting button
fig. 101L0A0230b
105
Page 107 of 386
106
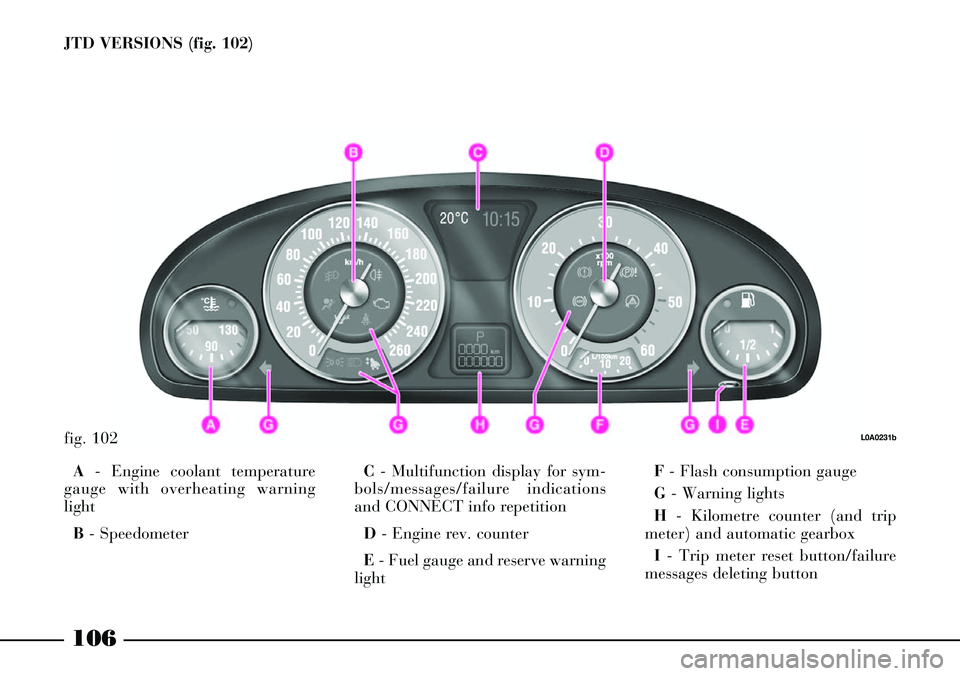
JTD VERSIONS (fig. 102)
fig. 102L0A0231b
A- Engine coolant temperature
gauge with overheating warning
light
B- SpeedometerC- Multifunction display for sym-
bols/messages/failure indications
and CONNECT info repetition
D - Engine rev. counter
E- Fuel gauge and reserve warning
lightF- Flash consumption gauge
G- Warning lights
H- Kilometre counter (and trip
meter) and automatic gearbox
I- Trip meter reset button/failure
messages deleting button
Page 109 of 386
108
fig. 106
L0A0236b
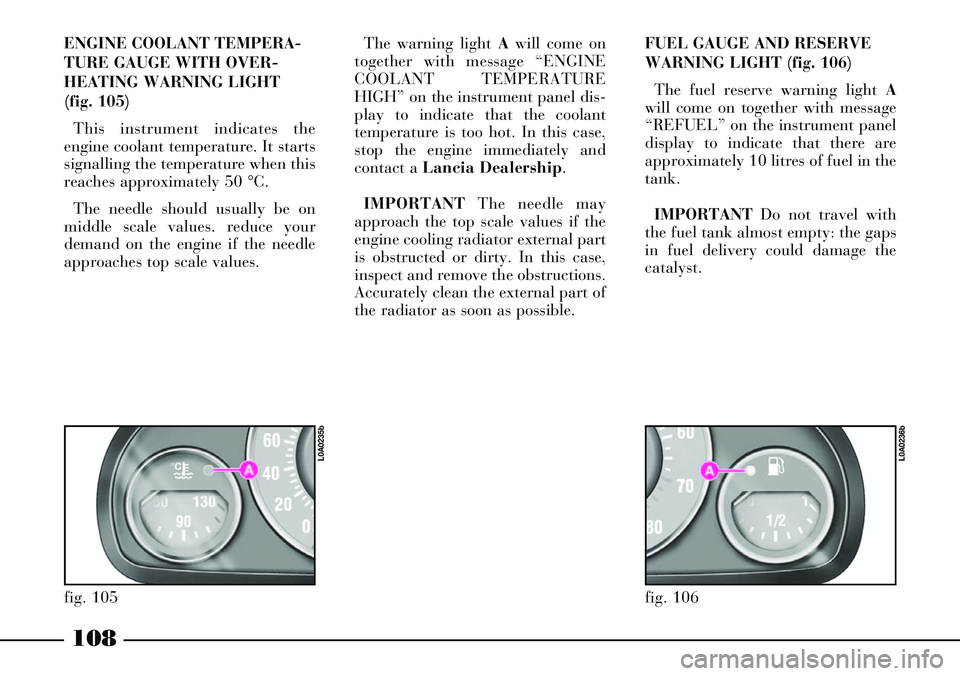
ENGINE COOLANT TEMPERA-
TURE GAUGE WITH OVER-
HEATING WARNING LIGHT
(fig. 105)
This instrument indicates the
engine coolant temperature. It starts
signalling the temperature when this
reaches approximately 50 °C.
The needle should usually be on
middle scale values. reduce your
demand on the engine if the needle
approaches top scale values.The warning light Awill come on
together with message “ENGINE
COOLANT TEMPERATURE
HIGH” on the instrument panel dis-
play to indicate that the coolant
temperature is too hot. In this case,
stop the engine immediately and
contact a Lancia Dealership.
IMPORTANTThe needle may
approach the top scale values if the
engine cooling radiator external part
is obstructed or dirty. In this case,
inspect and remove the obstructions.
Accurately clean the external part of
the radiator as soon as possible.FUEL GAUGE AND RESERVE
WARNING LIGHT (fig. 106)
The fuel reserve warning light A
will come on together with message
“REFUEL” on the instrument panel
display to indicate that there are
approximately 10 litres of fuel in the
tank.
IMPORTANTDo not travel with
the fuel tank almost empty: the gaps
in fuel delivery could damage the
catalyst.
fig. 105
L0A0235b