roof Lancia Thesis 2006 Owner handbook (in English)
[x] Cancel search | Manufacturer: LANCIA, Model Year: 2006, Model line: Thesis, Model: Lancia Thesis 2006Pages: 386, PDF Size: 8.69 MB
Page 225 of 386
224
After battery disconnec-
tion or fuse interruption,
the anti-trap system must
be initialized again as follows:
1) turn selector A clockwise and
fully to its stop, to position 3 cor-
responding to maximum pivoting
(fig. 184)
2) keep selector A depressed
until the sunroof jolts along to the
maximum pivoting position
3) release the selector after the
sunroof has stopped for at least 2
seconds
4) press, within 5 seconds, the
selector again and keep it
depressed
5) the sunroof will start moving
within 5 further seconds and will
perform a complete opening and
closing cycle, after which it will
stop in the closed position
6) release the selector after the
sunroof has stopped for at least 2
seconds.The system is thus initialized
and resumes its normal opera-
tion. If this does not occur, con-
tact your Lancia Dealership.
If the operation is interrupted
before it is completed, repeat the
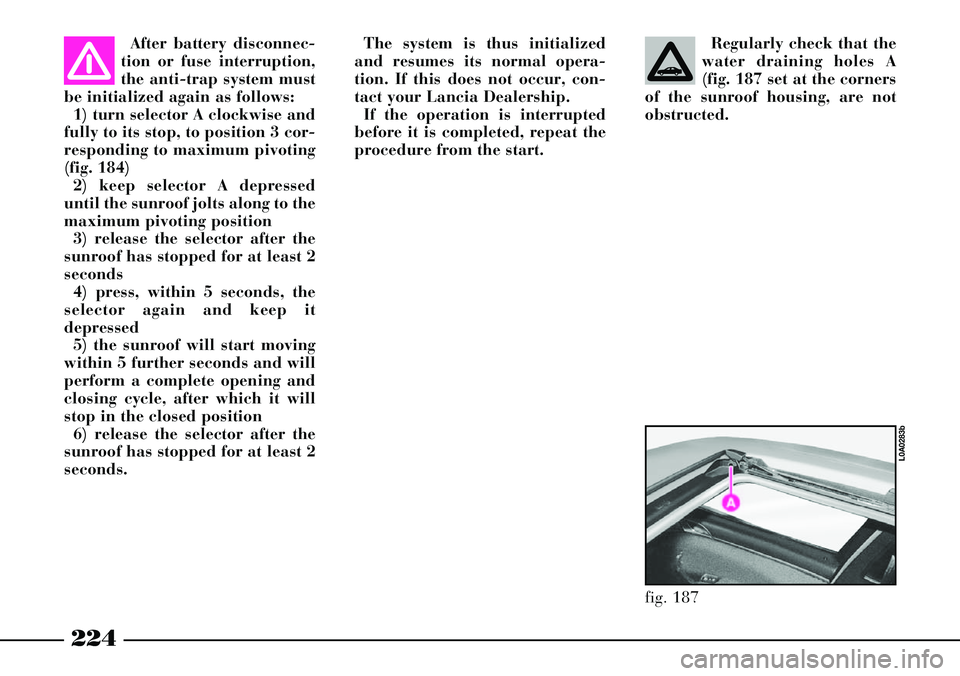
procedure from the start.Regularly check that the
water draining holes A
(fig. 187 set at the corners
of the sunroof housing, are not
obstructed.
fig. 187
L0A0283b
Page 226 of 386

225
CENTRAL SUNROOF AND
WINDOW LOCKING SYSTEM
Central locking/opening of sunroof
and windows can be actuated at the
following conditions:
– ignition key removed
– all doors closed correctly.To actuate central locking by
means of the remote control, keep
button B(fig. 188) depressed for
more than 3 seconds after closing
the doors: the sunroof and window
winders will be actuated until they
are completely closed or the button
is released.
To actuate central locking by
means of the remote control, keep
button A(fig. 188) depressed for
more than 3 seconds after opening
the doors: the sunroof and windows
winders will be actuated until they
are completely open or the button is
released.
This function can be used before
getting into the car when it has been
parked in the sun, in order to aerate
the passenger compartment.Central locking can also be actuat-
ed by turning the key in the lock of
one of the front doors: keep the key
turned to 2(fig. 189) for more than
3 seconds. The sunroof and window
winders are actuated until they are
completely closed or the key is
released.
By keeping the key turned to 1(fig.
189) for more than 3 seconds, both
the sunroof and all the windows will
open. The sunroof and window
winders are actuated until they are
completely open or the key is
released.
fig. 188
L0A0174b
fig. 189
L0A0176b
Page 227 of 386
226
SOLAR CELLS
The upper part of the sunroof
incorporates 21 solar cells that pro-
duce a maximum power of 24 W to
feed the climate control system fan,
when the car is parked with the sun-
roof closed or in pivoting position.
Fan actuation is automatic and air
distribution corresponds to the latest
setting made before switching the
car off.
This function is useful especially on
summer days, since it greatly
reduces the temperature inside the
passenger compartment as well as
the duration of the cooling cycle
after car start-up, thus avoiding the
accumulation of warm air in the air-
conditioning unit lines.
In winter, the ventilation function
reduces dampness inside the passen-
ger compartment.EMERGENCY MANOEUVRE
In case the electric actuation device
fails to operate, the sunroof can be
actuated manually, proceeding as
follows:
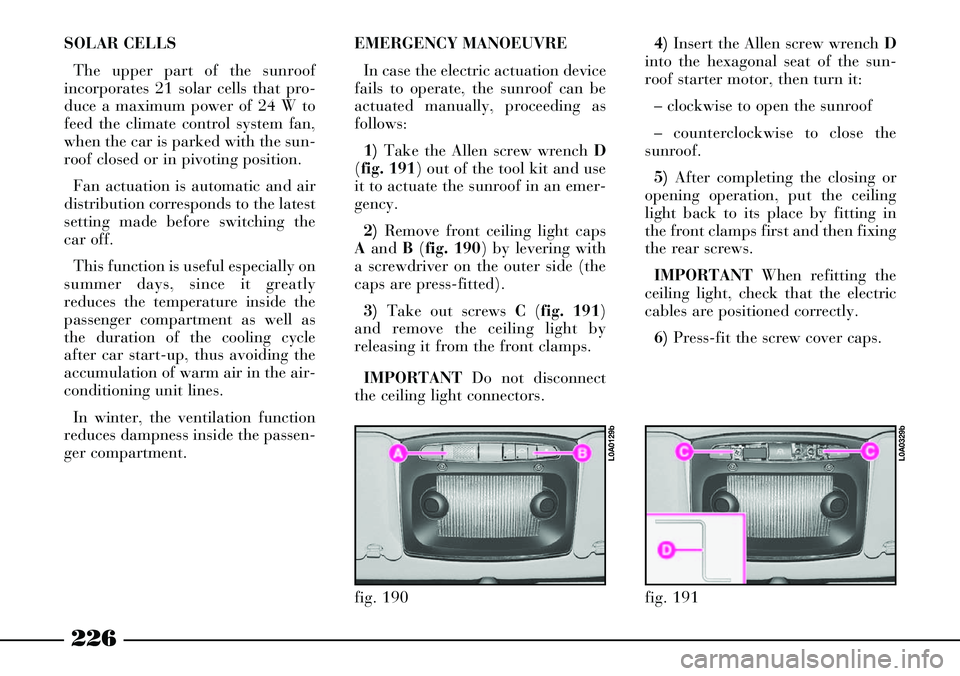
1)Take the Allen screw wrench D
(fig. 191) out of the tool kit and use
it to actuate the sunroof in an emer-
gency.
2)Remove front ceiling light caps
Aand B(fig. 190) by levering with
a screwdriver on the outer side (the
caps are press-fitted).
3)Take out screws C(fig. 191)
and remove the ceiling light by
releasing it from the front clamps.
IMPORTANTDo not disconnect
the ceiling light connectors.4)Insert the Allen screw wrench D
into the hexagonal seat of the sun-
roof starter motor, then turn it:
– clockwise to open the sunroof
– counterclockwise to close the
sunroof.
5)After completing the closing or
opening operation, put the ceiling
light back to its place by fitting in
the front clamps first and then fixing
the rear screws.
IMPORTANTWhen refitting the
ceiling light, check that the electric
cables are positioned correctly.
6)Press-fit the screw cover caps.
fig. 190
L0A0129b
fig. 191
L0A0329b
Page 242 of 386

241
After travelling a few
kilometres, check that the
screws securing the rack
are tight.
Distribuite the load
evenly and remember,
when driving the car, that
the car is now more susceptible to
side wind.
Never exceed the per-
mitted weights (refer to
the “Technical specifica-
tions” chapter).ROOF RACK –
SKI RACK
ANCHORAGE POINTS
The car roof features four brackets
for anchoring the roof rack/ski rack
(fig. 219); these brackets are hidden
by small covers.
To use the brackets, lift the covers
by levering on point A(fig. 220).
Fasten the roof rack/ski rack to the
brackets, by following the provided
instructions.After removing the roof rack/ski
rack, lower the covers by engaging
them into their seats.
IMPORTANTStrictly comply with
the law regulations in force concern-
ing maximum overall dimensions.
Strictly follow the assembly
instructions provided with the roof
rack/ski rack set. Assembly should
be made by qualified personnel.
fig. 219
L0A0083b
fig. 220
L0A0084b
Page 255 of 386
254
Never leave unsuper-
vised children in the car;
always remove the keys
and take them with you when you
leave the car.
If the CID device is
inside the car, the engine
can be started: therefore,
we recommend that you take the
greatest care since, in this cir-
cumstances, the engine could be
started unlawfully or by children
left unattended inside the car.PARKING
To park the car, proceed as fol-
lows:
– Stop the engine.
– Check for electric parking brake
engagement.
– Engage the 1
stgear if the car is
facing uphill or reverse if facing
downhill.
– In automatic gearbox versions
put selector to P.
– Leave the front wheels steered so
to stop the car immediately if the
parking brake is accidentally
released.
On versions equipped with sunroof
(where provided), the upper part of
the sunroof incorporates a set of
solar cells that feed the climate con-
trol system fan at first speed when
the car is parked to reduce the tem-
perature inside the passenger com-
partment.Never leave the ignition
key at MAR when the
engine is off to prevent
draining the battery.
IMPORTANT Best operation of
the fan when the car is parked is
obtained by closing completely the
windows and sunroof. Furthermore,
to check operation at first speed of
the fan, disengage air vents and set
air distribution from central dash-
board vents only before leaving the
car.
Page 261 of 386
260
CONTAINING RUNNING COSTS AND
POLLUTION
Some suggestions which may help
you to keep the running costs of the
car down and lower the amount of
toxic emissions released into the
atmosphere are given below.
GENERAL CONSIDERATIONS
Car maintenance
The overall state of the car is an
important factor which has a
marked influence over fuel con-
sumption and driving comfort and
on the life span of your car. For this
reason care should be taken to main-
tain your car by carrying out the
necessary checks and regulations in
accordance with the specifications
given in the “Service Schedule” (see
sections: spark plugs, air cleaners,
timing...).Tyres
Tyre pressure should be checked at
least once every four weeks: if the
pressure is too low fuel consumption
increases as the resistance to the
rolling movement of the tyre is
greater. In this state, tyre wear is
increased and handling suffers,
which will effect safety.
Unnecessary loads
Do not travel with too much load in
the boot. The weight of the car (in
town traffic above all), and its trim
greatly effect consumption and sta-
bility.Roof rack/ski rack
Remove the roof or ski racks from
the car as soon as they are no longer
needed. These accessories reduce the
aerodynamic penetration of the car
and will increase consumption.
When transporting particularly
large objects, use a trailer, where
possible.
Electrical devices
Use electrical devices for the neces-
sary time only. The heated rear win-
dow, fog lights, windscreen wipers,
heater fan require large amounts of
electricity and increasing the request
for power will also increase fuel con-
sumption (up to +25% when driving
in towns).
Climate control system
The climate control system is an
additional load which greatly effects
the engine leading to higher con-
sumption (up to +20% in average).
When the temperature outside
allows, use the air vents where pos-
sible.
Page 277 of 386

276
8) Unscrew manually the jack han-
dle A(fig. 7) and remove it from the
container B.9) Open the tool bag and take out
the tools to be used (fig. 8):
1 – tow ring
2 – flat/cross-head screwdriver
3 – ratchet wrench
4 – ratchet wrench bush
5 – wheel bolt (for versions with
alloy rims)
6 – tool for removing the hub cap
(for versions with alloy rims)
7 – bush for unscrewing/screwing
the wheel bolts by hand8 – wrench for power steering re-
servoir cap screws
9 – wrench for actuating the sun-
roof in an emergency (where fitted)
10) On versions with alloy rims,
remove the press-fit wheel hub cap
A(fig. 9), pulling it by tool Bfitted
into C. On versions with steel rims,
remove the press-fit wheel cap A
(fig. 10).
fig. 8
L0A0326b
fig. 7
L0A0038b
fig. 9
L0A0327b
fig. 10
L0A0367b
Page 302 of 386
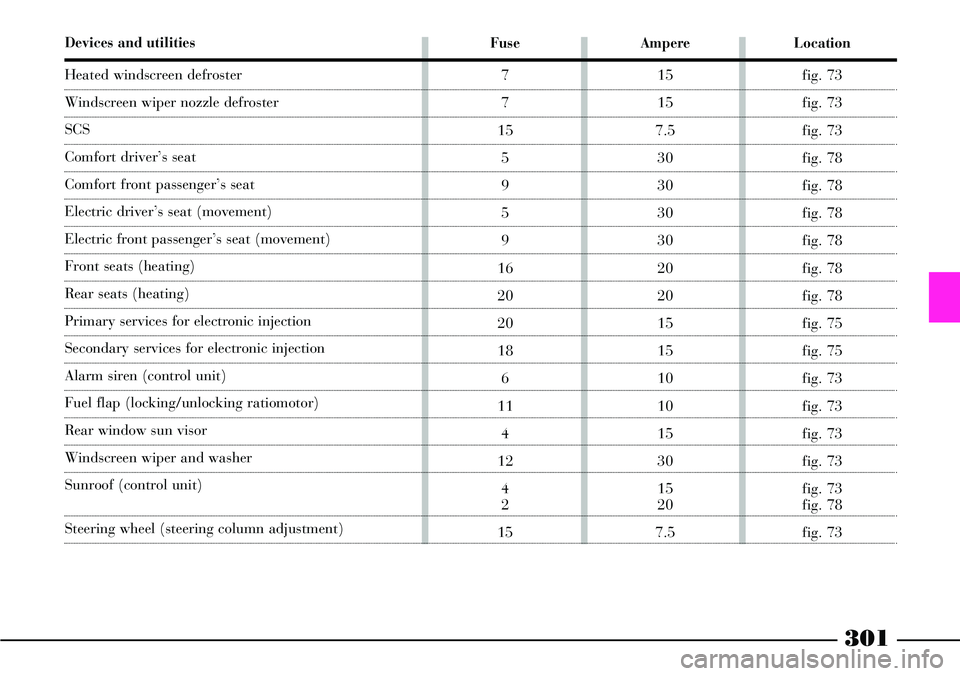
301
Devices and utilities
Heated windscreen defroster
Windscreen wiper nozzle defroster
SCS
Comfort driver’s seat
Comfort front passenger’s seat
Electric driver’s seat (movement)
Electric front passenger’s seat (movement)
Front seats (heating)
Rear seats (heating)
Primary services for electronic injection
Secondary services for electronic injection
Alarm siren (control unit)
Fuel flap (locking/unlocking ratiomotor)
Rear window sun visor
Windscreen wiper and washer
Sunroof (control unit)
Steering wheel (steering column adjustment)
Ampere
15
15
7.5
30
30
30
30
20
20
15
15
10
10
15
30
15
20
7.5
Location
fig. 73
fig. 73
fig. 73
fig. 78
fig. 78
fig. 78
fig. 78
fig. 78
fig. 78
fig. 75
fig. 75
fig. 73
fig. 73
fig. 73
fig. 73
fig. 73
fig. 78
fig. 73
Fuse
7
7
15
5
9
5
9
16
20
20
18
6
11
4
12
4
2
15
Page 339 of 386

338
Outside plastic parts must be
cleaned following the usual car
washing procedure.
Where possible avoid parking the
car under trees; the resinous sub-
stance that certain species of tree
shed dull the paintwork and increase
the possibility of rust forming.
IMPORTANTBird droppings
must be washed off immediately and
with great care as their acid is par-
ticularly aggressive.
Windows
Use specific window cleaners to
clean the windows. Use very clean
cloths to avoid scratching the glass
or damaging the transparency.
IMPORTANTTo prevent damage
to the electric heater element, wipe
the inside of the heated rear window
gently in the same direction as the
elements. To wash the car properly:
1) Remove the aerial from the roof
to prevent damaging it when wash-
ing the car in an automatic carwash.
2) Wash the body using a low pres-
sure jet of water.
3) Wipe a sponge with a light neu-
tral PH detergent solution over the
bodywork, frequently rinsing the
sponge.
4) Rinse well with water and dry
with a jet of air or a chamois leather.
When drying the car, be careful to
get at those parts which are not so
easily seen e.g. the door frames, bon-
net and around the headlights where
water can most readily collect.
You should leave the car out in the
open so that any water remaining
can evaporate more easily.
Do not wash the car after it has
been parked in the sun or while the
bonnet is hot: it could take the shine
off the paint. Cleaning chromium
plated/anodized bodywork parts
To clean body parts such as mold-
ings, cappings, etc., use neutral pH
detergents. Avoid generic cleaning
products.
These parts shall be rinsed well with
water and then dried with a jet of air
or a chamois leather.
For further treatment use special
polish for chromium plated/anodized
parts.
Suitable car cleaning products are
available at Lancia Dealerships.
Page 361 of 386
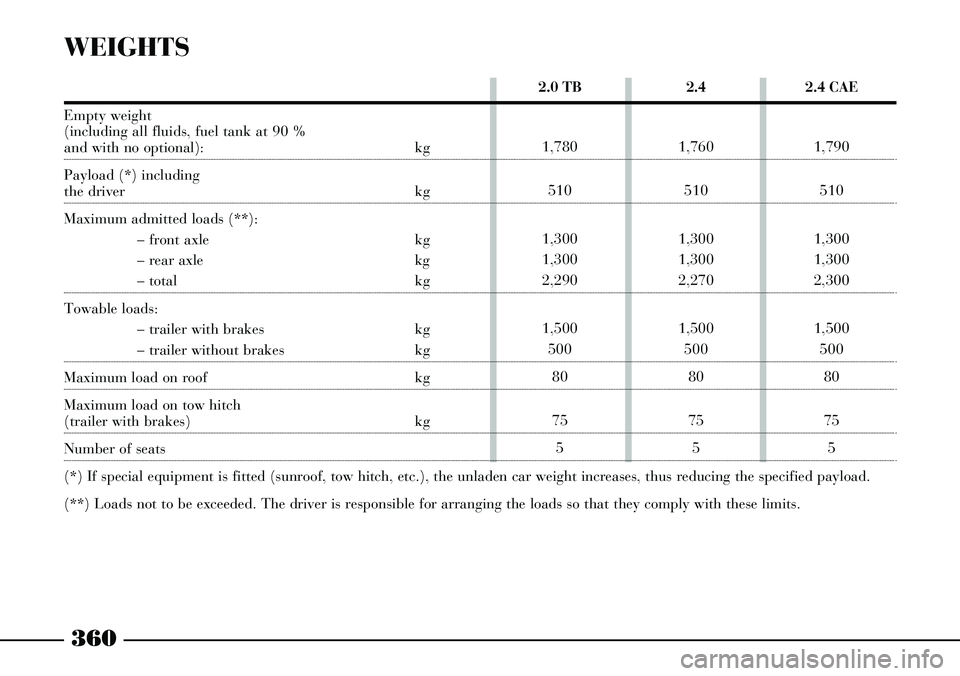
360
2.4
1,760
510
1,300
1,300
2,270
1,500
500
80
75
52.4 CAE
1,790
510
1,300
1,300
2,300
1,500
500
80
75
5 2.0 TB
1,780
510
1,300
1,300
2,290
1,500
500
80
75
5
WEIGHTS
Empty weight
(including all fluids, fuel tank at 90 %
and with no optional): kg
Payload (*) including
the driver kg
Maximum admitted loads (**):
– front axle kg
– rear axle kg
– total kg
Towable loads:
– trailer with brakes kg
– trailer without brakes kg
Maximum load on roof kg
Maximum load on tow hitch
(trailer with brakes) kg
Number of seats
(*) If special equipment is fitted (sunroof, tow hitch, etc.), the unladen car weight increases, thus reducing the specified payload.
(**) Loads not to be exceeded. The driver is responsible for arranging the loads so that they comply with these limits.