height adjustment Lancia Thesis 2006 Owner handbook (in English)
[x] Cancel search | Manufacturer: LANCIA, Model Year: 2006, Model line: Thesis, Model: Lancia Thesis 2006Pages: 386, PDF Size: 8.69 MB
Page 61 of 386
60
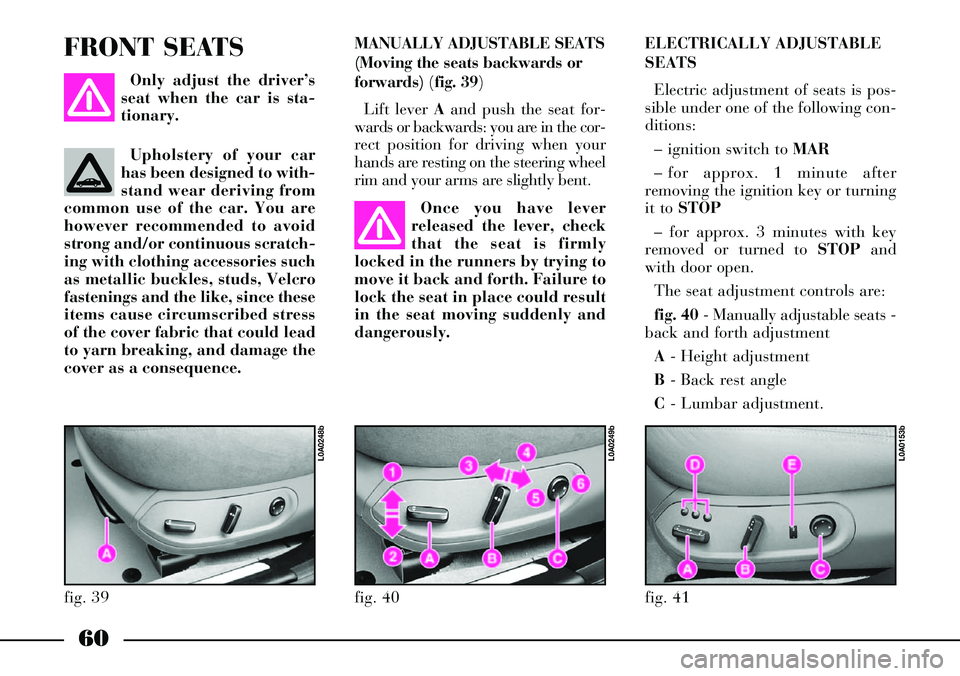
MANUALLY ADJUSTABLE SEATS
(Moving the seats backwards or
forwards) (fig. 39)
Lift lever Aand push the seat for-
wards or backwards: you are in the cor-
rect position for driving when your
hands are resting on the steering wheel
rim and your arms are slightly bent. FRONT SEATS
Only adjust the driver’s
seat when the car is sta-
tionary.
Once you have lever
released the lever, check
that the seat is firmly
locked in the runners by trying to
move it back and forth. Failure to
lock the seat in place could result
in the seat moving suddenly and
dangerously.ELECTRICALLY ADJUSTABLE
SEATS
Electric adjustment of seats is pos-
sible under one of the following con-
ditions:
– ignition switch to MAR
– for approx. 1 minute after
removing the ignition key or turning
it to STOP
– for approx. 3 minutes with key
removed or turned to STOPand
with door open.
The seat adjustment controls are:
fig. 40- Manually adjustable seats -
back and forth adjustment
A- Height adjustment
B- Back rest angle
C- Lumbar adjustment.
fig. 39
L0A0248b
fig. 41
L0A0153b
fig. 40
L0A0249b
Upholstery of your car
has been designed to with-
stand wear deriving from
common use of the car. You are
however recommended to avoid
strong and/or continuous scratch-
ing with clothing accessories such
as metallic buckles, studs, Velcro
fastenings and the like, since these
items cause circumscribed stress
of the cover fabric that could lead
to yarn breaking, and damage the
cover as a consequence.
Page 62 of 386
61
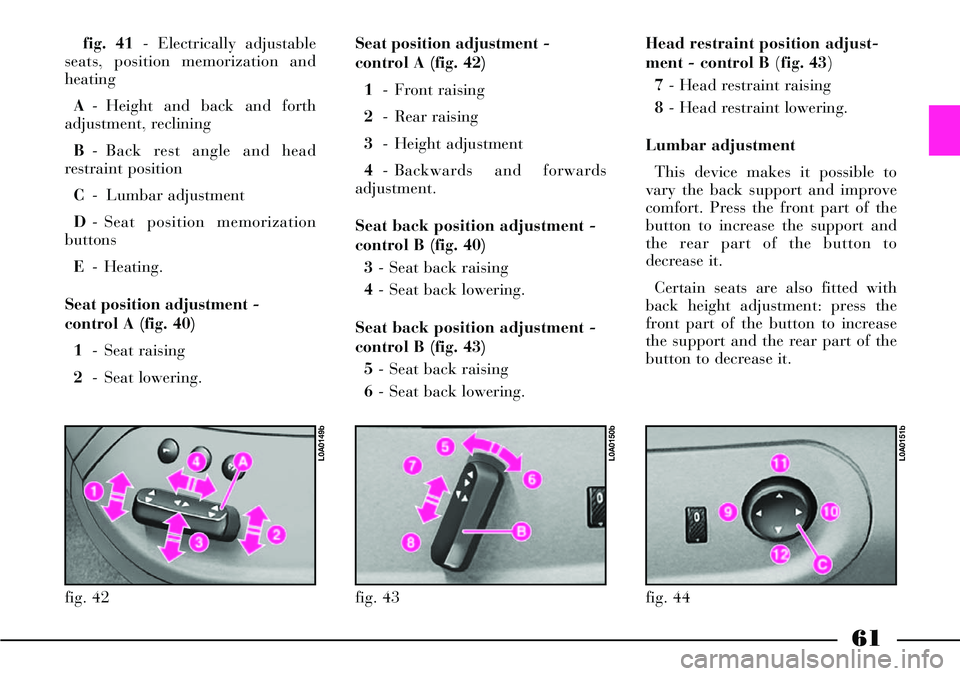
fig. 41- Electrically adjustable
seats, position memorization and
heating
A- Height and back and forth
adjustment, reclining
B- Back rest angle and head
restraint position
C- Lumbar adjustment
D- Seat position memorization
buttons
E- Heating.
Seat position adjustment -
control A (fig. 40)
1- Seat raising
2- Seat lowering.Seat position adjustment -
control A (fig. 42)
1- Front raising
2- Rear raising
3- Height adjustment
4- Backwards and forwards
adjustment.
Seat back position adjustment -
control B (fig. 40)
3- Seat back raising
4- Seat back lowering.
Seat back position adjustment -
control B (fig. 43)
5- Seat back raising
6- Seat back lowering.
fig. 42
L0A0149b
fig. 43
L0A0150b
fig. 44
L0A0151b
Head restraint position adjust-
ment - control B (fig. 43)
7 - Head restraint raising
8- Head restraint lowering.
Lumbar adjustment
This device makes it possible to
vary the back support and improve
comfort. Press the front part of the
button to increase the support and
the rear part of the button to
decrease it.
Certain seats are also fitted with
back height adjustment: press the
front part of the button to increase
the support and the rear part of the
button to decrease it.
Page 63 of 386
62
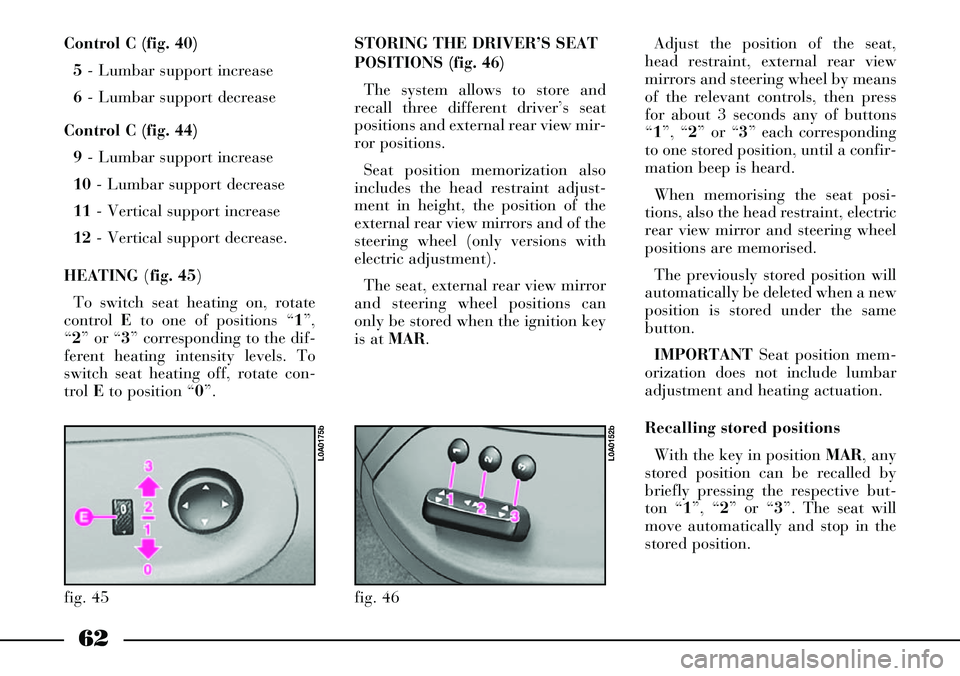
Control C (fig. 40)
5- Lumbar support increase
6- Lumbar support decrease
Control C (fig. 44)
9- Lumbar support increase
10- Lumbar support decrease
11- Vertical support increase
12- Vertical support decrease.
HEATING (fig. 45)
To switch seat heating on, rotate
control Eto one of positions “1”,
“2” or “3” corresponding to the dif-
ferent heating intensity levels. To
switch seat heating off, rotate con-
trol Eto position “0”.
fig. 45
L0A0175b
STORING THE DRIVER’S SEAT
POSITIONS (fig. 46)
The system allows to store and
recall three different driver’s seat
positions and external rear view mir-
ror positions.
Seat position memorization also
includes the head restraint adjust-
ment in height, the position of the
external rear view mirrors and of the
steering wheel (only versions with
electric adjustment).
The seat, external rear view mirror
and steering wheel positions can
only be stored when the ignition key
is at MAR.Adjust the position of the seat,
head restraint, external rear view
mirrors and steering wheel by means
of the relevant controls, then press
for about 3 seconds any of buttons
“1”, “2” or “3” each corresponding
to one stored position, until a confir-
mation beep is heard.
When memorising the seat posi-
tions, also the head restraint, electric
rear view mirror and steering wheel
positions are memorised.
The previously stored position will
automatically be deleted when a new
position is stored under the same
button.
IMPORTANTSeat position mem-
orization does not include lumbar
adjustment and heating actuation.
Recalling stored positions
With the key in position MAR, any
stored position can be recalled by
briefly pressing the respective but-
ton “1”, “2” or “3”. The seat will
move automatically and stop in the
stored position.
fig. 46
L0A0152b
Page 71 of 386
It is absolutely forbidden
to carry out whatever af-
ter-market operation in-
volving steering system or steering
column modifications (e.g.: instal-
lation of anti-theft Device) that
could badly affect performance
and safety, cause the lapse of war-
ranty and also result in non-com-
pliance of the car with homologa-
tion requirements.
70
STEERING WHEELSteering wheel position is stored
together with external rearview mir-
ror position, when storing the dri-
ver’s seat position.
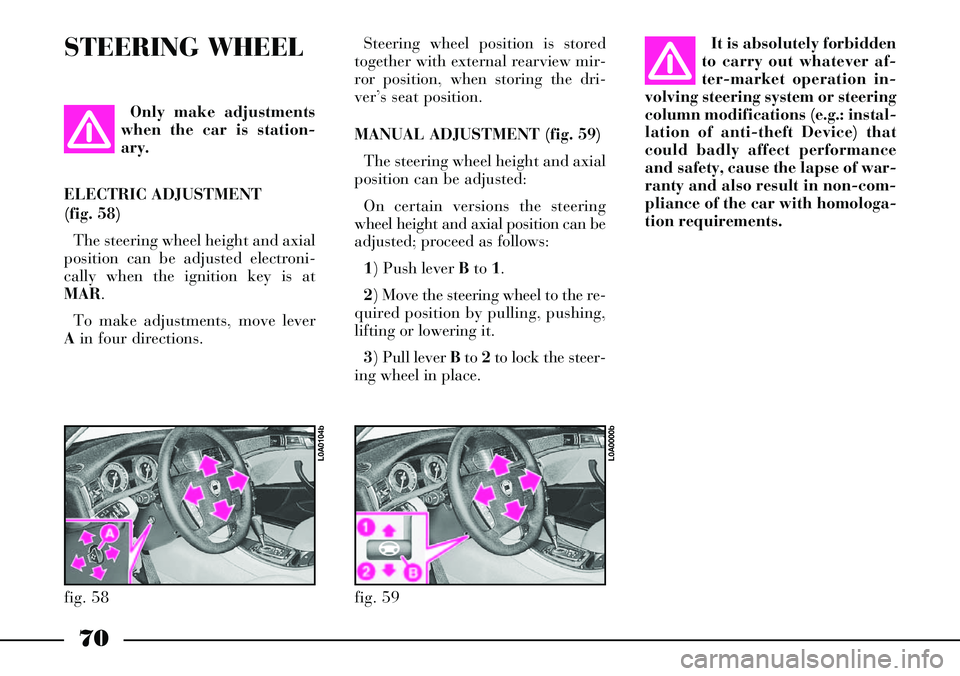
MANUAL ADJUSTMENT (fig. 59)
The steering wheel height and axial
position can be adjusted:
On certain versions the steering
wheel height and axial position can be
adjusted; proceed as follows:
1) Push lever Bto 1.
2) Move the steering wheel to the re-
quired position by pulling, pushing,
lifting or lowering it.
3) Pull leverBto 2to lock the steer-
ing wheel in place. Only make adjustments
when the car is station-
ary.
ELECTRIC ADJUSTMENT
(fig. 58)
The steering wheel height and axial
position can be adjusted electroni-
cally when the ignition key is at
MAR.
To make adjustments, move lever
Ain four directions.
fig. 58
L0A0104b
fig. 59
L0A0000b
Page 78 of 386
77
When the car is parked on a steep
slope the reel mechanism may block;
this is normal. The reel mechanism
prevents the webbing coming out
when it is jerked or if the car brakes
sharply, in a collision or when cor-
nering at high speed.
The rear seat is fitted with inertial
seat belts with three anchor points
and reel for the side and centre
seats.
Rear seat belts shall be worn as
shown in fig. 70.
To prevent incorrect fastening, the
tongues of the side seats and the
buckle of the centre lap belt are
incompatible.
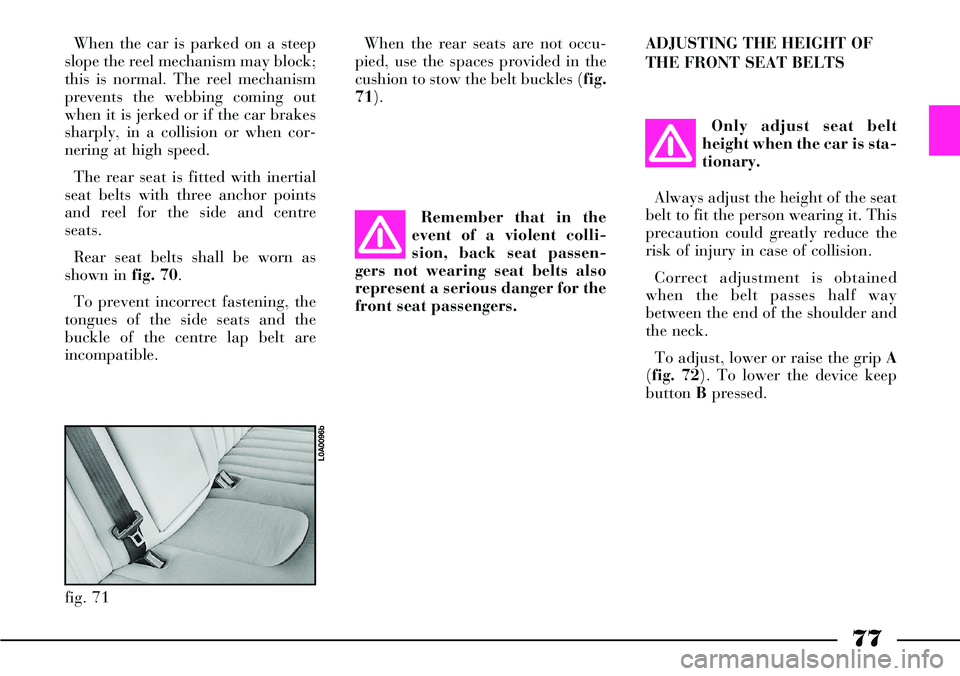
fig. 71
L0A0096b
When the rear seats are not occu-
pied, use the spaces provided in the
cushion to stow the belt buckles (fig.
71).
Remember that in the
event of a violent colli-
sion, back seat passen-
gers not wearing seat belts also
represent a serious danger for the
front seat passengers.ADJUSTING THE HEIGHT OF
THE FRONT SEAT BELTS
Only adjust seat belt
height when the car is sta-
tionary.
Always adjust the height of the seat
belt to fit the person wearing it. This
precaution could greatly reduce the
risk of injury in case of collision.
Correct adjustment is obtained
when the belt passes half way
between the end of the shoulder and
the neck.
To adjust, lower or raise the grip A
(fig. 72). To lower the device keep
button Bpressed.
Page 378 of 386
377
- Comfort Seats ................... 68
- head restraints .................. 66
- heating ............................. 67
Rearview mirror lights ............ 214
Rearview mirrors
- external ............................ 72
- internal ............................. 71
Recognition system
(Keyless System) ................. 44
- Autoclose function ............ 51
- bonnet opening ................. 50
- central locking/opening
of windows and sunroof ..... 52
- CID device ........................ 44
- CID device battery
replacement ....................... 54
- door unlocking to
access car........................... 49
- knob for activating
instrument panel and
engine start-up .................. 47- locking the door and
leaving the car ................... 50
- failure indication .............. 53
- “Garage” position
(emergency actuation) ...... 46
- locking the door and
leaving the car ................... 50
- ministerial homologation .. 53
- request for additional CID
devices .............................. 53
- system settings .................. 52
Remote control (CONNECT) .. 19
Rev counter ............................ 107
Reverse lights
- bulb replacement .............. 286
Rims ....................................... 354
- correct rim reading ............ 357
- important ......................... 356
Roof rack/ski rack................... 240
- anchorage points................ 240
Rubber tubing
(maintenance) ..................... 333Safe driving ........................... 255
- before getting behind the
wheel ................................... 255
- driving at night .................. 257
- driving in the fog ............... 258
- driving in the mountains .... 258
- driving in the rain .............. 257
- driving on snow and ice ..... 259
- driving with ABS ................ 259
- when travelling .................. 255
Seat belts
- front seat belt height
adjustment .......................... 77
- general instructions ............ 79
- how to keep seat belts
in proper working order ...... 80
- load limiting devices ........... 79
- pretensioners ...................... 78
- use ...................................... 76
Side/taillights
- control ................................ 97