tow Lancia Thesis 2006 Owner handbook (in English)
[x] Cancel search | Manufacturer: LANCIA, Model Year: 2006, Model line: Thesis, Model: Lancia Thesis 2006Pages: 386, PDF Size: 8.69 MB
Page 49 of 386
48
Before leaving the car in
a car-wash tunnel, disen-
gage the parking brake by
following the instructions
described in the relevant para-
graph, and leave the CID device
inside the passenger compart-
ment, to avoid automatic steering
column lock.IMPORTANTUser is not authorised
to move the car if the start-up knob is
not turned to the position MAR.
Should it be necessary to tow the car,
it is advised to turn the knob to the
MARposition before moving the car.
Steering column unlocking
The steering column is automati-
cally switched off, and the instru-
ment panel and electrical services
switched on, when the system
detects the simultaneous presence of
the following conditions:
cessive rotation of knob A(fig. 22)
to the STOPposition, and it will not
be possible to restart the car until a
valid CID device is identified inside
the passenger compartment.
IMPORTANTMake sure the CID
device is not positioned in places dif-
ficult to be accessed by the identifi-
cation system, such as the instru-
ment panel, the car floor or the shelf
below the rear window. Some elec-
tronic devices (e. g. mobile phones,
PDA, etc.) can moreover influence
the CID device identification. In the
case where, after a start-up opera-
tion, the message “ELECTRONIC
KEY NOT IDENTIFIED” should be
displayed, on the instrument panel,
make sure make sure whether the
CID is present into the passenger
compartment and it is located in
places tat can be reached by identi-
fication system.
IMPORTANTIf the CID device is
inside the luggage compartment, it is
possible that the engine could not be
started.Engine stop
To switch the engine off, turn the
knob from MARto STOP: the
engine will stop and the instrument
panel will display the message
“STEERING LOCKED WHEN
DOORS CLOSED”.
Steering column locking
The steering column lock is auto-
matically switched on by actuating
door closing by means of the remote
control, if the system has detected
the simultaneous presence of the fol-
lowing conditions:
– engine off (knob rotation to
STOPwith the car at a standstill)
– clutch pedal released (brake pedal
released on versions with automatic
transmission).
IMPORTANTThe steering column
lock is not switched on when the
door locks are actuated by means of
the emergency key in the CID
device, or automatically when the
CID device is taken away from the
car.
Page 78 of 386
77
When the car is parked on a steep
slope the reel mechanism may block;
this is normal. The reel mechanism
prevents the webbing coming out
when it is jerked or if the car brakes
sharply, in a collision or when cor-
nering at high speed.
The rear seat is fitted with inertial
seat belts with three anchor points
and reel for the side and centre
seats.
Rear seat belts shall be worn as
shown in fig. 70.
To prevent incorrect fastening, the
tongues of the side seats and the
buckle of the centre lap belt are
incompatible.
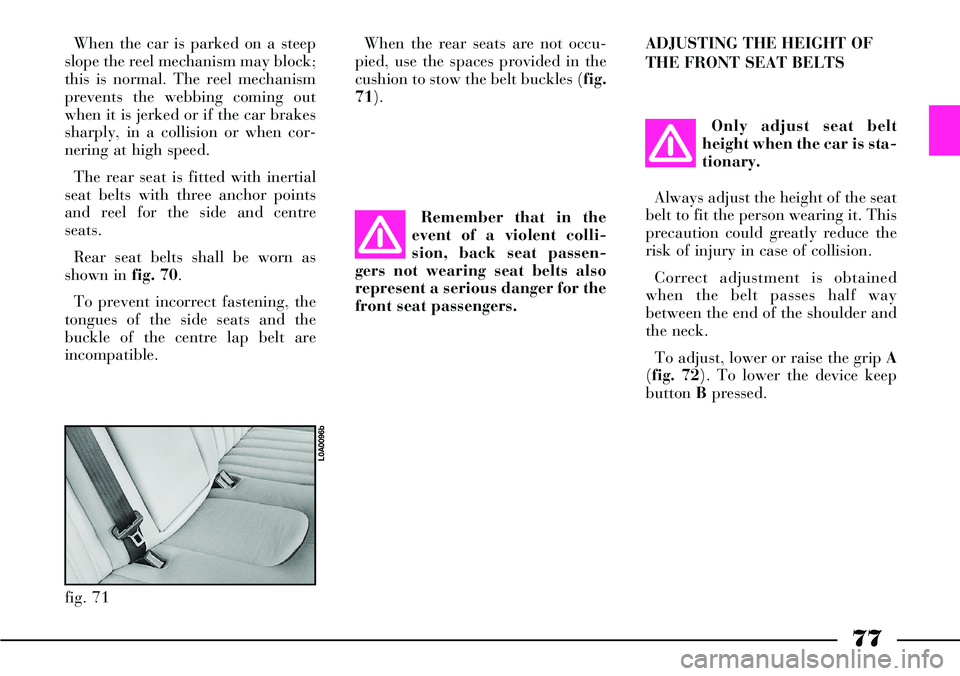
fig. 71
L0A0096b
When the rear seats are not occu-
pied, use the spaces provided in the
cushion to stow the belt buckles (fig.
71).
Remember that in the
event of a violent colli-
sion, back seat passen-
gers not wearing seat belts also
represent a serious danger for the
front seat passengers.ADJUSTING THE HEIGHT OF
THE FRONT SEAT BELTS
Only adjust seat belt
height when the car is sta-
tionary.
Always adjust the height of the seat
belt to fit the person wearing it. This
precaution could greatly reduce the
risk of injury in case of collision.
Correct adjustment is obtained
when the belt passes half way
between the end of the shoulder and
the neck.
To adjust, lower or raise the grip A
(fig. 72). To lower the device keep
button Bpressed.
Page 96 of 386
95
GENERAL NOTES
Do not apply stickers or
other objects to the steer-
ing wheel, to the passen-
ger's airbag cover or to the roof
side cover. Do not place objects
(like mobile phones) on the dash-
board on passenger side since
they could interfere with proper
passenger's airbag deployment
and cause severe injuries.
If the ¬warning light
does not turn on when
turning the ignition key to
MAR or if it stays on when travel-
ling (together with message on dis-
play), this could indicate a failure
in safety retaining systems; under
this condition air bags or preten-
sioners could not trigger in the
event of collision or, in a restricted
number of cases, they could trig-
ger accidentally. Stop the car and
contact Lancia Dealership to have
the system checked immediately.
Do not cover the back
rest of front and rear seats
with trims or covers there
are not set for the use of side bags.
Do not travel with
objects on your lap or in
front of you nor with a
pipe, pencil or similar between
your lips. You could seriously
hurt yourself if the airbag inflates
in a collision.
Always drive with both
hands on the rim of the
steering wheel so that the
airbag is free to inflate during a
head-on collision and protect you
from serious injury. Do not drive
with your body bending towards
the steering wheel, but sit in an
upright position with your back
resting against the seat.If an attempt has been
made to steal the car, or if
it has actually been stolen
or has been vandalised in anyway
or subjected to flooding, have the
airbag system checked over at a
Lancia Dealership.
It is important to
remember that the airbag
can be fired even when
the car is stationary if it is hit by
another vehicle travelling at suit-
able speed. As a consequence,
never sit children in the front
seat, even if the car is not moving.
On the contrary, the airbags will
not be fired if the car is crashed
into when the key is not inserted
or turned. Consequently, in this
case, the fact that the system is
not fired does not indicate a fault.
Page 100 of 386
99
Twilight sensor
It is composed by an infrared led
sensor installed on the windscreen in
order to detect the changes of the
external light intensity of the car , as
a function of the light sensitivity set;
greater is the sensitivity, smaller is
the amount of external light neces-
sary to control the switching-on of
the exterior headlights.
It consists of two sensors: a global
sensor for evaluating environment
light intensity and a directional one
for evaluating light intensity in run-
ning direction in order to recognize
tunnels, dark road sections, etc.When ring Ais turned to AUTO
(automatic light switching on), and
the twilight sensor is malfunction-
ing, side/taillights and dipped beam
headlights are switched on regard-
less of the light intensity and the dis-
play on the instrument panel shows
the message “TWILIGHT SENSOR
FAULT – GO TO DEALER”.
Failure indication will stay on as
long as ring Ais turned to AUTO. In
this case it is recommended to deac-
tivate the automatic function and
switch on the lights manually; con-
tact a Lancia Dealershipas soon as
possible.Delayed light switching off
(“Follow me home” device)
This device allows the illumination
of the space in front of the car for a
length of time of 30 seconds (or a
multiple of 30) and is activated with
the ignition key at STOPor
removed.
This device is activated by pulling
towards the steering wheel and then
releasing the left-hand stalk within 2
minutes from when the engine is
turned off. At each operation of the
stalk, the staying on of the lights is
extended by 30 seconds, up to a
maximum of 210 seconds that corre-
spond to 7 stalk operations, then the
lights are switched off automatical-
ly.
Total set time (in seconds) is
shown on the instrument panel dis-
play for about 20 seconds.
Page 101 of 386
100
After activating the device, the set
time can be extended also within 2
minutes from when the engine is
turned off by pulling the stalk.
Keeping the stalk pulled for over 2
seconds will deactivate this function
with immediate light turning off as a
consequence.
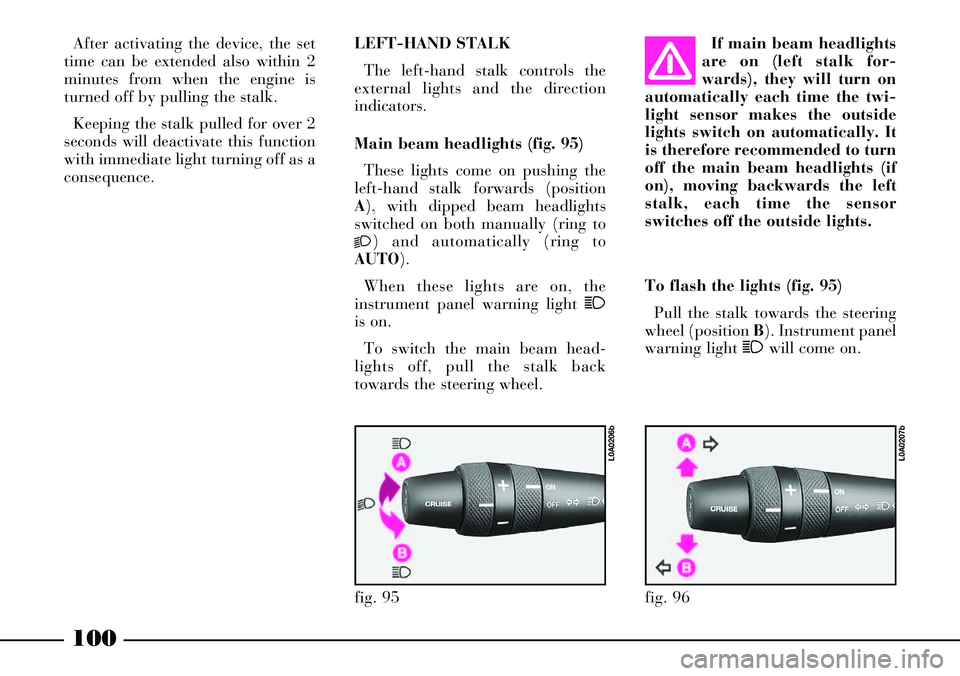
To flash the lights (fig. 95)
Pull the stalk towards the steering
wheel (position B). Instrument panel
warning light 1will come on. LEFT-HAND STALK
The left-hand stalk controls the
external lights and the direction
indicators.
Main beam headlights (fig. 95)
These lights come on pushing the
left-hand stalk forwards (position
A), with dipped beam headlights
switched on both manually (ring to
2) and automatically (ring to
AUTO).
When these lights are on, the
instrument panel warning light 1
is on.
To switch the main beam head-
lights off, pull the stalk back
towards the steering wheel.If main beam headlights
are on (left stalk for-
wards), they will turn on
automatically each time the twi-
light sensor makes the outside
lights switch on automatically. It
is therefore recommended to turn
off the main beam headlights (if
on), moving backwards the left
stalk, each time the sensor
switches off the outside lights.
fig. 95
L0A0206b
fig. 96
L0A0207b
Page 102 of 386
101
IMPORTANTThis operation will
flash the main beam headlights.
Follow the Highway Code to prevent
being fined.
Direction indicators (fig. 96)
Move the stalk as follows:
up (position A) - to switch on the
right-hand indicators
down (position B) - to switch on
the left-hand indicators.
When direction indicators are on,
instrument panel warning light
Ÿor
∆will flash.
The direction indicators return
automatically to neutral position
when the car straightens up.
IMPORTANTIf you want the indi-
cator to flash briefly to show that
you are about to change lane, move
the stalk up or down without click-
ing into position. When you let it go
it will return to its original position.RIGHT-HAND STALK
The right-hand stalk controls all
the washer/wiper controls.
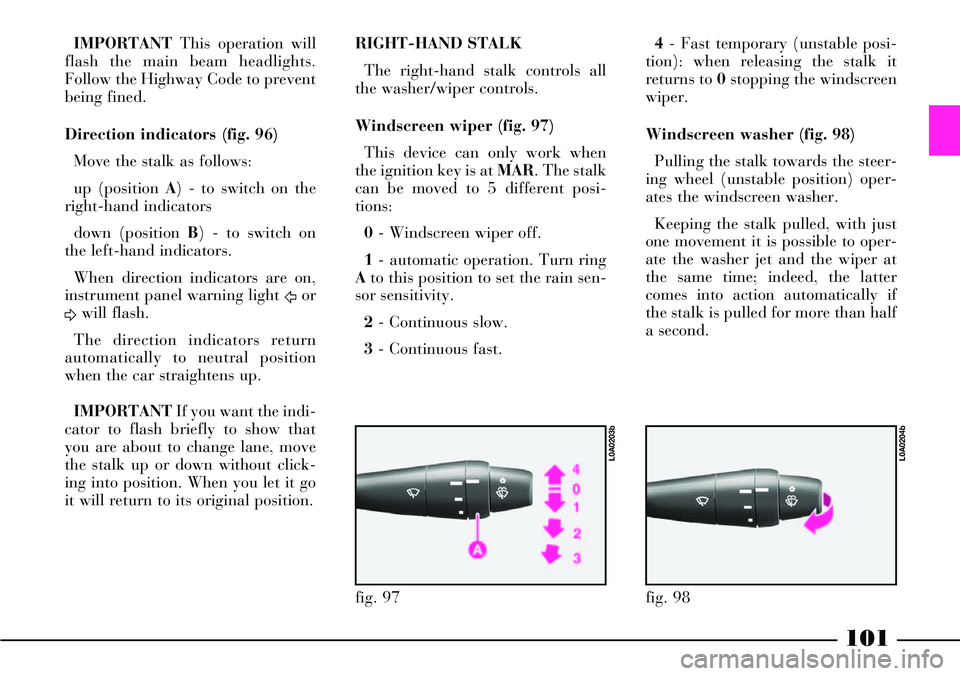
Windscreen wiper (fig. 97)
This device can only work when
the ignition key is at MAR. The stalk
can be moved to 5 different posi-
tions:
0- Windscreen wiper off.
1- automatic operation. Turn ring
Ato this position to set the rain sen-
sor sensitivity.
2- Continuous slow.
3- Continuous fast.4- Fast temporary (unstable posi-
tion): when releasing the stalk it
returns to 0stopping the windscreen
wiper.
Windscreen washer (fig. 98)
Pulling the stalk towards the steer-
ing wheel (unstable position) oper-
ates the windscreen washer.
Keeping the stalk pulled, with just
one movement it is possible to oper-
ate the washer jet and the wiper at
the same time; indeed, the latter
comes into action automatically if
the stalk is pulled for more than half
a second.
fig. 97
L0A0203b
fig. 98
L0A0204b
Page 103 of 386
102
The wiper stops working a few
strokes after releasing the stalk; a
further “cleaning stroke”, after a
few seconds completes the wiping
operation.
Windscreen washer nozzles are fit-
ted with demisting resistors that cut
in automatically (for about 3 min-
utes) when pressing the fast window
demisting/defrosting button.
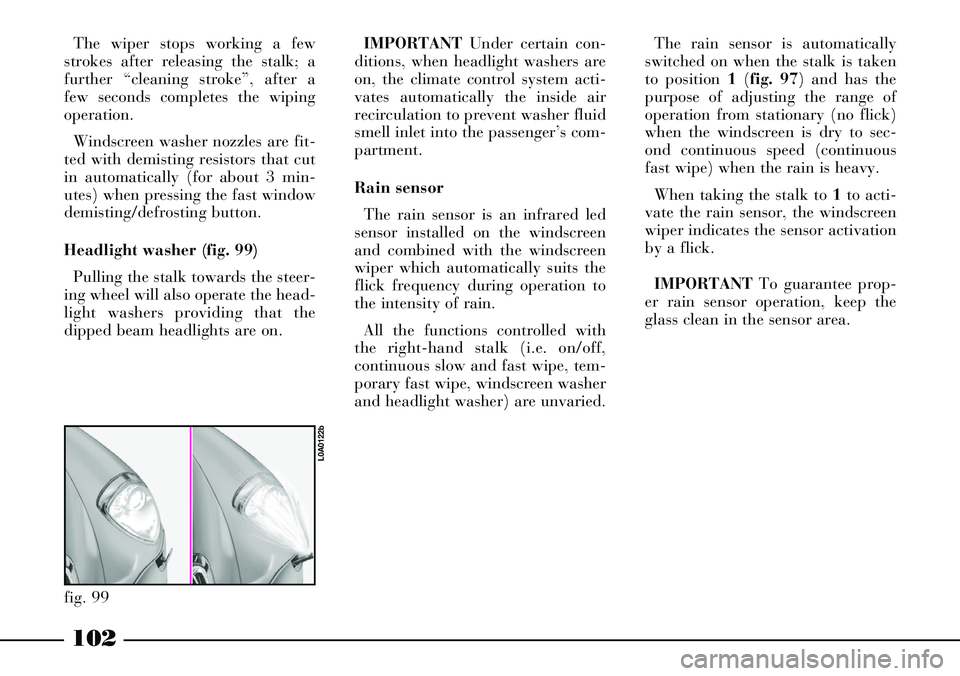
Headlight washer (fig. 99)
Pulling the stalk towards the steer-
ing wheel will also operate the head-
light washers providing that the
dipped beam headlights are on.IMPORTANTUnder certain con-
ditions, when headlight washers are
on, the climate control system acti-
vates automatically the inside air
recirculation to prevent washer fluid
smell inlet into the passenger’s com-
partment.
Rain sensor
The rain sensor is an infrared led
sensor installed on the windscreen
and combined with the windscreen
wiper which automatically suits the
flick frequency during operation to
the intensity of rain.
All the functions controlled with
the right-hand stalk (i.e. on/off,
continuous slow and fast wipe, tem-
porary fast wipe, windscreen washer
and headlight washer) are unvaried.
fig. 99
L0A0122b
The rain sensor is automatically
switched on when the stalk is taken
to position 1(fig. 97) and has the
purpose of adjusting the range of
operation from stationary (no flick)
when the windscreen is dry to sec-
ond continuous speed (continuous
fast wipe) when the rain is heavy.
When taking the stalk to 1to acti-
vate the rain sensor, the windscreen
wiper indicates the sensor activation
by a flick.
IMPORTANTTo guarantee prop-
er rain sensor operation, keep the
glass clean in the sensor area.
Page 145 of 386
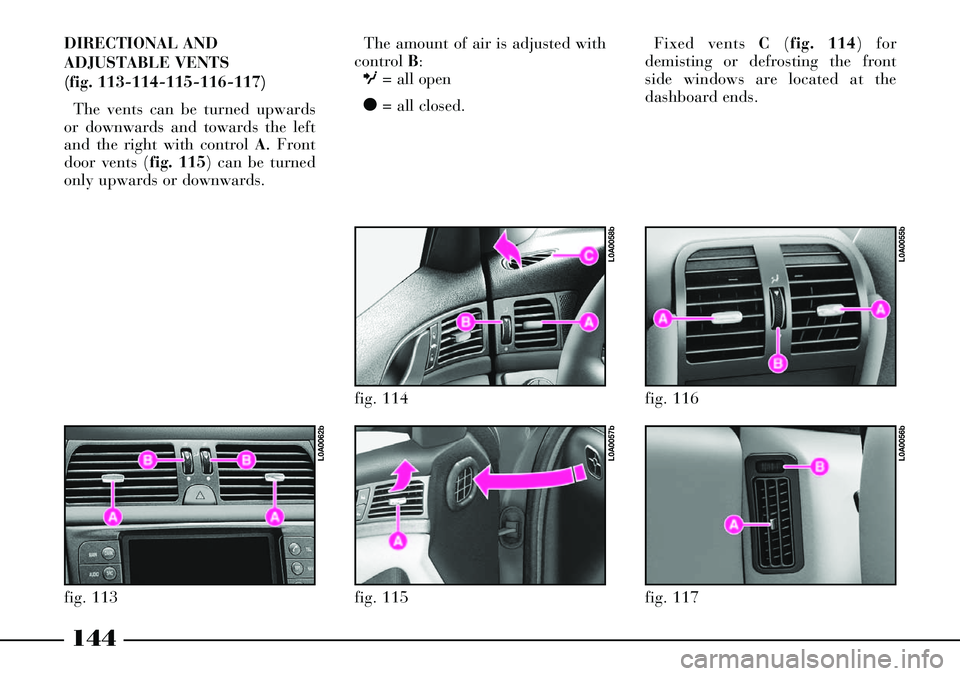
The amount of air is adjusted with
control B:
O= all open
ç= all closed.
fig. 117
L0A0056b
fig. 116
L0A0055b
144
DIRECTIONAL AND
ADJUSTABLE VENTS
(fig. 113-114-115-116-117)
The vents can be turned upwards
or downwards and towards the left
and the right with control A
.Front
door vents (fig. 115) can be turned
only upwards or downwards.
fig. 115
L0A0057b
fig. 114
L0A0058b
fig. 113
L0A0062b
Fixed vents C(fig. 114) for
demisting or defrosting the front
side windows are located at the
dashboard ends.
Page 153 of 386
152
CONTROLS
Knobs for adjusting air tempera-
ture (2, 8 fig. 121 - 1 fig. 122)
Turn the knobs towards the right
or towards the left to raise or lower
the air temperature required respec-
tively in the front left-hand area
(knob 2 fig. 121) and in the front
right-hand area (knob 8 fig. 121) or
back area (knob 1 fig. 122) of the
passenger compartment.
Since the system controls three
areas of the passenger compartment,
the driver and the front/back-seat
passengers can select different tem-
perature values with a maximum
difference accepted by the system of
7 °
C.
Temperature control in the front
passenger area and in the back pas-
senger area is alternated; when the
button led REARis off, control of
front passenger side is on, but when
button REARis pressed (button led
on) the back control panel is activat-
ed. The set temperatures are shown on
the displays set near the respective
knobs.
Press button 16(MONO - fig. 121)
to automatically align the
(front/back) passenger temperature
to the temperature on driver’s side.
Consequently the temperature in the
two areas can be set simply by turn-
ing the knob on the driver side 2
(fig. 121). This function is provided
to facilitate adjusting the temperature
in the passenger compartment when
only the driver is present. The sepa-
rate operation of the set temperatures
and air distribution is automatically
reset when knobs 8 (fig. 121) or 1
(fig. 122) are turned or button 16
(MONO - fig. 121) is pressed again,
when the button led is turned on.
Turn the knobs fully to the right or
to the left to the end positions HIor
LO, to obtain maximum heating or
cooling, respectively:– HIfunction (maximum heating):
this is switched on by turning the
temperature knob to the right
beyond the maximum value (32 °C).
It can be independently switched on
from driver’s side or from
(front/back) passenger’s side or
from both sides (also by selecting the
MONOfunction).
This function can be switched on to
speed up heating in the passenger
compartment by exploiting the sys-
tem potential to the maximum. The
function employs the maximum
coolant temperature while the air
distribution and fan speed are set by
the system according to environ-
mental conditions. In particular, if
the coolant temperature is not suffi-
cient, the function does not switch
the fan on at top speed to limit let-
ting into air which is not adequately
warm.
All the manually settings can be
adjusted when the function is on.
Page 170 of 386
169
OPERATION
WITH ENGINE RUNNING
“Supplementary heater” mode
This operating mode integrates the
engine coolant warming up, immedi-
ately after start up or during driving,
to reach and keep the optimal work-
ing temperature of the engine and the
passenger compartment heater in the
quickest way.
This mode is activated automatically
by the climate control unit when the
following conditions occur at the same
time:
– ignition key at MAR
– engine running– coolant temperature lower than 30
°C
– the climate control unit detects
(according to sensor detected temper-
atures) that fast passenger compart-
ment warming is required.
This mode is automatically deacti-
vated when one of the following con-
ditions occurs:
– coolant temperature higher than
70 °C
– the heater control unit detects a
fault in the supplementary heater
– engine off. The batteries must be replaced with
new ones of the same type, available
at the usual sellers.
To replace batteries:
– remove the remote control cover
by pushing it in the arrow direction
indicated on the cover
– remove exhausted batteries and
take note of their position
– fit the new batteries with pole (+)
towards the remote control antenna
– fit down the cover.
Request for additional remote
controls
The heater receiver will acknowl-
edge up to three remote controls. To
order new remote controls, or to re-
place the original one, contact a Lan-
cia Dealership.