seats Lancia Thesis 2007 Owner handbook (in English)
[x] Cancel search | Manufacturer: LANCIA, Model Year: 2007, Model line: Thesis, Model: Lancia Thesis 2007Pages: 386, PDF Size: 8.69 MB
Page 221 of 386
220
POWER SOCKET
It is located inside the rear armrest.
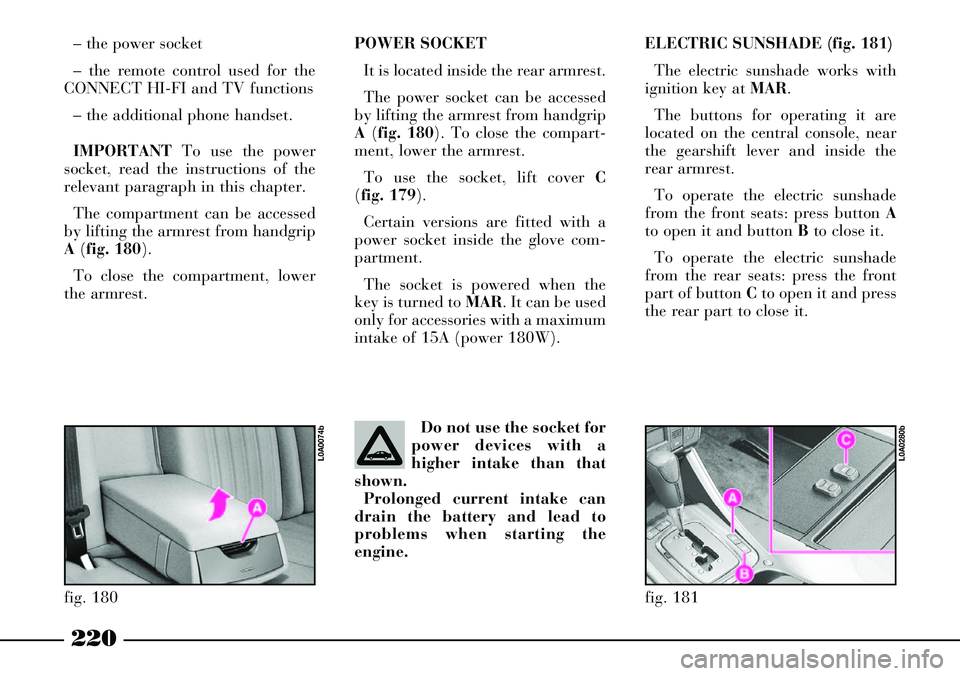
The power socket can be accessed
by lifting the armrest from handgrip
A (fig. 180). To close the compart-
ment, lower the armrest.
To use the socket, lift cover C
(fig. 179).
Certain versions are fitted with a
power socket inside the glove com-
partment.
The socket is powered when the
key is turned to MAR. It can be used
only for accessories with a maximum
intake of 15A (power 180W).ELECTRIC SUNSHADE (fig. 181)
The electric sunshade works with
ignition key at MAR.
The buttons for operating it are
located on the central console, near
the gearshift lever and inside the
rear armrest.
To operate the electric sunshade
from the front seats: press button A
to open it and button Bto close it.
To operate the electric sunshade
from the rear seats: press the front
part of button Cto open it and press
the rear part to close it.
Do not use the socket for
power devices with a
higher intake than that
shown.
Prolonged current intake can
drain the battery and lead to
problems when starting the
engine.– the power socket
– the remote control used for the
CONNECT HI-FI and TV functions
– the additional phone handset.
IMPORTANTTo use the power
socket, read the instructions of the
relevant paragraph in this chapter.
The compartment can be accessed
by lifting the armrest from handgrip
A (fig. 180).
To close the compartment, lower
the armrest.
fig. 180
L0A0074b
fig. 181
L0A0280b
Page 222 of 386

221
INSTALLATION OF ELECTRIC/
ELECTRONIC DEVICES
Electric/electronic devices installed
after buying the car or in aftermarket
shall bear the and marking:
Fiat Auto S.p.A. authorizes the in-
stallation of transceivers provided that
installation is carried out at a special-
ized shop, workmanlike performed
and in compliance with manufac-
turer's specifications.
IMPORTANTInstallation of devices
resulting in modifications of car char-
acteristics may cause driving license
seizing by traffic agents and also the
lapse of the warranty as concerns de-
fects due to the abovementioned mod-
ification or traceable back to it di-
rectly or indirectly.
Fiat Auto S.p.A. declines all respon-
sibility for damages caused by the in-
stallation of non-genuine accessories
or not recommended by Fiat Auto
S.p.A. and installed not in compliance
with the specified requirements. ACCESSORIES PURCHASED BY
THE USER
If after buying the car, you decide
to install electrical accessories that
require a permanent power supply
(e.g. satellite antitheft device), or
any other accessory that burden the
electric supply, contact your Lancia
Dealershipwhose qualified person-
nel, besides suggesting the most suit-
able devices belonging to the
Lineaccessori Lancia, will also eval-
uate the total electrical absorption,
checking whether the car’s electric
system is able to withstand the
required load or whether it must be
integrated with a more powerful
battery.
fig. 182
L0A0147b
fig. 183
L0A0222b
Before actuating the
sunshade, make sure that
no object is placed on the
rear parcel shelf.
MAP POCKETS (fig. 182)
(where provided)
Paper pockets are located on the
back of the front seats.
HANDLES (fig. 183)
They are placed just next to the
doors.
Each rear handle includes a clothes
hook A.
Page 233 of 386

232
The mobile net can be secured to
one of the two positions provided in
the front part of the boot (fig. 197-
198), by hooking it onto seats Aand
B(fig. 199).To secure the net, insert hooks A
(fig. 200) in seats Bthen push
downwards.
The net can be unhooked by slip-
ping it off upwards, by pressing
down button Con the attachment.ANCHORING THE LOAD
The loads can be secured with belts
(not provided), attached to the spe-
cific rings (fig. 201-202) in the boot
corners.
fig. 197
L0A0046b
fig. 198
L0A0047b
fig. 199
L0A0099b
fig. 200
L0A0048b
fig. 201
L0A0219b
Page 242 of 386

241
After travelling a few
kilometres, check that the
screws securing the rack
are tight.
Distribuite the load
evenly and remember,
when driving the car, that
the car is now more susceptible to
side wind.
Never exceed the per-
mitted weights (refer to
the “Technical specifica-
tions” chapter).ROOF RACK –
SKI RACK
ANCHORAGE POINTS
The car roof features four brackets
for anchoring the roof rack/ski rack
(fig. 219); these brackets are hidden
by small covers.
To use the brackets, lift the covers
by levering on point A(fig. 220).
Fasten the roof rack/ski rack to the
brackets, by following the provided
instructions.After removing the roof rack/ski
rack, lower the covers by engaging
them into their seats.
IMPORTANTStrictly comply with
the law regulations in force concern-
ing maximum overall dimensions.
Strictly follow the assembly
instructions provided with the roof
rack/ski rack set. Assembly should
be made by qualified personnel.
fig. 219
L0A0083b
fig. 220
L0A0084b
Page 256 of 386
255
SAFE DRIVING
In designing THESIS, LANCIA has
made every effort to come up with a
car able to provide driver and pas-
senger with top-class levels of safety.
Nevertheless it is always the behav-
iour of the person at the wheel that
determines road safety.
Below you will find some simple
tips to help you travel in safety
under different conditions. You will
no doubt be familiar with many of
them already, but it will be useful to
read them all carefully.
BEFORE GETTING BEHIND
THE WHEEL
– Make sure all lights, including
the headlights, are working proper-
ly.
– Adjust the position of the seats,
steering wheel, driving and door
mirrors properly for the best driving
position.
– Carefully adjust the head
restraints so that the back of the
head and not the nape of the neck is
supported. Make sure that nothing (mats etc.)
gets in the way of the pedals when
they are pushed down.
– Make sure that any child
restraint systems (child seats, carri-
ers etc.) are properly fixed on the
rear seat.
– Place any objects in the boot in
such a way that they cannot be
thrown forwards in the event of an
accident.
– Do not eat a heavy meal before
travelling. Light eating will help
keep your reflexes prompt. Above
all, do not have anything alcoholic to
drink.
Periodically, remember to check:
– tyre pressure and conditions;
– engine oil level;
– coolant level and cooling system
conditions;
– brake fluid level;
– power steering fluid level;
– windscreen washer fluid level. WHEN TRAVELLING
– The first rule of safe driving is
prudence.
– Prudence also means putting
yourself into a position where you
can predict wrong or imprudent
behaviour from other drivers.
– Stick closely to the rules of the
road in the particular country where
the vehicle is being driven and,
above all, do not exceed speed limits.
– Ensure that, besides yourself, all
the other passengers in the vehicle
have their seat belts fastened, that
children are sitting in the appropri-
ate child seats and any animals in
the car are placed in suitable com-
partments.
– You should be physically fit and
mentally alert before setting out on
long journeys.
Page 302 of 386
301
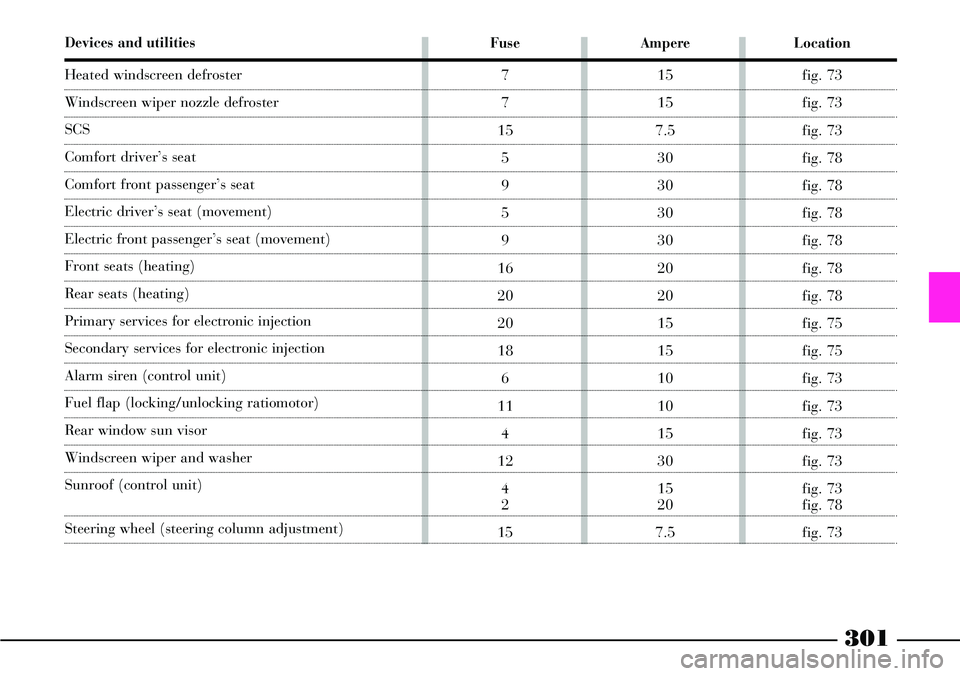
Devices and utilities
Heated windscreen defroster
Windscreen wiper nozzle defroster
SCS
Comfort driver’s seat
Comfort front passenger’s seat
Electric driver’s seat (movement)
Electric front passenger’s seat (movement)
Front seats (heating)
Rear seats (heating)
Primary services for electronic injection
Secondary services for electronic injection
Alarm siren (control unit)
Fuel flap (locking/unlocking ratiomotor)
Rear window sun visor
Windscreen wiper and washer
Sunroof (control unit)
Steering wheel (steering column adjustment)
Ampere
15
15
7.5
30
30
30
30
20
20
15
15
10
10
15
30
15
20
7.5
Location
fig. 73
fig. 73
fig. 73
fig. 78
fig. 78
fig. 78
fig. 78
fig. 78
fig. 78
fig. 75
fig. 75
fig. 73
fig. 73
fig. 73
fig. 73
fig. 73
fig. 78
fig. 73
Fuse
7
7
15
5
9
5
9
16
20
20
18
6
11
4
12
4
2
15
Page 340 of 386

339
Engine compartment
At the end of each winter season,
carefully clean the engine compart-
ment without directing the water jet
against electronic control units.
Have this done at a garage.
Detergents pollute water.
For this reason the car
must be washed in an
area equipped for the collection
and purification of the liquids
used while washing.
IMPORTANTThe car should
washed with the engine cold and the
ignition key at STOP. After washing
make sure that the various protec-
tions (e.g. rubber caps and various
covers) have not been damaged or
removed.INTERIORS
From time to time check that water
has not collected under the mats
(from dripping shoes, umbrellas,
etc.) which could cause the steel to
rust.
Never use inflammable
products like fuel oil
ether or rectified petrol
for cleaning inside the car. The
electrostatic discharges generat-
ed when rubbing to clean may
cause fire.
Do not keep aerosol cans
in the car. There is the
risk they might explode.
Aerosol cans must never be
exposed to a temperature above
50°C; when the weather starts to
get hot the temperature inside the
car might go well beyond that fig-
ure.
PLASTIC PARTS INSIDE
THE CAR
Use special products designed not
to alter the appearance of the com-
ponents.
IMPORTANTDo not use alcohol
or petrol to clean the instrument
panel.
CLEANING ALCANTARA
SEATS
Alcantara upholstery is easy to
clean. Follow the same instructions
provided for velvet upholstery.
Page 341 of 386

340
CLEANING VELVET SEATS
AND FABRICS
– Remove dust with a soft brush
and vacuum cleaner. Use a moist
brush to clean velvet upholstery.
– Brush the seats with a damp
sponge with water and a neutral
soap.CLEANING LEATHER SEATS
– Remove the dry dirt with a
chamois leather or very slightly
moist loth without exerting too
much pressure.
– Remove liquid or grease stains
with a dry absorbent cloth without
rubbing. Then wipe with a chamois
leather or soft cloth moistened with
water and neutral soap. If the stain
does not come out, use a special
cleaning compound being particu-
larly careful to follow the instruc-
tions for use.
IMPORTANTNever use alcohol or
alcohol-based products.STEERING WHEEL/GEAR
LEVER KNOB WITH GENUINE
LEATHER COVERING
These components shall only be
cleaned with water and neutral soap.
Never use spirit or alcohol-based
products.
Before using special products for
cleaning interiors, read carefully label
instructions and indications to make
sure they are free from spirit and/or
alcohol-based substances.
If when cleaning the windscreen
with special glass products, some
drops fall on the leather covering of
the steering wheel/gear lever knob re-
move them immediately and then
clean with water and neutral soap.
IMPORTANT Take the utmost care
when engaging the steering lock to
prevent scratching the leather cover-
ing. Upholstery of your car
has been designed to with-
stand wear deriving from
common use of the car. You are
however recommended to avoid
strong and/or continuous scratch-
ing with clothing accessories such
as metallic buckles, studs, Velcro
fastenings and the like, since these
items cause circumscribed stress
of the cover fabric that could lead
to yarn breaking, and damage the
cover as a consequence.
Page 361 of 386
360
2.4
1,760
510
1,300
1,300
2,270
1,500
500
80
75
52.4 CAE
1,790
510
1,300
1,300
2,300
1,500
500
80
75
5 2.0 TB
1,780
510
1,300
1,300
2,290
1,500
500
80
75
5
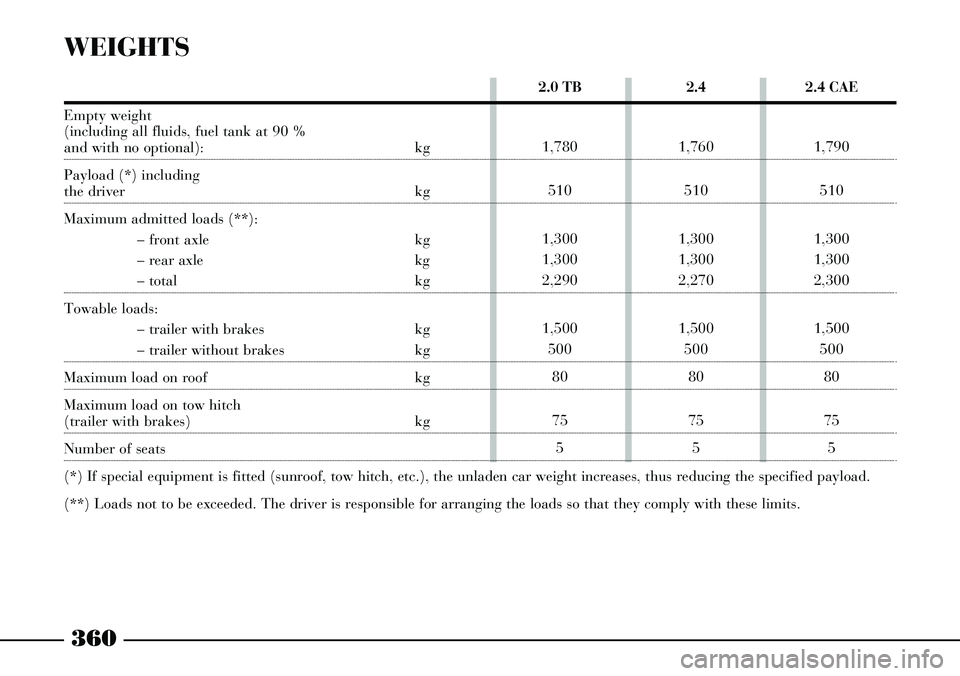
WEIGHTS
Empty weight
(including all fluids, fuel tank at 90 %
and with no optional): kg
Payload (*) including
the driver kg
Maximum admitted loads (**):
– front axle kg
– rear axle kg
– total kg
Towable loads:
– trailer with brakes kg
– trailer without brakes kg
Maximum load on roof kg
Maximum load on tow hitch
(trailer with brakes) kg
Number of seats
(*) If special equipment is fitted (sunroof, tow hitch, etc.), the unladen car weight increases, thus reducing the specified payload.
(**) Loads not to be exceeded. The driver is responsible for arranging the loads so that they comply with these limits.
Page 362 of 386
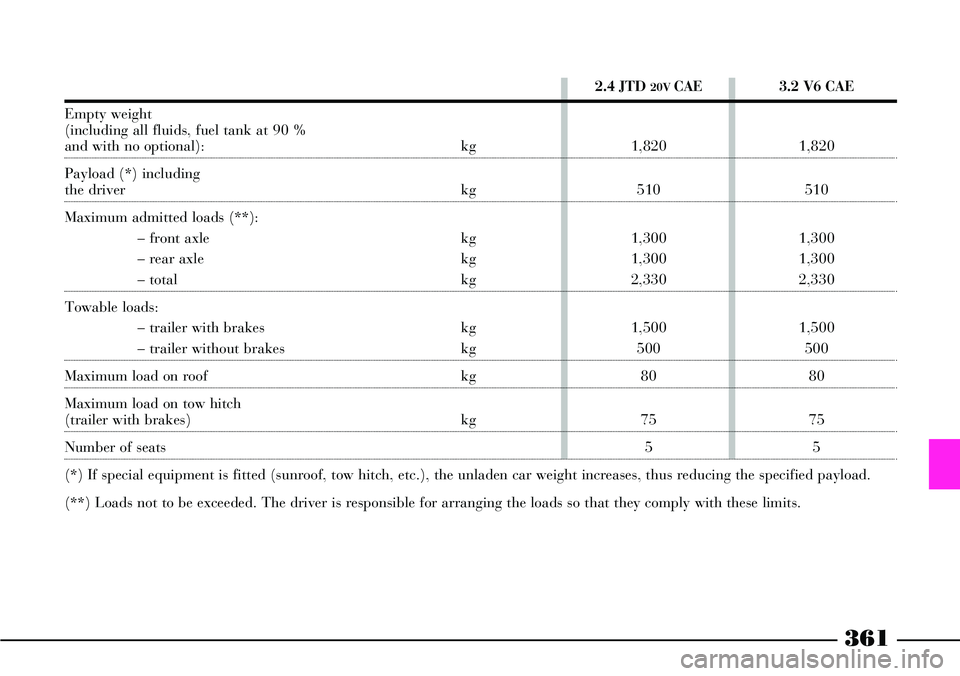
361
2.4 JTD 20V CAE
1,820
510
1,300
1,300
2,330
1,500
500
80
75
53.2 V6 CAE
1,820
510
1,300
1,300
2,330
1,500
500
80
75
5
Empty weight
(including all fluids, fuel tank at 90 %
and with no optional): kg
Payload (*) including
the driver kg
Maximum admitted loads (**):
– front axle kg
– rear axle kg
– total kg
Towable loads:
– trailer with brakes kg
– trailer without brakes kg
Maximum load on roof kg
Maximum load on tow hitch
(trailer with brakes) kg
Number of seats
(*) If special equipment is fitted (sunroof, tow hitch, etc.), the unladen car weight increases, thus reducing the specified payload.
(**) Loads not to be exceeded. The driver is responsible for arranging the loads so that they comply with these limits.