tow Lancia Thesis 2007 Owner handbook (in English)
[x] Cancel search | Manufacturer: LANCIA, Model Year: 2007, Model line: Thesis, Model: Lancia Thesis 2007Pages: 386, PDF Size: 8.69 MB
Page 265 of 386
264
TOWING A
TRAILER
GENERAL NOTES
The car must be fitted with a
homologated tow hitch and suitable
electrical system for towing a cara-
van or a trailer. Have the tow hitch
fitted by an expert who will issue
specific documentation for use on
roads.
Fit special and/or additional
rearview mirrors in accordance with
the highway code.
Remember that towing a trailer
makes it harder for the car to climb
the maximum gradients specified,
increases braking and overtaking
distance, proportionally to the over-
all weight of the trailer.Engage a low gear when driving
downhill rather than constantly
braking.
The weight the trailer exerts on the
car’s tow hitch coupling reduces the
car’s loading capacity by the same
amount. In order to be sure you are
not exceeding the maximum towing
weight (as specified in the registra-
tion book), you have to take into
account the trailer’s fully laden
weight, including accessories and
personal luggage.
Do not exceed the speed limits for
towing a trailer in the country you
are driving in. In any case, do not
exceed the top speed of 100 km/h.
Trailer electrical connection shall
only be performed with ignition key
at STOPor removed.
When trailer electrical connection
is on and you switch on the rear fog
lights, only the trailer rear fog lights
will come on.The ABS system will not
control the trailing brak-
ing system. Great care
should therefore be taken when
driving on slippery road surfaces.
Under no circumstances
modify the car’s braking
system for trailer braking
control. The trailer’s braking sys-
tem must be completely indepen-
dent of the car’s hydraulic sys-
tem.
The rear parking sensors
are automatically deacti-
vated when the plug of the
trailer’s electrical cable is insert-
ed in the car’s tow hitch socket.
The rear sensors activate auto-
matically when the trailer’s plug is
disconnected.
Page 266 of 386

265
TOW HITCH INSTALLATION
The tow hitch must be fixed to the
body by an expert in accordance
with the following instructions and
respecting the additional and/or
integrative information provided by
the tow hitch manufacturer.
The tow hitch to be fitted must
comply with the current regulations
in force, with reference to Directive
94/20/EEC and subsequent modifi-
cations.
Use a tow hitch suited for the max-
imum towable load of the car ver-
sion on which the tow hitch is to be
fitted.
Use a unified coupling for the elec-
trical connections. The coupling is
generally fitted on a specific mount
fastened to the tow hitch. A specific
trailer lights control unit shall be
installed on the car.For the electric connections, a 7
pole 12VDC coupling must be used
(CUNA/UNI and ISO/DIN stan-
dards). Follow the instructions pro-
vided by the manufacturer of the car
and/or the tow hitch.
The electrical brake (where rele-
vant) or other device (electrical
winch, etc.) must be powered direct-
ly from the battery by means of a
lead with a cross-section area no
smaller than 2.5 mm
2.
IMPORTANTUse the electrical
brake or winch only when the engine
is running.
In addition to the electrical connec-
tions, only the power wire for an
additional electrical brake and for
internal trailer lighting with a power
not exceeding 15W can be connect-
ed to the car’s electrical system.
For connections use the specific
control unit with battery cable not
less than 2.5 mm
2.INSTALLATION DIAGRAM (fig. 1)
Fasten the tow hitch in the points
marked with (1) using 18 M10
screws and, in the points marked
with (2) use four M8 screws.
Fasten the tow hitch to the body
avoiding any type of drilling and
trimming of the rear bumpers that
remains visible when the tow hitch is
removed.
IMPORTANTFasten a tag in a
clearly visible position at the same
height as the tow hitch. The tag is
compulsory. It must be adequately
sized, made of suitable material and
carry the following information:
MAX LOAD ON BALL COUPLING
75 kg.
After assembly, seal the fastening
screws holes to prevent exhaust fumes
from entering the passenger compart-
ment.
Page 274 of 386

273
7) Start the engine.
8) When the engine has started,
remove the leads in the reverse order
to before: D, C, Band finally A.
IMPORTANT If the engine fails to
start after a few attempts, do not keep
turning the key but have the car seen
to at a Lancia Dealership.
9) Put the cover back on the bat-
tery positive terminal by fitting the
lock flanges in.
10) Put the cover back and retight-
en the knob.
11) Close the boot tailgate.IMPORTANTWhen the tailgate is
closed, the boot latch is not locked.
To lock it, turn the metal insert of
the key anticlockwise in the latch.
Do not carry out this
procedure if you lack
experience: if it is not
done correctly it can cause very
intense electrical discharges and
the battery might even explode.
Do not to put naked flames or
lighted cigarettes near the battery
and do not cause sparks: risk of
explosion and fire.
Never use a battery
charger to jump start the
engine: you could damage
the electronic system, with spe-
cial reference to ignition and
injection control unit.
BUMP STARTING
Do not bump start by pushing,
towing or coasting downhill. This
way of starting could cause a rush of
fuel into the catalytic converter and
damage it beyond repair.
Remember that ifthe engine is not
running, the brake booster and the
power steering will not work. You
therefore have to use considerably
more effort on both the brake pedal
and the steering wheel.
Never connect the nega-
tive terminals of the two
batteries directly: sparks
could ignite the flammable gas
from the battery. If the auxiliary
battery is installed on another
car, prevent accidental contact
between the metal parts of the
two vehicles.
Page 277 of 386

276
8) Unscrew manually the jack han-
dle A(fig. 7) and remove it from the
container B.9) Open the tool bag and take out
the tools to be used (fig. 8):
1 – tow ring
2 – flat/cross-head screwdriver
3 – ratchet wrench
4 – ratchet wrench bush
5 – wheel bolt (for versions with
alloy rims)
6 – tool for removing the hub cap
(for versions with alloy rims)
7 – bush for unscrewing/screwing
the wheel bolts by hand8 – wrench for power steering re-
servoir cap screws
9 – wrench for actuating the sun-
roof in an emergency (where fitted)
10) On versions with alloy rims,
remove the press-fit wheel hub cap
A(fig. 9), pulling it by tool Bfitted
into C. On versions with steel rims,
remove the press-fit wheel cap A
(fig. 10).
fig. 8
L0A0326b
fig. 7
L0A0038b
fig. 9
L0A0327b
fig. 10
L0A0367b
Page 306 of 386

305
Under no circumstances
should a battery charger
be used to start the
engine: it could damage the elec-
tronic systems and in particular
the ignition and injection control
units.Carefully clean the
threading before fastening
the tow ring. Before start-
ing to tow the car, make sure the
ring has been fully fastened. Never try to charge a
frozen battery: first let it
thaw out, otherwise it
may bust. If the battery has
frozen, check that the internal
elements are not broken (risk of
short circuit) and that the casing
is not cracked causing the acid to
leak out. This acid is poisonous
and corrosive.
TOWING THE CAR
The tow ring provided with the car
is to be found in the tool box under
the boot carpet.
To fit the tow ring proceed as fol-
lows:
– Remove the clipped in Acover
from the front (fig. 82) or rear
bumper (fig. 83), by using a screw-
driver as a lever in the point shown
in the figure.IMPORTANT To carry out this
operation, if you use the provided
flat-head screwdriver, cover its head
with a piece of cloth to prevent paint
damaging.
– Screw the tow ring Bin its hous-
ing.
fig. 82
L0A0090b
fig. 83
L0A0091b
Page 307 of 386
306
Before towing the car,
disengage the parking
brake by following the
instructions described in the rel-
evant paragraph, and leave the
Keyless System CID device (if
provided) inside the passenger
compartment, to avoid automatic
steering column lock. Do not tow
the car with the engine running. Before starting to tow,
turn the ignition key to
MAR and then to STOP.
Do not remove the key. If the key
is removed, the steering lock
engages automatically which pre-
vents the wheels being turned.
Disengage the handbrake. While
the car is being towed with the
engine off, remember that the
brake pedal and steering will
require more effort as you no
longer have the benefit of the
brake booster and power steer-
ing. Do not use flexible cables to
tow. Avoid jerking. Whilst tow-
ing, ensure that the coupling to
the car does not damage the sur-
rounding components. When
towing, you must comply with the
specific traffic regulations
regarding the tow ring and how to
tow on the road.IMPORTANTFor versions with
automatic gearbox, check that the
selector is in neutral (selector to N),
that the car is moving because
pushed and act as for towing a car
with the manual gearbox, following
the above mentioned procedure.
If you cannot set the gear lever to
neutral, do not tow the car but con-
tact a Lancia Dealership.IMPORTANTOn versions fitted
with an identification system (Keyless
System), user is not authorised to
move the car unless the start-up knob
is turned to the position MAR. Should
it be necessary to tow the car, it is ad-
vised to turn the knob to position
MAR before moving the car.
Page 316 of 386
315
Do not smoke while
working in the engine
compartment: the pres-
ence of flammable gas and
vapour could cause a fire.
Be careful not to mix up
the various types of fluids
when you are topping up:
they are all mutually incompati-
ble and could damage the car.
Maintenance of your car
should be entrusted to a
Lancia Dealership. For
ordinary routine maintenance
operations which you are able to
carry out yourself, ensure that
you have the necessary tools and
original Lancia spare parts and
fluids available. Do not carry out
servicing operations if you have
no experience.IMPORTANT - Engine oil
If the car is normally driven in one
of the following particularly severe
conditions:
– towing a trailer
– on dirty roads
– for short, repeated trips (less
than 7-8 km) with outside tempera-
ture below zero
– with engine frequently idling or
for long distances at low speed (e.g.
taxi, door-to-door deliveries) or pro-
longed storage
change the engine oil more frequent-
ly than shown in the Service
Schedule.
IMPORTANT - Air cleaner
Replace the air cleaner more fre-
quently than shown in the Service
Schedule if the car is used on dusty
roads.
If you are in doubt about how often
the engine oil or the air cleaner
should be changed in relation to how
you use the car, contact a Lancia
Dealership.
Page 361 of 386
360
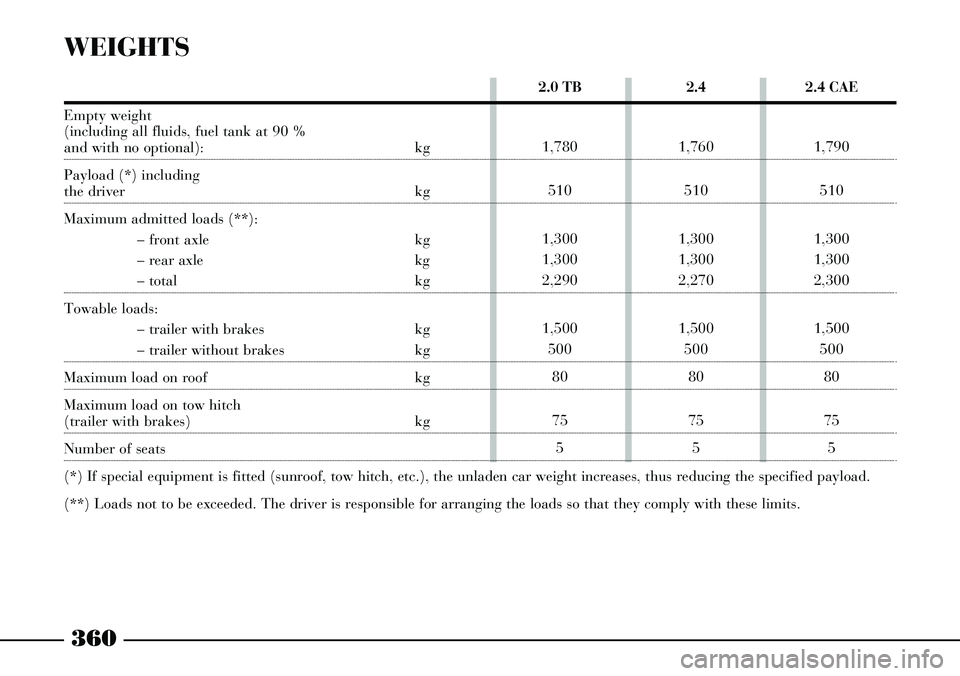
2.4
1,760
510
1,300
1,300
2,270
1,500
500
80
75
52.4 CAE
1,790
510
1,300
1,300
2,300
1,500
500
80
75
5 2.0 TB
1,780
510
1,300
1,300
2,290
1,500
500
80
75
5
WEIGHTS
Empty weight
(including all fluids, fuel tank at 90 %
and with no optional): kg
Payload (*) including
the driver kg
Maximum admitted loads (**):
– front axle kg
– rear axle kg
– total kg
Towable loads:
– trailer with brakes kg
– trailer without brakes kg
Maximum load on roof kg
Maximum load on tow hitch
(trailer with brakes) kg
Number of seats
(*) If special equipment is fitted (sunroof, tow hitch, etc.), the unladen car weight increases, thus reducing the specified payload.
(**) Loads not to be exceeded. The driver is responsible for arranging the loads so that they comply with these limits.
Page 362 of 386
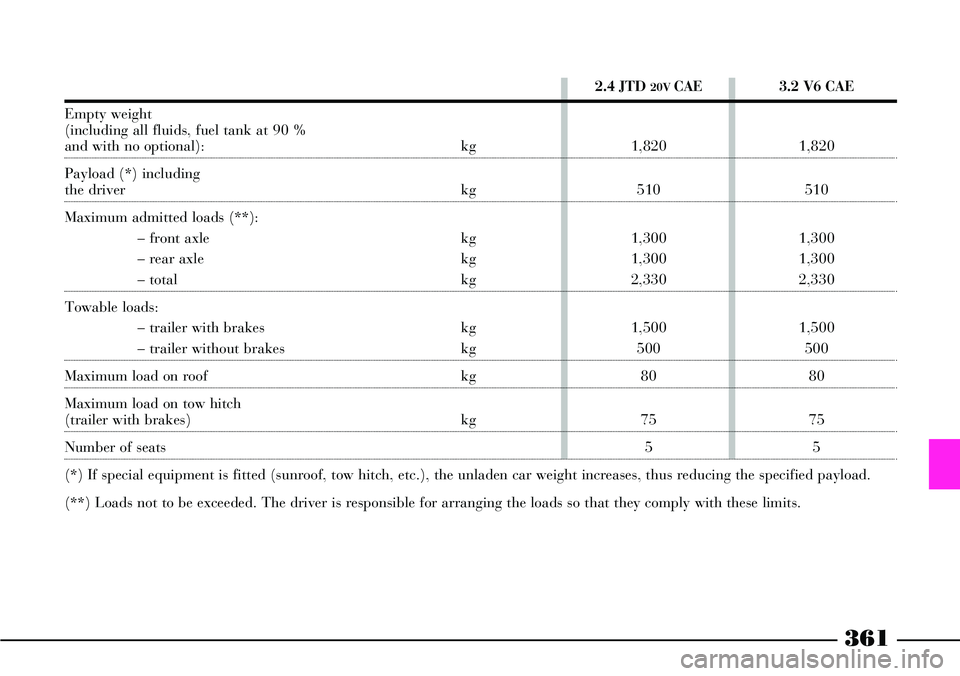
361
2.4 JTD 20V CAE
1,820
510
1,300
1,300
2,330
1,500
500
80
75
53.2 V6 CAE
1,820
510
1,300
1,300
2,330
1,500
500
80
75
5
Empty weight
(including all fluids, fuel tank at 90 %
and with no optional): kg
Payload (*) including
the driver kg
Maximum admitted loads (**):
– front axle kg
– rear axle kg
– total kg
Towable loads:
– trailer with brakes kg
– trailer without brakes kg
Maximum load on roof kg
Maximum load on tow hitch
(trailer with brakes) kg
Number of seats
(*) If special equipment is fitted (sunroof, tow hitch, etc.), the unladen car weight increases, thus reducing the specified payload.
(**) Loads not to be exceeded. The driver is responsible for arranging the loads so that they comply with these limits.
Page 374 of 386

373
- what triggers the alarm
off ..................................... 42
Electronic automatic gearbox
(COMFORTRONIC) ............. 180
- automatic operation ........... 182
- bump starting .................... 188
- failure indication ............... 187
- gearbox display.................. 110
- manual sequential
operation ........................... 186
- moving off ......................... 180
- selecting the automatic/
manual sequential
operation ........................... 182
- sound signal ..................... 188
- starting the engine ............ 180
- stopping ............................. 181
- technical specifications ..... 348
- towing the car ................... 189
Electronic brakeforce
distributor (EBD) .................... 245
Electronic control units
(important) ......................... 330Engine
- identification code ............ 341
- marking ............................ 341
- technical specifications ..... 344
Engine compartment
(cleaning) ............................ 339
Engine coolant ........................ 321
Engine coolant temperature
gauge .................................. 108
Engine oil
- checking level ................... 320
- specifications ..................... 364
Engine oil consumption .......... 321
Engine oil level ....................... 320
Engine warming up ................ 252
Environment
(safety and protection) ......... 4-5
EOBD system ......................... 244
EPB (electric parking brake) .. 175
- emergency disengagement.. 178
ESP system ............................ 189
- ASR function .................... 191- ESP system action ............. 192
- failure indication .............. 192
- initialising the control units
of the door locks, air
conditioner and ESP
system................................ 303
- MSR system ....................... 192
- operation .......................... 190
Exhaust gas
(recirculation system) .......... 7
External lights (controls) ........ 97
Flash consumption
gauge .................................. 109
Flashing the headlights
(main beam) ....................... 100
Fluids and lubricants .............. 364
Follow me home
(delayed light switching off) 99
Front ceiling light ................... 212
- bulb replacement .............. 287