buttons Lancia Thesis 2007 Owner handbook (in English)
[x] Cancel search | Manufacturer: LANCIA, Model Year: 2007, Model line: Thesis, Model: Lancia Thesis 2007Pages: 386, PDF Size: 8.69 MB
Page 14 of 386
13
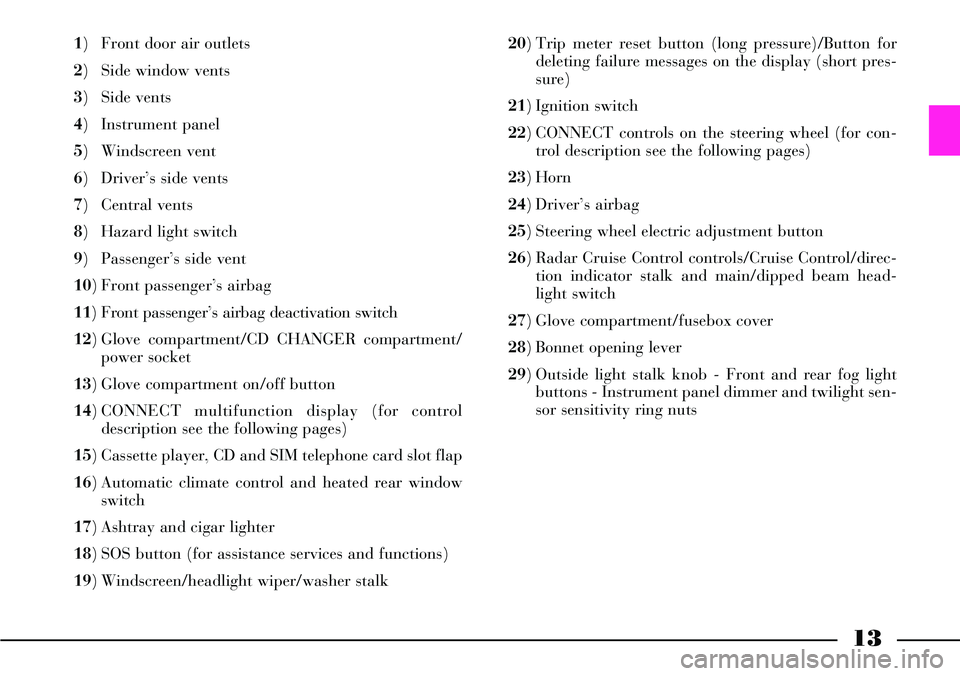
1) Front door air outlets
2) Side window vents
3) Side vents
4) Instrument panel
5) Windscreen vent
6) Driver’s side vents
7) Central vents
8) Hazard light switch
9) Passenger’s side vent
10) Front passenger’s airbag
11) Front passenger’s airbag deactivation switch
12) Glove compartment/CD CHANGER compartment/
power socket
13) Glove compartment on/off button
14) CONNECT multifunction display (for control
description see the following pages)
15) Cassette player, CD and SIM telephone card slot flap
16) Automatic climate control and heated rear window
switch
17) Ashtray and cigar lighter
18) SOS button (for assistance services and functions)
19) Windscreen/headlight wiper/washer stalk 20) Trip meter reset button (long pressure)/Button for
deleting failure messages on the display (short pres-
sure)
21) Ignition switch
22) CONNECT controls on the steering wheel (for con-
trol description see the following pages)
23) Horn
24) Driver’s airbag
25) Steering wheel electric adjustment button
26) Radar Cruise Control controls/Cruise Control/direc-
tion indicator stalk and main/dipped beam head-
light switch
27) Glove compartment/fusebox cover
28) Bonnet opening lever
29) Outside light stalk knob - Front and rear fog light
buttons - Instrument panel dimmer and twilight sen-
sor sensitivity ring nuts
Page 16 of 386
15
THESIS CONNECT infotelematic
system, in its most refined version,
includes: colour TV set, sound sys-
tem with cassette player, CD-
ROM/Audio CD player, CD-chang-
er, GSM cell phone, navigator, trip
computer and voice commands (for
certain functions of cell phone,
audio system and navigator).
The following pages describe the
system controls and main functions.
The car is provided with a special
supplement dealing with CONNECT
infotelematic system to be used as
quick reference guide for using the
system. Read through this supple-
ment carefully and keep it always
within reach (e.g. in the glove com-
partment).
IMPORTANTFor the navigation
system of the CONNECT, only use
only the original CD provided with
the car or, in any case other CDs of
the same brand.If you drive with the vol-
ume too high you put both
your own life and that of
others in jeopardy. You should
adjust the volume so that you can
hear noises from outside the car
(e.g. horns, ambulance/police
sirens, etc.).
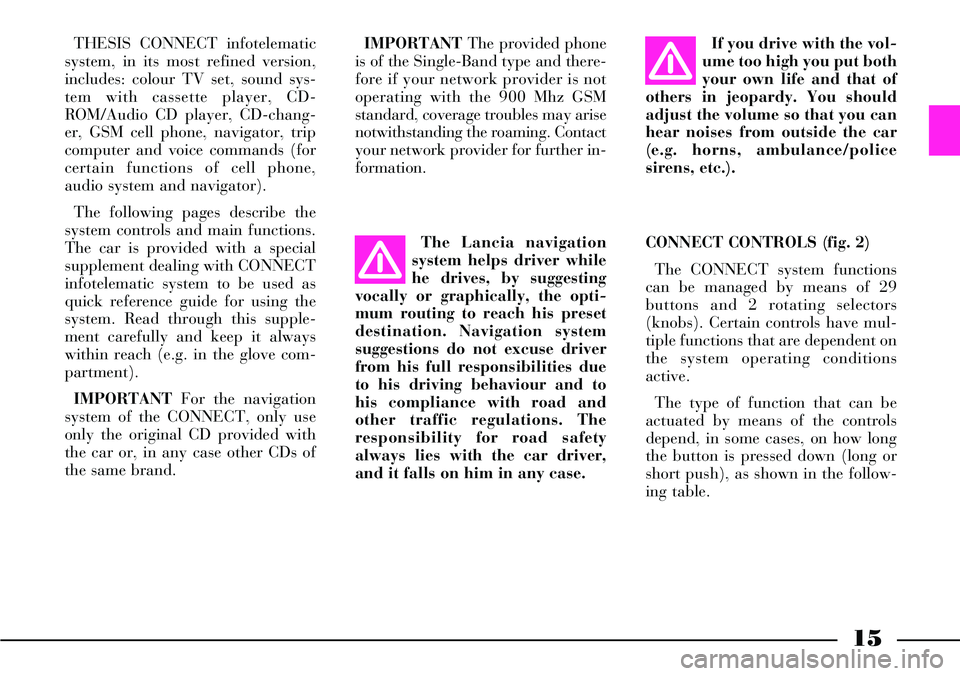
CONNECT CONTROLS (fig. 2)
The CONNECT system functions
can be managed by means of 29
buttons and 2 rotating selectors
(knobs). Certain controls have mul-
tiple functions that are dependent on
the system operating conditions
active.
The type of function that can be
actuated by means of the controls
depend, in some cases, on how long
the button is pressed down (long or
short push), as shown in the follow-
ing table. The Lancia navigation
system helps driver while
he drives, by suggesting
vocally or graphically, the opti-
mum routing to reach his preset
destination. Navigation system
suggestions do not excuse driver
from his full responsibilities due
to his driving behaviour and to
his compliance with road and
other traffic regulations. The
responsibility for road safety
always lies with the car driver,
and it falls on him in any case.IMPORTANTThe provided phone
is of the Single-Band type and there-
fore if your network provider is not
operating with the 900 Mhz GSM
standard, coverage troubles may arise
notwithstanding the roaming. Contact
your network provider for further in-
formation.
Page 18 of 386
17
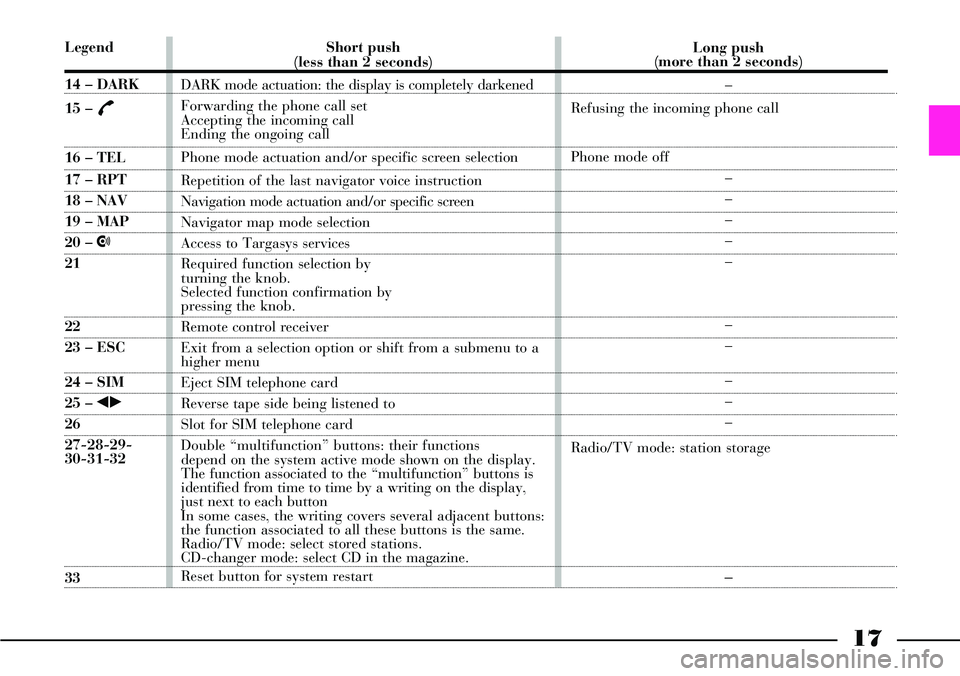
Legend
14 – DARK
15 –
£
16 – TEL
17 – RPT
18 – NAV
19 – MAP
20 – •
21
22
23 – ESC
24 – SIM
25 – ¯˙
26
27-28-29-
30-31-32
33Short push
(less than 2 seconds)
DARK mode actuation: the display is completely darkened
Forwarding the phone call set
Accepting the incoming call
Ending the ongoing call
Phone mode actuation and/or specific screen selection
Repetition of the last navigator voice instruction
Navigation mode actuation and/or specific screen
Navigator map mode selection
Access to Targasys services
Required function selection by
turning the knob.
Selected function confirmation by
pressing the knob.
Remote control receiver
Exit from a selection option or shift from a submenu to a
higher menu
Eject SIM telephone card
Reverse tape side being listened to
Slot for SIM telephone card
Double “multifunction” buttons: their functions
depend on the system active mode shown on the display.
The function associated to the “multifunction” buttons is
identified from time to time by a writing on the display,
just next to each button
In some cases, the writing covers several adjacent buttons:
the function associated to all these buttons is the same.
Radio/TV mode: select stored stations.
CD-changer mode: select CD in the magazine.
Reset button for system restart Long push
(more than 2 seconds)
–
Refusing the incoming phone call
Phone mode off
–
–
–
–
–
–
–
–
–
–
Radio/TV mode: station storage–
Page 20 of 386
19
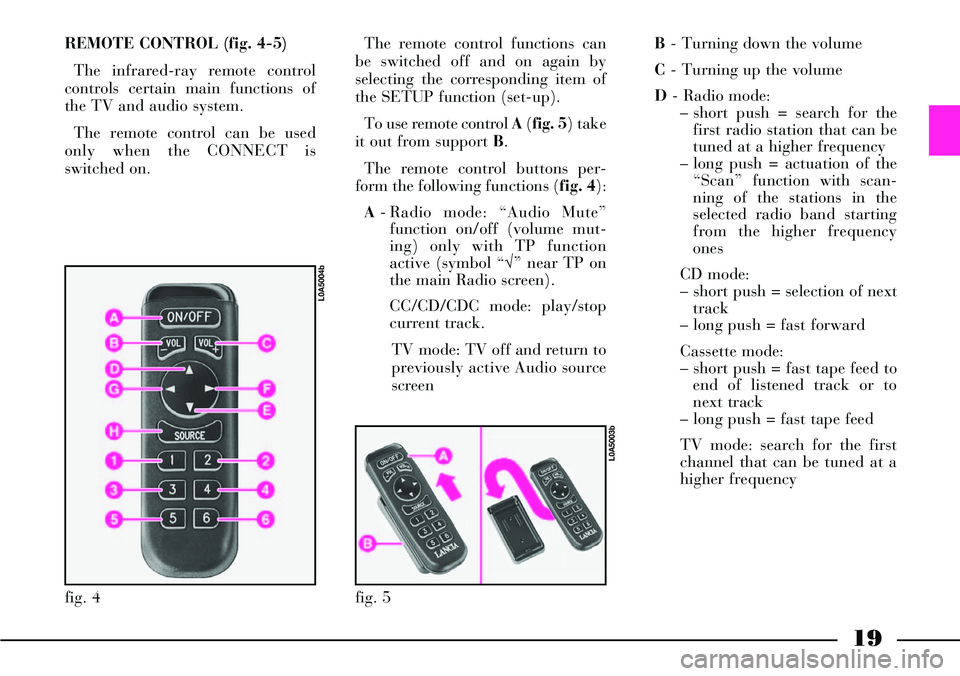
REMOTE CONTROL (fig. 4-5)
The infrared-ray remote control
controls certain main functions of
the TV and audio system.
The remote control can be used
only when the CONNECT is
switched on. The remote control functions can
be switched off and on again by
selecting the corresponding item of
the SETUP function (set-up).
To use remote control A(fig. 5) take
it out from support B.
The remote control buttons per-
form the following functions (fig. 4):
A- Radio mode: “Audio Mute”
function on/off (volume mut-
ing) only with TP function
active (symbol “√” near TP on
the main Radio screen).
CC/CD/CDC mode: play/stop
current track.
TV mode: TV off and return to
previously active Audio source
screenB- Turning down the volume
C- Turning up the volume
D- Radio mode:
– short push = search for the
first radio station that can be
tuned at a higher frequency
– long push = actuation of the
“Scan” function with scan-
ning of the stations in the
selected radio band starting
from the higher frequency
ones
CD mode:
– short push = selection of next
track
– long push = fast forward
Cassette mode:
– short push = fast tape feed to
end of listened track or to
next track
– long push = fast tape feed
TV mode: search for the first
channel that can be tuned at a
higher frequency
fig. 5
L0A5003b
fig. 4
L0A5004b
Page 22 of 386
21
Function
Audio module switching on
Audio module switching off
Audio mute (only with TP
active on the main
Radio screen)
Audio source selection
Turning the volumeup/down
Selection of stored
radio stations
Radio station memorization
Search for the first radio
station that can be tuned
at a higher frequency
Search for the first radio
station that can be tuned
at a lower frequencyCONNECT buttons
Short push on AUDIO button
Long push on AUDIO button
“Audio Mute” selection and con-
firmation on Radio menu by the
right knob 21(fig. 2)
Press the multifunction but-
tons FM, AM, CC, CD, CDC,
TV or the SOURCE button
Rotate the left-hand knob
Short push on buttons
1 to 6
Long push on buttons 1 to 6
Short push on button ˙
Short push on button ¯Steering wheel buttons
–
–
–
Press the SOURCEbutton
Press VOL+/- buttons
–
–
Short push on SCAN+ button
Short push on SCAN- buttonRemote control buttons
–
–
Press the ON/OFF key
Press the SOURCEbutton
Press VOL+ or VOL- buttons
Short push on buttons
1 to 6
Long push on buttons 1 to 6
Short push on button N
Short push on button O
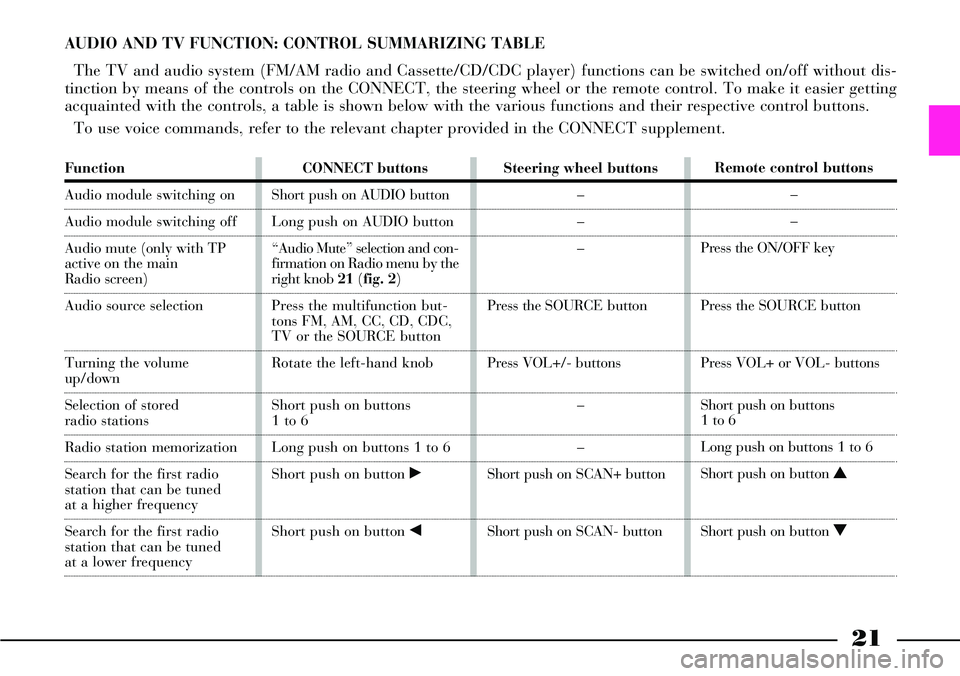
AUDIO AND TV FUNCTION: CONTROL SUMMARIZING TABLE
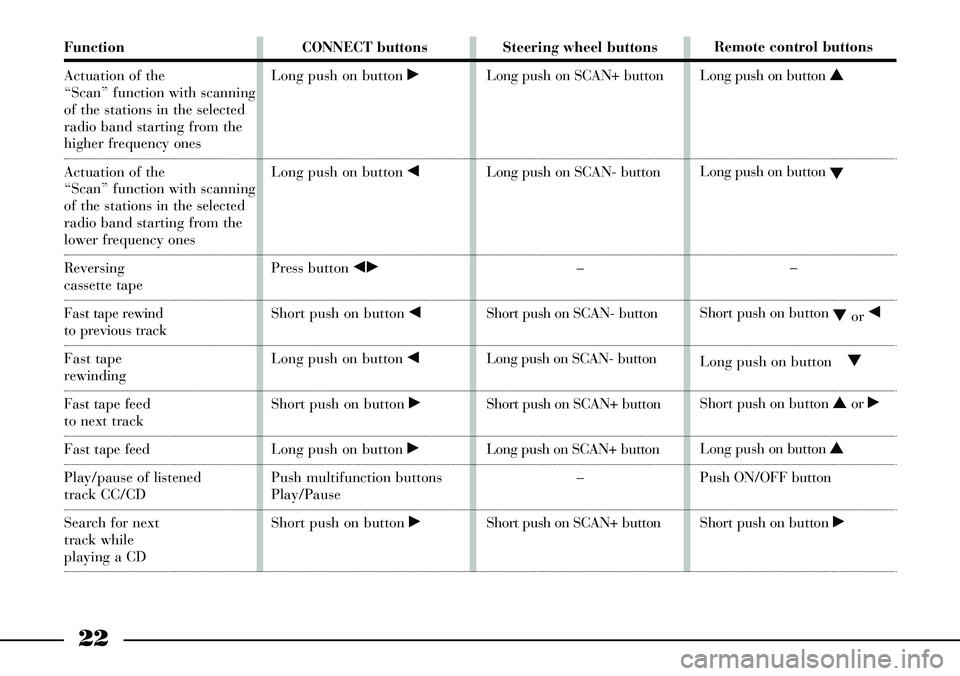
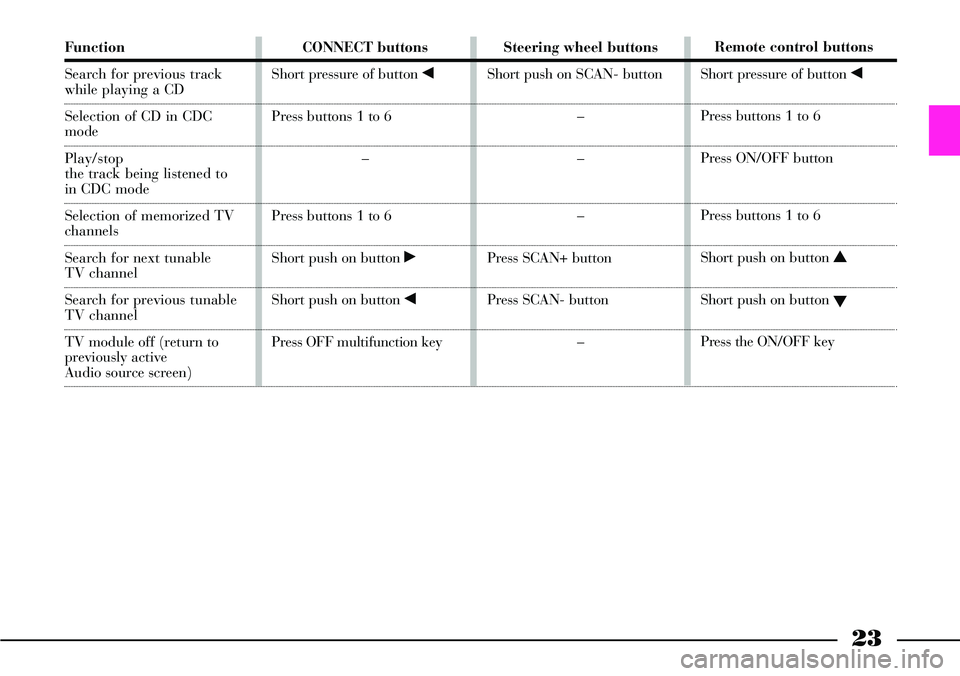
The TV and audio system (FM/AM radio and Cassette/CD/CDC player) functions can be switched on/off without dis-
tinction by means of the controls on the CONNECT, the steering wheel or the remote control. To make it easier getting
acquainted with the controls, a table is shown below with the various functions and their respective control buttons.
To use voice commands, refer to the relevant chapter provided in the CONNECT supplement.
Page 23 of 386
22
Function
Actuation of the
“Scan” function with scanning
of the stations in the selected
radio band starting from the
higher frequency ones
Actuation of the
“Scan” function with scanning
of the stations in the selected
radio band starting from the
lower frequency ones
Reversing
cassette tape
Fast tape rewind
to previous track
Fast tape
rewinding
Fasttape feed
to next track
Fast tape feed
Play/pause of listened
track CC/CD
Search for next
track while
playing a CD CONNECT buttons
Long push on button ˙
Long push on button ¯
Press button ¯˙
Short push on button ¯
Long push on button ¯
Short push on button ˙
Long push on button ˙
Push multifunction buttons
Play/Pause
Short push on button ˙Steering wheel buttons
Long push on SCAN+ button
Long push on SCAN- button
–
Short push on SCAN- button
Long push on SCAN- button
Short push on SCAN+ button
Long push on SCAN+ button
–
Short push on SCAN+ button Remote control buttons
Long push on button N
Long push on button
O
–
Short push on button
Oor ¯
Long push on buttonO
Short push on button Nor ˙
Long push on button N
Push ON/OFF button
Short push on button ˙
Page 24 of 386
23
Function
Search for previous track
while playing a CD
Selection of CD in CDC
mode
Play/stop
the track being listened to
in CDC mode
Selection of memorized TV
channels
Search for next tunable
TV channel
Search for previous tunable
TV channel
TV module off (return to
previously active
Audio source screen)CONNECT buttons
Short pressure of button ¯
Press buttons 1 to 6
–
Press buttons 1 to 6
Short push on button ˙
Short push on button ¯
Press OFF multifunction keySteering wheel buttons
Short push on SCAN- button
–
–
–
Press SCAN+ button
Press SCAN- button
–Remote control buttons
Short pressure of button ¯
Press buttons 1 to 6
Press ON/OFF button
Press buttons 1 to 6
Short push on button N
Short push on button
O
Press the ON/OFF key
Page 32 of 386
31
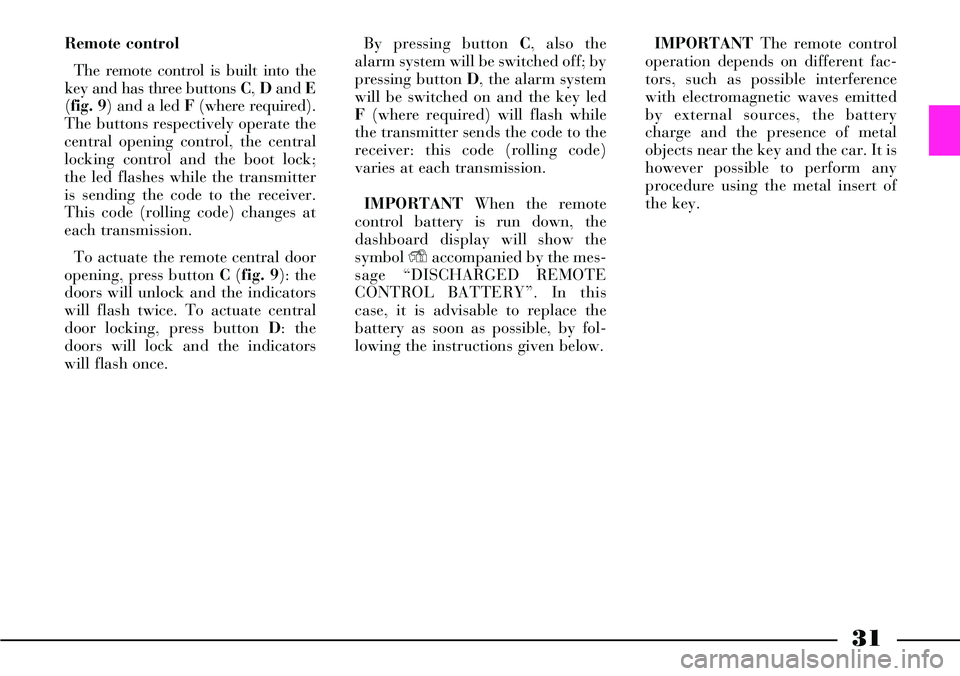
Remote control
The remote control is built into the
key and has three buttons C, Dand E
(fig. 9) and a led F (where required).
The buttons respectively operate the
central opening control, the central
locking control and the boot lock;
the led flashes while the transmitter
is sending the code to the receiver.
This code (rolling code) changes at
each transmission.
To actuate the remote central door
opening, press button C (fig. 9): the
doors will unlock and the indicators
will flash twice. To actuate central
door locking, press button D: the
doors will lock and the indicators
will flash once.By pressing button C, also the
alarm system will be switched off; by
pressing button D, the alarm system
will be switched on and the key led
F(where required) will flash while
the transmitter sends the code to the
receiver: this code (rolling code)
varies at each transmission.
IMPORTANTWhen the remote
control battery is run down, the
dashboard display will show the
symbol Yaccompanied by the mes-
sage “DISCHARGED REMOTE
CONTROLBATTERY”. In this
case, it is advisable to replace the
battery as soon as possible, by fol-
lowing the instructions given below.IMPORTANTThe remote control
operation depends on different fac-
tors, such as possible interference
with electromagnetic waves emitted
by external sources, the battery
charge and the presence of metal
objects near the key and the car. It is
however possible to perform any
procedure using the metal insert of
the key.
Page 45 of 386
44
RECOGNITION
SYSTEM (KEYLESS
SYSTEM)
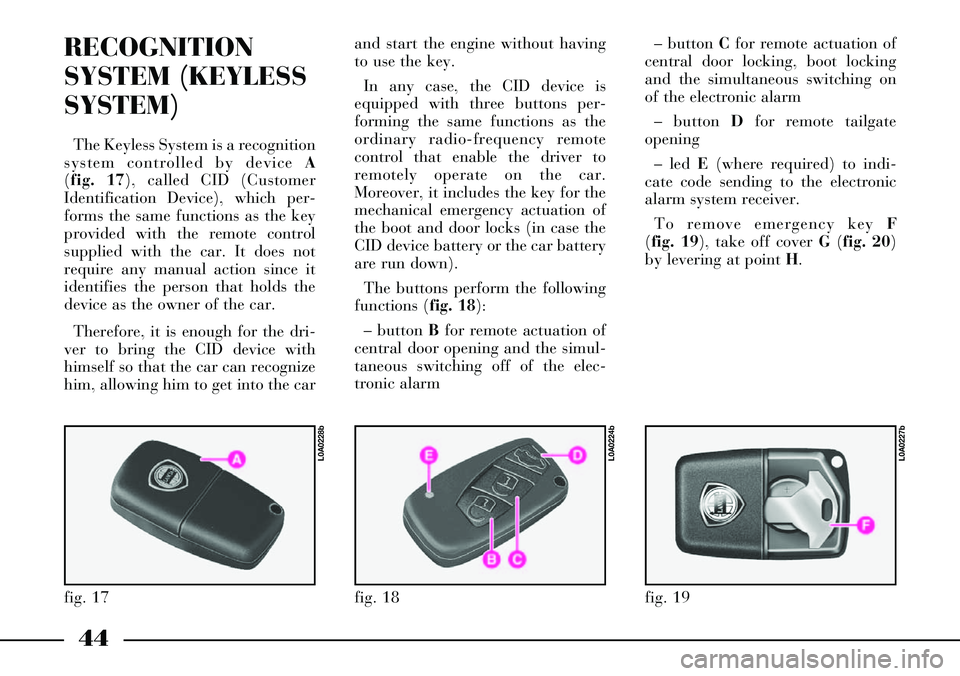
The Keyless System is a recognition
system controlled by device A
(fig. 17), called CID (Customer
Identification Device), which per-
forms the same functions as the key
provided with the remote control
supplied with the car. It does not
require any manual action since it
identifies the person that holds the
device as the owner of the car.
Therefore, it is enough for the dri-
ver to bring the CID device with
himself so that the car can recognize
him, allowing him to get into the carand start the engine without having
to use the key.
In any case, the CID device is
equipped with three buttons per-
forming the same functions as the
ordinary radio-frequency remote
control that enable the driver to
remotely operate on the car.
Moreover, it includes the key for the
mechanical emergency actuation of
the boot and door locks (in case the
CID device battery or the car battery
are run down).
The buttons perform the following
functions (fig. 18):
– button Bfor remote actuation of
central door opening and the simul-
taneous switching off of the elec-
tronic alarm– button Cfor remote actuation of
central door locking, boot locking
and the simultaneous switching on
of the electronic alarm
– button Dfor remote tailgate
opening
– led E(where required) to indi-
cate code sending to the electronic
alarm system receiver.
To remove emergency keyF
(fig. 19), take off cover G(fig. 20)
by levering at point H.
fig. 17
L0A0228b
fig. 18
L0A0224b
fig. 19
L0A0227b
Page 57 of 386

56
Deadlock device
The deadlock device enables to dis-
connect mechanically the internal
door handles; in this case, doors can-
not be opened from the inside by
acting on the handles after breaking
the glass (improving protection
against theft).
The device can be switched on by
pressing the remote control button B
(fig. 29) again within 1 second after
closing the doors: active function
will be indicated by a beep and 2
further blinks of the direction indi-
cators.
The device activates only if all the
doors are properly closed.
When the deadlock device is
switched on, the door panel leds will
flash twice with red light.
After activating the dead
lock device it will be
impossible to get out of
the passenger compartment: for
this reason this device must be
activated only after making sure
that the passenger compartment
is empty.The front door leds are also used as
deterrent leds for the alarm system;
as a consequence, they will flash
when the alarm system is on or the
doors are locked.
The CONNECT enables to set the
central locking of all the doors or
only the driver’s door.
In the former case, all the car doors
are unlocked simultaneously and
access is possible through any door.
In the second case, access is possible
only through the driver’s door,
whereas the other doors are locked,
thus preventing un-authorized per-
sons from getting into the car.In this case, the driver’s door led
comes on with green light, whereas
the leds on the other doors will
remain off.
When only the driver’s door is
unlocked, after opening the driver’s
door, also the other doors can be
unlocked by pressing the central
unlocking button B(fig. 35) so as to
enable passengers getting into the
car.
IMPORTANTButtons Band C
(fig. 35) are disabled when the doors
are locked from the outside.
If, when the doors are closed from
the outside, one or more doors
and/or the boot are not closed cor-
rectly, the direction indicators will
flash rapidly for a few seconds.
fig. 34
L0A0063b
fig. 35
L0A0051b