ESP Lancia Voyager 2012 Owner handbook (in English)
[x] Cancel search | Manufacturer: LANCIA, Model Year: 2012, Model line: Voyager, Model: Lancia Voyager 2012Pages: 344, PDF Size: 3.95 MB
Page 251 of 344
WARNING!(Continued)
Unequal tire pressures can cause
steering problems. You could lose
control of your vehicle.
Unequal tire pressures from one
side of the vehicle to the other can
cause the vehicle to drift to the
right or left.
Always drive with each tire in-
flated to the recommended cold
tire inflation pressure.
Economy
Improper inflation pressures can
cause uneven wear patterns to de-
velop across the tire tread. These ab-
normal wear patterns will reduce
tread life resulting in a need for earlier
tire replacement. Under-inflation,
also increases tire rolling resistance
resulting in higher fuel consumption.
Ride Comfort And Vehicle
Stability
Proper tire inflation contributes to a
comfortable ride. Over-inflation pro-
duces a jarring and uncomfortable
ride. TIRE INFLATION
PRESSURES
The proper cold tire inflation pressure
is listed on the
driver's side “B” Pillar
or rear edge of the driver's side door.
The tire pressure should be checked
and adjusted, and the tires inspected
for signs of wear or visible damage, at
least once a month. Use a good quality
pocket-type gauge to check tire pres-
sure. Do not make a visual judgement
when determining proper inflation.
Radial tires may look properly in-
flated, even when they are under-
inflated.
CAUTION!
After inspecting or adjusting the tire
pressure, always reinstall the valve
stem cap. This will prevent moisture
and dirt from entering the valve
stem, which could damage the valve
stem.
Inflation pressures specified on the
placard are always “cold tire inflation
pressure.” Cold tire inflation pressure
is defined as the tire pressure after the
vehicle has not been driven for at least three hours, or driven less than
1.6 km after a three-hour period. The
cold tire inflation pressure must not
exceed the maximum inflation pres-
sure molded into the tire sidewall.
Check tire pressures more often if
subject to a wide range of outdoor
temperatures, as tire pressures vary
with temperature changes.
Tire pressures change by approxi-
mately 0.07 BAR per 7° C of air tem-
perature change. Keep this in mind
when checking tire pressure inside a
garage, especially in the Winter.
Example: If garage temperature is
20°C and the outside temperature is
0°C, then the cold tire inflation pres-
sure should be increased by 0.21
BAR, which equals 0.07 BAR for ev-
ery 7°C for this outside temperature
condition.
Tire pressure may increase from 0.13
to 0.4 BAR during operation. Do not
reduce this normal pressure buildup
or your tire pressure will be too low.
245
Page 256 of 344
CAUTION!
To avoid damage to your vehicle or
tires, observe the following precau-
tions:
Use chains on P225/65R17 tiresonly.
Because of restricted chain clear-
ance between tires and other sus-
pension components, it is impor-
tant that only chains in good
condition are used. Broken chains
can cause serious damage. Stop
the vehicle immediately if noise
occurs that could indicate chain
breakage. Remove the damaged
parts of the chain before further
use.
Do not exceed 70 km/h.
Drive cautiously and avoid severe
turns and large bumps, especially
with a loaded vehicle.
Install chains on the front wheels
as tightly as possible and then re-
tighten after driving about
0.8 km.
Do not drive for prolonged periods
of time on dry pavement.
(Continued)
CAUTION!(Continued)
Observe the tire chain manufac-
tur er's instructions on the method
of installation, operating speed,
and conditions for use. Always use
the lower suggested operating
speed of the chain manufacturer,
if different from the speed r ecom-
mended by the vehicle manufac-
turer.
Always use the lower suggested oper-
ating speed if the chain manufacturer
and vehicle manufacturer suggest dif-
ferent maximum speeds. This notice
applies to all chain traction devices,
including link and cable (radial)
chains.
TIRE ROTATION
RECOMMENDATIONS
Tires on the front and rear axles of
vehicles operate at different loads and
perform different steering, driving,
and braking functions. For these rea-
sons, they wear at unequal rates.
These effects can be reduced by
timely rotation of tires. The benefits
of rotation are especially worthwhile with aggressive tread designs such as
those on all season type tires. Rotation
will increase tread life, help to main-
tain mud, snow and wet traction lev-
els, and contribute to a smooth, quiet
ride.
Refer to the “Maintenance Schedule”
for the proper maintenance intervals.
The reasons for any rapid or unusual
wear should be corrected prior to ro-
tation being performed.
TIRE PRESSURE
MONITOR SYSTEM
(TPMS)
The TPMS will warn the driver of a
low tire pressure based on the cold
inflation tire pressure requirements
found on the tire placard located on
the
driver's-side B-pillar.
The tire pressure will vary with tem-
perature by about 0.069 BAR for ev-
ery 6.5°C. This means that when the
outside temperature decreases, the
tire pressure will decrease. Tire pres-
sure should always be set based on
cold inflation tire pressure. This is
defined as the tire pressure after a
vehicle has not been driven for more
250
Page 258 of 344
The TPMS should not be used asa tire pressure gauge while ad-
justing your tire pressure.
Driving on a significantly under- inflated tire causes the tire to
overheat and can lead to tire
failure. Under-inflation also re-
duces fuel efficiency and tire
tread life, and may affect the ve-
hicle’s handling and stopping
ability.
The TPMS is not a substitute for proper tire maintenance, and it
is the driver's responsibility to
maintain correct tire pressure,
using an accurate tire pressure
gage, even if under-inflation has
not reached the level to trigger
illumination of the “Tire Pres-
sure Monitoring Telltale Light.”
Seasonal temperature changes will affect tire pressure, and the
TPMS will monitor the actual
tire pressure in the tire.
BASE SYSTEM
The TPMS uses wireless technology
with wheel rim mounted electronic
sensors to monitor tire pressure levels. Sensors, mounted to each wheel as
part of the valve stem, transmit tire
pressure readings to the Receiver
Module.
NOTE:
It is particularly important for you
to check the tire pressure in all of
your tires regularly and to main-
tain the proper pressure.
The Basic TPMS consists of the fol-
lowing components:
Receiver Module
Four Tire Pressure Monitoring Sen-
sors
TPMS Telltale Warning Light
Tire Pressure Monitoring Low
Tire Pressure Warnings The “Tire Pressure Moni-
toring Telltale Light” will
illuminate in the instru-
ment cluster, a "TIRE LOW
PRESSURE" message will display in
the instrument cluster, and an audible
chime will be activated when one or
more of the four active road tire pres-
sures are low. Should this occur, you
should stop as soon as possible, check the inflation pressure of each tire on
your vehicle, and inflate each tire to
the vehicle's recommended cold tire
pressure value (located on the placard
on the driver's-side B-Pillar). The
system will automatically update and
the “Tire Pressure Monitoring Telltale
Light” will extinguish once the up-
dated tire pressures have been re-
ceived.
NOTE:
The vehicle may need to be driven
for up to 20 minutes above 24 km/h
to receive this information.
The “Tire Pressure Monitoring Tell-
tale Light” will flash on and off for
75 seconds, and remain on solid when
a system fault is detected. The system
fault will also sound a chime. If the
ignition switch is cycled, this se-
quence will repeat, providing the sys-
tem fault still exists. The “Tire Pres-
sure Monitoring Telltale Light” will
turn off when the fault condition no
longer exists. A system fault can occur
with any of the following scenarios:252
Page 263 of 344
METHANOL
(Methyl or Wood Alcohol) is used in a
variety of concentrations when
blended with unleaded gasoline. You
may find fuels containing 3% or more
methanol along with other alcohols
called cosolvents.
Problems that result from using
methanol/gasoline or E-85 Ethanol
blends are not the responsibility of the
manufacturer. While MTBE is an oxy-
genate made from Methanol, it does
not have the negative effects of
Methanol.CAUTION!
Do not use gasolines containing
Methanol or E-85 Ethanol. Use of
these blends may result in starting
and driveability problems and may
damage critical fuel system compo-
nents.
ETHANOL
The manufacturer recommends that
your vehicle be operated on fuel con-
taining no more than 10% ethanol.
Purchasing your fuel from a reputable
supplier may reduce the risk of ex- ceeding this 10% limit and/or of re-
ceiving fuel with abnormal properties.
It should also be noted that an in-
crease in fuel consumption should be
expected when using ethanol-blended
fuels, due to the lower energy content
of ethanol.
Problems that result from using
methanol/gasoline or E-85 Ethanol
blends are not the responsibility of the
manufacturer. While MTBE is an oxy-
genate made from Methanol, it does
not have the negative effects of
Methanol.
CAUTION!
Use of fuel with ethanol content
higher than 10% may result in en-
gine malfunction, starting and oper-
ating difficulties and materials deg-
radation. These adverse effects
could result in permanent damage to
your vehicle.
CLEAN AIR GASOLINE
Many gasolines are now being
blended that contribute to cleaner air,
especially in those areas where air
pollution levels are high. These new blends provide a cleaner burning fuel
and some are referred to as “reformu-
lated gasoline.”
The manufacturer supports these ef-
forts toward cleaner air. You can help
by using these blends as they become
available.
MMT IN GASOLINE
MMT is a manganese containing me-
tallic additive that is blended into
some gasoline to increase octane.
Gasoline blended with MMT provides
no performance advantage beyond
gasoline of the same octane number
without MMT. Gasoline blended with
MMT reduces spark plug life and re-
duces emission system performance in
some vehicles. The manufacturer rec-
ommends that gasoline without MMT
be used in your vehicle. The MMT
content of gasoline may not be indi-
cated on the gasoline pump; therefore,
you should ask your gasoline retailer
whether or not his/her gasoline con-
tains MMT.
257
Page 286 of 344
NOTE:
To improve the vehicle’s traction
when starting off in deep snow,
sand or gravel, it may be desirable
to switch the Electronic Stability
Program (ESP) to “Partial Off”
mode. Refer to “Electronic Brake
Control System” in “Starting and
Operating” for further informa-
tion.CAUTION!
When “rocking” a stuck vehicleby moving between DRIVE and
REVERSE, do not spin the wheels
faster than 24 km/h, or drivetrain
damage may result.
Revving the engine or spinning
the wheels too fast may lead to
transmission overheating and
failure. It can also damage the
tires. Do not spin the wheels above
48 km/h while in gear (no trans-
mission shifting occurring).
WARNING!
Fast spinning tires can be danger-
ous. Forces generated by excessive
wheel speeds may cause damage, or
even failure, of the axle and tires. A
tire could explode and injure some-
one. Do not spin your vehicle's
wheels faster than 48 km/h or for
longer than 30 seconds continuously
without stopping when you are stuck
and do not let anyone near a spin-
ning wheel, no matter what the
speed.
SHIFT LEVER
OVERRIDE
If a malfunction occurs and the shift
lever cannot be moved out of the
PARK position, you can use the fol-
lowing procedure to temporarily
move the shift lever:
1. Firmly apply the parking brake.
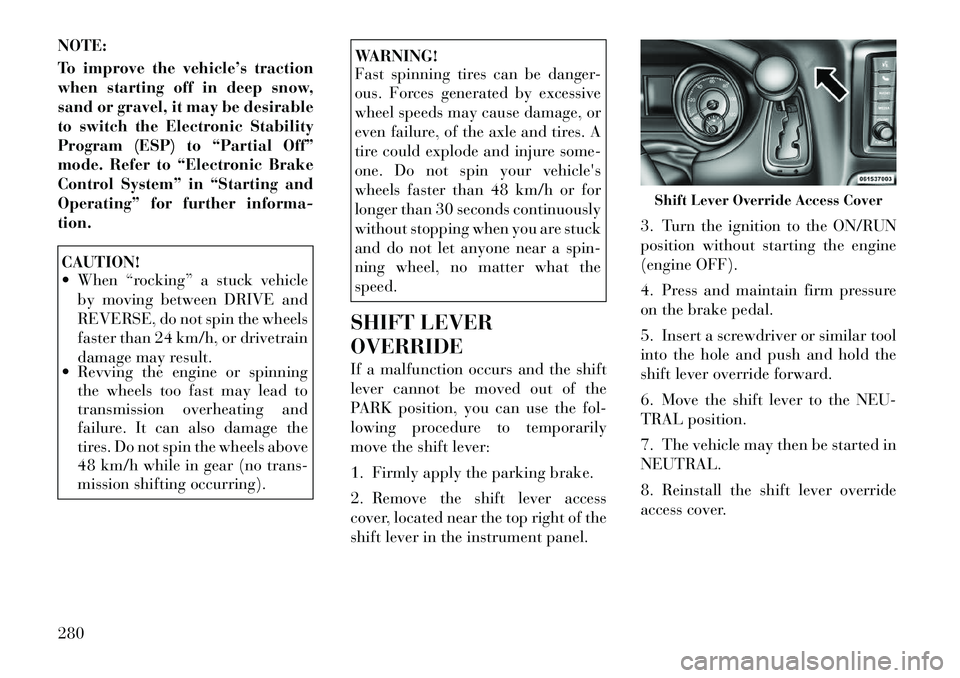
2. Remove the shift lever access
cover, located near the top right of the
shift lever in the instrument panel. 3. Turn the ignition to the ON/RUN
position without starting the engine
(engine OFF).
4. Press and maintain firm pressure
on the brake pedal.
5. Insert a screwdriver or similar tool
into the hole and push and hold the
shift lever override forward.
6. Move the shift lever to the NEU-
TRAL position.
7. The vehicle may then be started in
NEUTRAL.
8. Reinstall the shift lever override
access cover.
Shift Lever Override Access Cover
280
Page 307 of 344

highly corrosive to the metal in your
vehicle. Outside parking, which ex-
poses your vehicle to airborne con-
taminants, road surfaces on which the
vehicle is operated, extreme hot or
cold weather and other extreme con-
ditions will have an adverse effect on
paint, metal trim, and underbody
protection.
The following maintenance recom-
mendations will enable you to obtain
maximum benefit from the corrosion
resistance built into your vehicle.
What Causes Corrosion?
Corrosion is the result of deterioration
or removal of paint and protective
coatings from your vehicle.
The most common causes are:
Road salt, dirt and moisture accu-mulation
Stone and gravel impact
Insects, tree sap and tar
Salt in the air near seacoast locali- ties
Atmospheric fallout/industrial pol- lutants Washing
Wash your vehicle regularly. Al-
ways wash your vehicle in the shade
using a mild car wash soap, and
rinse the panels completely with
clear water.
Use a high quality cleaner wax to remove road film, stains and to pro-
tect your paint finish. Take care
never to scratch the paint.
Avoid using abrasive compounds and power buffing that may dimin-
ish the gloss or thin out the paint
finish.
CAUTION!
Do not use abrasive or strong clean-
ing materials such as steel wool or
scouring powder, which will scratch
metal and painted surfaces.
Special Care
If you drive on salted or dusty roads or if you drive near the ocean, hose
off the undercarriage at least once a
month. It is important that the drain holes
in the lower edges of the doors and
rocker panels be kept clear and
open.
If you detect any stone chips or scratches in the paint, touch them
up immediately. The cost of such
repairs is considered the responsi-
bility of the owner.
If your vehicle is damaged due to an accident or similar cause which de-
stroys the paint and protective
coating, have your vehicle repaired
as soon as possible. The cost of such
repairs is considered the responsi-
bility of the owner.
If you carry special cargo such as chemicals, fertilizers, de-icer salt,
etc., be sure that such materials are
well packaged and sealed.
If a lot of driving is done on gravel roads, consider mud or stone
shields behind each wheel.
Use Touch Up Paint or equivalent on scratches as soon as possible.
Your authorized dealer has touch
up paint to match the color of your
vehicle.
301
Page 308 of 344

Wheel And Wheel Trim Care
All wheels and wheel trim, especially
aluminum and chrome plated wheels,
should be cleaned regularly with a
mild soap and water to prevent corro-
sion.CAUTION!
Do not use scouring pads, steel wool,
a bristle brush, or metal polishes. Do
not use oven cleaner. These products
may damage the wheel's protective
finish. Avoid automatic car washes
that use acidic solutions or harsh
brushes that may damage the
wheel's protective finish. Use only
the approved wheel cleaners or
equivalent.
Stain Repel Fabric Cleaning
Procedure (for versions/markets,
where provided)
Stain Repel seats may be cleaned in
the following manner:
Remove as much of the stain as possible by blotting with a clean,
dry towel. Blot any remaining stain with a
clean, damp towel.
For tough stains, apply a mild soap solution to a clean, damp cloth and
remove the stain. Use a fresh, damp
towel to remove soap residue.
For grease stains, apply a high quality cleaner to a clean, damp
cloth and remove the stain. Use a
fresh, damp towel to remove soap
residue.
Do not use any harsh solvents or any other form of protectants on
Stain Repel products.
Interior Care
Instrument Panel Surfaces
The instrument panel cover has a low
glare surface, which minimizes reflec-
tions in the windshield. Do not use
protectants or other products which
may cause undesirable reflections.
Use soap and warm water to restore
the low glare surface. Cleaning Leather Upholstery
Your leather upholstery can be best
preserved by regular cleaning with a
damp soft cloth. Small particles of
dirt can act as an abrasive and dam-
age the leather upholstery and should
be removed promptly with a damp
cloth. Care should be taken to avoid
soaking your leather upholstery with
any liquid. Please do not use polishes,
oils, cleaning fluids, solvents, deter-
gents, or ammonia-based cleaners to
clean your leather upholstery. Appli-
cation of a leather conditioner is not
required to maintain the original con-
dition.
WARNING!
Do not use volatile solvents for
cleaning purposes. Many are poten-
tially flammable, and if used in
closed areas they may cause respira-
tory harm.
302
Page 310 of 344

Shake the excess water from the liner
and dry the outer surfaces with a
clean soft cloth.
Installation
Place the liner into the cupholder
drawer and press the liner into place
so that the retention tabs seat into the
corresponding openings in the
drawer.
FUSES
TOTALLY INTEGRATED
POWER MODULE
The Totally Integrated Power Module
is located in the engine compartment
near the battery. Refer to the appli-
cable “Engine Compartment” illus-
tration in this section. This center
contains cartridge fuses and mini-
fuses. A label that identifies each
component may be printed or em-
bossed on the inside of the cover.
CAUTION!
When installing the Totally Inte-grated Power Module cover, it is
important to ensure the cover is
properly positioned and fully
latched. Failure to do so may al-
low water to get into the Inte-
grated Power Module, and possi-
bly result in a electrical system
failure.
(Continued)
CAUTION!(Continued)
When replacing a blown fuse, it is
important to use only a fuse hav-
ing the correct amperage rating.
The use of a fuse with a rating
other than indicated may result in
a dangerous electrical system
overload. If a properly rated fuse
continues to blow, it indicates a
problem in the circuit that must
be corrected.
The numbers inside the TIPM cover
correspond to the following table.
Totally Integrated Power Module
304
Page 320 of 344

ARRANGEMENTS FOR DEALING
WITH THE VEHICLE AT THE
END OF ITS LIFE
LANCIA has been committed for
many years to safeguarding the envi-
ronment through the constant im-
provement of its production processes
and manufacturing products that are
increasingly “eco-compatible”.
To give customers the best possible
service in terms of respecting environ-
mental laws and in response to Euro-
pean Directive 2000/53/EC govern-
ing vehicles at the end of their life,
LANCIA is offering its customers the
opportunity of handing over their ve-
hicle* at the end of its life without
incurring any additional costs.
The European Directive sets out that
when the vehicle is handed over thelast keeper or owner should not incur
any expenses as a result of it having a
zero or negative market value.
In all European Union countries, until
1st January 2007, only vehicles regis-
tered after 1st July 2002 were col-
lected free of charge, while since 2007
collection has been free of charge irre-
spective of the year of registration as
long as the vehicle contains its basic
components (in particular, the engine
and bodywork) and has no additional
waste.
To hand your vehicle over at the end
of its life without extra cost, go to one
of our Dealerships or LANCIA-
authorized collection and scrapping
centres.
These centres have been carefully
chosen to offer high quality service forthe collection, treatment and recy-
cling of unused vehicles with respect
to the environment.
You can find further information on
these collection and scrapping centres
either from a LANCIA or LANCIA
Commercial Vehicle Dealership or by
calling the freephone number 00800
526242 00 or by going on the
LANCIA website.
(*) Vehicle for transporting passen-
gers with a maximum of nine seats
and a total permitted weight of 3.5 t
314
Page 334 of 344
DisposalAntifreeze (Engine
Coolant) . . . . . . . . . . . . . . 297
Engine Oil . . . . . . . . . . . . . 289
Domelight . . . . . . . . . . . . . . . 120
Door Locks . . . . . . . . . . . . . . . 22
Door Locks, Automatic . . . . . . 23
Driving On Slippery Surfaces . . . . . 236
Through Flowing, Rising, or
Shallow Standing Water . . . 236
Driving to Achieve Maximum
Fuel Economy . . . . . . . . . . . . 178
Electric Remote Mirrors . . . . . . 76
Electrical Power Outlets . . . . . 141
Electronic Brake Control
System . . . . . . . . . . . . . . . . . 241 Brake Assist System . . . . . . 242
Electronic Speed Control
(Cruise Control) . . . . . . . . . . 128
Electronic Stability Control
(ESC) . . . . . . . . . . . . . . . . . . 242
Electronic Vehicle Information
Center (EVIC) . . . . . . . . 135,172
Emergency, In Case of Hazard Warning Flasher . . . 268
Jacking . . . . . . . . . . . . 269,272
Jump Starting . . . . . . . . . . 277 Overheating . . . . . . . . . . . . 268
Engine . . . . . . . . . . . . . . . . . 286 Air Cleaner . . . . . . . . . . . . 289
Break-In Recommendations . . 62
Checking Oil Level . . . . . . . 288
Compartment . . . . . . . . . . . 285
Compartment
Identification . . . . . . . . . . . 285
Coolant (Antifreeze) . . . . . . 312
Cooling . . . . . . . . . . . . . . . 295
Exhaust Gas Caution . . . . 33,63
Fails to Start . . . . . . . . . . . 227
Flooded, Starting . . . . . . . . 227
Fuel Requirements . . . . . . . 311
Oil . . . . . . . . . . . . 288,311,312
Oil Change Interval . . . . . . 288
Oil Disposal . . . . . . . . . . . . 289
Oil Filler Cap . . . . . . . . . . . 286
Oil Filter Disposal . . . . . . . 289
Oil Selection . . . . . . . . 288,311
Oil Synthetic . . . . . . . . . . . 289
Overheating . . . . . . . . . . . . 268
Starting . . . . . . . . . . . . . . . 225
Temperature Gauge . . . . . . 169
Enhanced Accident Response
Feature . . . . . . . . . . . . . . . . . . 50
Entry System, Illuminated . . . . 18
Event Data Recorder . . . . . . . . 52
Exhaust Gas Caution . . 33,63,290 Exhaust System . . . . . . . . 63,290
Exterior Folding Mirrors . . . . . . 76
Exterior Lights . . . . . . . . . . . . 65
Fabric Care . . . . . . . . . . . . . . 302
Filler Location Fuel . . . . . . . . 167
Filters
Air Cleaner . . . . . . . . . . . . 289
Air Conditioning . . . . . 220,293
Engine Oil . . . . . . . . . . 289,312
Engine Oil Disposal . . . . . . 289
Flash-To-Pass . . . . . . . . . . . . 123
Flashers Hazard Warning . . . . . . . . . 268
Turn Signal . . . . . . . 65,164,309
Flooded Engine Starting . . . . . 227
Floor Console . . . . . . . . . . . . 148
Fluid Capacities . . . . . . . . . . . 311
Fluid Leaks . . . . . . . . . . . . . . 65
Fluid Level Checks Automatic Transaxle . . . . . . 300
Brake . . . . . . . . . . . . . 299,313
Power Steering . . . . . . 238,313
Fluid, Brake . . . . . . . . . . . . . 313
Fluids . . . . . . . . . . . . . . . . . . 312
Fluids, Lubricants and
Genuine Parts . . . . . . . . . . . . 312
Fog Light Service . . . . . . . . . . 310
Fog Lights . . . . . . . . 122,164,310
328