language Lancia Voyager 2012 Owner handbook (in English)
[x] Cancel search | Manufacturer: LANCIA, Model Year: 2012, Model line: Voyager, Model: Lancia Voyager 2012Pages: 344, PDF Size: 3.95 MB
Page 88 of 344
Astronomy Zone — System
Temporarily Unavailable
When the vehicle enters this zone the
blind spot system will become tempo-
rarily unavailable and the EVIC will
display the message “ Blind spot sys-
tem unavailable-Astronomy zone”.
The side mirrors LED’s will be lit up
and stay lit until the vehicle exits the
zone.
UCONNECT™ PHONE
(for versions/markets,
where provided)
NOTE:
For Uconnect™ Phone with Navi-
gation or Multimedia radio, refer
to the Navigation or Multimedia
radio's User's Manual (separate
booklet) Uconnect™ Phone sec-
tion.
Uconnect™ Phone is a voice-
activated, hands-free, in-vehicle com-
munications system. Uconnect™
Phone allows you to dial a phone
number with your mobile phone* us-
ing simple voice commands (e.g.,
“Call”…“Jim”… “Work” or“Dial”…“151-1234 -5555”). Your
mobile phone's audio is transmitted
through your vehicle's audio system;
the system will automatically mute
your radio when using the
Uconnect™ Phone.
Uconnect™ Phone allows you to
transfer calls between the Uconnect™
Phone and your mobile phone as you
enter or exit your vehicle and enables
you to mute the Uconnect™ Phone's
microphone for private conversation.
The Uconnect™ Phone is driven
through your Bluetooth® “Hands-
Free profile” mobile phone.
Uconnect™ Phone features
Bluetooth® technology - the global
standard that enables different elec-
tronic devices to connect to each other
without wires or a docking station, so
Uconnect™ Phone works no matter
where you stow your mobile phone
(be it your purse, pocket, or brief-
case), as long as your phone is turned
on and has been paired to the vehicle's
Uconnect™ Phone. The Uconnect™
Phone allows up to seven mobile
phones to be linked to the system.
Only one linked (or paired) mobilephone can be used with the
Uconnect™ Phone at a time. The
Uconnect™ Phone is available in
English, Dutch, French, German,
Italian or Spanish languages (as
equipped).
WARNING!
Any voice commanded system
should be used only in safe driving
conditions following local laws and
phone use. All attention should be
kept on the roadway ahead. Failure
to do so may result in a collision
causing serious injury or death.
Uconnect™ Phone Button The radio or steering wheel
controls (for versions/
markets, where provided)
will contain the two control
buttons (Uconnect™ Phone
but-
ton and Voice Commandbut-
ton) that will enable you to access the
system. When you press the button
you will hear the word Uconnect™
followed by a BEEP. The beep is your
signal to give a command.
82
Page 91 of 344
After the “Ready” prompt and thefollowing beep, say “Call.”
The system will prompt you to say the name of the person you want to
call.
After the “Ready” prompt and the following beep, say the name of the
person you want to call. For ex-
ample, you can say “John Doe”,
where John Doe is a previously
stored name entry in the
Uconnect™ Phonebook or down-
loaded phonebook. To learn how to
store a name in the phonebook ,
refer to “Add Names to Your
Uconnect™ Phonebook”.
The Uconnect™ Phone will con- firm the name and then dial the
corresponding phone number,
which may appear in the display of
certain radios.
Add Names To Your Uconnect™
Phonebook
NOTE:
Adding names to the Uconnect™
Phonebook is recommended when
the vehicle is not in motion. Press the
button to begin.
After the “Ready” prompt and the following beep, say “Phonebook
New Entry”.
When prompted, say the name of the new entry. Use of long names
helps the Voice Command and it is
recommended. For example, say
“Robert Smith” or “Robert” in-
stead of “Bob”.
When prompted, enter the number designation (e.g., “Home”,
“Work”, “Mobile”, or “Other”).
This will allow you to store multiple
numbers for each phonebook entry,
if desired.
When prompted, recite the phone number for the phonebook entry
that you are adding.
After you are finished adding an entry
into the phonebook, you will be given
the opportunity to add more phone
numbers to the current entry or to
return to the main menu.
The Uconnect™ Phone will allow you
to enter up to 32 names in the phone-
book with each name having up to four associated phone numbers and
designations. Each language has a
separate 32-name phonebook acces-
sible only in that language. In addi-
tion, for versions/markets, where pro-
vided, and supported by your phone,
Uconnect™ Phone automatically
downloads your mobile phone’s
phonebook.
Phonebook Download —
Automatic Phonebook Transfer
From Mobile Phone
For versions/markets, where pro-
vided and specifically supported by
your phone, Uconnect™ Phone auto-
matically downloads names (text
names) and number entries from your
mobile phone’s phonebook. Specific
Bluetooth® Phones with Phone Book
Access Profile may support this fea-
ture. See Uconnect™ website for sup-
ported phones.
To call a name from downloaded
(or Uconnect™) Phonebook, follow
the procedure in “Call by Saying a
Name” section.
Automatic download and update, if supported, begins as soon as the
85
Page 93 of 344
“List Names” to hear a list of the
entries in the phonebook from
which you choose. To select one of
the entries from the list, press the
button while the Uconnect™
Phone is playing the desired entry
and say “Delete”.
After you enter the name, the Uconnect™ Phone will ask you
which designation you wish to de-
lete; home, work, mobile, other, or
all. Say the designation you wish to
delete.
Note that only the phonebook entry in the current language is deleted.
Automatic downloaded phonebook entries cannot be deleted or edited.
Delete/Erase “All” Uconnect™
Phonebook Entries
Press the
button to begin.
After the “Ready” prompt and the following beep, say “Phonebook
Erase All”.
The Uconnect™ Phone will ask you to verify that you wish to delete all
the entries from the phonebook. After confirmation, the phonebook
entries will be deleted.
Note that only the phonebook in the current language is deleted.
Automatic downloaded phonebook entries cannot be deleted or edited.
List All Uconnect™ Phonebook
Names
Press the
button to begin.
After the “Ready” prompt and the following beep, say “Phonebook
List Names”.
The Uconnect™ Phone will play the names of all the phonebook en-
tries, including the downloaded
phonebook entries, if available.
To call one of the names in the list, press the
button during the
playing of the desired name, and
say “Call”.
NOTE:
The user can also exercise “Edit”
or “Delete” operations at this
point. The Uconnect™ Phone will then
prompt you as to the number des-
ignation you wish to call.
The selected number will be dialed.
PHONE CALL FEATURES
The following features can be ac-
cessed through the Uconnect™ Phone
if the feature(s) are available on your
mobile service plan. For example, if
your mobile service plan provides
three-way calling, this feature can be
accessed through the Uconnect™
Phone. Check with your mobile ser-
vice provider for the features that you
have.
Answer Or Reject An Incoming
Call — No Call Currently In
Progress
When you receive a call on your mo-
bile phone, the Uconnect™ Phone
will interrupt the vehicle audio sys-
tem, if on, and will ask if you would
like to answer the call. Press the
button to accept the call. To reject the
call, press and hold the
button
until you hear a single beep indicating
that the incoming call was rejected.
87
Page 95 of 344
NOTE:
This may not be the last number
dialed from the Uconnect™
Phone.
Call Continuation
Call continuation is the progression of
a phone call on the Uconnect™ Phone
after the vehicle ignition key has been
switched to OFF. Call continuation
functionality available on the vehicle
can be any one of three types:
After the ignition key is switched toOFF, a call can continue on the
Uconnect™ Phone either until the
call ends, or until a vehicle specific
time expires, or until the vehicle
battery condition dictates cessation
of the call on the Uconnect™ Phone
and transfer of the call to the mo-
bile phone.
After the ignition key is switched to OFF, a call can continue on the
Uconnect™ Phone for a certain du-
ration, after which the call is auto-
matically transferred from the
Uconnect™ Phone to the mobile
phone. An active call is automatically
transferred to the mobile phone af-
ter the ignition key is switched to
OFF.
UCONNECT™ PHONE
FEATURES
Language Selection
To change the language that the
Uconnect™ Phone is using:
Press the
button to begin.
After the “Ready” prompt and the following beep, say the name of the
language you wish to switch to
(English, Dutch, French, German,
Italian, or Spanish, if so equipped).
Continue to follow the system prompts to complete language se-
lection.
After selecting one of the languages,
all prompts and voice commands will
be in that language.
NOTE:
After every Uconnect™ Phone lan-
guage change operation, only the
language-specific 32-name
phonebook is usable. The paired phone name is not language-
specific and is usable across all
languages.
For command translations and alter-
nate commands in supported lan-
guages, refer to “Commands” in
“Voice Command System Operation”.
Emergency Assistance (for
versions/markets, where
provided)
If you are in an emergency and the
mobile phone is reachable:
Pick up the phone and manually
dial the emergency number for
your area.
If the phone is not reachable and the
Uconnect™ Phone is operational, you
may reach the emergency number as
follows:
Press the
button to begin.
After the “Ready” prompt and the following beep, say “Emergency”
and the Uconnect™ Phone will in-
struct the paired mobile phone to
call the emergency number.
89
Page 99 of 344
After the “Ready” prompt and thefollowing beep, say “Setup Phone
Pairing”.
At the next prompt, say “Delete” and follow the prompts.
You can also press the
button
at any time while the list is being
played, and then choose the phone
you wish to delete.
THINGS YOU SHOULD
KNOW ABOUT YOUR
UCONNECT™ PHONE
Uconnect™ Phone Tutorial
To hear a brief tutorial of the
Uconnect™ Phone features, press the
button and say “Uconnect™ Tu-
torial”.
Voice Training
For users experiencing difficulty with
the Uconnect™ Phone recognizing
their voice commands or numbers,
the Uconnect™ Phone Voice Training
feature may be used. To enter this
training mode, follow one of the two
following procedures:
From outside the Uconnect™ Phone
mode (e.g., from radio mode) Press and hold the
button for
five seconds until the session be-
gins, or,
Press the
button and say the
“Voice Training, System Training,
or Start Voice Training” command.
You can either press the Uconnect™
Phone button to restore the factory
setting or repeat the words and
phrases when prompted by the
Uconnect™ Phone. For best results,
the Voice Training session should be
completed when the vehicle is parked
with the engine running, all windows
closed, and the blower fan switched
off.
This procedure may be repeated with
a new user. The system will adapt to
the last trained voice only.
Reset
press thebutton.
After the “Ready” prompt, and the following beep, say “Setup”, then
“Reset”.
This will delete all phone pairing,
phone book entries, and other settings in all language modes. The System
will prompt you before resetting to
factory settings.
Voice Command
For best performance, adjust the
rearview mirror to provide at least
1 cm gap between the overhead
console (for versions/markets,
where provided) and the mirror.
Always wait for the beep before speaking.
Speak normally, without pausing, just as you would speak to a person
sitting a few meters away from you.
Make sure that no one other than you is speaking during a voice pe-
riod.
Performance is maximized under: low-to-medium blower setting,
low-to-medium vehicle speed,
low road noise,
smooth road surface,
fully closed windows,
dry weather conditions.
93
Page 101 of 344
Send Messages:
You can send messages using
Uconnect™ Phone. To send a new
message:
Press the
button.
After the “Ready” prompt and the following beep, say “SMS Send” or
“Send Messages”.
You can either say the message you wish to send or say “List Mes-
sages.” There are 20 preset mes-
sages.
To send a message, press the
button while the system is listing the
message and say “Send.”
Uconnect™ Phone will prompt you to
say the name or number of the person
you wish to send the message to.
List of Preset Messages:
1. Yes
2. No
3. Where are you?
4. I need more direction. 5. L O L
6. Why
7. I love you
8. Call me
9. Call me later
10. Thanks
11. See You in 15 minutes
12. I am on my way
13. I’ll be late
14. Are you there yet?
15. Where are we meeting?
16. Can this wait?
17. Bye for now
18. When can we meet
19. Send number to call
20. Start without me
Turn SMS Incoming Announcement
ON/OFF
Turning the SMS Incoming An-
nouncement OFF will stop the system
from announcing the new incoming
messages.
Press the
button.
After the “Ready” prompt and the following beep, say “Setup, Incom-
ing Message Announcement”, you
will then be given a choice to
change it.
Bluetooth® Communication Link
Mobile phones have been found to
lose connection to the Uconnect™
Phone. When this happens, the con-
nection can generally be reestablished
by switching the phone off/on. Your
mobile phone is recommended to re-
main in Bluetooth® ON mode.
Power-Up
After switching the ignition key from
OFF to either ON or ACC position, or
after a language change, you must
wait at least 15 seconds prior to using
the system.
95
Page 105 of 344
Voice Commands
Primary Alternate(s)
zero
one
two
three
four
five
six
seven
eight
nine
asterisk (*) star
plus (+)
hash (#)
all all of them
Breakdown ser-
vice
call
cancel
confirmation
prompts confirmation
continue
delete
dial
download
Dutch Nederlands
edit
emergency
English
delete all erase all
Voice Commands
Primary Alternate(s)
Espanol
Francais
German Deutsch
help
home
Italian Italiano
language
list names
list phones
main menu. return to main
menu
mobile
mute on
mute off
new entry
no
other other
pair a phone
phone pairing pairing
phonebook phonebook
previous
redial
select phone select
send
set up phone settings or
phone set up
transfer call
Uconnect™
Tutorial
Voice Commands
Primary Alternate(s)
try again
voice training system training
work
yes
VOICE COMMAND (for
versions/markets, where
provided)
VOICE COMMAND SYSTEM
OPERATIONThis Voice Command system
allows you to control your
AM, FM radio, disc player,
and a memo recorder.
NOTE:
Take care to speak into the Voice
Interface System as calmly and
normally as possible. The ability
of the Voice Interface System to
recognize user voice commands
may be negatively affected by
rapid speaking or a raised voice
level.
99
Page 108 of 344
“Switch to setup”
In this mode, you may say thefollow-
ing commands:
“Language English”
“Language French”
“Language Spanish”
“Language Dutch”
“Language Deutsch”
“Language Italian”
“Tutorial”
“Voice Training”
NOTE:
Keep in mind that you have to
press the Voice Commandbutton first and wait for the beep
before speaking the “Barge In”
commands.
VOICE TRAINING
For users experiencing difficulty with
the system recognizing their voice
commands or numbers the
Uconnect™ Voice “Voice Training”
feature may be used. 1. Press the Voice Command
button, say “System Setup” and once
you are in that menu then say “Voice
Training.” This will train your own
voice to the system and will improve
recognition.
2. Repeat the words and phrases
when prompted by Uconnect™ Voice.
For best results, the Voice Training
session should be completed when the
vehicle is parked, engine running, all
windows closed, and the blower fan
switched off. This procedure may be
repeated with a new user. The system
will adapt to the last trained voice
only.
SEATS
Seats are a part of the Occupant Re-
straint System of the vehicle.WARNING!
It is dangerous to ride in a cargo
area, inside or outside of a vehicle.
In a collision, people riding in
these areas are more likely to be
seriously injured or killed.
(Continued)
WARNING!(Continued)
Do not allow people to ride in any
area of your vehicle that is not
equipped with seats and seat
belts. In a collision, people riding
in these areas are more likely to be
seriously injured or killed.
Be sure everyone in your vehicle is
in a seat and using a seat belt
properly.
POWER SEATS (for
versions/markets, where
provided)
Some models may be equipped with
eight-way power seats for the driver
and front passenger. The power seat
switches are located on the outboard
side of the seat. The switches control
the movement of the seat cushion and
the seatback.
102
Page 189 of 344

CUSTOMER-
PROGRAMMABLE
FEATURES (SYSTEM
SETUP)
Personal Settings allows you to set
and recall features when the transmis-
sion is in PARK. If the transmission is
out of PARK or the vehicle begins
moving, a warning messageSYSTEM
SETUP NOT AVAILABLE VE-
HICLE NOT IN PARK displays when
you try to select “System Setup” from
the main menu.
Press and release the UP or DOWN
button until "System Setup" is high-
lighted in the main menu of the EVIC.
Then press the SELECT button to
enter the System Setup sub-menu.
Press and release the UP or DOWN
button to select a feature form the
following choices:
Language (for versions/markets,
where provided)
When in this display you may select
one of five languages for all display
nomenclature, including the trip
functions and the navigation system
(for versions/markets, where pro- vided). Press the UP or DOWN button
while in this display and scroll
through the language choices. Press
the SELECT button to select English,
Spanish (Español), French (Fran-
çais). Then, as you continue, the in-
formation will display in the selected
language.
Nav–Turn By Turn (for
versions/markets, where
provided)
When this feature is selected, the
navigation system utilizes voice com-
mands, guiding through the drive
route, mile by mile, turn-by-turn un-
til the final destination is reached. To
make your selection, press and release
the SELECT button until a check-
mark appears next to the feature
showing the system has been acti-
vated or the check-mark is removed
showing the system has been deacti-
vated.
Enable/Disable the Rear Park
Assist System (for versions/
markets, where provided)
The Rear Park Assist system will scan
for objects behind the vehicle when
the transmission is in the REVERSEposition and the vehicle speed is less
than 18 km/h. The system can be
enabled with Sound Only, Sound and
Display, or turned OFF through the
EVIC. To make your selection, press
and release the SELECT button until
a check-mark appears next to the fea-
ture showing the system has been ac-
tivated or the check-mark is removed
showing the system has been deacti-
vated. Refer to “Rear Park Assist Sys-
tem” in “Understanding The Features
Of Your Vehicle” for system function
and operating information.
Auto Unlock Doors (for
versions/markets, where
provided)
When ON is selected, all doors will
unlock when the vehicle is stopped
and the transmission is in the PARK
or NEUTRAL position and the driv-
er's door is opened. To make your
selection, press and release the
SE-
LECT button until a check-mark ap-
pears next to the feature showing the
system has been activated or the
check-mark is removed showing the
system has been deactivated.
183
Page 211 of 344
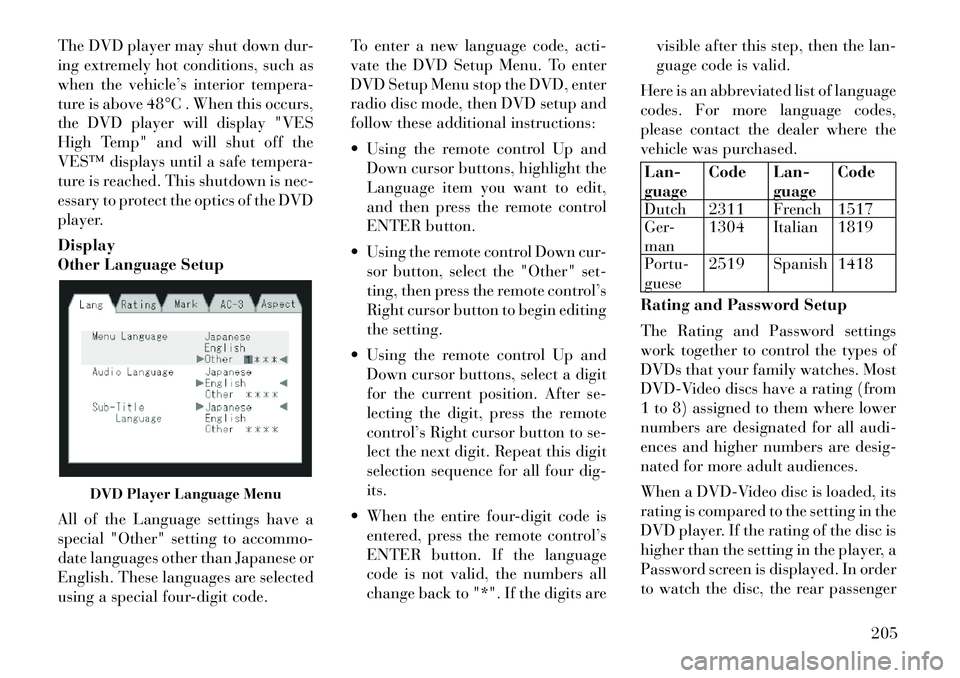
The DVD player may shut down dur-
ing extremely hot conditions, such as
when the vehicle’s interior tempera-
ture is above 48°C . When this occurs,
the DVD player will display "VES
High Temp" and will shut off the
VES™ displays until a safe tempera-
ture is reached. This shutdown is nec-
essary to protect the optics of the DVD
player.
Display
Other Language Setup
All of the Language settings have a
special "Other" setting to accommo-
date languages other than Japanese or
English. These languages are selected
using a special four-digit code.To enter a new language code, acti-
vate the DVD Setup Menu. To enter
DVD Setup Menu stop the DVD, enter
radio disc mode, then DVD setup and
follow these additional instructions:
Using the remote control Up and
Down cursor buttons, highlight the
Language item you want to edit,
and then press the remote control
ENTER button.
Using the remote control Down cur- sor button, select the "Other" set-
ting, then press the remote control’s
Right cursor button to begin editing
the setting.
Using the remote control Up and Down cursor buttons, select a digit
for the current position. After se-
lecting the digit, press the remote
control’s Right cursor button to se-
lect the next digit. Repeat this digit
selection sequence for all four dig-
its.
When the entire four-digit code is entered, press the remote control’s
ENTER button. If the language
code is not valid, the numbers all
change back to "*". If the digits are visible after this step, then the lan-
guage code is valid.
Here is an abbreviated list of language
codes. For more language codes,
please contact the dealer where the
vehicle was purchased.
Lan-
guage Code Lan-
guageCode
Dutch 2311 French 1517
Ger-
man 1304 Italian 1819
Portu-
guese 2519 Spanish 1418
Rating and Password Setup
The Rating and Password settings
work together to control the types of
DVDs that your family watches. Most
DVD-Video discs have a rating (from
1 to 8) assigned to them where lower
numbers are designated for all audi-
ences and higher numbers are desig-
nated for more adult audiences.
When a DVD-Video disc is loaded, its
rating is compared to the setting in the
DVD player. If the rating of the disc is
higher than the setting in the player, a
Password screen is displayed. In order
to watch the disc, the rear passenger
DVD Player Language Menu
205