belt Lancia Voyager 2014 Owner handbook (in English)
[x] Cancel search | Manufacturer: LANCIA, Model Year: 2014, Model line: Voyager, Model: Lancia Voyager 2014Pages: 364, PDF Size: 3.49 MB
Page 10 of 364
INTRODUCTION
Congratulations on selecting your
new LANCIA vehicle. Be assured that
it represents precision workmanship,
distinctive styling, and high quality -
all essentials that are traditional to
our vehicles.
Before you start to drive this vehicle,
read this Owner's Manual and all the
supplements. Be sure you are familiar
with all vehicle controls, particularly
those used for braking, steering, and
transmission shifting. Learn how your
vehicle handles on different road sur-
faces. Your driving skills will improve
with experience, but as in driving any
vehicle, take it easy as you begin. Al-
ways observe local laws wherever you
drive.
NOTE: After reviewing the owner
information, it should be stored in
the vehicle for convenient refer-
encing and remain with the vehicle
when sold.
Failure to operate this vehicle cor-
rectly may result in loss of control or a
collision.Operating this vehicle at excessive
speeds or while intoxicated may result
in loss of control, collision with other
vehicles or objects, going off the road,
or overturning; any of which may lead
to serious injury or death. Also, failure
to use seat belts subjects the driver
and passengers to a greater risk of
injury or death.
To keep your vehicle running at its
best, have your vehicle serviced at
recommended intervals by an autho-
rized dealer who has the qualified per-
sonnel, special tools, and equipment
to perform all service.
The manufacturer and its distributors
are vitally interested in your complete
satisfaction with this vehicle. If you
encounter a service or warranty prob-
lem, which is not resolved to your
satisfaction, discuss the matter with
your dealer's management.
Your authorized dealer will be happy
to assist you with any questions about
your vehicle.
IMPORTANT NOTICE
ALL MATERIAL CONTAINED IN
THIS PUBLICATION IS BASED ON
THE LATEST INFORMATION
AVAILABLE AT TIME OF PUBLI-
CATION APPROVAL. THE RIGHT
IS RESERVED TO PUBLISH REVI-
SIONS AT ANY TIME.
This Owner's Manual has been pre-
pared with the assistance of service
and engineering specialists to ac-
quaint you with the operation and
maintenance of your new vehicle. It is
supplemented by a Warranty Infor-
mation Booklet and various
customer-oriented documents. You
are urged to read these publications
carefully. Following the instructions
and recommendations in this Owner's
Manual will help assure safe and en-
joyable operation of your vehicle.
After you have read the Owner’s
Manual, it should be stored in the
vehicle for convenient reference and
remain with the vehicle when sold.
4
Page 17 of 364
SLIDING SIDE DOOR......................29
POWER SLIDING SIDE DOOR (for versions/ markets, where provided) .................29
SLIDING SIDE DOOR CHILD PROTECTION LOCK ................................31
LIFTGATE ...............................33
POWER LIFTGATE (for versions/markets, where available) .............................33
OCCUPANT RESTRAINTS ...................35
LAP/SHOULDER BELTS ..................36
SEAT BELTS IN PASSENGER SEATING POSITIONS ............................40
AUTOMATIC LOCKING RETRACTOR MODE (ALR) .................................40
ENERGY MANAGEMENT FEATURE ..........41
SEAT BELT PRETENSIONERS .............41
SUPPLEMENTAL ACTIVE HEAD RESTRAINTS (AHR) — (for versions/markets where
provided) ..............................42
ACTIVE HOOD SYSTEM ..................43
ENHANCED SEAT BELT USE REMINDER SYSTEM (BeltAlert®) ....................45
SEAT BELTS AND PREGNANT WOMEN ......46
SUPPLEMENTAL RESTRAINT SYSTEM (SRS) — AIR BAGS .............................46
AIR BAG SYSTEM COMPONENTS ...........47
ADVANCED FRONT AIR BAG FEATURES .....47
AIR BAG DEPLOYMENT SENSORS AND CONTROLS ............................50
11
Page 41 of 364
If the liftgate release button isactivated while the power lift-
gate is closing, the liftgate will
reverse to the full open position.
The power liftgate buttons will not operate if the shift lever is in
gear or the vehicle speed is
above 0 km/h.
The power liftgate will not oper- ate in temperatures below 24°C
or temperatures above 62°C. Be
sure to remove any buildup of
snow or ice from the liftgate be-
fore pressing any of the power
liftgate buttons.
If the power liftgate encounters multiple obstructions within the
same cycle, the system will auto-
matically stop and must be
opened or closed manually.WARNING!
Driving with the liftgate open canallow poisonous exhaust gases
into your vehicle. You and your
passengers could be injured by
these fumes. Keep the liftgate
closed when you are operating the
vehicle.
If you are required to drive with the liftgate open, make sure that
all windows are closed, and the
climate control blower switch is
set at high speed. Do not use the
recirculation mode.
OCCUPANT RESTRAINTS
Some of the most important safety
features in your vehicle are the re-
straint systems:
Three-point lap and shoulder belts for all seating positions
Advanced Front Air Bags for driver and front passenger Supplemental Active Head Re-
straints (AHR) located on top of the
front seats (integrated into the head
restraint)
Supplemental Side Air Bag Inflat- able Curtains (SABIC) that span
the front, second, and third row
seating for the driver and passen-
gers seated next to a window
Supplemental Seat-Mounted Side Air Bags (SAB)
An energy-absorbing steering col- umn and steering wheel
Knee bolsters/blockers for front seat occupants
Front seat belts incorporate preten- sioners that may enhance occupant
protection by managing occupant
energy during an impact event
All seat belt systems (except the
driver’s) include Automatic Locking
Retractors (ALRs), which lock the
seat belt webbing into position by
extending the belt all the way out
and then adjusting the belt to the
35
Page 42 of 364
desired length to restrain a child seat
or secure a large item in a seat
If you will be carrying children too
small for adult-sized seat belts, the
seat belts or the ISOFIX feature also
can be used to hold infant and child
restraint systems. For more informa-
tion on ISOFIX, see ISOFIX — Child
Seat Anchorage System.
WARNING!
Never place a rear facing infantseat in front of an air bag. A de-
ploying Passenger Advanced
Front Air Bag can cause death or
serious injury to a child 12 years
or younger, including a child in a
rearward facing infant seat.
Only use a rearward-facing child restraint in a vehicle with a rear
seat.
NOTE: The Advanced Front Air
Bags have a multistage inflator de-
sign. This allows the air bag to
have different rates of inflation
based on several factors, including
the severity and type of collision. Please pay close attention to the infor-
mation in this section. It tells you how
to use your restraint system properly,
to keep you and your passengers as
safe as possible.
Buckle up even though you are an
excellent driver, even on short trips.
Someone on the road may be a poor
driver and cause a collision that in-
cludes you. This can happen far away
from home or on your own street.
Research has shown that seat belts
save lives, and they can reduce the
seriousness of injuries in a collision.
Some of the worst injuries happen
when people are thrown from the ve-
hicle. Seat belts reduce the possibility
of ejection and the risk of injury
caused by striking the inside of the
vehicle. Everyone in a motor vehicle
should be belted at all times.
LAP/SHOULDER BELTS
All seating positions in your vehicle
are equipped with combination lap/
shoulder belts.
The belt webbing in the retractor is
designed to lock during very suddenstops or collisions. This feature allows
the shoulder part of the belt to move
freely with you under normal condi-
tions. However, in a collision the belt
will lock and reduce the risk of you
striking the inside of the vehicle or
being thrown out.
The driver is responsible for respect-
ing, and ensuring that all the other
occupants of the car also respect, the
local laws in force in relation to the
use of the seat belts. Always fasten the
seat belts before starting.
WARNING!
It is dangerous to ride in a cargo
area, inside or outside of a ve-
hicle. In a collision, people riding
in these areas are more likely to
be seriously injured or killed.
Do not allow people to ride in any area of your vehicle that is not
equipped with seats and seat
belts.
Be sure everyone in your vehicle is in a seat and using a seat belt
properly.
(Continued)
36
Page 43 of 364

WARNING!(Continued)
Wearing a seat belt incorrectly isdangerous. Seat belts are de-
signed to go around the large
bones of your body. These are the
strongest parts of your body and
can take the forces of a collision
the best.
Wearing your belt in the wrong place could make your injuries in
a collision much worse. You
might suffer internal injuries, or
you could even slide out of part of
the belt. Follow these instructions
to wear your seat belt safely and
to keep your passengers safe, too.
Two people should never be belted into a single seat belt.
People belted together can crash
into one another in a collision,
hurting one another badly. Never
use a lap/shoulder belt or lap belt
for more than one person, no
matter what their size. Lap/Shoulder Belt Operating
Instructions
1. Enter the vehicle and close the
door. Sit back and adjust the seat.
2. The seat belt latch plate is near the
seatback of the front seats and next to
your arm in the rear seats. Grasp the
latch plate and pull out the belt. Slide
the latch plate up the webbing as far
as necessary to allow the belt to go
around your lap.
WARNING!
A belt that is worn under your
arm is dangerous. Your body
could strike the inside surfaces of
(Continued)
WARNING!(Continued)
the vehicle in a collision, increas-
ing head and neck injury. A belt
worn under the arm can cause
internal injuries. Ribs aren't as
strong as shoulder bones. Wear
the belt over your shoulder so that
your strongest bones will take the
force in a collision.
A shoulder belt placed behind you
will not protect you from injury
during a collision. You are more
likely to hit your head in a collision
if you do not wear your shoulder
belt. The lap and shoulder belt are
meant to be used together.
3. When the belt is long enough to fit,
insert the latch plate into the buckle
until you hear a “click”.
Pulling Out Belt And Latch Plate
Inserting Latch Plate Into Buckle
37
Page 44 of 364
WARNING!
A belt that is buckled into thewrong buckle will not protect you
properly. The lap portion could
ride too high on your body, possi-
bly causing internal injuries. Al-
ways buckle your belt into the
buckle nearest you.
A belt that is too loose will not
protect you properly. In a sudden
stop you could move too far for-
ward, increasing the possibility of
injury. Wear your seat belt snugly.
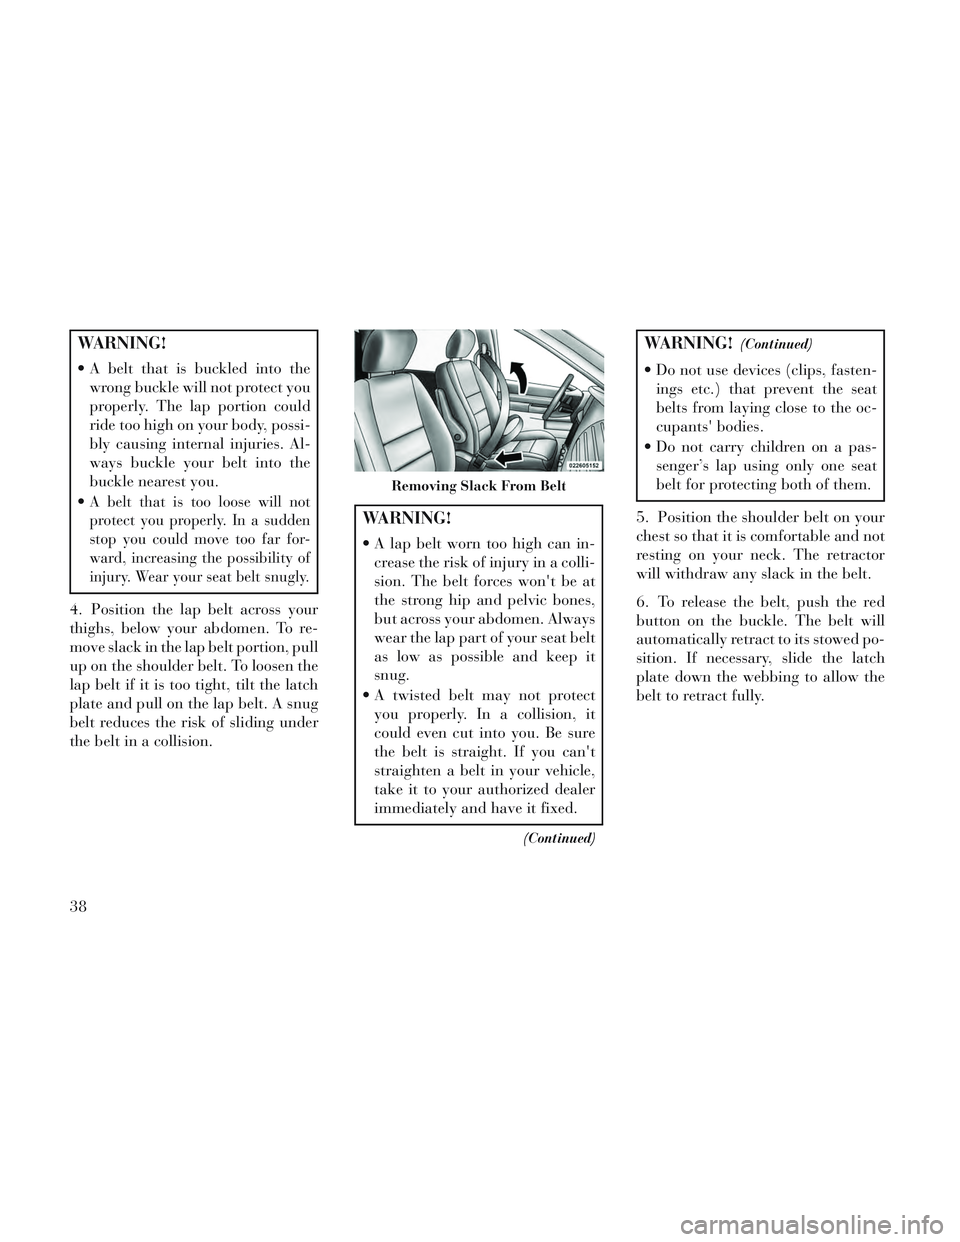
4. Position the lap belt across your
thighs, below your abdomen. To re-
move slack in the lap belt portion, pull
up on the shoulder belt. To loosen the
lap belt if it is too tight, tilt the latch
plate and pull on the lap belt. A snug
belt reduces the risk of sliding under
the belt in a collision.
WARNING!
A lap belt worn too high can in- crease the risk of injury in a colli-
sion. The belt forces won't be at
the strong hip and pelvic bones,
but across your abdomen. Always
wear the lap part of your seat belt
as low as possible and keep it
snug.
A twisted belt may not protect you properly. In a collision, it
could even cut into you. Be sure
the belt is straight. If you can't
straighten a belt in your vehicle,
take it to your authorized dealer
immediately and have it fixed.
(Continued)
WARNING!(Continued)
Do not use devices (clips, fasten-ings etc.) that prevent the seat
belts from laying close to the oc-
cupants' bodies.
Do not carry children on a pas- senger’s lap using only one seat
belt for protecting both of them.
5. Position the shoulder belt on your
chest so that it is comfortable and not
resting on your neck. The retractor
will withdraw any slack in the belt.
6. To release the belt, push the red
button on the buckle. The belt will
automatically retract to its stowed po-
sition. If necessary, slide the latch
plate down the webbing to allow the
belt to retract fully.
Removing Slack From Belt
38
Page 45 of 364
WARNING!
A frayed or torn belt could rip apart
in a collision and leave you with no
protection. Inspect the belt system
periodically, checking for cuts,
frays, or loose parts. Damaged
parts must be replaced immedi-
ately. Do not disassemble or modify
the system. Seat belt assemblies
must be replaced after a collision if
they have been damaged (bent re-
tractor, torn webbing, etc.).
Third Row Center Shoulder Belt
Instructions
The shoulder belt for the third row
center seat is located in the headliner
slightly behind the third row seat.
Pull the strap down and secure the
small latch plate of the lap belt into
the small buckle until you hear a
“click”.
Position the shoulder belt on your
chest so that it is comfortable and not
resting on your neck. When the belt is
long enough to fit , insert the large
latch plate into the buckle until you hear a “click.” The retractor should
withdraw any slack in the belt.
To release the small latch plate, posi-
tion the end of the large latch plate
against the red button on the small
latch plate and push upward. Rein-
stall the latch plates into the head-
liner.
Lap/Shoulder Belt Untwisting
Procedure
Use the following procedure to un-
twist a twisted lap/shoulder belt.
1. Position the latch plate as close as
possible to the anchor point.
2. At about 15 to 30 cm above the
latch plate, grasp and twist the belt
webbing 180 degrees to create a fold
that begins immediately above the
latch plate.
3. Slide the latch plate upward over
the folded webbing. The folded web-
bing must enter the slot at the top of
the latch plate.
4. Continue to slide the latch plate up
until it clears the folded webbing.
Adjustable Upper Shoulder Belt
Anchorage
In the front seats and the second row
outboard seats, the shoulder belt an-
chorage can be adjusted upward or
downward to help position the belt
away from your neck. The upper an-
chorage can be adjusted upward by
pushing anywhere on the anchorage.
To move the anchorage downward,
squeeze the actuation buttons while
simultaneously pushing down on the
anchorage assembly.
As a guide, if you are shorter than
average you will prefer a lower posi-
tion, and if you are taller than average
you will prefer a higher position.
When you release the anchorage, try
to move it up or down to make sure
that it is locked in position.
WARNING!
The seat belts height must only be
adjusted when the vehicle is sta-
tionary.
39
Page 46 of 364
SEAT BELTS IN
PASSENGER SEATING
POSITIONS
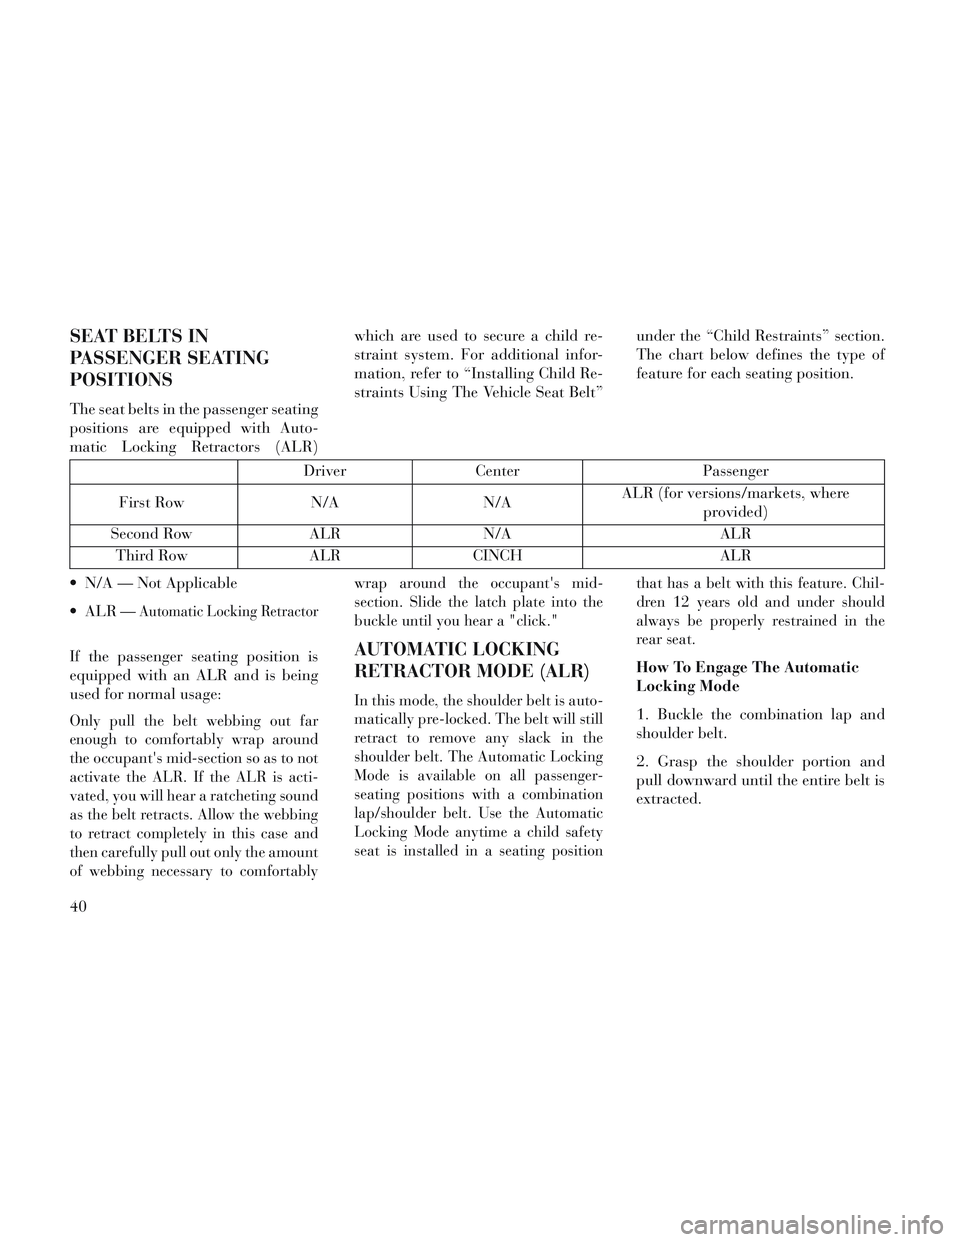
The seat belts in the passenger seating
positions are equipped with Auto-
matic Locking Retractors (ALR)which are used to secure a child re-
straint system. For additional infor-
mation, refer to “Installing Child Re-
straints Using The Vehicle Seat Belt”
under the “Child Restraints” section.
The chart below defines the type of
feature for each seating position.
Driver
Center Passenger
First Row N/AN/AALR (for versions/markets, where
provided)
Second Row ALRN/A ALR
Third Row ALRCINCH ALR
N/A — Not Applicable
ALR —
Automatic Locking Retractor
If the passenger seating position is
equipped with an ALR and is being
used for normal usage:
Only pull the belt webbing out far
enough to comfortably wrap around
the occupant's mid-section so as to not
activate the ALR. If the ALR is acti-
vated, you will hear a ratcheting sound
as the belt retracts. Allow the webbing
to retract completely in this case and
then carefully pull out only the amount
of webbing necessary to comfortably wrap around the occupant's mid-
section. Slide the latch plate into the
buckle until you hear a "click."
AUTOMATIC LOCKING
RETRACTOR MODE (ALR)
In this mode, the shoulder belt is auto-
matically pre-locked. The belt will still
retract to remove any slack in the
shoulder belt. The Automatic Locking
Mode is available on all passenger-
seating positions with a combination
lap/shoulder belt. Use the Automatic
Locking Mode anytime a child safety
seat is installed in a seating position
that has a belt with this feature. Chil-
dren 12 years old and under should
always be properly restrained in the
rear seat.
How To Engage The Automatic
Locking Mode
1. Buckle the combination lap and
shoulder belt.
2. Grasp the shoulder portion and
pull downward until the entire belt is
extracted.
40
Page 47 of 364
3. Allow the belt to retract. As the
belt retracts, you will hear a clicking
sound. This indicates the safety belt is
now in the Automatic Locking Mode.
How To Disengage The Automatic
Locking Mode
Unbuckle the combination lap/
shoulder belt and allow it to retract
completely to disengage the Auto-
matic Locking Mode and activate the
vehicle sensitive (emergency) locking
mode.
WARNING!
The belt and retractor assemblymust be replaced if the seat belt
assembly Automatic Locking Re-
tractor (ALR) feature or any
other seat belt function is not
working properly when checked
according to the procedures in the
Service Manual.
Failure to replace the belt and retractor assembly could increase
the risk of injury in collisions.
ENERGY MANAGEMENT
FEATURE
This vehicle has a safety belt system
with an energy management feature
in the front seating positions to help
further reduce the risk of injury in the
event of a head-on collision. This
safety belt system has a retractor as-
sembly that is designed to release
webbing in a controlled manner. This
feature is designed to help reduce the
belt force acting on the occupant’s
chest.
WARNING!
The belt and retractor assemblymust be replaced if the seat belt
assembly Automatic Locking Re-
tractor (ALR) feature or any
other seat belt function is not
working properly when checked
according to the procedures in the
Service Manual.
Failure to replace the belt and retractor assembly could increase
the risk of injury in collisions.
SEAT BELT
PRETENSIONERS
The seat belts for both front seating
positions are equipped with preten-
sioning devices that are designed to
remove slack from the seat belt in the
event of a collision. These devices may
improve the performance of the seat
belt by assuring that the belt is tight
about the occupant early in a colli-
sion. Pretensioners work for all size
occupants, including those in child
restraints.
NOTE: These devices are not a
substitute for proper seat belt
placement by the occupant. The
seat belt still must be worn snugly
and positioned properly.
The pretensioners are triggered by the
Occupant Restraint Controller
(ORC). Like the air bags, the preten-
sioners are single use items. A de-
ployed pretensioner or a deployed air
bag must be replaced immediately.
41
Page 51 of 364
CAUTION!
To prevent possible damage, do not
slam the rear of the hood to reset it.
Press the rear of the hood down
until an audible and tactile detent is
detected (approximately 5 mm
above the fender). This should se-
cure both hood hinge reset mecha-
nisms.
WARNING!
Ignoring the Air Bag WarningLight in your instrument panel or
the “SERVICE ACTIVE HOOD”
message in the EVIC could mean
you won’t have the Active Hood
to enhance pedestrian protection.
If the light does not come on as a
bulb check when the ignition is
first turned on, stays on after you
start the vehicle, or if it comes on
as you drive, see your authorized
dealer.
(Continued)
WARNING!(Continued)
Modifications to any part of theActive Hood system could cause it
to fail when you need it. Do not
modify the components or wiring.
Do not modify the front bumper,
vehicle body structure, or add an
aftermarket front bumper or
cover.
It is dangerous to try to repair any part of the Active Hood system
yourself. Be sure to tell anyone
who works on your vehicle that it
has an Active Hood system.
Do not attempt to modify any part of your Active Hood system.
The Active Hood may deploy ac-
cidentally or may not function
properly if modifications are
made. Take your vehicle to an
authorized dealer for any hood
service.
(Continued)
WARNING!(Continued)
Drivers must be aware of pedes-trians. Always be sure to check
for pedestrians, animals, other
vehicles, and obstructions. You
are responsible for safety and
must continue to pay attention to
your surroundings. Failure to do
so can result in serious injury or
death.
ENHANCED SEAT BELT
USE REMINDER SYSTEM
(BeltAlert®)
BeltAlert® is a feature intended to
remind the driver and front passenger
(for versions/markets, where pro-
vided with front passenger
BeltAlert®) to fasten their seat belts.
The feature is active whenever the
ignition is on. If the driver or front
seat passenger is unbelted, the Seat
Belt Reminder Light will turn on and
remain on until both front seat belts
are fastened.
The BeltAlert® warning sequence be-
gins after the vehicle speed is over
8 km/h, by blinking the Seat Belt
45