lock Lancia Ypsilon 2002 Owner handbook (in English)
[x] Cancel search | Manufacturer: LANCIA, Model Year: 2002, Model line: Ypsilon, Model: Lancia Ypsilon 2002Pages: 191, PDF Size: 2.45 MB
Page 16 of 191
13
G
THE LANCIA
CODE SYSTEM
To further protect your car from at-
tempted theft, it has been fitted with
an electronic engine immobiliser sys-
tem called “Lancia CODE”, which is
currently considered the most effec-
tive way of protecting your car against
theft.This system is automatically
activated each time the engine is
switched off. Each ignition key, in
fact, contains an electronic device
which modulates a radio-frequency
signal emitted by a special aerial dur-
ing ignition. The modulated signal is
a “password” with which the control
unit recognises the key. Engine igni-
tion is enabled only if the key is recog-
nised by the system.THE KEYS
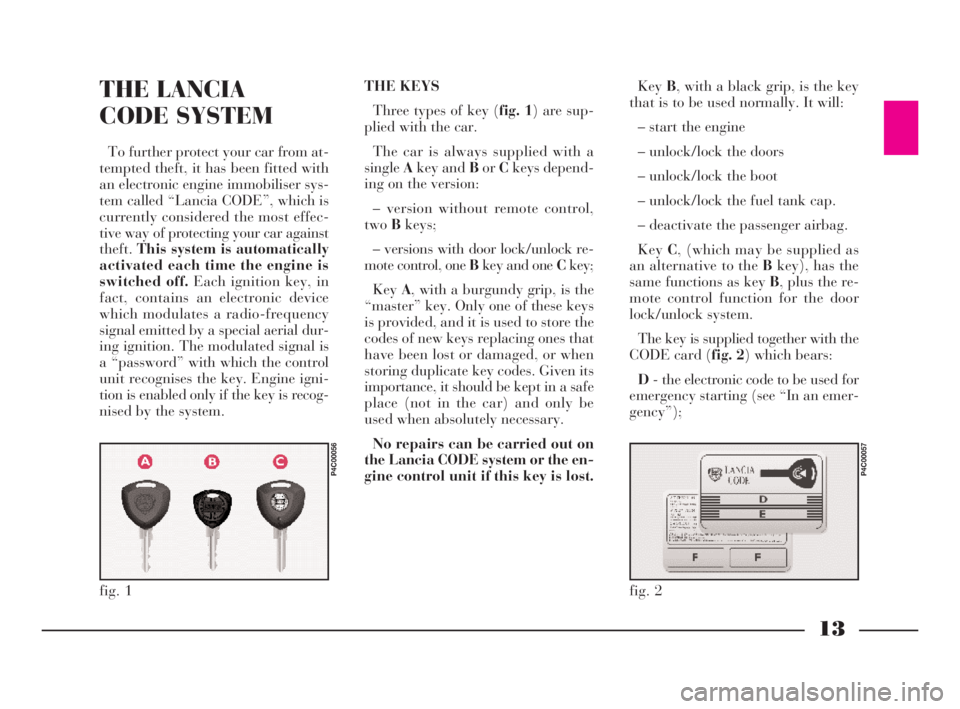
Three types of key (fig. 1) are sup-
plied with the car.
The car is always supplied with a
singleAkey and BorCkeys depend-
ing on the version:
– version without remote control,
twoBkeys;
– versions with door lock/unlock re-
mote control, one Bkey and one Ckey;
KeyA, with a burgundy grip, is the
“master” key. Only one of these keys
is provided, and it is used to store the
codes of new keys replacing ones that
have been lost or damaged, or when
storing duplicate key codes. Given its
importance, it should be kept in a safe
place (not in the car) and only be
used when absolutely necessary.
No repairs can be carried out on
the Lancia CODE system or the en-
gine control unit if this key is lost.KeyB, with a black grip, is the key
that is to be used normally. It will:
– start the engine
– unlock/lock the doors
– unlock/lock the boot
– unlock/lock the fuel tank cap.
– deactivate the passenger airbag.
KeyC, (which may be supplied as
an alternative to the Bkey), has the
same functions as key B, plus the re-
mote control function for the door
lock/unlock system.
The key is supplied together with the
CODE card (fig. 2) which bears:
D- the electronic code to be used for
emergency starting (see “In an emer-
gency”);
fig. 1
P4C00056
fig. 2
P4C00057
4C001-067 ING 11-03-2008 11:57 Pagina 13
Page 18 of 191

15
G
DUPLICATE KEYS
If you ask for extra keys, remember
that all the keys, both the new ones
and those you already possess, must
be stored in the memory (up to a
maximum of 7). Go directly to your
nearestLANCIA Dealership, taking
with you the burgundy “master” key,
all the keys in your possession and the
CODE card. The LANCIA Dealer-
shipmay ask you to demonstrate that
you own the car.
The codes of any keys that are not
available when the new storage pro-
cedure is carried out will be deleted
from the memory to prevent any lost
keys being used to start the car.
The burgundy key, plus
all the other keys, and the
CODE card must be
handed over to the new owner
when selling the car.Ministerial homologation
With respect to the legislation in
force in each country on the use of ra-
dio frequencies:
– the market specific homologation
codes are given in the chapter “Ac-
cessory installation”;
– the homologation code is printed
on the ignition key-remote control for
the markets which require it.DOOR LOCK/UNLOCK
REMOTE CONTROL (fig. 3)
The remote control is built into the
ignition key. It consists of a button C
and a LED D. The button operates
the control and the LED flashes while
the transmitter is sending the code to
the receiver.
This a radio-frequency remote con-
trol and must be used close to the car.
fig. 3
P4C00058
4C001-067 ING 11-03-2008 11:57 Pagina 15
Page 19 of 191
IGNITION SWITCH
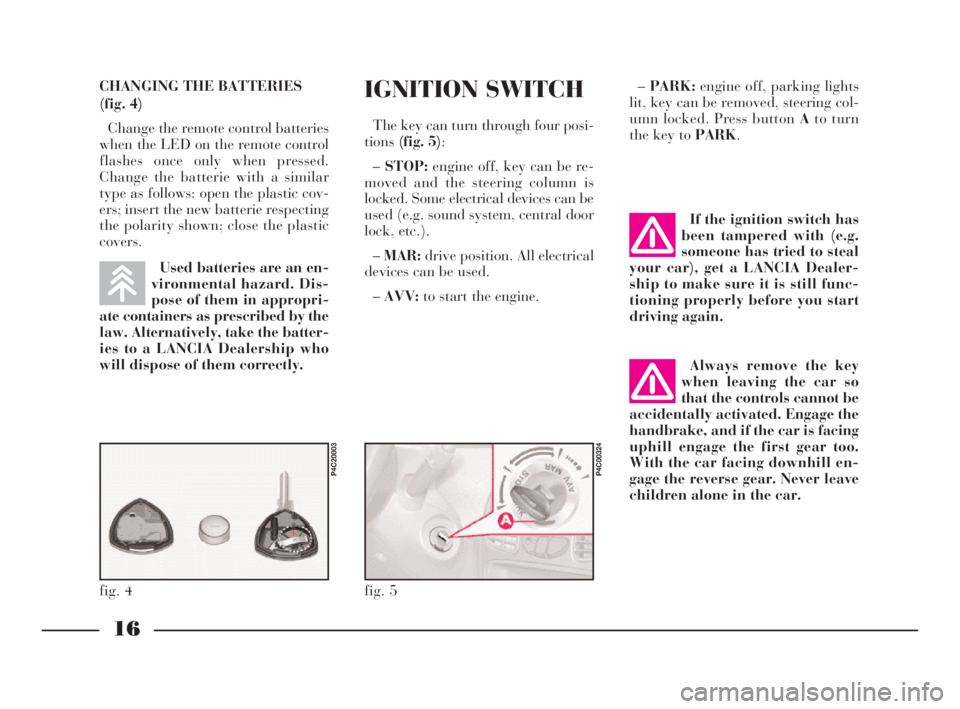
The key can turn through four posi-
tions(fig. 5):
–STOP:engine off, key can be re-
moved and the steering column is
locked. Some electrical devices can be
used (e.g. sound system, central door
lock, etc.).
–MAR:drive position. All electrical
devices can be used.
–AVV:to start the engine.–PARK:engine off, parking lights
lit, key can be removed, steering col-
umn locked. Press button Ato turn
the key to PARK.
fig. 5
P4C00324
If the ignition switch has
been tampered with (e.g.
someone has tried to steal
your car), get a LANCIA Dealer-
ship to make sure it is still func-
tioning properly before you start
driving again.
Always remove the key
when leaving the car so
that the controls cannot be
accidentally activated. Engage the
handbrake, and if the car is facing
uphill engage the first gear too.
With the car facing downhill en-
gage the reverse gear. Never leave
children alone in the car.
16
G
CHANGING THE BATTERIES
(fig. 4)
Change the remote control batteries
when the LED on the remote control
flashes once only when pressed.
Change the batterie with a similar
type as follows: open the plastic cov-
ers; insert the new batterie respecting
the polarity shown; close the plastic
covers.
Used batteries are an en-
vironmental hazard. Dis-
pose of them in appropri-
ate containers as prescribed by the
law. Alternatively, take the batter-
ies to a LANCIA Dealership who
will dispose of them correctly.
fig. 4
P4C20003
4C001-067 ING 11-03-2008 11:57 Pagina 16
Page 20 of 191
17
G
STEERING COLUMN LOCK
To set: remove the ignition key from
theSTOPorPARKposition, and
turn the steering wheel until it locks.
To release: move the steering wheel
slightly as you turn the ignition key to
MAR.
Never remove the ignition
key while the car is mov-
ing. The steering wheel
would automatically lock as soon
as you tried to turn it. This also
applies when the car is being
towed.INDIVIDUAL
SETTINGS
Adjustments must be
made only when the car is
stationary.
FRONT SEATS
Moving the seat backwards
or forwards
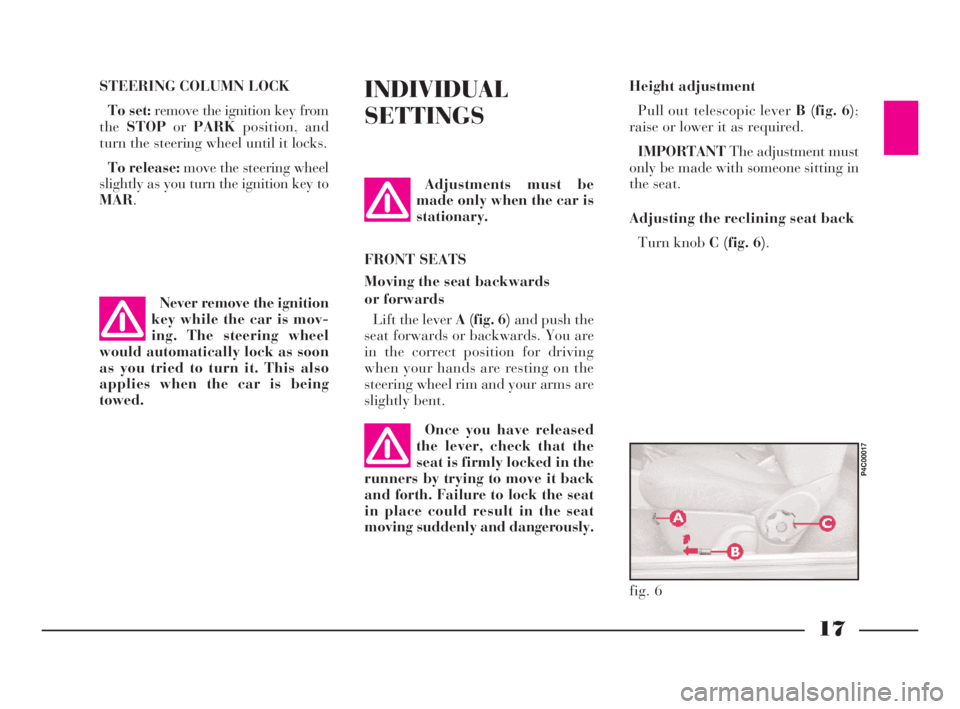
Lift the lever A (fig. 6)and push the
seat forwards or backwards. You are
in the correct position for driving
when your hands are resting on the
steering wheel rim and your arms are
slightly bent.Height adjustment
Pull out telescopic lever B (fig. 6);
raise or lower it as required.
IMPORTANTThe adjustment must
only be made with someone sitting in
the seat.
Adjusting the reclining seat back
Turn knob C (fig. 6).
fig. 6
P4C00017
Once you have released
the lever, check that the
seat is firmly locked in the
runners by trying to move it back
and forth. Failure to lock the seat
in place could result in the seat
moving suddenly and dangerously.
4C001-067 ING 11-03-2008 11:57 Pagina 17
Page 22 of 191
19
G
ACCESS TO THE BACK SEATS
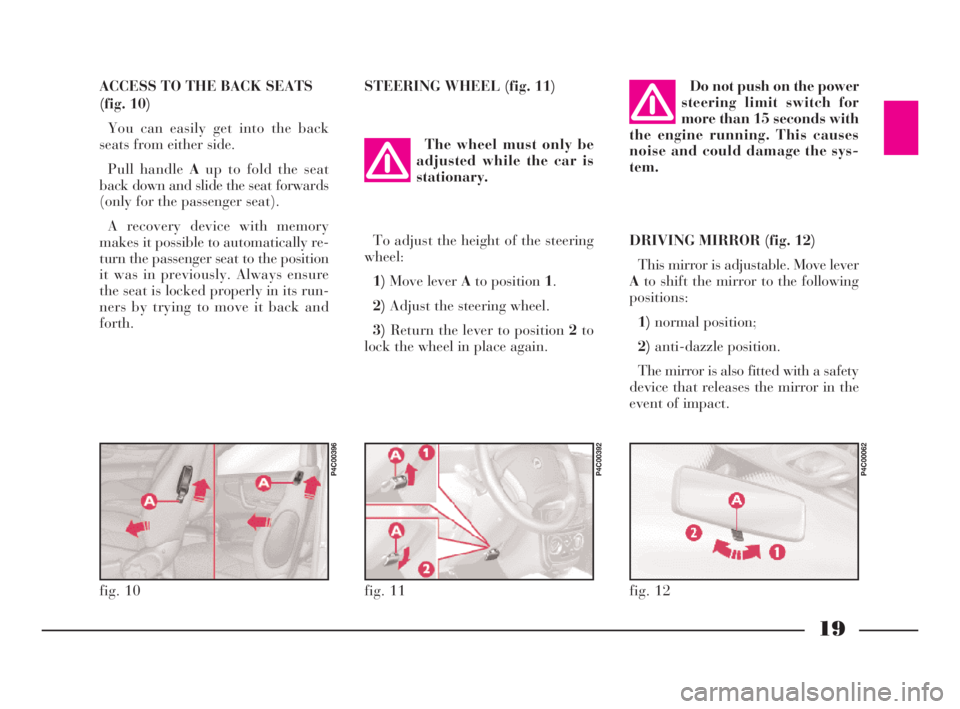
(fig. 10)
You can easily get into the back
seats from either side.
Pull handle Aup to fold the seat
back down and slide the seat forwards
(only for the passenger seat).
A recovery device with memory
makes it possible to automatically re-
turn the passenger seat to the position
it was in previously. Always ensure
the seat is locked properly in its run-
ners by trying to move it back and
forth.STEERING WHEEL (fig. 11)
DRIVING MIRROR (fig. 12)
This mirror is adjustable. Move lever
Ato shift the mirror to the following
positions:
1)normal position;
2)anti-dazzle position.
The mirror is also fitted with a safety
device that releases the mirror in the
event of impact. The wheel must only be
adjusted while the car is
stationary.Do not push on the power
steering limit switch for
more than 15 seconds with
the engine running. This causes
noise and could damage the sys-
tem.
fig. 11
P4C00392
fig. 12
P4C00062
To adjust the height of the steering
wheel:
1)Move lever Ato position 1.
2)Adjust the steering wheel.
3)Return the lever to position 2to
lock the wheel in place again.
fig. 10
P4C00396
4C001-067 ING 11-03-2008 11:57 Pagina 19
Page 24 of 191
21
G
SEAT BELTS
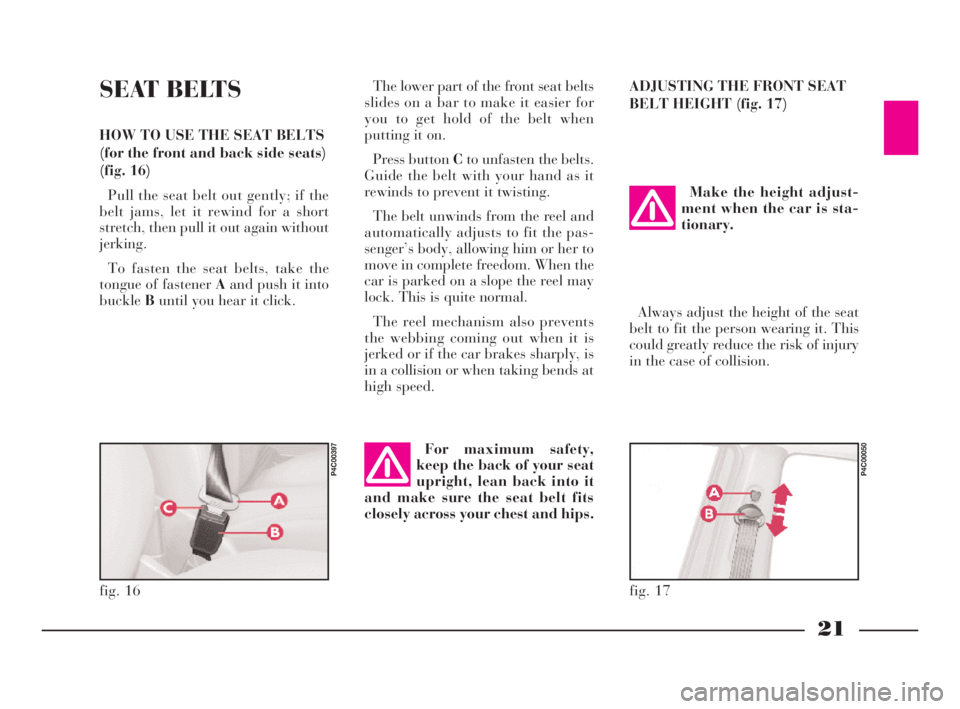
HOW TO USE THE SEAT BELTS
(for the front and back side seats)
(fig. 16)
Pull the seat belt out gently; if the
belt jams, let it rewind for a short
stretch, then pull it out again without
jerking.
To fasten the seat belts, take the
tongue of fastener Aand push it into
buckleBuntil you hear it click.The lower part of the front seat belts
slides on a bar to make it easier for
you to get hold of the belt when
putting it on.
Press button Cto unfasten the belts.
Guide the belt with your hand as it
rewinds to prevent it twisting.
The belt unwinds from the reel and
automatically adjusts to fit the pas-
senger’s body, allowing him or her to
move in complete freedom. When the
car is parked on a slope the reel may
lock. This is quite normal.
The reel mechanism also prevents
the webbing coming out when it is
jerked or if the car brakes sharply, is
in a collision or when taking bends at
high speed.ADJUSTING THE FRONT SEAT
BELT HEIGHT (fig. 17)
For maximum safety,
keep the back of your seat
upright, lean back into it
and make sure the seat belt fits
closely across your chest and hips.
fig. 17
P4C00050
Make the height adjust-
ment when the car is sta-
tionary.
Always adjust the height of the seat
belt to fit the person wearing it. This
could greatly reduce the risk of injury
in the case of collision.
fig. 16
P4C00397
4C001-067 ING 11-03-2008 11:57 Pagina 21
Page 25 of 191
22
G
For maximum pretensioner protec-
tion, make sure your seat belt fits
snugly to your chest and hips.
Never dismantle or tam-
per with pretensioner
components. Any interven-
tion must be performed by skilled
and qualified personnel. Always
have interventions performed at a
LANCIA Dealership.PRETENSIONERS
The Lancia Y is fitted with preten-
sioners to enable the seat belts to of-
fer even more effective protection.
These devices “feel” that a violent col-
lision is in progress, via a sensor, and
call in a few inches of webbing. The
pretensioner, therefore, ensures the
belt is adhering perfectly to the body
before it begins to stop the wearer
moving forward.
When the seat belt locks, it indicates
the pretensioner has been activated.
The belt will not wind back even if
accompanied manually.
A small amount of smoke may be
noticed: this is not harmful and does
not indicate the beginning of a fire.
The pretensioner needs no mainte-
nance or lubrication. Any modifica-
tion to its original features will nullify
the pretensioner’s effectiveness. If wa-
ter or mud accidentally get into the
pretensioner as a result of floods or
storms, the device must be replaced. The belt is adjusted properly when
the webbing passes approximately
halfway between the edge of the
shoulder and the neck.
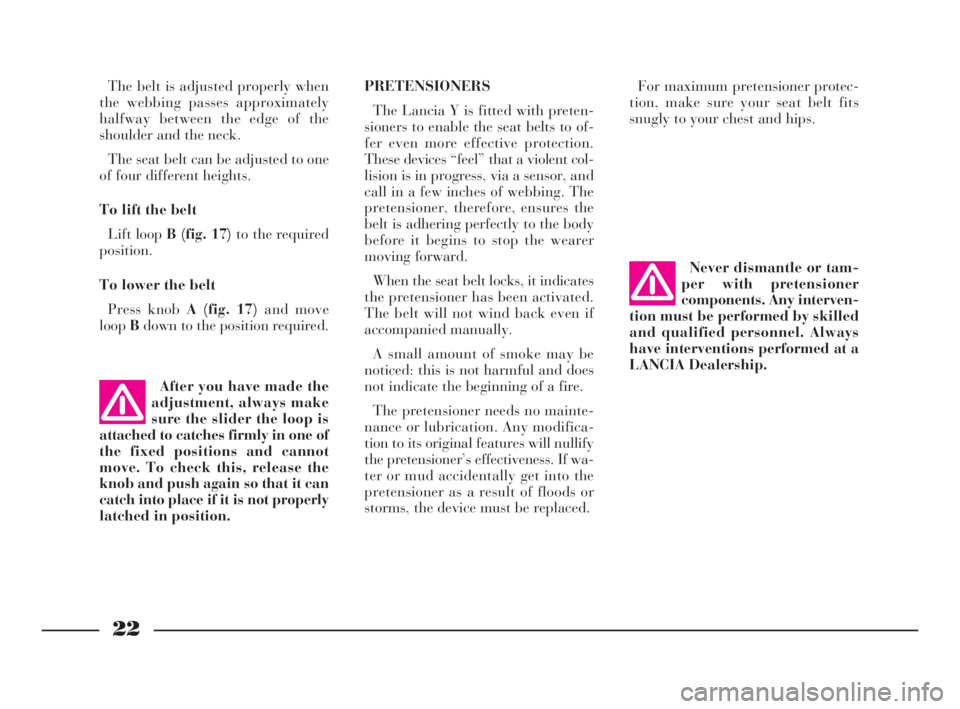
The seat belt can be adjusted to one
of four different heights.
To lift the belt
Lift loop B (fig. 17)to the required
position.
To lower the belt
Press knob A (fig. 17)and move
loopBdown to the position required.
After you have made the
adjustment, always make
sure the slider the loop is
attached to catches firmly in one of
the fixed positions and cannot
move. To check this, release the
knob and push again so that it can
catch into place if it is not properly
latched in position.
4C001-067 ING 11-03-2008 11:57 Pagina 22
Page 32 of 191
29
G
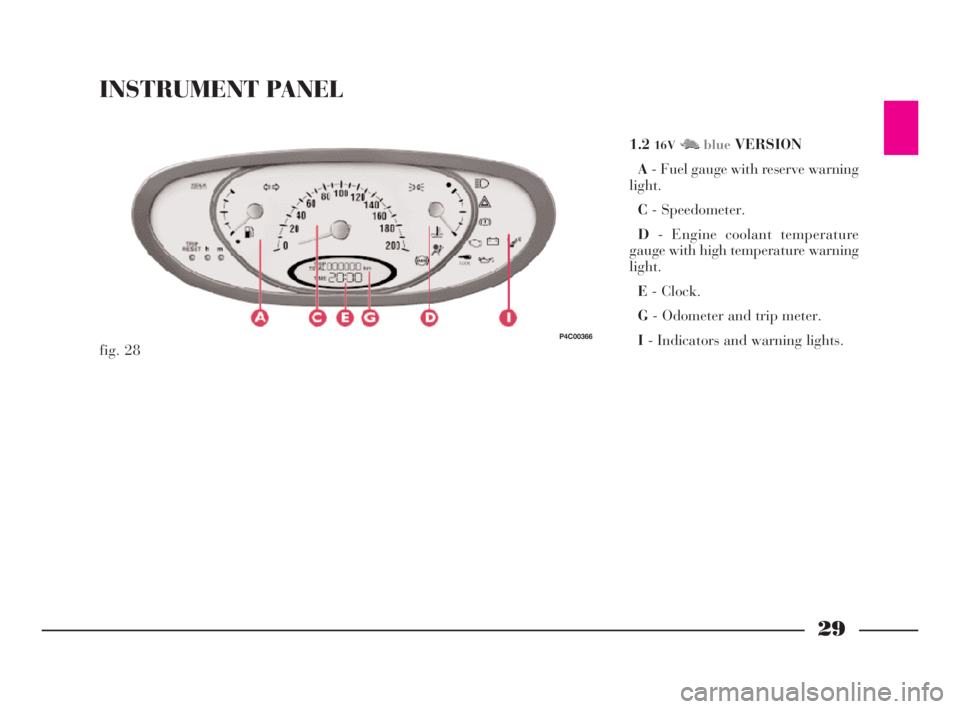
INSTRUMENT PANEL
1.216VM NblueVERSION
A- Fuel gauge with reserve warning
light.
C- Speedometer.
D- Engine coolant temperature
gauge with high temperature warning
light.
E- Clock.
G- Odometer and trip meter.
I- Indicators and warning lights.
fig. 28
P4C00366
4C001-067 ING 11-03-2008 11:57 Pagina 29
Page 33 of 191

30
G
LS-LX VERSIONS
A- Fuel gauge with reserve warning
light.
B- Rev counter.
C- Speedometer.
D- Engine coolant temperature gauge
with high temperature warning light.
E- Clock.
F- Outside temperature gauge.
G- Odometer.
H- Trip meter.
I- Indicators and warning lights.
fig. 29
P4C00367
1.216VM NredVERSION
A- Fuel gauge with reserve warning
light.
B- Rev counter.
C- Speedometer.
D- Engine coolant temperature gauge
with high temperature warning light.
E- Clock.
F- Outside temperature gauge.
G- Odometer.
H- Trip meter.
I- Indicators and warning lights.
fig. 30
P4C00368
4C001-067 ING 11-03-2008 11:57 Pagina 30
Page 35 of 191
32
G
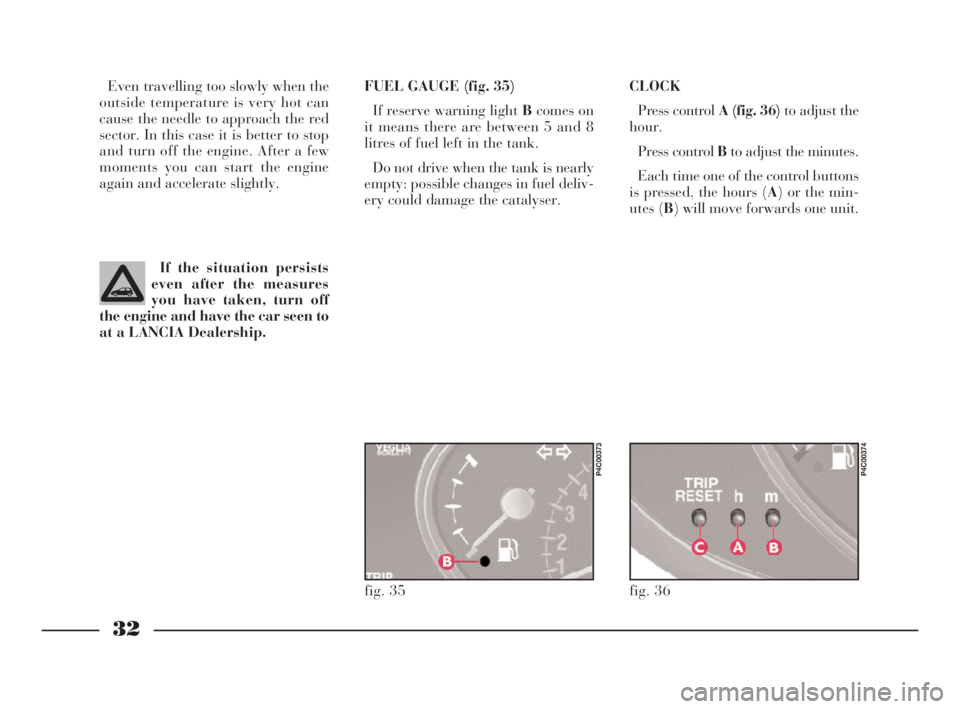
CLOCK
Press control A (fig. 36)to adjust the
hour.
Press control Bto adjust the minutes.
Each time one of the control buttons
is pressed, the hours (A) or the min-
utes (B) will move forwards one unit. Even travelling too slowly when the
outside temperature is very hot can
cause the needle to approach the red
sector. In this case it is better to stop
and turn off the engine. After a few
moments you can start the engine
again and accelerate slightly.FUEL GAUGE (fig. 35)
If reserve warning light Bcomes on
it means there are between 5 and 8
litres of fuel left in the tank.
Do not drive when the tank is nearly
empty: possible changes in fuel deliv-
ery could damage the catalyser.
If the situation persists
even after the measures
you have taken, turn off
the engine and have the car seen to
at a LANCIA Dealership.
fig. 36
P4C00374
fig. 35
P4C00373
4C001-067 ING 11-03-2008 11:57 Pagina 32