bonnet Lancia Ypsilon 2002 Owner handbook (in English)
[x] Cancel search | Manufacturer: LANCIA, Model Year: 2002, Model line: Ypsilon, Model: Lancia Ypsilon 2002Pages: 191, PDF Size: 2.45 MB
Page 13 of 191
You are recommended to read this chapter sit-
ting comfortably in your new Lancia Y. In this
way you will be able to identify the parts de-
scribed immediate and see for yourself what you
have just read.
In short, you will increase your knowledge of your
Lancia Y with its controls and other devices. Later,
when you start the engine and join the traffic you
will make a host of other pleasant discoveries.
DASHBOARD................................................. 11
THE LANCIA CODE SYSTEM....................... 13
IGNITION SWITCH ........................................ 16
INDIVIDUAL SETTINGS ............................... 17
SEAT BELTS .................................................. 21
TRANSPORTING CHILDREN SAFELY .......... 26
INSTRUMENT PANEL ................................... 29
INSTRUMENTS............................................. 31
WARNING LIGHTS ........................................ 34HEATING AND VENTILATION ..................... 37
CLIMATE CONTROL SYSTEM....................... 40
STEERING COLUMN STALKS ...................... 41
CONTROLS.................................................... 43
INTERIOR EQUIPMENT ................................ 45
SUNROOF...................................................... 48
DOORS........................................................... 49
BOOT ............................................................. 51
BONNET........................................................ 53
SKI AND ROOF RACKS................................. 55
HEADLIGHTS............................................... 55
ABS ................................................................ 56
FRONT AND SIDE AIRBAGS.......................... 58
EOBD SYSTEM............................................... 63
SOUND SYSTEM ........................................... 64
RADIO-NAVIGATION SYSTEM..................... 65
CELLULAR PHONE SETUP........................... 66
FUEL TANK CAP ............................................ 67
10
G
GETTING TO KNOW YOUR CAR
4C001-067 ING 11-03-2008 11:57 Pagina 10
Page 14 of 191
11
G
DASHBOARD
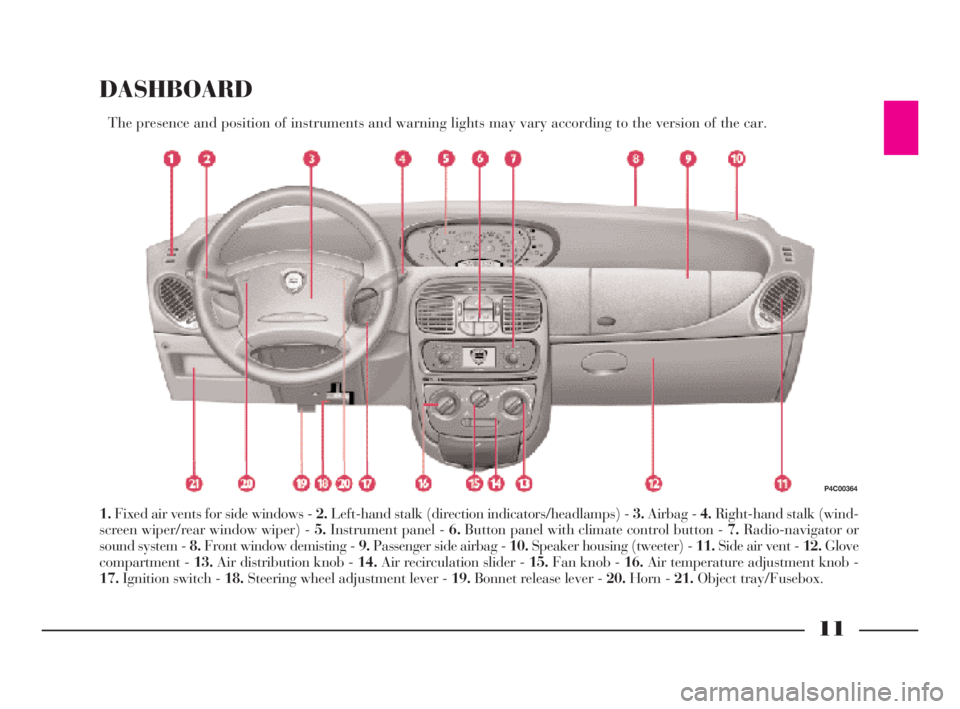
The presence and position of instruments and warning lights may vary according to the version of the car.
1.Fixed air vents for side windows - 2.Left-hand stalk (direction indicators/headlamps) - 3.Airbag - 4.Right-hand stalk (wind-
screen wiper/rear window wiper) - 5.Instrument panel - 6.Button panel with climate control button - 7.Radio-navigator or
sound system - 8.Front window demisting - 9.Passenger side airbag - 10.Speaker housing (tweeter) - 11.Side air vent - 12.Glove
compartment - 13.Air distribution knob - 14.Air recirculation slider - 15.Fan knob - 16.Air temperature adjustment knob -
17.Ignition switch - 18.Steering wheel adjustment lever - 19.Bonnet release lever - 20.Horn - 21.Object tray/Fusebox.
P4C00364
4C001-067 ING 11-03-2008 11:57 Pagina 11
Page 15 of 191
12
G
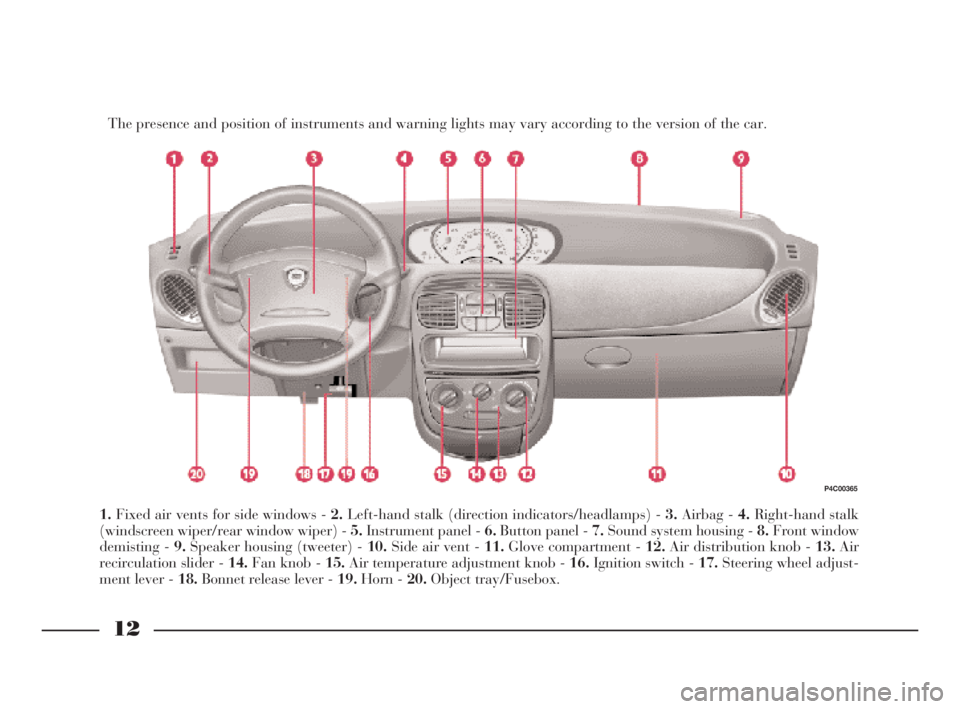
The presence and position of instruments and warning lights may vary according to the version of the car.
1.Fixed air vents for side windows - 2.Left-hand stalk (direction indicators/headlamps) - 3.Airbag - 4.Right-hand stalk
(windscreen wiper/rear window wiper) - 5.Instrument panel - 6.Button panel - 7.Sound system housing - 8.Front window
demisting - 9.Speaker housing (tweeter) - 10.Side air vent - 11.Glove compartment - 12.Air distribution knob - 13.Air
recirculation slider - 14.Fan knob - 15.Air temperature adjustment knob - 16.Ignition switch - 17.Steering wheel adjust-
ment lever - 18.Bonnet release lever - 19.Horn - 20.Object tray/Fusebox.
P4C00365
4C001-067 ING 11-03-2008 11:57 Pagina 12
Page 56 of 191
53
G
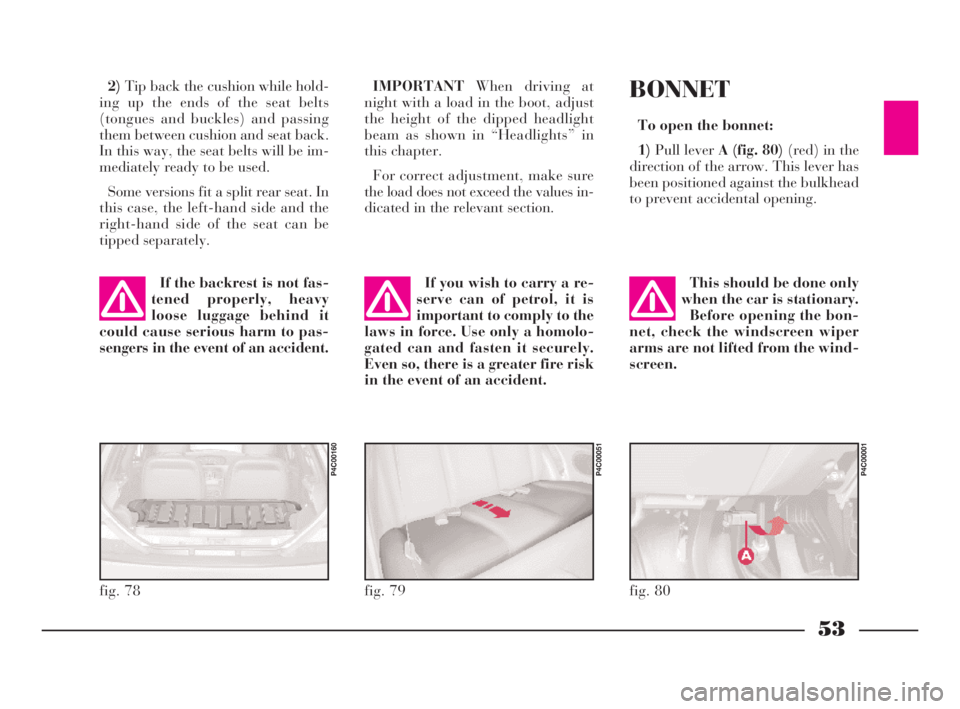
2)Tip back the cushion while hold-
ing up the ends of the seat belts
(tongues and buckles) and passing
them between cushion and seat back.
In this way, the seat belts will be im-
mediately ready to be used.
Some versions fit a split rear seat. In
this case, the left-hand side and the
right-hand side of the seat can be
tipped separately.IMPORTANTWhen driving at
night with a load in the boot, adjust
the height of the dipped headlight
beam as shown in “Headlights” in
this chapter.
For correct adjustment, make sure
the load does not exceed the values in-
dicated in the relevant section.
fig. 78
P4C00160
fig. 79
P4C00051
If the backrest is not fas-
tened properly, heavy
loose luggage behind it
could cause serious harm to pas-
sengers in the event of an accident.If you wish to carry a re-
serve can of petrol, it is
important to comply to the
laws in force. Use only a homolo-
gated can and fasten it securely.
Even so, there is a greater fire risk
in the event of an accident.
BONNET
To open the bonnet:
1)Pull lever A (fig. 80)(red) in the
direction of the arrow. This lever has
been positioned against the bulkhead
to prevent accidental opening.
fig. 80
P4C00001
This should be done only
when the car is stationary.
Before opening the bon-
net, check the windscreen wiper
arms are not lifted from the wind-
screen.
4C001-067 ING 11-03-2008 11:57 Pagina 53
Page 57 of 191

54
G
To close the bonnet:
1)Hold the bonnet up with one
hand and, with the other, remove rod
A (fig. 82)from recess Cand replace
it in its clip B.
2)Lower the bonnet until it is about
20 cm (8 ins) above the engine com-
partment.
3)Let it fall: the bonnet closes auto-
matically.
Always make sure the
bonnet is closed properly
so it will not open while
travelling.
2)Lift lever B (fig. 81).
3)Lift the bonnet, and release the
support rod A (fig. 82)from its clip B.
4)Place the tip of the support rod in
recessCof the bonnet.
fig. 81
P4C00005
Important. The bonnet
might fall violently if the
support rod is not posi-
tioned properly.
Scarves, ties and loose
garmets can get caught in
moving parts. This can be
extremely dangerous.
fig. 82
P4C00006
If repairs need to be car-
ried out inside the engine
compartment when this is
still hot, be careful not to burn
yourself and keep away from the
electric fan as this may cut in at
any time, even if the key is re-
moved from the ignition switch.
Wait until the engine has cooled.
4C001-067 ING 11-03-2008 11:57 Pagina 54
Page 136 of 191
133
G
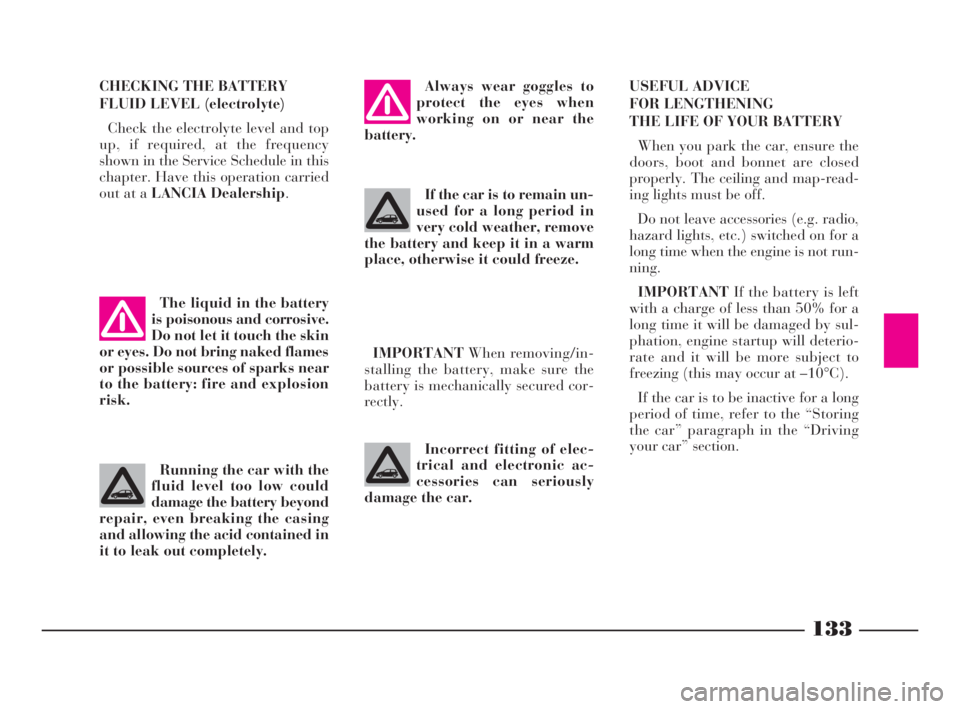
USEFUL ADVICE
FOR LENGTHENING
THE LIFE OF YOUR BATTERY
When you park the car, ensure the
doors, boot and bonnet are closed
properly. The ceiling and map-read-
ing lights must be off.
Do not leave accessories (e.g. radio,
hazard lights, etc.) switched on for a
long time when the engine is not run-
ning.
IMPORTANTIf the battery is left
with a charge of less than 50% for a
long time it will be damaged by sul-
phation, engine startup will deterio-
rate and it will be more subject to
freezing (this may occur at –10°C).
If the car is to be inactive for a long
period of time, refer to the “Storing
the car” paragraph in the “Driving
your car” section.
The liquid in the battery
is poisonous and corrosive.
Do not let it touch the skin
or eyes. Do not bring naked flames
or possible sources of sparks near
to the battery: fire and explosion
risk.
Incorrect fitting of elec-
trical and electronic ac-
cessories can seriously
damage the car.
IMPORTANTWhen removing/in-
stalling the battery, make sure the
battery is mechanically secured cor-
rectly.
Running the car with the
fluid level too low could
damage the battery beyond
repair, even breaking the casing
and allowing the acid contained in
it to leak out completely.
Always wear goggles to
protect the eyes when
working on or near the
battery.
If the car is to remain un-
used for a long period in
very cold weather, remove
the battery and keep it in a warm
place, otherwise it could freeze.
CHECKING THE BATTERY
FLUID LEVEL (electrolyte)
Check the electrolyte level and top
up, if required, at the frequency
shown in the Service Schedule in this
chapter. Have this operation carried
out at a LANCIA Dealership.
4C120-143 ING 11-03-2008 12:01 Pagina 133
Page 144 of 191

141
G
IMPORTANTCars with optional
“Kaleidos” options (non-standard
personalised paint colours), can be re-
paired in exactly the same way as
other cars painted with standard
colours at your LANCIA Dealership.To wash the car properly:
1)Remove the aerial from the roof
to prevent damaging it when washing
the car in an automatic carwash.
2)Wet the body using a low pressure
jet of water.
3)Wipe a sponge with a slightly
soapy solution over the bodywork,
frequently rinsing the sponge.
4)Rinse well with water and dry
with a jet of air or a chamois leather.
When drying the car, be careful to
get at those parts which are not so
easily seen e.g. the door frames, bon-
net and around the headlights where
water can most readily collect. You
are advised not to take the car into a
closed area immediately, but to leave
it out in the open so any water left can
evaporate more easily.
Do not wash the car after it has been
parked in the sun or while the bonnet
is hot: it could take the shine off the
paint.
External plastic parts must be
cleaned following the usual car wash-
ing procedure. As far as possible avoid parking your
car under trees; the resinous sub-
stances which often drop from certain
types of trees could dull the paint and
increase the possibility of rusting.
IMPORTANTBird droppings must
be washed off immediately and with
great care as their acid is particularly
aggressive.
Detergents pollute water.
For this reason, the car
must be washed in an area
equipped for the collection and
purification of the liquids used
while washing.
IMPORTANTWashing is to be car-
ried out with the engine cold and the
ignition key on STOP. After washing
make sure that the various protections
(rubber sheaths and other guards)
have not moved from their positions
or been damaged.
4C120-143 ING 11-03-2008 12:01 Pagina 141
Page 180 of 191
177
fdG
INDEX
ABS ...................................... 56
Accessories purchased
by the user ........................... 88
Accessory installation........... 168
Accident .................................. 117
Air cleaner............................... 131
Air recirculation ...................... 39
Air vents.................................. 38
Airbags (front and side) .......... 58
– passenger airbag manual
deactivation ....................... 59
– warnings............................ 61
Alternator ............................... 155
Ashtray .................................. 46
Battery
– jump starting .................... 92
– fluid level ......................... 133
– recharging ........................ 113
– replacement ....................... 132
– specifications ..................... 155
Bodywork
– maintenance ..................... 140
– paint identification plate.... 146
– versions ............................. 146
Bonnet..................................... 53
Boot
– extending........................... 52– opening/closing ................. 51
– replacing a bulb................. 107
Boot light ................................ 107
Brake fluid .............................. 130
Brake lights ............................. 105
Brakes
– fluid level ......................... 130
– service and emergency ....... 151
Bulb replacement ................ 74-99
Capacities ...................... 73-160
Car maintenance................... 120
– additional checks .............. 124
– annual inspection schedule . 124
– bodywork maintenance ..... 140
– scheduled service ............... 121
– service schedule ................. 122
Catalytic converter (three-way) . 4
Ceiling light ........................ 45-46
– bulb replacement .............. 106
Cellular telephone setup system 66
Cellular telephones .............. 66-88
Centralised door locking system 49
Cheap running ....................... 83
Checking fluid levels .............. 127
Cigar lighter ........................... 46
Clock ...................................... 32
Clutch ..................................... 150
CO
2emissions in exhaust ......... 167
Containing running costs and
pollution............................... 81Control buttons ....................... 44
Dashboard ............................ 11
Demisting
– electrical mirrors ........... 20-39
– rear window ...................... 39
– windscreen and side
windows ............................ 39
Differential ............................. 151
Dimensions ............................. 158
Dipped beam headlights
– bulb replacement .............. 102
– control .............................. 41
Direction indicators
– control .............................. 42
– front bulb replacement ..... 103
– rear bulb replacement ....... 104
– side bulb replacement ........ 103
Doors ...................................... 49
Driving your car.................... 68
EBD electronic brake force
distributor ........................ 35-58
Electric window winders.......... 50
Electronic control unit ............. 134
Engine
– cooling .............................. 149
– identification code ............. 146
4C177-184 Indice ING 13-03-2008 13:31 Pagina 177