seats Lancia Ypsilon 2003 Owner handbook (in English)
[x] Cancel search | Manufacturer: LANCIA, Model Year: 2003, Model line: Ypsilon, Model: Lancia Ypsilon 2003Pages: 191, PDF Size: 2.45 MB
Page 10 of 191
G
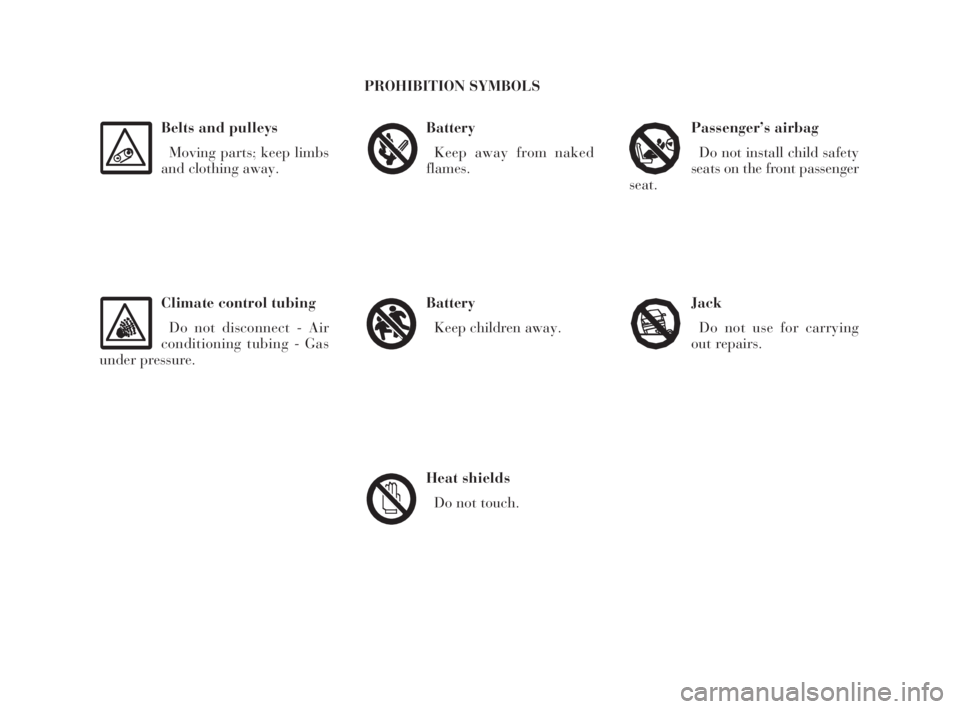
Belts and pulleys
Moving parts; keep limbs
and clothing away.
Climate control tubing
Do not disconnect - Air
conditioning tubing - Gas
under pressure.
Battery
Keep away from naked
flames.
Battery
Keep children away.
Heat shields
Do not touch.
Passenger’s airbag
Do not install child safety
seats on the front passenger
seat.
Jack
Do not use for carrying
out repairs.
PROHIBITION SYMBOLS
4C001-067 ING 11-03-2008 11:57 Pagina 7
Page 20 of 191
17
G
STEERING COLUMN LOCK
To set: remove the ignition key from
theSTOPorPARKposition, and
turn the steering wheel until it locks.
To release: move the steering wheel
slightly as you turn the ignition key to
MAR.
Never remove the ignition
key while the car is mov-
ing. The steering wheel
would automatically lock as soon
as you tried to turn it. This also
applies when the car is being
towed.INDIVIDUAL
SETTINGS
Adjustments must be
made only when the car is
stationary.
FRONT SEATS
Moving the seat backwards
or forwards
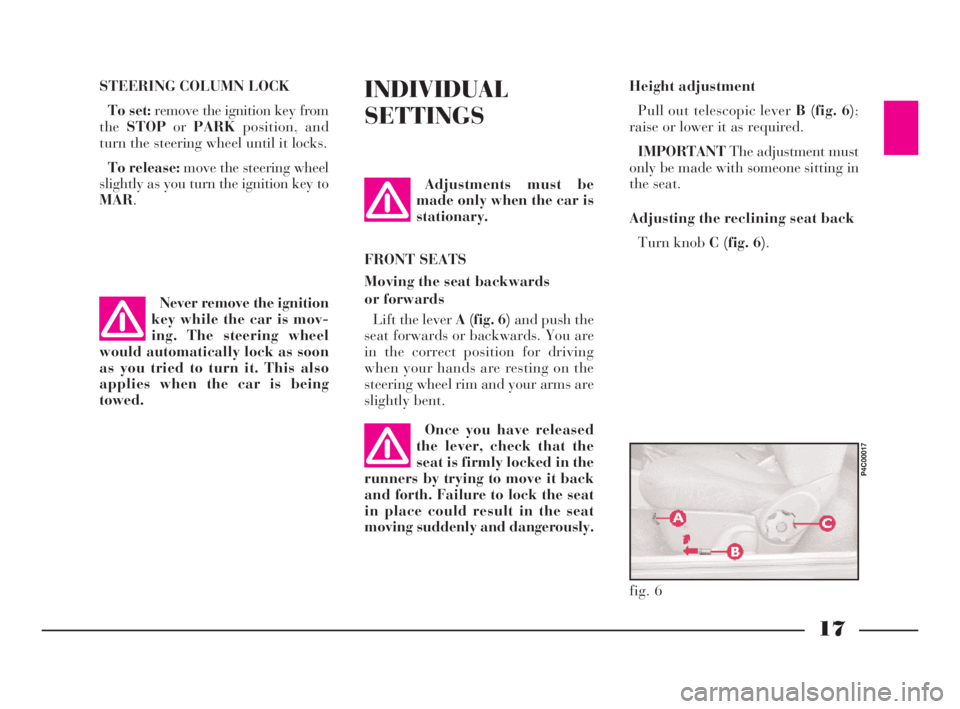
Lift the lever A (fig. 6)and push the
seat forwards or backwards. You are
in the correct position for driving
when your hands are resting on the
steering wheel rim and your arms are
slightly bent.Height adjustment
Pull out telescopic lever B (fig. 6);
raise or lower it as required.
IMPORTANTThe adjustment must
only be made with someone sitting in
the seat.
Adjusting the reclining seat back
Turn knob C (fig. 6).
fig. 6
P4C00017
Once you have released
the lever, check that the
seat is firmly locked in the
runners by trying to move it back
and forth. Failure to lock the seat
in place could result in the seat
moving suddenly and dangerously.
4C001-067 ING 11-03-2008 11:57 Pagina 17
Page 22 of 191
19
G
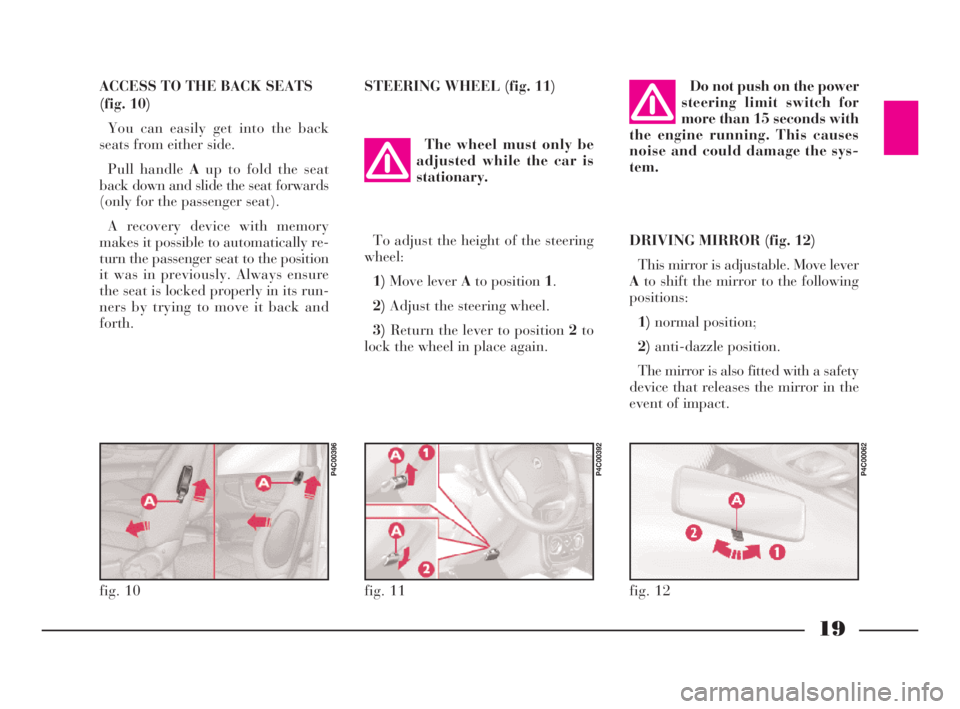
ACCESS TO THE BACK SEATS
(fig. 10)
You can easily get into the back
seats from either side.
Pull handle Aup to fold the seat
back down and slide the seat forwards
(only for the passenger seat).
A recovery device with memory
makes it possible to automatically re-
turn the passenger seat to the position
it was in previously. Always ensure
the seat is locked properly in its run-
ners by trying to move it back and
forth.STEERING WHEEL (fig. 11)
DRIVING MIRROR (fig. 12)
This mirror is adjustable. Move lever
Ato shift the mirror to the following
positions:
1)normal position;
2)anti-dazzle position.
The mirror is also fitted with a safety
device that releases the mirror in the
event of impact. The wheel must only be
adjusted while the car is
stationary.Do not push on the power
steering limit switch for
more than 15 seconds with
the engine running. This causes
noise and could damage the sys-
tem.
fig. 11
P4C00392
fig. 12
P4C00062
To adjust the height of the steering
wheel:
1)Move lever Ato position 1.
2)Adjust the steering wheel.
3)Return the lever to position 2to
lock the wheel in place again.
fig. 10
P4C00396
4C001-067 ING 11-03-2008 11:57 Pagina 19
Page 24 of 191
21
G
SEAT BELTS
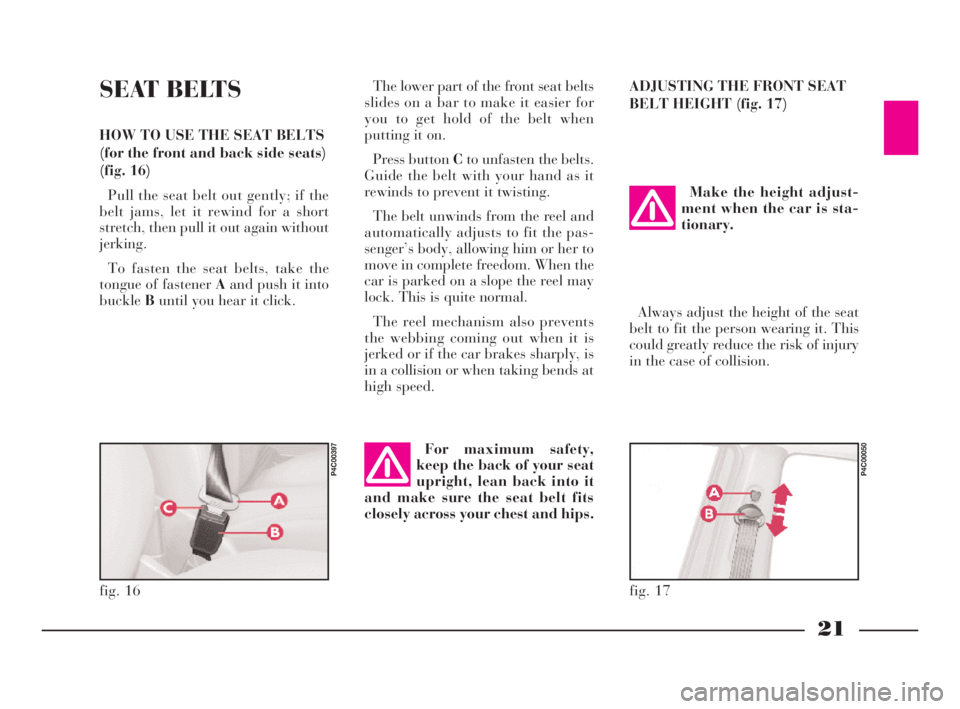
HOW TO USE THE SEAT BELTS
(for the front and back side seats)
(fig. 16)
Pull the seat belt out gently; if the
belt jams, let it rewind for a short
stretch, then pull it out again without
jerking.
To fasten the seat belts, take the
tongue of fastener Aand push it into
buckleBuntil you hear it click.The lower part of the front seat belts
slides on a bar to make it easier for
you to get hold of the belt when
putting it on.
Press button Cto unfasten the belts.
Guide the belt with your hand as it
rewinds to prevent it twisting.
The belt unwinds from the reel and
automatically adjusts to fit the pas-
senger’s body, allowing him or her to
move in complete freedom. When the
car is parked on a slope the reel may
lock. This is quite normal.
The reel mechanism also prevents
the webbing coming out when it is
jerked or if the car brakes sharply, is
in a collision or when taking bends at
high speed.ADJUSTING THE FRONT SEAT
BELT HEIGHT (fig. 17)
For maximum safety,
keep the back of your seat
upright, lean back into it
and make sure the seat belt fits
closely across your chest and hips.
fig. 17
P4C00050
Make the height adjust-
ment when the car is sta-
tionary.
Always adjust the height of the seat
belt to fit the person wearing it. This
could greatly reduce the risk of injury
in the case of collision.
fig. 16
P4C00397
4C001-067 ING 11-03-2008 11:57 Pagina 21
Page 26 of 191
23
G
Work involving knocks,
vibrations or localised
heating (maximum 6 hours
at over 100° C) near the preten-
sioner unit can cause damage or
even trigger the device. Vibrations
caused by uneven roads or acci-
dentally driving over small bumps
(e.g. curbs), etc., do not fall into
this category. See a LANCIA Deal-
ership if work is required on the
device.The pretensioners can
only be used once. After
they have been activated,
have them replaced at a LANCIA
Dealership.
The device was made to last 10
years from the manufacturing date
shown in the specific adhesive la-
bel. The pretensioners must be
changed before expiry.
Remember, in the case of
a violent collision, back
seat passengers not wear-
ing seat belts also represent a se-
rious danger to the passengers in
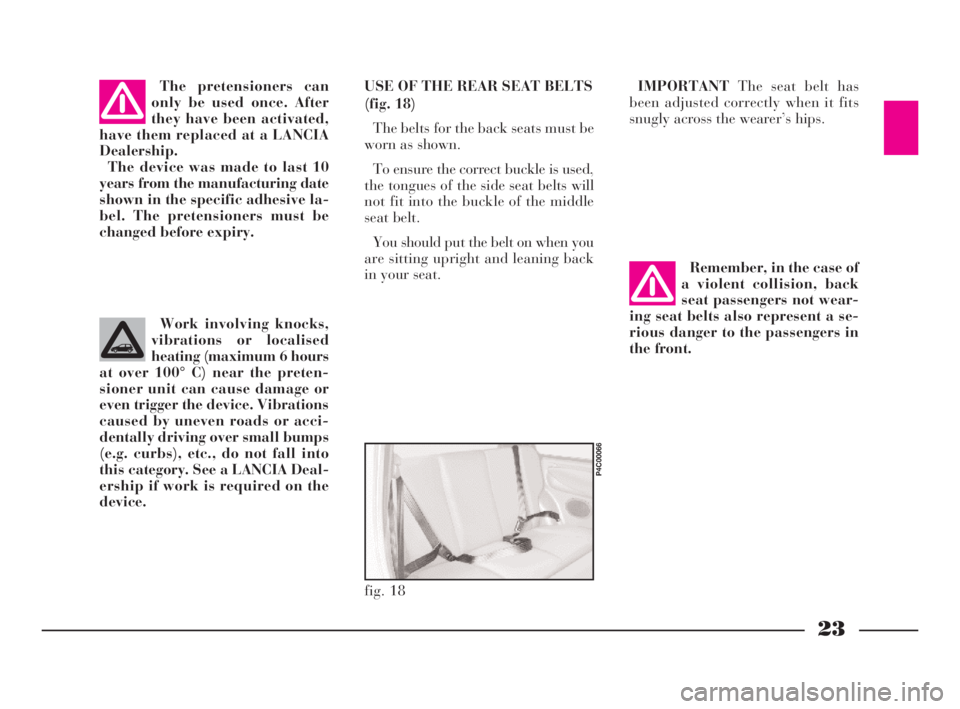
the front. USE OF THE REAR SEAT BELTS
(fig. 18)
The belts for the back seats must be
worn as shown.
To ensure the correct buckle is used,
the tongues of the side seat belts will
not fit into the buckle of the middle
seat belt.
You should put the belt on when you
are sitting upright and leaning back
in your seat.IMPORTANTThe seat belt has
been adjusted correctly when it fits
snugly across the wearer’s hips.
fig. 18
P4C00066
4C001-067 ING 11-03-2008 11:57 Pagina 23
Page 30 of 191
27
G
fig. 24
P4C00310
fig. 25
P4C00311
We recommend sitting
children on the rear seat.
This is the most protected
position in the event of a crash.
Never fit child restraint systems in
the front passenger seat in vehicles
with a passenger airbag. The in-
flated airbag could cause even fa-
tal injury, regardless of the sever-
ity of the crash which triggered it
off.
Children can sit in the front pas-
senger seat in cars with passenger
side airbag only if the system has
been deactivated. In this case, al-
ways make sure that the amber in-
strument panel warning light is on
to confirm that the airbag has been
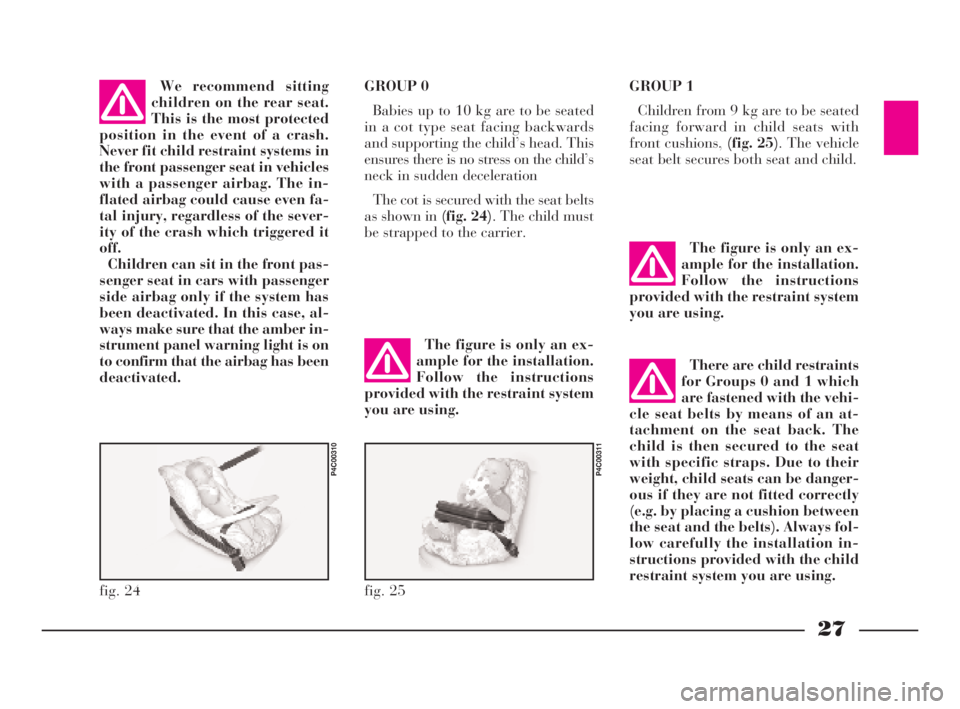
deactivated.GROUP 0
Babies up to 10 kg are to be seated
in a cot type seat facing backwards
and supporting the child’s head. This
ensures there is no stress on the child’s
neck in sudden deceleration
The cot is secured with the seat belts
as shown in (fig. 24). The child must
be strapped to the carrier.GROUP 1
Children from 9 kg are to be seated
facing forward in child seats with
front cushions, (fig. 25). The vehicle
seat belt secures both seat and child.
The figure is only an ex-
ample for the installation.
Follow the instructions
provided with the restraint system
you are using.
The figure is only an ex-
ample for the installation.
Follow the instructions
provided with the restraint system
you are using.
There are child restraints
for Groups 0 and 1 which
are fastened with the vehi-
cle seat belts by means of an at-
tachment on the seat back. The
child is then secured to the seat
with specific straps. Due to their
weight, child seats can be danger-
ous if they are not fitted correctly
(e.g. by placing a cushion between
the seat and the belts). Always fol-
low carefully the installation in-
structions provided with the child
restraint system you are using.
4C001-067 ING 11-03-2008 11:57 Pagina 27
Page 40 of 191

37
G
HEATING AND VENTILATION
fig. 41Key to (fig. 41)
1- Windscreen defrosting/demist-
ing vent.
2- Front side windows defrost-
ing/demisting vent.
3- Central adjustable vents for
sending air to front-seat passengers.
4- Side vents for sending air to feet
of front-seat passengers.
5- Side vents for sending air to feet
of back-seat passengers.
6- Side adjustable vent for sending
air to front-seat passengers.
7- Vent for sending air above the
heads of those in the front seats.
P4C00398
4C001-067 ING 11-03-2008 11:57 Pagina 37
Page 49 of 191

46
G
sition and the cigar lighter is ready to
use.
The ashtray can be removed.
IMPORTANTMake sure that the
cigar lighter does in fact pop out af-
ter it has been pushed in.
The rear seats have a concealed ash-
tray in the right side panel.
Follow the direction of the arrow to
use and extract the ashtray (fig. 61).
fig. 61
P4C00099
CEILING LAMP (fig. 59)
SwitchesAandBswitch the ceiling
lights on and off.
The following conditions are created
according to the position of these
switches:
–with switch A in the centre po-
sition, light Cin the ceiling lamp will
come on when the doors are opened;
–with switch A moved to the left,
lightCin the ceiling lamp is off and
will not light up if the doors are
opened;
–with switch A moved to the
right, light Cin the ceiling lamp will
light up regardless of whether the
doors are open or not.SwitchBwill switch the map-read-
ing light Don/off (spot light).
IMPORTANTBefore getting out of
the car, make sure that switch Ais in
the centre position; the ceiling light will
then go out when the doors are closed
and you will not drain the battery.
ASHTRAY AND CIGAR LIGHTER
How to use them:
1)Open flap A (fig. 60)in the di-
rection of the arrow to reach the cigar
lighter and the ashtray.
2)Press button B: after around fif-
teen seconds it returns to its initial po-
fig. 60
P4C00215
fig. 59
P4C00097
4C001-067 ING 11-03-2008 11:57 Pagina 46
Page 55 of 191

52
G
4)Fold the seat back forwards to
make a flat loading surface with the
boot floor (fig. 78).
If necessary, the cushion can also be
tilted(fig. 79). Consequently, before
releasing the seat back, lift the cush-
ion as shown and tip it against the
front seat backs; the rear seat back-
rest can then be released and tilted
forwards.
To return the seat to its normal po-
sition:
1)Return the seat back to the verti-
cal position and make sure it is prop-
erly locked into place; the red strip on
the hook-up button must disappear.
fig. 77
P4C00034
Removing the parcel shelf
If you wish to remove the parcel
shelf to extend the boot capacity, un-
hook the two tie-rods (one each side)
A (fig. 75)from the hooks B, then
pull the parcel shelf outwards so that
pinsCcome out.
The shelf can then be positioned be-
hind the front seats.INCREASING THE LOAD AREA
Proceed as follows:
1)Make sure that the side seat belts
A (fig. 76)have been inserted into the
corresponding bracket B.
2)Remove the rear head restraints
if required.
3)Release the seat back by pressing
buttonA (fig. 77)(one for each side)
located on the back seat back-rest
(even when a split back seat is fitted);
a red strip will appear on the short
side of the button (towards the inside
of the car) to indicate that it has been
released.
fig. 75
P4C00009
fig. 76
P4C00052
Heavy loads which are
not securely anchored
could seriously injure pas-
sengers in the event of an accident.
4C001-067 ING 11-03-2008 11:57 Pagina 52
Page 59 of 191

56
G
ABS
The car is fitted with an ABS brak-
ing system that prevents the wheels
locking when braking, it exploits the
grip on the road surface holding the
car in the case of sudden braking.
The driver becomes aware of the
ABS activation through a slight throb-
bing of the brake pedal and the rele-
vant noise it makes.
This does not indicate brake mal-
functioning, it is an indication to the
driver that the ABS is operating. It is
a warning that the car is travelling at
borderline road grip and therefore the
speed should be adjusted to the type
of road surface.
The ABS is an addition to the basic
braking system; in the case of a fail-
ure it disables, leaving the braking
system in the same conditions as a ve-
hicle without ABS installed. COMPENSATION
FOR THE UPWARD SLANT
OF THE HEADLIGHT BEAMS
When the car is loaded, it “slopes”
backwards. This means that the head-
light beam rises. In this case it is nec-
essary to return it to the correct posi-
tion.
The car is fitted with an electric ad-
juster(fig. 84)situated at the side of
the handbrake:
Position0- one or two people on the
front seats.
Position1- five people.
Position2- five people + load in
luggage compartment.
Position3- driver + maximum per-
missible load all in the boot.
fig. 84
P4C00105
Check the positioning of
the headlight beams every
time you change the load
to be carried.
IMPORTANTIn order that the ad-
juster operates properly, the load in
the boot must not exceed the maxi-
mum values indicated.
ADJUSTING THE BEAM
OF THE FRONT FOGLIGHTS
Ask a LANCIA Dealershipto check
and, if necessary, adjust the beam for
you.
4C001-067 ING 11-03-2008 11:57 Pagina 56