fuse Lancia Ypsilon 2012 Owner handbook (in English)
[x] Cancel search | Manufacturer: LANCIA, Model Year: 2012, Model line: Ypsilon, Model: Lancia Ypsilon 2012Pages: 307, PDF Size: 13.3 MB
Page 7 of 307

GETTING TO KNOW YOUR CAR
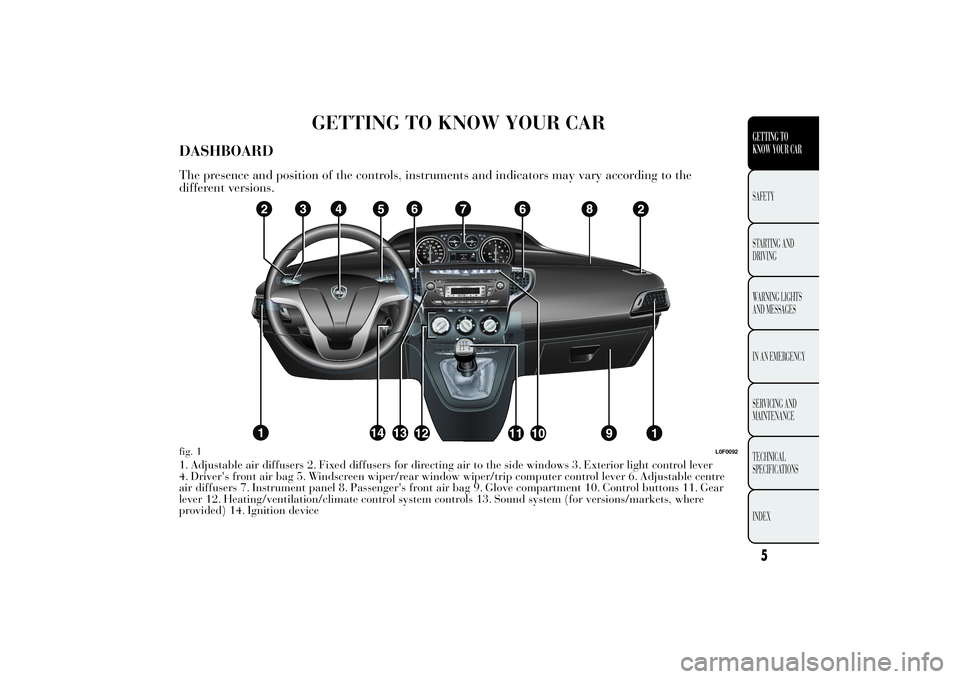
DASHBOARDThe presence and position of the controls, instruments and indicators may vary according to the
different versions.1. Adjustable air diffusers 2. Fixed diffusers for directing air to the side windows 3. Exterior light control lever
4. Driver's front air bag 5. Windscreen wiper/rear window wiper/trip computer control lever 6. Adjustable centre
air diffusers 7. Instrument panel 8. Passenger's front air bag 9. Glove compartment 10. Control buttons 11. Gear
lever 12. Heating/ventilation/climate control system controls 13. Sound system (for versions/markets, where
provided) 14. Ignition devicefig. 1
L0F0092
5GETTING TO
KNOW YOUR CARSAFETY
STARTING AND
DRIVING
WARNING LIGHTS
AND MESSAGES
IN AN EMERGENCY
SERVICING AND
MAINTENANCE
TECHNICAL
SPECIFICATIONS
INDEX
Page 42 of 307

CLIMATE CONTROLSIDE AIR DIFFUSERS
A fig. 29 - Adjustable and directable side air
diffusers:
❒use device B to adjust the vent to the required
position;
❒turn wheel C to adjust the air flow.
D - Fixed side air diffuser.CENTRAL AIR DIFFUSERS
A fig. 30 - Adjustable and directable central air
diffusers:
❒use device B to adjust the vent to the required
position;
❒turn wheel C to adjust the air flow.
fig. 29
L0F0103
fig. 30
L0F0104
40GETTING TO
KNOW YOUR CAR
SAFETY
STARTING AND
DRIVING
WARNING LIGHTS
AND MESSAGES
IN AN EMERGENCY
SERVICING AND
MAINTENANCE
TECHNICAL
SPECIFICATIONS
INDEX
Page 43 of 307

CLIMATIC COMFORTDIFFUSERS1. Upper fixed diffusers – 2. Adjustable side diffusers – 3. Fixed diffusers for side windows – 4. Adjustable centre air
diffusers – 5. Passenger compartment front foot area diffusersfig. 31
L0F0230
41GETTING TO
KNOW YOUR CARSAFETY
STARTING AND
DRIVING
WARNING LIGHTS
AND MESSAGES
IN AN EMERGENCY
SERVICING AND
MAINTENANCE
TECHNICAL
SPECIFICATIONS
INDEX
Page 47 of 307

AUTOMATIC CLIMATE CONTROL(for versions/markets, where provided)
CONTROLS
Buttons A - Manual air distribution selection
By pressing the buttons, one of the five possible
air flow distribution modes can be selected:
to the windscreen and front side window
diffusers to demist or defrost them.
to the central and side dashboard vents to
ventilate the chest and the face during the hot
season.
fig. 33
L0F0129
45GETTING TO
KNOW YOUR CARSAFETY
STARTING AND
DRIVING
WARNING LIGHTS
AND MESSAGES
IN AN EMERGENCY
SERVICING AND
MAINTENANCE
TECHNICAL
SPECIFICATIONS
INDEX
Page 48 of 307

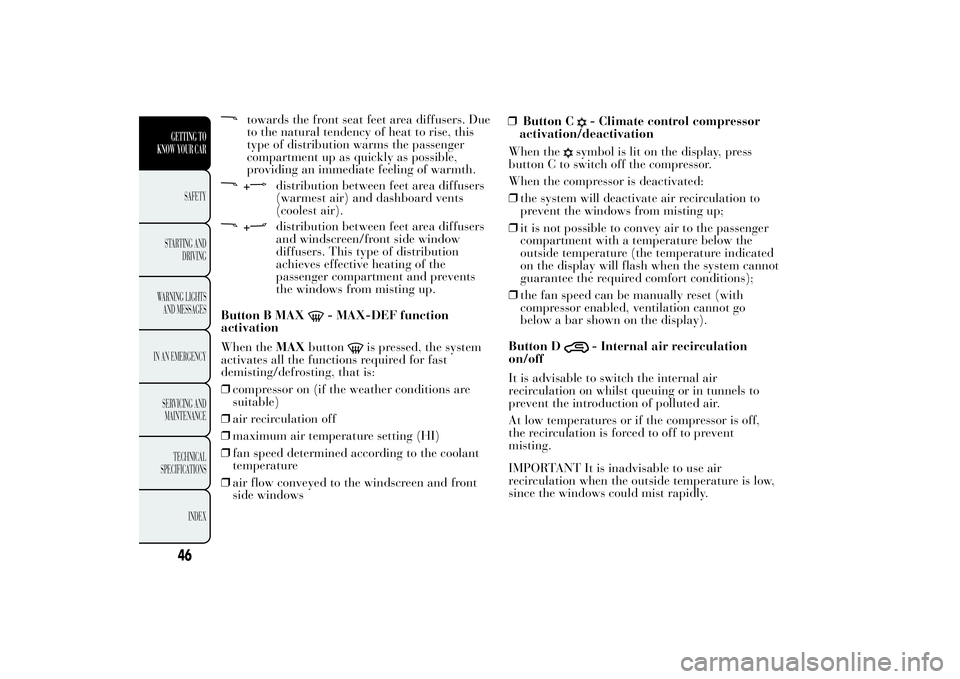
towards the front seat feet area diffusers. Due
to the natural tendency of heat to rise, this
type of distribution warms the passenger
compartment up as quickly as possible,
providing an immediate feeling of warmth.+
distribution between feet area diffusers
(warmest air) and dashboard vents
(coolest air).
+
distribution between feet area diffusers
and windscreen/front side window
diffusers. This type of distribution
achieves effective heating of the
passenger compartment and prevents
the windows from misting up.
Button B MAX
- MAX-DEF function
activation
When theMAXbutton
is pressed, the system
activates all the functions required for fast
demisting/defrosting, that is:
❒compressor on (if the weather conditions are
suitable)
❒air recirculation off
❒maximum air temperature setting (HI)
❒fan speed determined according to the coolant
temperature
❒air flow conveyed to the windscreen and front
side windows❒Button C
- Climate control compressor
activation/deactivation
When the
symbol is lit on the display, press
button C to switch off the compressor.
When the compressor is deactivated:
❒the system will deactivate air recirculation to
prevent the windows from misting up;
❒it is not possible to convey air to the passenger
compartment with a temperature below the
outside temperature (the temperature indicated
on the display will flash when the system cannot
guarantee the required comfort conditions);
❒the fan speed can be manually reset (with
compressor enabled, ventilation cannot go
below a bar shown on the display).
Button D
- Internal air recirculation
on/off
It is advisable to switch the internal air
recirculation on whilst queuing or in tunnels to
prevent the introduction of polluted air.
At low temperatures or if the compressor is off,
the recirculation is forced to off to prevent
misting.
IMPORTANT It is inadvisable to use air
recirculation when the outside temperature is low,
since the windows could mist rapidly.
46GETTING TO
KNOW YOUR CAR
SAFETY
STARTING AND
DRIVING
WARNING LIGHTS
AND MESSAGES
IN AN EMERGENCY
SERVICING AND
MAINTENANCE
TECHNICAL
SPECIFICATIONS
INDEX
Page 53 of 307

IMPORTANT Internal air recirculation makes it
possible to reach the required heating or cooling
conditions more quickly depending on the mode
selected. It is not advisable to switch the air
recirculation on when it is rainy/cold to prevent
the windows from misting, especially if the climate
control system has not been activated. It is
advisable to switch the internal air recirculation
on whilst queuing or in tunnels to prevent the
introduction of polluted air. Do not use the
function for a long time, particularly if there are
several passengers on board, to prevent the
windows from misting.
CLIMATE CONTROL COMPRESSOR
ACTIVATION/DEACTIVATION
Press button
to switch on the climate control
compressor.
Compressor activation:
symbol appears on
display.
Compressor deactivation
❒
symbol on display disappears;
❒internal air recirculation excluded;
With the climate control compressor switched off,
air cannot be introduced into the passenger
compartment that has a lower temperature than
the outside air; in this case the
symbol in the
display will flash.The deactivation of the climate control compressor
is memorised even after the engine has stopped.
To reactivate the climate control compressor, press
button
or AUTO again: if you press AUTO,
the other manual settings will be cancelled.
AIR DISTRIBUTION SELECTION
Press one or more of buttons A to manually select
one of the possible air distribution settings for
the passenger compartment:
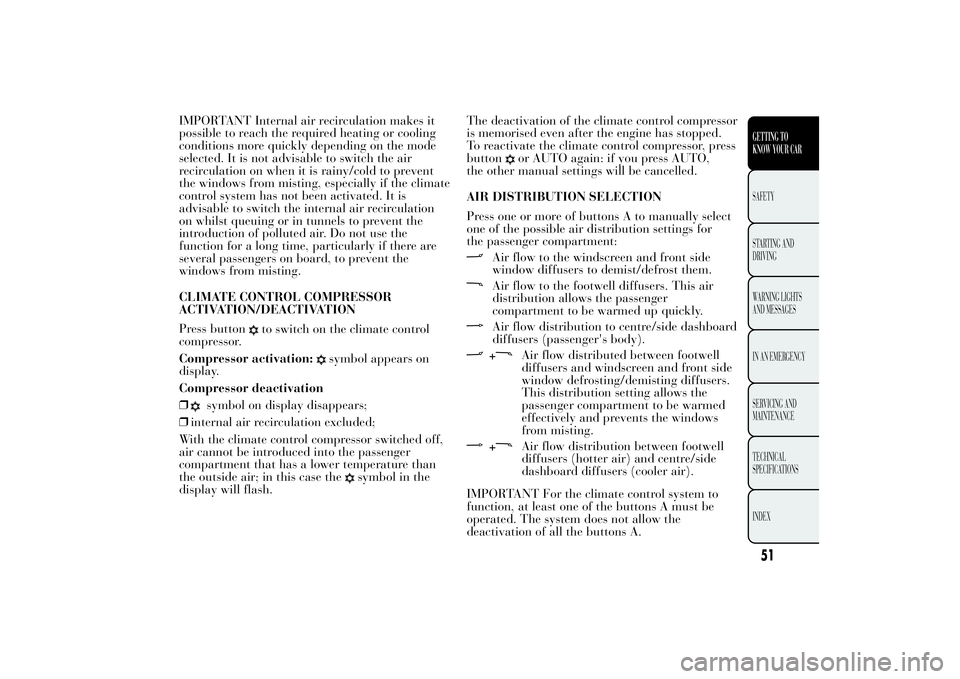
Air flow to the windscreen and front side
window diffusers to demist/defrost them.Air flow to the footwell diffusers. This air
distribution allows the passenger
compartment to be warmed up quickly.Air flow distribution to centre/side dashboard
diffusers (passenger's body).+
Air flow distributed between footwell
diffusers and windscreen and front side
window defrosting/demisting diffusers.
This distribution setting allows the
passenger compartment to be warmed
effectively and prevents the windows
from misting.
+
Air flow distribution between footwell
diffusers (hotter air) and centre/side
dashboard diffusers (cooler air).
IMPORTANT For the climate control system to
function, at least one of the buttons A must be
operated. The system does not allow the
deactivation of all the buttons A.
51GETTING TO
KNOW YOUR CARSAFETY
STARTING AND
DRIVING
WARNING LIGHTS
AND MESSAGES
IN AN EMERGENCY
SERVICING AND
MAINTENANCE
TECHNICAL
SPECIFICATIONS
INDEX
Page 66 of 307

❒pressed to the left (position 0): light C switches
on;
❒pressed to the right (position 2): light D
switches on.
IMPORTANT Before getting out of the car, make
sure that both switches are in the central position:
when the doors are closed the lights will switch
off to avoid draining the battery. In any case,
if the switch is left in the on position, the courtesy
light switches off automatically about 15 minutes
after the engine has been switched off.
Diffused light on dashboard
The diffused light on the dashboard switches on in
the same way as the front roof light.
ROOF LIGHT TIMING
On certain versions, to facilitate getting into/out of
the car, especially at night or in poorly-lit areas,
two timed modes have been provided.
Timing when getting into the car
The roof lights switch on according to the
following modes:
❒for about 10 seconds when the doors are
unlocked;
❒for about 3 minutes when one of the doors is
opened;
❒for about 10 seconds when the doors are closed.
The timed period is interrupted when the ignition
key is turned to MAR-ON.The lights switch off in three ways:
❒when all doors are closed, the 3-minute timer
will stop and a 10-second one will start. This
timer will stop when the key is turned to
MAR-ON;
❒when doors are locked (either with remote
control or with key on driver side door), the roof
light switches off.
❒the courtesy lights are switched off in any case
after 15 minutes to preserve battery charge
Timing when getting out of the car
After removing the key from the ignition switch,
the roof lights switch on as follows:
❒if the ignition key is removed within 3 minutes
from the engine stopping, the roof lights switch
on for 10 seconds;
❒for about 3 minutes when one of the doors is
opened;
❒for about 10 seconds when one of the doors is
closed.
The timing stops automatically when the doors are
locked.
64GETTING TO
KNOW YOUR CAR
SAFETY
STARTING AND
DRIVING
WARNING LIGHTS
AND MESSAGES
IN AN EMERGENCY
SERVICING AND
MAINTENANCE
TECHNICAL
SPECIFICATIONS
INDEX
Page 78 of 307

Once the doors have been locked via the remote
control or the key pawl, it will no longer be
possible to unlock them by pressing button
.
In the absence of electrical power supply (blown
fuse, battery disconnected, etc.) it is still possible
to lock the doors manually.
IMPORTANT With central locking active, pulling
the internal opening lever of the passenger side
door unlocks the door (the LED stays on). Pulling
the internal opening lever of the driver side door
activates central unlocking.
IMPORTANT The rear doors cannot be opened
from the inside when the child-lock system is
engaged (see the description in the following
paragraph).
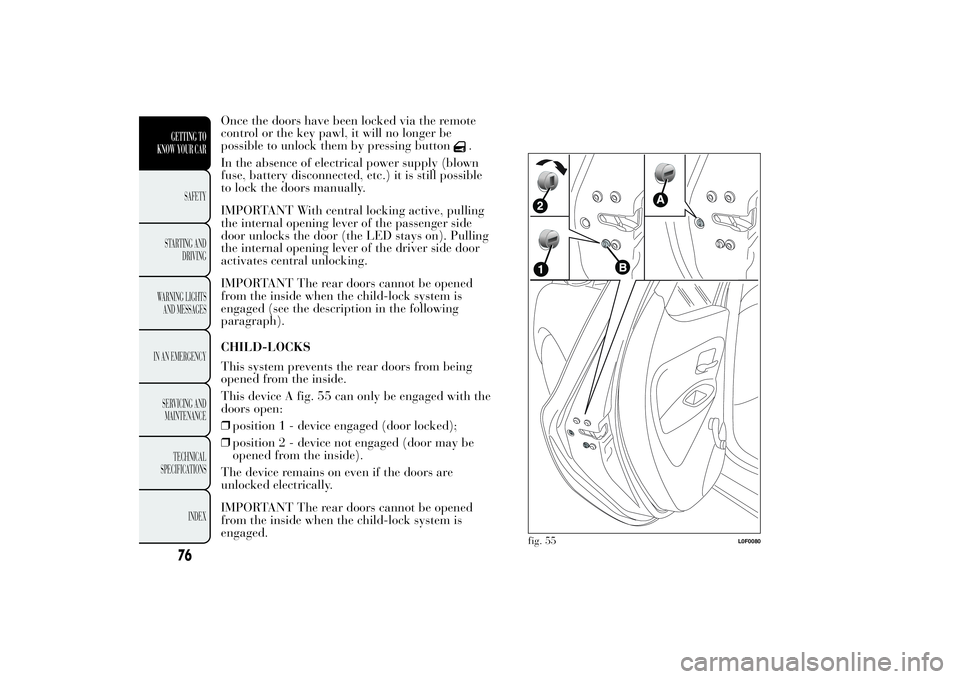
CHILD-LOCKS
This system prevents the rear doors from being
opened from the inside.
This device A fig. 55 can only be engaged with the
doors open:
❒position 1 - device engaged (door locked);
❒position 2 - device not engaged (door may be
opened from the inside).
The device remains on even if the doors are
unlocked electrically.
IMPORTANT The rear doors cannot be opened
from the inside when the child-lock system is
engaged.
fig. 55
L0F0080
76GETTING TO
KNOW YOUR CAR
SAFETY
STARTING AND
DRIVING
WARNING LIGHTS
AND MESSAGES
IN AN EMERGENCY
SERVICING AND
MAINTENANCE
TECHNICAL
SPECIFICATIONS
INDEX
Page 79 of 307

WARNING
Always use this device when carrying
children. After engaging the child
lock on both rear doors, check for effective
engagement by trying to open a door with
the internal handle.
PASSENGER SIDE FRONT DOOR AND REAR
DOOR EMERGENCY LOCKING DEVICE
The passenger side front door and the rear doors
have a device to lock them when there is no power.
In this case proceed as follows:
❒engage the metal insert of the ignition key in
position Afig. 56 (passenger side front door)
or B fig. 55 (rear doors);
❒turn the key clockwise and then remove it from
housing Afig. 56 or B fig. 55.The door lock knob can be realigned (only when
the battery charge has been restored) as follows:
❒press the
button on the remote control;
❒press button
for locking/unlocking the doors;
❒open a front door by inserting the key into the
key pawl;
❒operate the internal door handle.
If the child lock was engaged and the
previously described locking
procedure carried out, operating the
internal handle will not open the door but will
only realign the door lock knobs. To open the
door, the outside handle must be used. The
door central locking/unlocking button
is
not disabled by the engagement of the
emergency lock.
IMPORTANT If the battery is disconnected or the
protection fuse blows, the door opening/closing
mechanism must be reinitialised as follows:
❒close all the doors;
❒press button
on the remote control or button
for locking/unlocking the doors on the
instrument panel;
❒press button
on the remote control or button
for locking/unlocking the doors on the
instrument panel.
fig. 56
L0F0215
77GETTING TO
KNOW YOUR CARSAFETY
STARTING AND
DRIVING
WARNING LIGHTS
AND MESSAGES
IN AN EMERGENCY
SERVICING AND
MAINTENANCE
TECHNICAL
SPECIFICATIONS
INDEX
Page 83 of 307

Proceed as follows:
❒remove the rear head restraints and completely
fold back the seats (see the paragraph
“Expanding the luggage compartment”);
❒adjust lever A fig. 59.
WARNING
Be careful not to hit object on the
storage shelf when you open the
luggage compartment tailgate.CLOSURE
Pull the tab A fig. 60 and lower the tailgate by
pressing next to the lock until it clicks.
The direction indicators will blink twice and an
internal light will switch on when the luggage
compartment is opened: the light switches off
automatically when the luggage compartment is
closed. The light switches off automatically after a
few minutes if the tailgate is left open.
IMPORTANT Before closing the luggage
compartment make sure that you have the keys.
The luggage compartment is locked automatically.
LUGGAGE COMPARTMENT INITIALISATION
IMPORTANT If the battery is disconnected or the
protection fuse blows, the luggage compartment
opening/closing mechanism must be reinitialised
as follows:
fig. 59
L0F0041
fig. 60
L0F0193
81GETTING TO
KNOW YOUR CARSAFETY
STARTING AND
DRIVING
WARNING LIGHTS
AND MESSAGES
IN AN EMERGENCY
SERVICING AND
MAINTENANCE
TECHNICAL
SPECIFICATIONS
INDEX
Emergency opening from inside