sensor Lancia Ypsilon 2015 Owner handbook (in English)
[x] Cancel search | Manufacturer: LANCIA, Model Year: 2015, Model line: Ypsilon, Model: Lancia Ypsilon 2015Pages: 315, PDF Size: 10.85 MB
Page 15 of 315

SETUP MENU
The menu comprises a series of options which can
be selected using buttons
andto access
the different selection and setting operations
(Setup) indicated below. Some options have a
submenu.
The menu can be activated by briefly pressing the
button.
The menu comprises the following options:
❒MENU
❒LIGHTING
❒SPEED BEEP
❒LIGHT SENSOR (for versions/markets, where
provided)
❒RAIN SENSOR (for versions/markets, where
provided)
❒TRIP B ACTIVATION/DATA
❒SET TIME
❒SET DATE
❒FIRST PAGE (for versions/markets, where
provided)
❒AUTOCLOSE
❒MEASUREMENT UNIT
❒LANGUAGE
❒BUZZER VOLUME
❒BUTTON VOLUME
❒BELT BUZZER❒SERVICE
❒AIRBAG/PASSENGER BAG (for versions/
markets, where provided)
❒EXIT MENU
Selecting an option from the main menu without a
submenu:
❒briefly press the
button to select the main
menu option to be set;
❒press buttons
or(with single presses) to
select the new setting;
❒briefly press the
button to store the new
setting and to go back to the main menu option
selected previously.
Selecting an option from the main menu with a
submenu:
❒a short press on the
button will display the
first submenu option;
❒press buttons
or(with single presses) to
scroll through all the submenu options;
❒briefly press the
button to select the displayed
submenu option and to open the relevant set-up
menu;
❒press buttons
or(with single presses) to
select the new setting for this submenu option;
❒Briefly press button
to store the new setting
and at the same time go back to the previously
selected menu option.
11
GETTING TO
KNOW YOUR CAR
SAFETY
STARTING AND
DRIVING
WARNING LIGHTS
AND MESSAGES
IN AN EMERGENCY
SERVICING AND
MAINTENANCE
TECHNICAL
SPECIFICATIONS
INDEX
❒DAYTIME RUNNING LIGHTS
Page 17 of 315

To cancel the setting, proceed as follows:
❒briefly press the
button: "On" will flash on
the display;
❒press button
: "Off" will flash on the
display;
❒press the
button briefly to return to the menu
screen or give the button a long press to return
to the standard screen without storing.
Headlight sensor (automatic headlights/dusk
sensor sensitivity adjustment)(for versions/
markets, where provided)
This function is used to turn the headlights on or
off according to external light conditions.
The dusk sensor sensitivity can be adjusted
according to 3 levels (level 1 = minimum
sensitivity, level 2 = average sensitivity, level 3 =
maximum sensitivity); the greater the sensitivity
set, the less the external light variation needed
to turn on the lights (e.g. with a setting on level 3
at sunset the headlights switch on earlier in
relation to levels 1 and 2).
Proceed as follows to set:
❒press the
button briefly; the previously set
level will flash on the display;
❒press the
orbutton to make the
adjustment;
❒press the
button briefly to return to the menu
screen or give the button a long press to return
to the standard screen without storing.Rain sensor (Rain sensor sensitivity
adjustment)(for versions/markets, where
provided)
This function allows you to adjust the rain sensor
sensitivity to 4 levels.
To set the required sensitivity level, proceed as
follows:
❒briefly press the
button: the previously set
sensitivity “level” flashes on the display;
❒press the
orbutton to make the
adjustment;
❒press the
button briefly to return to the menu
screen or give the button a long press to return
to the standard screen without storing.
13
GETTING TO
KNOW YOUR CAR
SAFETY
STARTING AND
DRIVING
WARNING LIGHTS
AND MESSAGES
IN AN EMERGENCY
SERVICING AND
MAINTENANCE
TECHNICAL
SPECIFICATIONS
INDEX
Page 59 of 315

SIDE LIGHTS AND DIPPED BEAM
HEADLIGHTS
With the ignition key turned to MAR, turn the ring
nut A fig. 34 to
. If dipped beams are
activated, the daytime running lights go out and
the side lights and dipped headlights come on.
The
warning light will come on in the
instrument panel.
When the ignition key is turned to STOP or
removed and the ring nut A is turned fromOto
, all the side lights and number plate lights
come on. The
warning light switches on in the
instrument panel.
PARKING LIGHTS
These lights can only be switched on with ignition
key at STOP or removed, by moving ring nut A
first to positionOand then to position
.
The warning light
switches on on the
instrument panel. When the direction indicator
stalk is activated the side for the lights (left or
right) can be selected.AUTOMATIC LIGHTING CONTROL
(AUTOLIGHT) (Dusk sensor)
(for versions/markets,
where provided)
This infrared LED sensor, combined with the rain
sensor and located on the windscreen, detects
the variations in outside brightness depending on
the light sensitivity set with the Setup Menu:
the greater the sensitivity, the less external light is
required to activate the exterior lights.
Activation
The dusk sensor activates when ring nut A fig. 34
is turned to
. In this way the side lights and
dipped headlights are activated automatically
according to the external light level.
When the lights are turned on by the sensor, the
fog lights (for versions/markets, where provided)
and the rear fog lights may be turned on. When
the lights are automatically switched off, the front
and rear fog lights (if activated) are also switched
off. The next time the lights are switched on
automatically, the fog lights must be reactivated
manually (if required).
With the sensor active, it is possible to flash the
headlights but the main beam headlights cannot
be switched on. To activate these lights, turn
the ring nut A to
and activate the fixed dipped
beam headlights.
55
GETTING TO
KNOW YOUR CAR
SAFETY
STARTING AND
DRIVING
WARNING LIGHTS
AND MESSAGES
IN AN EMERGENCY
SERVICING AND
MAINTENANCE
TECHNICAL
SPECIFICATIONS
INDEX
Page 60 of 315

When the lights have been activated automatically
and are then switched off by the sensor, the
dipped beam headlights are switched off first,
followed by the side lights a few seconds later. If
the sensor is activated but is malfunctioning,
the side lights and dipped beam headlights are
switched on irrespective of the outside light level
and the sensor failure is indicated on the
instrument panel display. It is also possible to
deactivate the sensor and switch on the side lights
and dipped beam headlights.
IMPORTANT The sensor is unable to detect the
presence of fog. Under these circumstances, these
lights are therefore turned on manually.
MAIN BEAM HEADLIGHTS
To activate the main beam headlights, with ring
nut at
, pull the stalk towards the steering
wheel. The warning light
switches on in the
instrument panel.
When the stalk is pulled towards the steering
wheel again, the lights deactivate, the dipped
headlights reactivate and the
warning light
switches off.
It is not possible to switch on the main beam
headlights in fixed mode if the automatic lighting
control system is active.FLASHING
You can flash the headlights by pulling the stalk
towards the wheel (unstable position). The
warning light will come on in the instrument
panel.
DIRECTION INDICATORS
Bring the stalk to the (stable) position:
upwards:right-hand direction indicator
activation;
downwards:left-hand direction indicator
activation.
Warning light
orshould flash in the
instrument panel. The indicators switch off
automatically when the steering wheel is
straightened.
Lane change function
If you wish to signal a lane change, put the left
stalk in the unstable position for less than half a
second.
The direction indicator on the side selected will be
activated for 5 flashes and then go out
automatically.
56
GETTING TO
KNOW YOUR CAR
SAFETY
STARTING AND
DRIVING
WARNING LIGHTS
AND MESSAGES
IN AN EMERGENCY
SERVICING AND
MAINTENANCE
TECHNICAL
SPECIFICATIONS
INDEX
Page 63 of 315

"Smart washing" function
Pull the lever towards the steering wheel (unstable
position) to activate the windscreen washer.
Keeping the stalk pulled for more than half a
second, with just one movement it is possible to
operate the washer jet and the wiper at the same
time.
The wiper stops working three strokes after the
stalk is released.
A further stroke after approximately six seconds
completes the wiping cycle.
RAIN SENSOR
(for versions/markets, where provided)
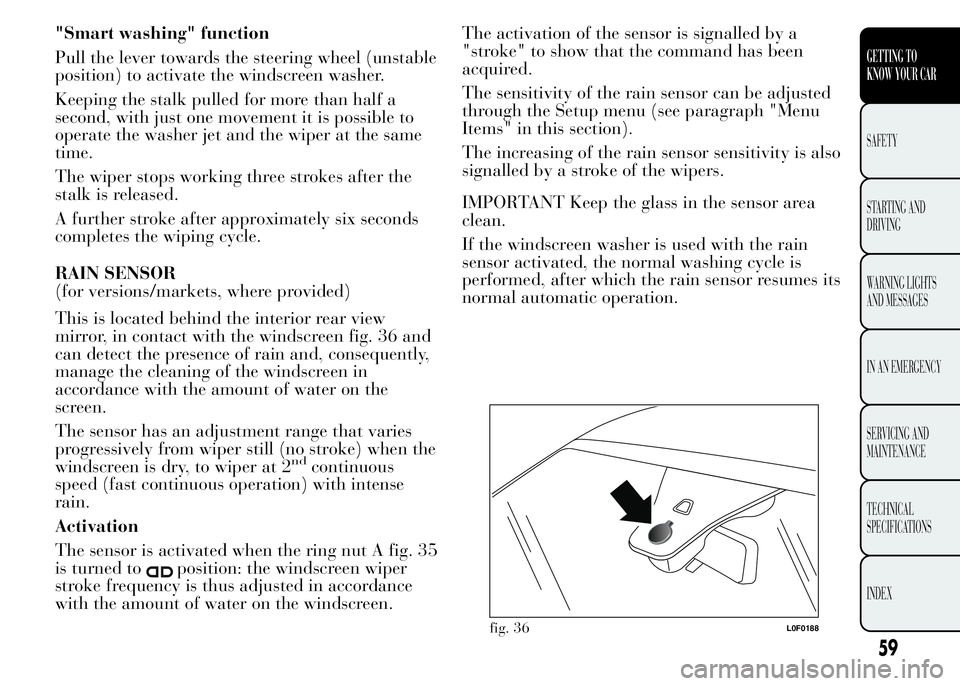
This is located behind the interior rear view
mirror, in contact with the windscreen fig. 36 and
can detect the presence of rain and, consequently,
manage the cleaning of the windscreen in
accordance with the amount of water on the
screen.
The sensor has an adjustment range that varies
progressively from wiper still (no stroke) when the
windscreen is dry, to wiper at 2
ndcontinuous
speed (fast continuous operation) with intense
rain.
Activation
The sensor is activated when the ring nut A fig. 35
is turned to
position: the windscreen wiper
stroke frequency is thus adjusted in accordance
with the amount of water on the windscreen.The activation of the sensor is signalled by a
"stroke" to show that the command has been
acquired.
The sensitivity of the rain sensor can be adjusted
through the Setup menu (see paragraph "Menu
Items" in this section).
The increasing of the rain sensor sensitivity is also
signalled by a stroke of the wipers.
IMPORTANT Keep the glass in the sensor area
clean.
If the windscreen washer is used with the rain
sensor activated, the normal washing cycle is
performed, after which the rain sensor resumes its
normal automatic operation.
fig. 36L0F0188
59
GETTING TO
KNOW YOUR CAR
SAFETY
STARTING AND
DRIVING
WARNING LIGHTS
AND MESSAGES
IN AN EMERGENCY
SERVICING AND
MAINTENANCE
TECHNICAL
SPECIFICATIONS
INDEX
Page 64 of 315

Deactivation
Move the stalk ring nut away from the position
or turn the ignition key to STOP.
If the ignition key is turned to the STOP position
leaving the ring nut A in position
, no wiping
cycle is performed at the next startup (ignition key
to the MAR position) even if rain is present. This
prevents unwanted activation of the rain sensor
when the engine is started (i.e. when the
windscreen is being washed by hand or the wipers
are stuck to the windscreen by ice).
To restore automatic operation of the rain sensor,
turn ring nut A from
position toposition
and then turn the ring nut back to the
position.
When the rain sensor is reactivated using any of
the manoeuvres described above, reactivation
is indicated by a single stroke of the windscreen
wipers, regardless of the condition of the
windscreen.If the sensitivity is changed whilst the rain sensor
is operating, a windscreen wiper stroke is carried
out to confirm the change even if the windscreen
is dry.
In the event of malfunction of the rain sensor
whilst it is active, the windscreen wiper operates
intermittently at a speed consistent with the
sensitivity setting of the rain sensor, regardless of
whether there is rain on the glass (on some
versions sensor failure is indicated on the display).
The sensor continues to operate and it is possible
to set the windscreen wiper to continuous mode
(1
stor 2ndspeed). The failure indication remains
for as long as the sensor is active.
60
GETTING TO
KNOW YOUR CAR
SAFETY
STARTING AND
DRIVING
WARNING LIGHTS
AND MESSAGES
IN AN EMERGENCY
SERVICING AND
MAINTENANCE
TECHNICAL
SPECIFICATIONS
INDEX
Page 65 of 315

The rain sensor is able to recognise, and
automatically adjust itself in the presence of the
following conditions:
❒presence of dirt on the controlled surface (salt,
dirt, etc.);
❒presence of streaks of water caused by the worn
window wiper blades;
❒difference between day and night.
Do not activate the rain sensor when
washing the car in an automatic car
wash.
Make sure the device is switched off if
there is ice on the windscreen.
WARNING
Make sure the device is switched off
whenever the windscreen must be
cleaned.REAR WINDOW WASHER/ WIPER
It can be operated only with the ignition key
turned to MAR.
Activation
Turn the ring nut B fig. 35 from
toto operate
the rear window wiper as follows:
❒in intermittent mode when the windscreen wiper
is not operating;
❒in synchronous mode (at half the speed of the
windscreen wiper) when the windscreen wiper
is operating;
❒in continuous mode with reverse gear engaged
and the control active.
With the windscreen wiper on and reverse gear
engaged, rear window wiping will be continuous.
Pushing the stalk towards the dashboard
(unstable position) the rear window washer jet
will activate. Keep the stalk pushed for more than
half a second to activate the rear window wiper
as well. Releasing the stalk will activate the smart
washing function, as described for the windscreen
wiper.
61
GETTING TO
KNOW YOUR CAR
SAFETY
STARTING AND
DRIVING
WARNING LIGHTS
AND MESSAGES
IN AN EMERGENCY
SERVICING AND
MAINTENANCE
TECHNICAL
SPECIFICATIONS
INDEX
Page 106 of 315

"ENERGY SAVING" FUNCTION
(for versions/markets, where provided)
If, following automatic engine restarting, the
driver does not carry out any action on the car for
over 3 minutes, the Start&Stop system stops the
engine once and for all, to prevent fuel
consumption. In these cases, the engine can be
restarted only using the ignition key.
NoteIn any case, it is possible to keep the engine
running by deactivating the Start&Stop system.
IRREGULAR OPERATION
In the event of malfunction, the Start&Stop
system is deactivated.
Versions with multifunction display: the
warning light on the instrument panel switches
on and a message appears on the display in the
event of Start&Stop system failure.
Versions with reconfigurable multifunction
display: the
icon switches on and a message
appears on the display in the event of Start&Stop
system failure.
In the event of a Start&Stop system failure,
contact a Lancia Dealership.CAR INACTIVITY
In the event of car inactivity, special attention
must be paid due to the disconnection of the
battery power supply.
Proceed as follows: detach the connector A fig. 72
(by pressing button B) from sensor C for
monitoring the status of the battery installed on
the negative battery pole D. This sensor should
never be disconnected from the pole except if the
battery is replaced.
WARNING
When replacing the battery, always
contact a Lancia Dealership. Replace
the battery with one of the same type
(HEAVY DUTY) and with the same
specifications.
fig. 72L0F0083
102
GETTING TO
KNOW YOUR CAR
SAFETY
STARTING AND
DRIVING
WARNING LIGHTS
AND MESSAGES
IN AN EMERGENCY
SERVICING AND
MAINTENANCE
TECHNICAL
SPECIFICATIONS
INDEX
Page 112 of 315

RADIO TRANSMITTERS AND CELLULAR
PHONES
Radio transmitter equipment (vehicle mobile
phones, CB radios, amateur radio etc.) cannot be
used inside the car unless a separate aerial is
mounted externally.
IMPORTANT The use of these devices inside the
passenger compartment (without an external
aerial) may cause the electrical systems to
malfunction. This could compromise the safety of
the car in addition to constituting a potential
hazard for passengers' health.
In addition, transmission and reception of these
devices may be affected by the shielding effect of
the car body. As far as the use of EC-approved
mobile phones is concerned (GSM, GPRS, UMTS),
follow the usage instructions provided by the
mobile phone manufacturer.PARKING SENSORS
(for versions/markets, where provided)
The parking sensors are located in the car's rear
bumper fig. 79 and their function is to inform the
driver, through an intermittent acoustic signal,
about the presence of obstacles behind the car.
ACTIVATION/DEACTIVATION
The sensors are automatically activated when
reverse gear is engaged. As the obstacle behind the
vehicle gets closer to the car, the acoustic signal
becomes more frequent.
ACOUSTIC SIGNAL
When reverse gear is engaged and there is an
obstacle behind the car an acoustic signal is
activated which varies according to the distance of
the obstacle from the bumper.
LANCIA
fig. 79L0F0027
108
GETTING TO
KNOW YOUR CAR
SAFETY
STARTING AND
DRIVING
WARNING LIGHTS
AND MESSAGES
IN AN EMERGENCY
SERVICING AND
MAINTENANCE
TECHNICAL
SPECIFICATIONS
INDEX
Page 113 of 315

The frequency of the acoustic signal:
❒increases as the distance between the car and
the obstacle decreases;
❒becomes continuous when the distance between
the car and the obstacle is less than 30 cm and
stops immediately if the distance increases;
❒is constant if the distance is unchanged.
If several obstacles are detected by the sensors,
only the nearest one is considered.
FAULT INDICATION
Any parking sensor faults will be indicated when
reverse is engaged by the
warning light on
the instrument panel together with the message in
the multifunction display (for versions/markets,
where provided) (see “Warning lights and
messages” section).OPERATION WITH TRAILER
Sensor operation is deactivated automatically
when the trailer's electric cable plug is fitted into
the car's tow hook socket.
The sensors are automatically reactivated when
the trailer's cable plug is removed.
For correct operation, sensors must
always be clean from mud, dirt, snow
or ice. Be careful not to scratch or
damage the sensors while cleaning them.
Avoid using dry, rough or hard cloths. The
sensors must be washed using clean water,
with the addition of car shampoo if necessary.
When using special washing equipment such
as high pressure jets or steam cleaning, clean
the sensors very quickly keeping the jet more
than 10 cm away.
109
GETTING TO
KNOW YOUR CAR
SAFETY
STARTING AND
DRIVING
WARNING LIGHTS
AND MESSAGES
IN AN EMERGENCY
SERVICING AND
MAINTENANCE
TECHNICAL
SPECIFICATIONS
INDEX