stop start Lancia Ypsilon 2016 Owner handbook (in English)
[x] Cancel search | Manufacturer: LANCIA, Model Year: 2016, Model line: Ypsilon, Model: Lancia Ypsilon 2016Pages: 200, PDF Size: 4.53 MB
Page 101 of 200
Thesymbol appears on the display
when the engine stops.
Restarting the engine
With manual gearbox: press the clutch
pedal.
With Dual FuNction System gearbox:if
the gear lever is in position N (Neutral),
place it in any other gear, otherwise
release the brake pedal or move the
gear lever to+,–or R (Reverse).
MANUAL SYSTEM
ACTIVATION/
DEACTIVATION
To activate/deactivate the system
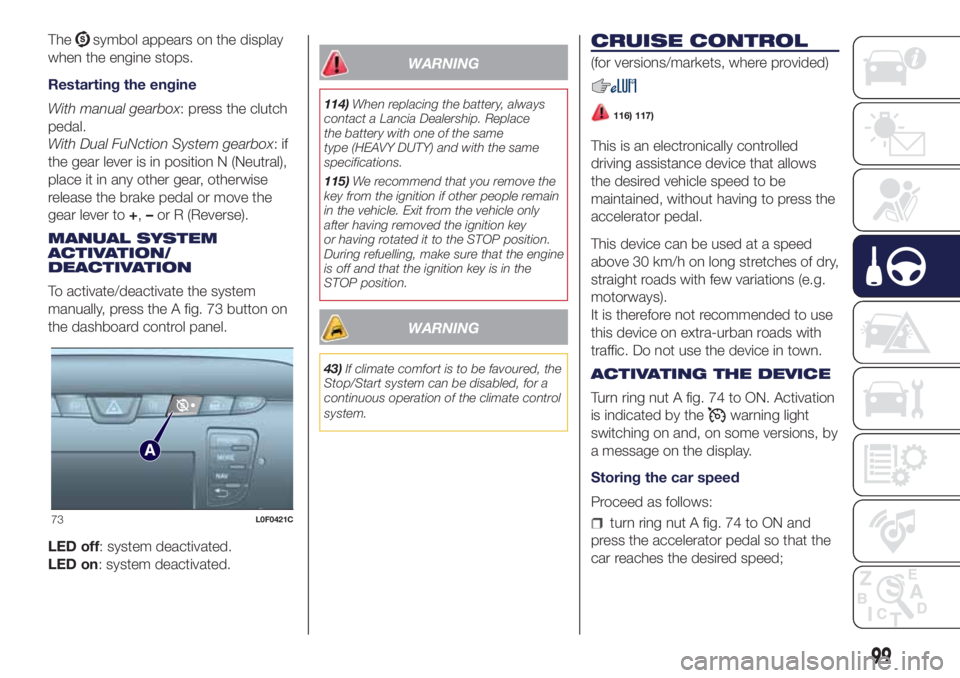
manually, press the A fig. 73 button on
the dashboard control panel.
LED off: system deactivated.
LED on: system deactivated.
WARNING
114)When replacing the battery, always
contact a Lancia Dealership. Replace
the battery with one of the same
type (HEAVY DUTY) and with the same
specifications.
115)We recommend that you remove the
key from the ignition if other people remain
in the vehicle. Exit from the vehicle only
after having removed the ignition key
or having rotated it to the STOP position.
During refuelling, make sure that the engine
is off and that the ignition key is in the
STOP position.
WARNING
43)If climate comfort is to be favoured, the
Stop/Start system can be disabled, for a
continuous operation of the climate control
system.
CRUISE CONTROL
(for versions/markets, where provided)
116) 117)
This is an electronically controlled
driving assistance device that allows
the desired vehicle speed to be
maintained, without having to press the
accelerator pedal.
This device can be used at a speed
above 30 km/h on long stretches of dry,
straight roads with few variations (e.g.
motorways).
It is therefore not recommended to use
this device on extra-urban roads with
traffic. Do not use the device in town.
ACTIVATING THE DEVICE
Turn ring nut A fig. 74 to ON. Activation
is indicated by the
warning light
switching on and, on some versions, by
a message on the display.
Storing the car speed
Proceed as follows:
turn ring nut A fig. 74 to ON and
press the accelerator pedal so that the
car reaches the desired speed;73L0F0421C
99
Page 106 of 200
Petrol and Diesel versions equipped
with "Smart Fuel" system
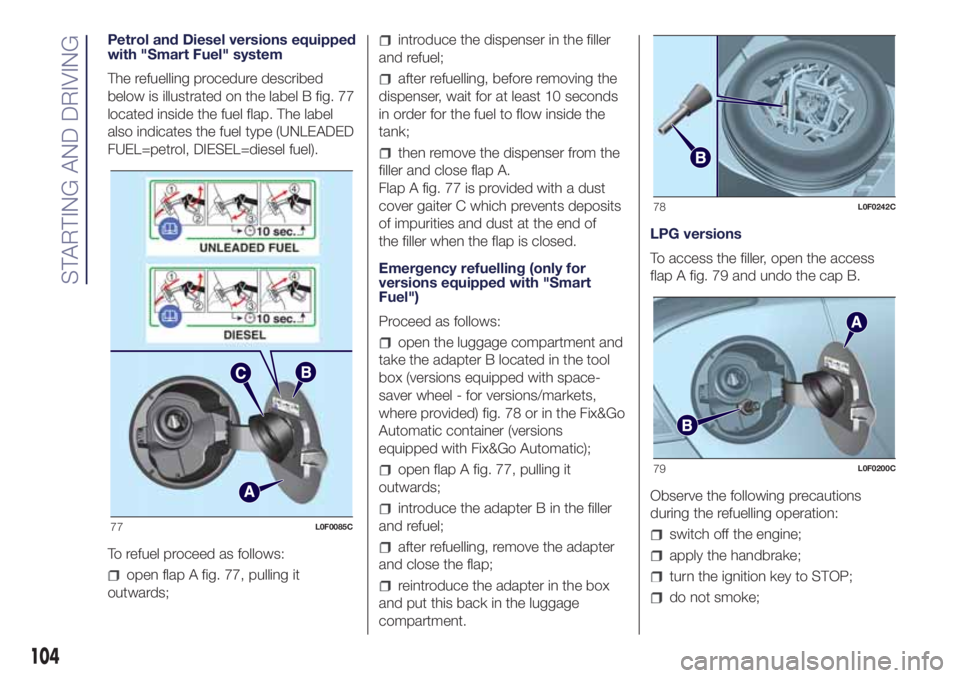
The refuelling procedure described
below is illustrated on the label B fig. 77
located inside the fuel flap. The label
also indicates the fuel type (UNLEADED
FUEL=petrol, DIESEL=diesel fuel).
To refuel proceed as follows:
open flap A fig. 77, pulling it
outwards;
introduce the dispenser in the filler
and refuel;
after refuelling, before removing the
dispenser, wait for at least 10 seconds
in order for the fuel to flow inside the
tank;
then remove the dispenser from the
filler and close flap A.
Flap A fig. 77 is provided with a dust
cover gaiter C which prevents deposits
of impurities and dust at the end of
the filler when the flap is closed.
Emergency refuelling (only for
versions equipped with "Smart
Fuel")
Proceed as follows:
open the luggage compartment and
take the adapter B located in the tool
box (versions equipped with space-
saver wheel - for versions/markets,
where provided) fig. 78 or in the Fix&Go
Automatic container (versions
equipped with Fix&Go Automatic);
open flap A fig. 77, pulling it
outwards;
introduce the adapter B in the filler
and refuel;
after refuelling, remove the adapter
and close the flap;
reintroduce the adapter in the box
and put this back in the luggage
compartment.LPG versions
To access the filler, open the access
flap A fig. 79 and undo the cap B.
Observe the following precautions
during the refuelling operation:
switch off the engine;
apply the handbrake;
turn the ignition key to STOP;
do not smoke;
77L0F0085C
78L0F0242C
79L0F0200C
104
STARTING AND DRIVING
Page 123 of 200
INFLATION PROCEDURE
141) 142) 143) 144)
Proceed as follows:
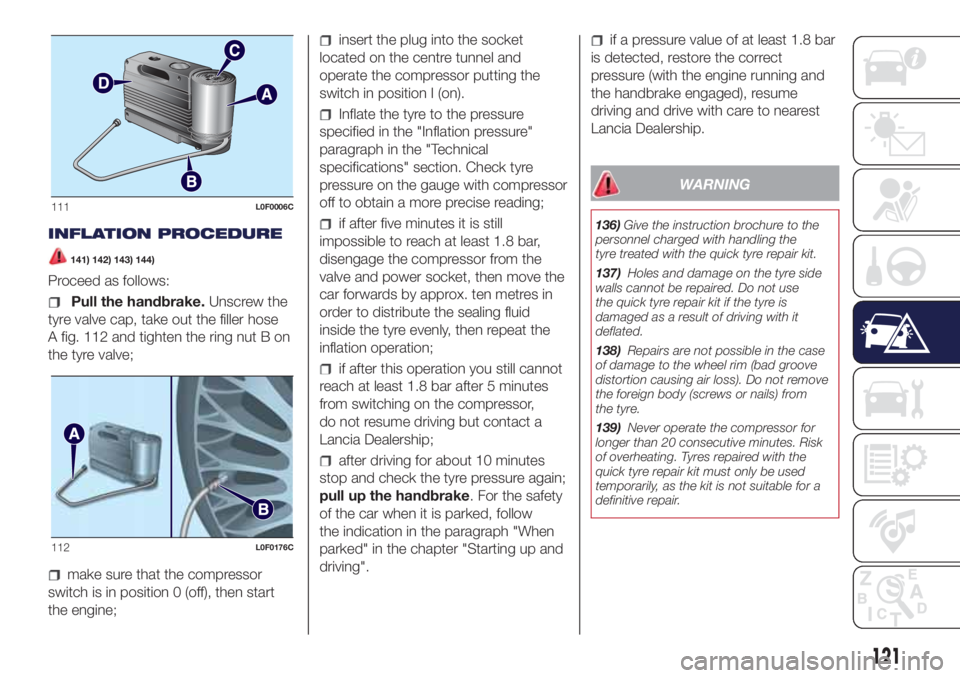
Pull the handbrake.Unscrew the
tyre valve cap, take out the filler hose
A fig. 112 and tighten the ring nut B on
the tyre valve;
make sure that the compressor
switch is in position 0 (off), then start
the engine;
insert the plug into the socket
located on the centre tunnel and
operate the compressor putting the
switch in position I (on).
Inflate the tyre to the pressure
specified in the "Inflation pressure"
paragraph in the "Technical
specifications" section. Check tyre
pressure on the gauge with compressor
off to obtain a more precise reading;
if after five minutes it is still
impossible to reach at least 1.8 bar,
disengage the compressor from the
valve and power socket, then move the
car forwards by approx. ten metres in
order to distribute the sealing fluid
inside the tyre evenly, then repeat the
inflation operation;
if after this operation you still cannot
reach at least 1.8 bar after 5 minutes
from switching on the compressor,
do not resume driving but contact a
Lancia Dealership;
after driving for about 10 minutes
stop and check the tyre pressure again;
pull up the handbrake. For the safety
of the car when it is parked, follow
the indication in the paragraph "When
parked" in the chapter "Starting up and
driving".
if a pressure value of at least 1.8 bar
is detected, restore the correct
pressure (with the engine running and
the handbrake engaged), resume
driving and drive with care to nearest
Lancia Dealership.
WARNING
136)Give the instruction brochure to the
personnel charged with handling the
tyre treated with the quick tyre repair kit.
137)Holes and damage on the tyre side
walls cannot be repaired. Do not use
the quick tyre repair kit if the tyre is
damaged as a result of driving with it
deflated.
138)Repairs are not possible in the case
of damage to the wheel rim (bad groove
distortion causing air loss). Do not remove
the foreign body (screws or nails) from
the tyre.
139)Never operate the compressor for
longer than 20 consecutive minutes. Risk
of overheating. Tyres repaired with the
quick tyre repair kit must only be used
temporarily, as the kit is not suitable for a
definitive repair.
111L0F0006C
112L0F0176C
121
Page 125 of 200

with a second lead, connect the
negative terminal–of the auxiliary
battery to an earth point
on
the engine or the gearbox of the car to
be started;
start the engine;
when the engine has been started,
remove the leads reversing the order
above.
For versions with Start&Stop system, to
carry out the jump starting procedure,
refer to paragraph “Start&Stop system”
in the “Knowing your vehicle” section.
If after a few attempts the engine does
not start, do not persist but contact
a Lancia Dealership.IMPORTANT Do not directly connect
the negative terminals of the two
batteries: sparks could ignite explosive
gas released from the battery. If the
auxiliary battery is installed on another
car, prevent accidental contact
between metallic parts of the two cars.
WARNING
145)This starting procedure must be
performed by expert personnel because
incorrect actions could cause electrical
discharge of considerable intensity.
Furthermore, battery fluid is poisonous and
corrosive: avoid contact with skin and
eyes. Keep naked flames and lighted
cigarettes away from the battery and do
not cause sparks.
146)Remove any metal objects (e.g. rings,
watches, bracelets), that might cause an
accidental electrical contact and cause
serious injury.
WARNING
57)Never use a fast battery-charger to
start the engine as this could damage the
electronic systems of your vehicle,
particularly the ignition and engine fuel
supply control units.58)Do not connect the cable to the
negative terminal (–) of the flat battery. The
following spark could lead to battery
explosion and cause serious harm. Only
use the specific earth point; do not use any
other exposed metallic part.
113L0F0084C
123
Page 127 of 200
VERSIONS WITH DUAL FUNCTION
SYSTEM GEARBOX
Make sure that the gearbox is in neutral
(N) (checking that the vehicle moves
when pushed) and proceed in the same
way as for towing a normal vehicle
with a manual gearbox.
If the gearbox cannot be put in neutral,
do not tow the car and contact a
Lancia Dealership.
WARNING
148)Before towing, turn the ignition key to
MAR-ON and then to STOP without
removing it. The steering column
will automatically lock when the key is
removed and the wheels cannot be
steered.
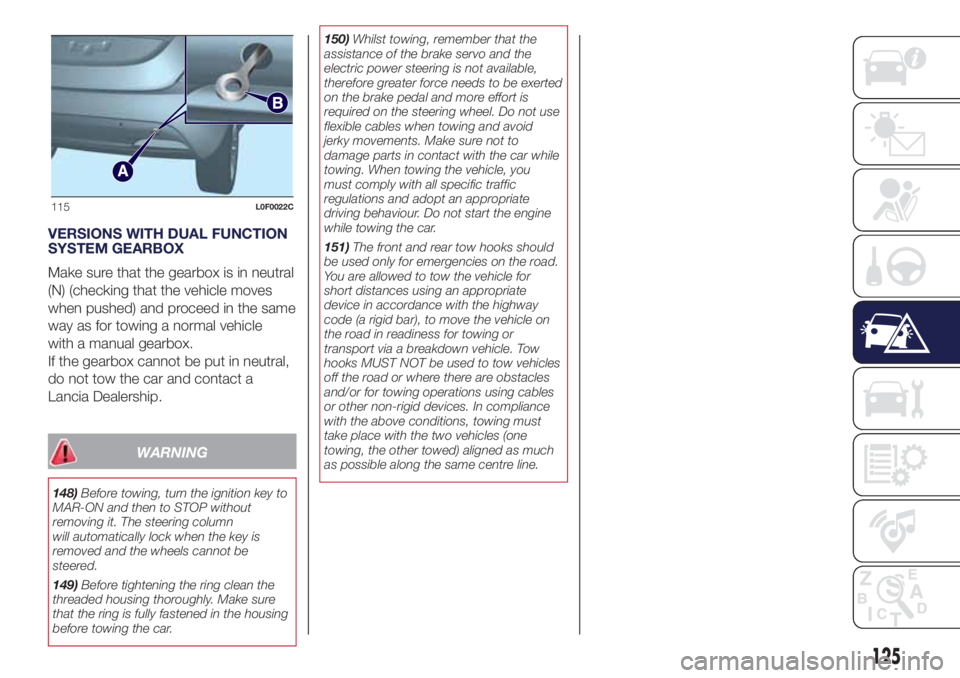
149)Before tightening the ring clean the
threaded housing thoroughly. Make sure
that the ring is fully fastened in the housing
before towing the car.150)Whilst towing, remember that the
assistance of the brake servo and the
electric power steering is not available,
therefore greater force needs to be exerted
on the brake pedal and more effort is
required on the steering wheel. Do not use
flexible cables when towing and avoid
jerky movements. Make sure not to
damage parts in contact with the car while
towing. When towing the vehicle, you
must comply with all specific traffic
regulations and adopt an appropriate
driving behaviour. Do not start the engine
while towing the car.
151)The front and rear tow hooks should
be used only for emergencies on the road.
You are allowed to tow the vehicle for
short distances using an appropriate
device in accordance with the highway
code (a rigid bar), to move the vehicle on
the road in readiness for towing or
transport via a breakdown vehicle. Tow
hooks MUST NOT be used to tow vehicles
off the road or where there are obstacles
and/or for towing operations using cables
or other non-rigid devices. In compliance
with the above conditions, towing must
take place with the two vehicles (one
towing, the other towed) aligned as much
as possible along the same centre line.
115L0F0022C
125
Page 144 of 200
64)Incorrect installation of electric and
electronic devices may cause severe
damage to your car. After purchasing your
car, if you wish to install any accessories
(car alarm, car phone etc.), contact a
Lancia Dealership, which will suggest the
most appropriate devices for your vehicle
and will, most importantly, advise you if
a highercapacity battery needs to be
installed.
WARNING
5)Used engine oil and oil filters contain
substances which are harmful to the
environment. You are advised to go to a
Lancia Dealership to have the oil and filters
replaced.
6)Used transmission fluid contains
substances that are harmful to the
environment. We advise going to a Lancia
Dealership to change the oil as they are
equipped to dispose of the used oil in
accordance with the legislation governing
the safeguarding of the environment.
7)Batteries contain substances which are
very dangerous for the environment. For
battery replacement, contact a Lancia
Dealership.
BATTERY
RECHARGING
163)
IMPORTANT The battery recharging
procedure is given as information only.
You are advised to go to a Lancia
Dealership to have this operation
performed.
IMPORTANT After turning the ignition
key to STOP and having closed the
driver's side door, wait at least one
minute before disconnecting and then
reconnecting the electrical supply to the
battery.
Low amperage slow recharging for
approximately 24 hours is advised.
Charging for a longer time may damage
the battery.
VERSIONS WITHOUT
START&STOP SYSTEM
(for versions/markets, where provided)
To recharge, proceed as follows:
disconnect the terminal from the
negative battery pole;
connect the charger cables to the
battery terminals, observing the polarity;
turn on the battery charger;
when it is recharged, turn the
charger off before disconnecting it from
the battery;
reconnect the terminal to the
negative battery pole.
VERSIONS WITH
START&STOP SYSTEM
(for versions/markets, where provided)
To recharge, proceed as follows:
disconnect the connector A fig. 119
(pressing the button B) from the sensor
C monitoring the battery conditions,
on the negative pole D of the battery;
connect the positive cable of the
battery charger to the positive battery
terminal E and the negative cable to
sensor terminal D as shown;
turn on the battery charger. At the
end of the charging process, switch the
battery charger off;
after having disconnected the
battery charger, reconnect connector A
fig. 119 to the sensor C as shown.
142
SERVICING AND CARE
Page 147 of 200
WHEELS AND TYRES
165) 166) 167) 168) 169)
IMPORTANT NOTES
Take the following precautions to
prevent damage to the tyres:
avoid braking suddenly, racing starts
and violent impact against the curb,
potholes or other obstacles and driving
for extended periods on uneven road
surfaces;
periodically check that the tyres
have no cuts in the side wall, abnormal
swelling or irregular tread wear;
avoid travelling with the vehicle
overloaded. If a tyre is punctured, stop
immediately and change it;
tyres age even if they are not used
much. Cracks in the tread rubber
and at the sides are a sign of ageing. In
any case, if the tyres have been on
the car for over 6 years, they should be
checked by specialised personnel.
Also remember to check the
space-saver wheel very carefully (for
versions/markets, where provided);
alternate the tyres, between front
and rear, every 10-15 thousand
kilometres, keeping them on the same
side of the car so as not to reverse
the direction of rotation;
in the case of replacement, always
fit new tyres, avoiding those of
unknown origin;
if a tyre is changed, also change the
inflation valve.
avoid travelling with partially or
completely deflated tyres as this can
compromise safety and damage the
tyres beyond repair.
WARNING
165)The road holding qualities of the car
also depend on the correct inflation
pressure of the tyres.
166)If tyre pressure is too low, it may
overheat and be severely damaged as a
result.
167)Do not cross switch the tyres, moving
them from the right of the car to the left
and vice versa.
168)Do not repaint alloy wheel rims at
temperatures higher than 150°C. The
mechanical characteristics of the wheels
might be compromised.
169)Travelling with partially or completely
deflated tyres can cause safety problems
and damage the concerned tyre beyond
repair.
BODY
PRESERVING THE
BODYWORK
Paint
Touch up abrasions and scratches
immediately to prevent the formation of
rust.
Maintenance of paintwork consists of
washing the car: the frequency
depends on the conditions and
environment where the car is used. For
example, in highly polluted areas, or if
the roads are spread with salt, it is
advisable to wash the car more
frequently.
To correctly wash the car, proceed as
follows:
remove the aerial from the roof to
prevent damage to it if the car is
washed in an automatic system;
if there is any decorative sticker or if
high pressure jets or cleaners are used
to wash the car, keep a distance of
at least 40 cm from the bodywork to
avoid damage or alteration;
wash the bodywork using a low
pressure jet of water;
wipe a sponge with a slightly soapy
solution over the bodywork, frequently
rinsing the sponge;
145
Page 166 of 200
FUEL CONSUMPTION
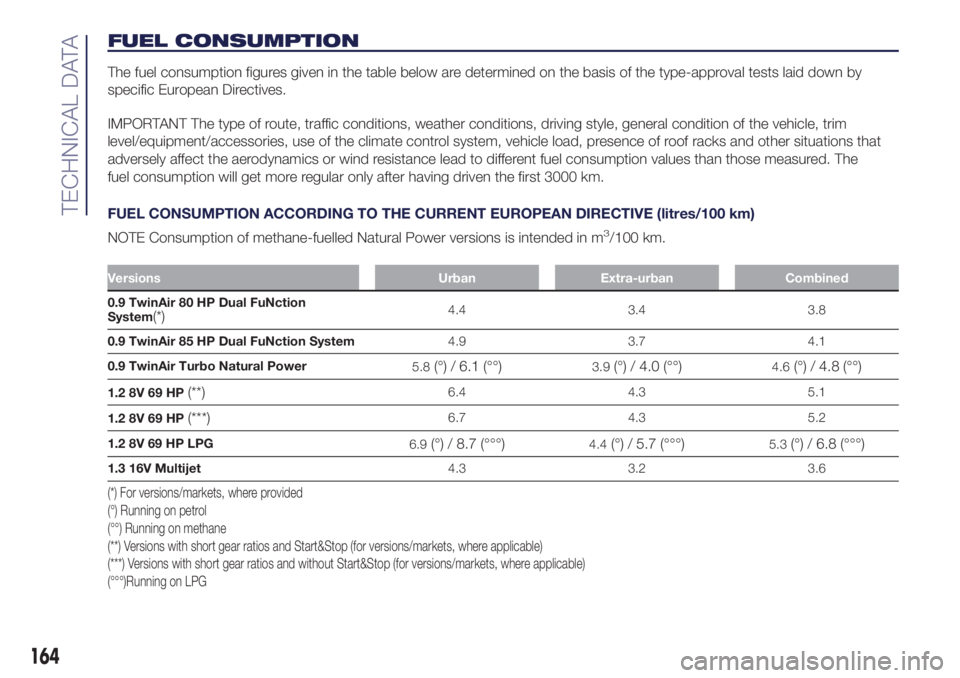
The fuel consumption figures given in the table below are determined on the basis of the type-approval tests laid down by
specific European Directives.
IMPORTANT The type of route, traffic conditions, weather conditions, driving style, general condition of the vehicle, trim
level/equipment/accessories, use of the climate control system, vehicle load, presence of roof racks and other situations that
adversely affect the aerodynamics or wind resistance lead to different fuel consumption values than those measured. The
fuel consumption will get more regular only after having driven the first 3000 km.
FUEL CONSUMPTION ACCORDING TO THE CURRENT EUROPEAN DIRECTIVE (litres/100 km)
NOTE Consumption of methane-fuelled Natural Power versions is intended in m
3/100 km.
Versions Urban Extra-urban Combined
0.9 TwinAir 80 HP Dual FuNction
System(*)4.4 3.4 3.8
0.9 TwinAir 85 HP Dual FuNction System4.9 3.7 4.1
0.9 TwinAir Turbo Natural Power
5.8
(°) / 6.1 (°°)3.9(°) / 4.0 (°°)4.6(°) / 4.8 (°°)
1.2 8V 69 HP(**)6.4 4.3 5.1
1.2 8V 69 HP
(***)6.7 4.3 5.2
1.2 8V 69 HP LPG
6.9
(°) / 8.7 (°°°)4.4(°) / 5.7 (°°°)5.3(°) / 6.8 (°°°)
1.3 16V Multijet4.3 3.2 3.6
(*) For versions/markets, where provided
(°) Running on petrol
(°°) Running on methane
(**) Versions with short gear ratios and Start&Stop (for versions/markets, where applicable)
(***) Versions with short gear ratios and without Start&Stop (for versions/markets, where applicable)
(°°°)Running on LPG
164
TECHNICAL DATA
Page 167 of 200

CO2EMISSIONS
The CO2emission levels given in the following table refer to combined consumption.
Versions CO2emissions according to the current European directive (g/km)
0.9 TwinAir 80 HP Dual FuNction
System(*)88
0.9 TwinAir 85 HP Dual FuNction System97
0.9 TwinAir Turbo Natural Power
107
(°)/86(°°)
1.2 8V 69 HP(**)118
1.2 8V 69 HP
(***)120
1.2 8V 69 HP LPG
124
(°)/ 110(°°°)
1.3 16V MultiJet95
(*) For versions/markets, where provided
(°) Running on petrol
(°°) Running on methane
(**)Versions with short gear ratios and Start&Stop (for versions/markets, where applicable)
(***) Versions with short gear ratios without Start&Stop (for versions/markets, where applicable)
(°°°) Running on LPG
165
Page 181 of 200
The App can by downloaded from "App
Store" or "Google play".
For safety reasons, the App cannot be
accessed when the phone is paired
with the radio.
Personal details (e-mail and password)
are required to access theUconnect™
LIVEradio services, therefore the
content of your personal accounts is
protected and can only be accessed by
the real user.
Connected services that can be
accessed on the vehicle
TheUconnect™LIVEservices
available in the radio menu can change
according to the market.
Theeco:Drive™ application is
developed to improve the customer's
driving experience and is available in all
countries where theUconnect™
LIVEservices can be accessed.
For further information visit the
www.driveuconnect.eu website.
If the navigation system is installed in
the radio, accessing theUconnect™
LIVEservices enables use of the
TomTom LIVE services. Further
information about the LIVE functions is
available in the dedicated chapter.eco:Drive™
Theeco:Drive™ application allows you
to display your driving behaviour in
real time, in order to help you reach a
more efficient driving style as far as
consumption and emissions are
concerned.
In addition, the data can be saved on
an USB stick, and the data analysis can
be made on your personal computer
with theeco:Drive™ desktop
application, available on www.fiat.it or
www.driveuconnect.eu.
Driving style is evaluated by means of
four indices which monitor the following
parameters:
Acceleration
Deceleration
Transmission
Speed
eco:Drive™ display
Press theeco:Drive™ button to
interact with the function.
A screen will be displayed on the radio,
showing the 4 indices described above.
These indices are grey until the system
has enough data to evaluate the driving
style.Once sufficient data are available, the
indices will have 5 colours depending
on the evaluation: dark green (very
good), light green, yellow, orange and
red (very bad).
"Current trip index" refers to the entire
value calculated in real time based
on the average of the described
indices. It represents eco-friendliness of
the driving style: from 0 (low) to 100
(high).
In the event of extended inactivity the
display will show the average of the
indexes until that moment (the "Average
index"), then the indexes will be
coloured again in real time as soon as
the vehicle is restarted.
To check the data average of previous
route (the "route" starts when the
ignition key is turned to MAR and stops
when it is turned to STOP), select the
"Previous route" button.
The details of the previous trip can also
be displayed by pressing the "Details"
button, in which journey duration (time
and mileage) and average speed will be
reported.
179