lock Lancia Ypsilon 2020 Owner handbook (in English)
[x] Cancel search | Manufacturer: LANCIA, Model Year: 2020, Model line: Ypsilon, Model: Lancia Ypsilon 2020Pages: 200, PDF Size: 4.53 MB
Page 138 of 200
REGULAR CHECKS
Every 1,000 km or before long
journeys, check and, if necessary, top
up:
engine coolant, brake fluid and
windscreen washer fluid level;
tyre inflation pressure and condition;
operation of lighting system
(headlights, direction indicators, hazard
warning lights, etc.);
operation of windscreen washer/
wiper system and positioning/wear of
rear window wiper blades.
Every 3,000 km, check and top up if
required: engine oil level.
For cars with 0.9 TwinAir engines:
every3,000km check the engine oil
level and top it up to the maximum level
if necessary.
DEMANDING USE OF THE
CAR
If the car is used mainly under one of
the following conditions:
towing a trailer or caravan;
dusty roads;
short, repeated journeys (less than
7-8 Km) at sub-zero outdoor
temperatures;
engine often idling or driving long
distances at low speeds or long periods
of inactivity;perform the following inspections more
frequently than shown on the
Scheduled Servicing Plan:
check front disc brake pad condition
and wear;
check cleanliness of bonnet and
luggage compartment locks,
cleanliness and lubrication of linkage;
visually inspect conditions of:
engine, gearbox, transmission, pipes
and hoses (exhaust/fuel system/brakes)
and rubber elements (gaiters/sleeves/
bushes, etc.);
check battery charge and battery
fluid level (electrolyte);
visually inspect conditions of the
accessory drive belts;
check and, if necessary, change
engine oil and replace oil filter;
check and, if necessary, replace
pollen filter;
check and, if necessary, replace air
cleaner.
136
SERVICING AND CARE
Page 145 of 200
WINDSCREEN /
REAR WINDOW
WIPERS
164)65)
Replacing the
windscreen wiper
blades
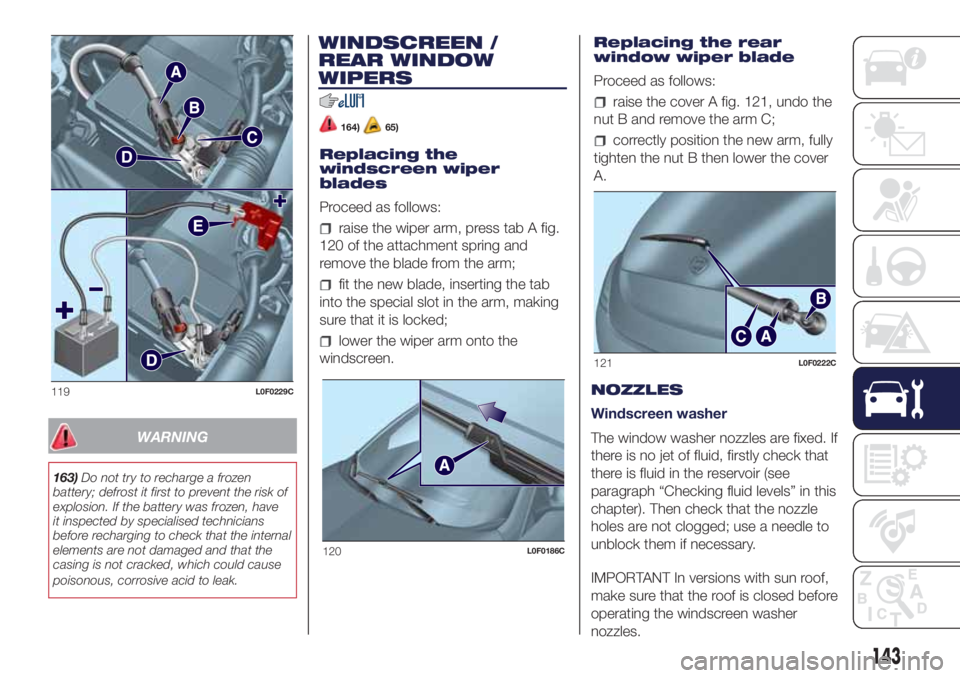
Proceed as follows:
raise the wiper arm, press tab A fig.
120 of the attachment spring and
remove the blade from the arm;
fit the new blade, inserting the tab
into the special slot in the arm, making
sure that it is locked;
lower the wiper arm onto the
windscreen.Replacing the rear
window wiper blade
Proceed as follows:
raise the cover A fig. 121, undo the
nut B and remove the arm C;
correctly position the new arm, fully
tighten the nut B then lower the cover
A.
NOZZLES
Windscreen washer
The window washer nozzles are fixed. If
there is no jet of fluid, firstly check that
there is fluid in the reservoir (see
paragraph “Checking fluid levels” in this
chapter). Then check that the nozzle
holes are not clogged; use a needle to
unblock them if necessary.
IMPORTANT In versions with sun roof,
make sure that the roof is closed before
operating the windscreen washer
nozzles.
119L0F0229C
120L0F0186C
121L0F0222C
143
WARNING
163)Do not try to recharge a frozen
battery; defrost it first to prevent the risk of
explosion. If the battery was frozen, have
it inspected by specialised technicians
before recharging to check that the internal
elements are not damaged and that the
casing is not cracked, which could cause
poisonous, corrosive acid to leak.
Page 150 of 200
IDENTIFICATION
DATA
It is advisable to take note of the
identification codes. The following
identification codes are printed and
shown on the plates:
VIN plate.
Chassis marking.
Bodywork paint identification plate.
Engine marking.
VEHICLE IDENTIFICATION
NUMBER (VIN) PLATE
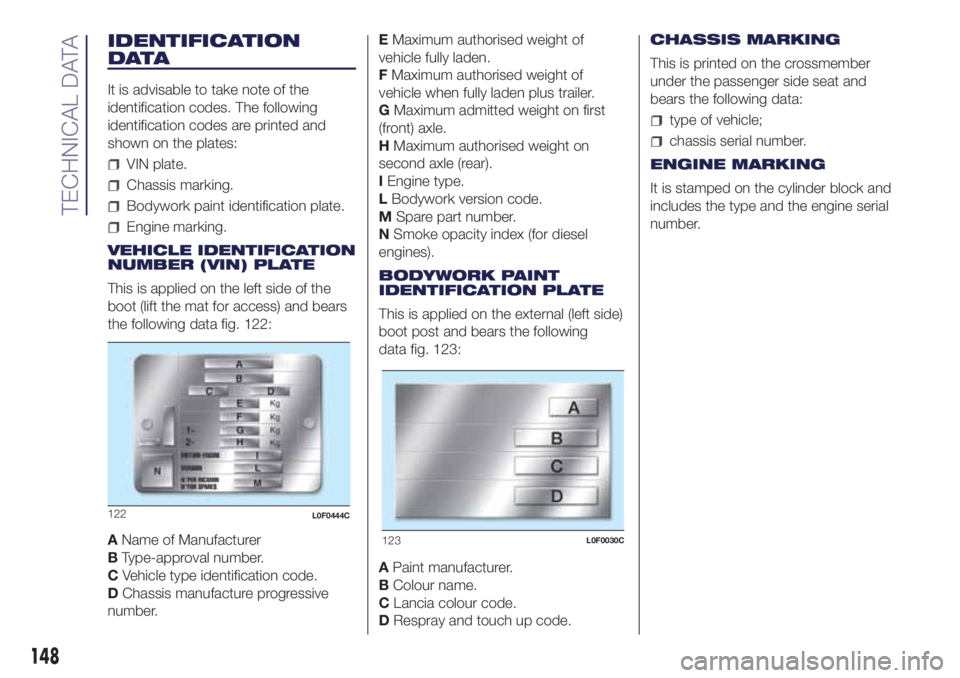
This is applied on the left side of the
boot (lift the mat for access) and bears
the following data fig. 122:
AName of Manufacturer
BType-approval number.
CVehicle type identification code.
DChassis manufacture progressive
number.EMaximum authorised weight of
vehicle fully laden.
FMaximum authorised weight of
vehicle when fully laden plus trailer.
GMaximum admitted weight on first
(front) axle.
HMaximum authorised weight on
second axle (rear).
IEngine type.
LBodywork version code.
MSpare part number.
NSmoke opacity index (for diesel
engines).
BODYWORK PAINT
IDENTIFICATION PLATE
This is applied on the external (left side)
boot post and bears the following
data fig. 123:
APaint manufacturer.
BColour name.
CLancia colour code.
DRespray and touch up code.CHASSIS MARKING
This is printed on the crossmember
under the passenger side seat and
bears the following data:
type of vehicle;
chassis serial number.
ENGINE MARKING
It is stamped on the cylinder block and
includes the type and the engine serial
number.
123L0F0030C
148
TECHNICAL DATA
122L0F0444C
Page 170 of 200
TIPS, CONTROLS
AND GENERAL
INFORMATION
ROAD SAFETY
Learn how to use the various system
functions before setting off.
Read the instructions for the system
carefully before setting off.
172) 173)
RECEPTION CONDITIONS
Reception conditions change
constantly while driving. Reception may
be interfered with by the presence of
mountains, buildings or bridges,
especially when you are far away from
the broadcaster.
IMPORTANT The volume may be
increased when receiving traffic
information and news.CARE AND
MAINTENANCE
70) 71)
Observe the following precautions to
ensure the system is fully operational:
the display is sensitive to scratching,
liquids and detergents. The display
should not come into contact with
pointed or rigid objects which could
damage its surface. Do not press
on the display when cleaning it.
never use alcohol, petrols and
derivatives to clean the display lens.
prevent any liquid from entering the
system: this could damage it beyond
repair.
MEDIA DEVICES
IMPORTANT Some multimedia players
may not be compatible with the
Uconnect™ system.
ANTITHEFT PROTECTION
The system is equipped with an
anti-theft protection system based on
the exchange of information with the
electronic control unit (Body Computer)
on the vehicle.
This guarantees maximum safety and
prevents the secret code from being
entered after the power supply has
been disconnected.If the check has a positive outcome, the
system will start to operate, whereas if
the comparison codes are not the
same or if the electronic control unit
(Body Computer) is replaced, the
system will ask the user to enter the
secret code according to the procedure
described in the paragraph below.
Entering the secret code
When the system is switched on, if the
code is requested, the display will
show "Please enter Anti-Theft Code"
followed by the screen showing a
keypad to enter the secret code.
The secret code is made up of four
digits, from 0 to 9: to insert the code,
turn the "BROWSE ENTER" right knob
and press to confirm.
After inserting the fourth digit, move the
cursor to "OK" and press the
"BROWSE ENTER" right knob: the
system will start to operate.
If an incorrect code is entered, the
system displays "Incorrect Code" to
notify the user of the need to enter the
correct code.
After the 3 available attempts to enter
the code, the system displays
"Incorrect Code. Radio locked. Wait for
30 minutes". After the text has
disappeared it is possible to start the
code entering procedure again.
168
MULTIMEDIA
Page 176 of 200
SWITCHING THE SYSTEM
ON/OFF
The system is switched on/off by
pressing the
(ON/OFF) button/knob.
Turn the button/knob clockwise to
increase the radio volume or
anticlockwise to decrease it.
The system is equipped with the
following tuners: AM, FM and DAB (for
versions/markets, where provided).
RADIO MODE
Press the RADIO button on the front
panel to activate radio mode.
After the desired radio station is
selected, the following information is
shown on the display:
At the top: the list of radio stations
stored (preset) is displayed; the station
currently playing is highlighted.
In the middle: display of the name of
the current radio station and the
buttons for selecting the previous or
next radio station.
At the bottom: display of the following
buttons:
"Browse": list of the radio stations
available;
"AM/FM", "AM/DAB", "FM/DAB":
selection of the desired frequency band
(button reconfigurable according to
the band selected: AM, FM or DAB);
"Tune" : manual radio station tuning
(not available for DAB radios);
"Info": additional information on the
source being listened to;
"Audio": access to the "Audio
settings" screen.
Radio station selection
To search for the desired radio station
press buttons
oron the display
or use the steering wheel controls.
Previous/next radio station search
Briefly press buttons
oron
the display: when the button is released
the previous or the next radio station
is displayed.
Previous/next radio station fast
search
Hold down buttons
oron the
display to start fast search: when the
button is released, the first tunable
radio station can be heard.
Audio menu
To access the "Audio" menu press the
Audio" button located at the bottom
of the display.
The following adjustments can be
carried out using the "Audio" menu:
"Equaliser" (for versions/markets,
where provided);
"Balance/Fader" (left/right and
front/rear audio balance adjustment);
"Speed/Volume" (speed-dependent
automatic volume control);
"Loudness" (for versions/markets,
where provided);
"Auto-On Radio";
"Radio Off Delay".
To exit the "Audio" menu, press the
/Done button.
MEDIA MODE
Audio source selection
Press the "Source" button to select the
desired audio source among those
available: AUX, USB, iPod or
Bluetooth®.
NOTE Applications used on portable
devices may be not compatible with the
Uconnect™system
Track change
Briefly press the
button or turn the
BROWSE ENTER button/knob
clockwise to play the next track or
briefly press the
button or turn the
BROWSE ENTER button/knob
anticlockwise to return to the beginning
of the selected track or to the beginning
of the previous track if it has been
played for less than 3 seconds.
174
MULTIMEDIA
Page 182 of 200
Trip data storage and transfer
The trip data can be stored in
the system memory and transferred
using a suitably configured USB flash
drive orUconnect™LIVE App. This
allows you to display the history of
the collected data, showing the
complete analysis of the trip data and
of your driving style.
Further information is available at
www.driveuconnect.eu.
IMPORTANT Do not remove the USB
memory stick nor unpair the
smartphone and theUconnect™LIVE
Appbefore the system has
downloaded the data, since these
could be lost. During the transfer of
data to the devices, messages may
appear on the radio display to guide the
user correctly through the operation;
follow these instructions. These
messages are only displayed with the
ignition key at STOP and when a delay
in the system switching off is set. The
data are automatically transferred to the
devices when the engine is switched
off. Transferred data will be deleted
from the system memory in this
manner. You can choose to store the
trip data or not, by pressing the
"Settings" button and by setting the
storage activation and the USB or
Cloud transfer mode.When the USB memory stick is full, the
warning messages are shown on the
radio display.
When theeco:Drive™ data are not
transferred to USB memory stick for a
long time, the internal memory of the
Uconnect™LIVEsystem may be
exhausted. Follow the instructions given
by the messages on the radio display.
SETTINGS
Press SETTINGS button
on the
front panel (versions withUconnect™
5” Radio LIVE) or the APPS button
on the front panel and then the
“Settings” graphic button (versions with
Uconnect™ 5” Radio Nav LIVE) on
the display to view the “Settings” main
menu.
NOTE The menu items displayed vary
according to the versions.
The menu includes the following items:
Display;
Units;
Voice controls;
Clock & Date;
Safety (for versions/markets where
provided)
Lights (for versions/markets where
provided);
Doors & Locks;
Vehicle Off Options;
Audio;
Phone / Bluetooth;
Configurat. SiriusXM (for versions/
markets where provided);
Radio Setup;
Restore settings;
Clear Personal Data.
Safety
(for versions/markets, where provided)
This function can be used to carry
out the following adjustments:
"Rain sensor"(for versions/markets,
where provided): this function can be
used to activate/deactivate the
automatic operation of the wipers in the
event of rain.
NAVIGATION
(Uconnect™ 5" Radio Nav LIVE only)
IMPORTANT In the interest of safety
and to reduce distractions while you are
driving, you should always plan a route
before you start driving.
To plan a route, do the following:
tap the screen to open the Main
menu;
Tap "Navigate to" or "Drive to".
Tap "Address". You can change the
country or state setting by tapping
the flag before you select a city.
180
MULTIMEDIA
Page 183 of 200
Enter the town or city name, or the
postcode. Towns with similar names
are shown in the list while you type.
When the correct city or town appears
in the list, tap the name to select the
destination.
Enter the street name. Streets with
similar names are shown in the list while
you type. When the correct street
name appears in the list, tap the name
to select the destination.
Enter the house number, then tap
"Done".
If in the Advanced settings menu the
"Show location preview" option is
active, your position is shown on the
map. Tap "Select" to continue or tap
"Back" to enter another address.
When the new route is shown, tap
"Done". For more information about the
route, tap on "Details". To change
your route, for example, to travel via a
particular location or to select a new
destination, tap "Change route".
You are guided to your destination,
using spoken instructions and
on-screen directions.Updating the map
Two modes for downloading a map
update are available:
Most recent maps guarantee: if a
new map is available for your system
within 90 days of initial use, you can
download it once free of charge.
Map update: you can purchase a
new version of the map installed on
your system.
Preparing a USB device
To update the map, use a USB device
that meets the following requirements.
Ideally, the USB device should be
empty.
The USB device must have at least
8 GB of memory free.
The USB device must use a FAT-32
file system.
The USB device must not be
blocked and must allow files to be
saved.
NOTE: the use of a memory stick is
recommended, while the use of mass
storage devices, such as mobile
phones or multimedia players, is not
recommended.
To prepare a USB device, proceed as
follows:
SelectNavigation updatesin the
settingsmenu.You are asked whether you wish to
prepare a USB device for downloading
updates.
SelectYes.
Insert the USB device.
NOTE If the system continues to ask
you to insert the USB device, check
that the device meets the requirements
indicated previously, then retry.
The system starts to prepare the USB
device.
When the USB device is ready, a
dedicated message is displayed.
Remove the USB device and
connect it to the computer. The new
map can now be downloaded to the
USB device.
TomTom home installation
To install TomTom HOME and create a
MyTomTom account, proceed as
follows:
Download and install the TomTom
HOME application on the computer. On
the computer, access tomtom.com/
getstarted. Select "Download TomTom
HOME", then follow the instructions
provided.
Connect the USB device prepared
with the computer. TomTom HOME
is started automatically.
Select "Enter" in the top right corner
of TomTom HOME.
181
Page 198 of 200
Occupant protection systems
.......71
Official type approvals..............184
Paintwork (cleaning and
maintenance)
....................145
Parking lights.......................18
Parking sensors....................101
Performance (top speed)...........163
Petrol versions service
scheduled plan..................128
Pre-tensioners......................74
Rain sensor
........................21
Rear fog lights.......................19
Rear view mirrors....................16
Rear window washer
rear window washer fluid
level...........................140
Rear Window Wiper
blade replacement.............143
blades.........................143
Rear window wiper/washer..........21
Refuelling
capacities table................158
Refuelling procedure...............103
Emergency refuelling...........104
Refuelling the vehicle...............103
Regular checks....................136Replacing a bulb...................107
Replacing an exterior bulb..........109
Safe Lock (device)
..................12
SBR (Seat Belt Reminder)
system...........................73
Scheduled Servicing...............127
Screen wiper/washer................21
Seat belts...........................72
Seats...............................13
Setup menu.........................42
Side bags...........................90
Side lights..........................18
Snow chains.......................154
Spark plugs (type)..................149
Starting the engine..................94
Steering wheel......................16
Stop/Start system...................98
Sun roof ............................28
Supplementary Restraint System
(SRS) - Airbag....................87
Symbols.............................4
Technical specifications
............148
The keys.............................9
Tips, controls and general
information......................168
Towing the vehicle..................124Towing trailers.....................102
Ty r e s
inflation pressures..............153
UconnectTM5 Radio LIVE. . . . . . . . . .170
Uconnect 5 Radio Nav LIVE . . . . . . .170
"Universal" child restraint system
fitting.............................82
Version with LPG system............33
Version with methane system
(Natural Power)...................35
Warning lights and messages.......44
Weights and loads.................156
Wheels............................152
Wheels and tyres...................145
Window bag........................90
Windows (cleaning)................146
Windscreen washer
windscreen washer fluid level.................................140
Windscreen wiper
blades.........................143
replacing blades................143
Windscreen/rear window wiper.......21
INDEX
FCA Italy S.p.A. - MOPAR - Technical Services - Service Engineering
Largo Senatore G. Agnelli, 3 - 10040 Volvera - Turin (Italy)
Print no. 603.99.852 - 06/2017 - 2 Edition
TM