bulb Lancia Ypsilon 2020 Owner handbook (in English)
[x] Cancel search | Manufacturer: LANCIA, Model Year: 2020, Model line: Ypsilon, Model: Lancia Ypsilon 2020Pages: 200, PDF Size: 4.53 MB
Page 22 of 200
Rear fog lights
Press the
fig. 18 button to switch
the light on/off.
The rear fog light switches on only
when the dipped headlights or
fog lights are switched on. Press the
button again to switch the light off,
or switch off the dipped headlights or
the front fog lights (for versions/
markets, where provided).
WARNING
16)The daytime running lights are an
alternative to the dipped headlights for
driving during the daytime in countries
where it is compulsory to have lights on
during the day; where it is not compulsory,
the use of daytime running lights is
permitted.
17)Daytime running lights cannot replace
dipped beam headlights when driving at
night or through tunnels. The use of
daytime running lights is governed by the
highway code of the country in which
you are driving. Comply with legal
requirements.
INTERIOR LIGHTS
FRONT CEILING LIGHT
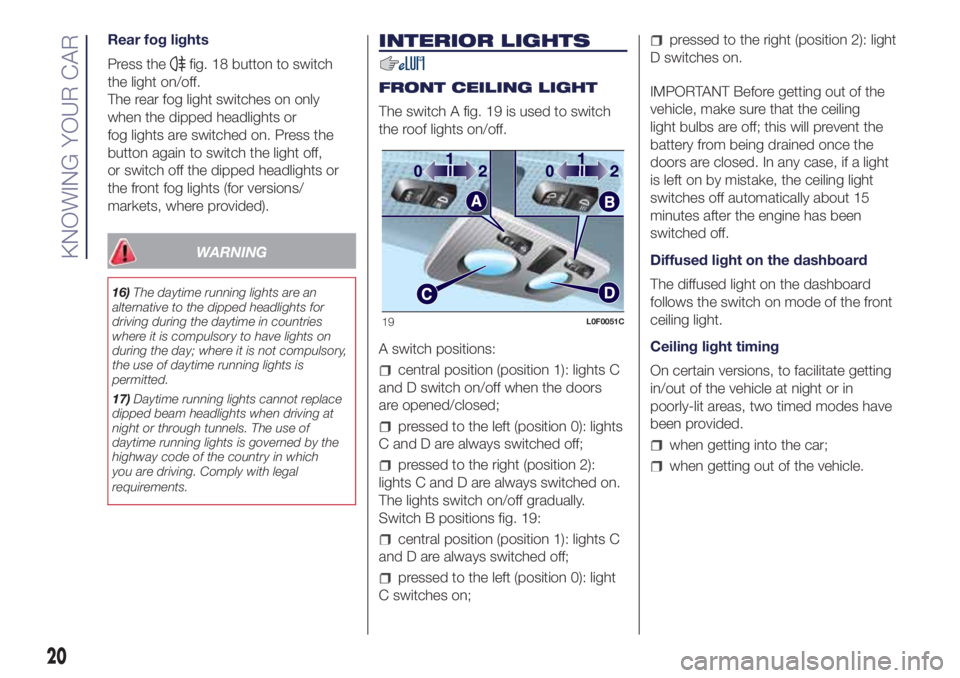
The switch A fig. 19 is used to switch
the roof lights on/off.
A switch positions:
central position (position 1): lights C
and D switch on/off when the doors
are opened/closed;
pressed to the left (position 0): lights
C and D are always switched off;
pressed to the right (position 2):
lights C and D are always switched on.
The lights switch on/off gradually.
Switch B positions fig. 19:
central position (position 1): lights C
and D are always switched off;
pressed to the left (position 0): light
C switches on;
pressed to the right (position 2): light
D switches on.
IMPORTANT Before getting out of the
vehicle, make sure that the ceiling
light bulbs are off; this will prevent the
battery from being drained once the
doors are closed. In any case, if a light
is left on by mistake, the ceiling light
switches off automatically about 15
minutes after the engine has been
switched off.
Diffused light on the dashboard
The diffused light on the dashboard
follows the switch on mode of the front
ceiling light.
Ceiling light timing
On certain versions, to facilitate getting
in/out of the vehicle at night or in
poorly-lit areas, two timed modes have
been provided.
when getting into the car;
when getting out of the vehicle.
19L0F0051C
20
KNOWING YOUR CAR
Page 62 of 200
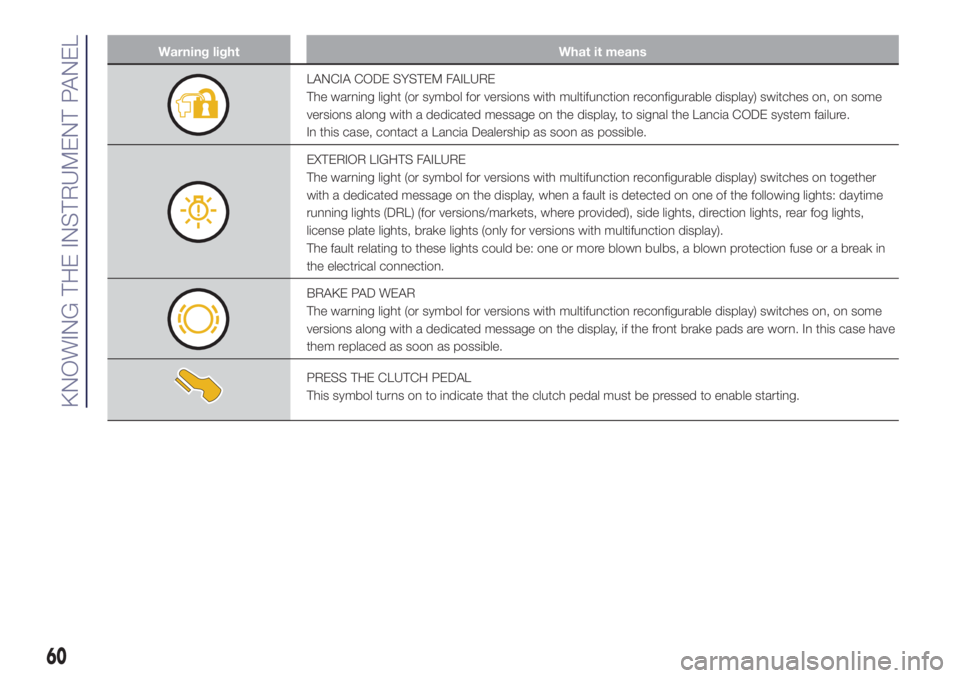
Warning light What it means
LANCIA CODE SYSTEM FAILURE
The warning light (or symbol for versions with multifunction reconfigurable display) switches on, on some
versions along with a dedicated message on the display, to signal the Lancia CODE system failure.
In this case, contact a Lancia Dealership as soon as possible.
EXTERIOR LIGHTS FAILURE
The warning light (or symbol for versions with multifunction reconfigurable display) switches on together
with a dedicated message on the display, when a fault is detected on one of the following lights: daytime
running lights (DRL) (for versions/markets, where provided), side lights, direction lights, rear fog lights,
license plate lights, brake lights (only for versions with multifunction display).
The fault relating to these lights could be: one or more blown bulbs, a blown protection fuse or a break in
the electrical connection.
BRAKE PAD WEAR
The warning light (or symbol for versions with multifunction reconfigurable display) switches on, on some
versions along with a dedicated message on the display, if the front brake pads are worn. In this case have
them replaced as soon as possible.
PRESS THE CLUTCH PEDAL
This symbol turns on to indicate that the clutch pedal must be pressed to enable starting.
60
KNOWING THE INSTRUMENT PANEL
Page 108 of 200
IN AN EMERGENCY
A punctured tyre or a burnt-out bulb?
At times, a problem may interfere
with our journey.
The pages on emergencies can help
you to deal with critical situations
independently and with calm.
In an emergency we recommend that
you call the freephone number found in
the Warranty Booklet.
It is also possible to call the national or
international universal freephone
number to search for the nearest
Dealership.HAZARD WARNING LIGHTS...........107
REPLACING A BULB ......................107
REPLACING FUSES........................112
REPLACING A WHEEL ...................117
"FIX&GO AUTOMATIC" KIT .............120
EMERGENCY STARTING ................122
FUEL CUT-OFF SYSTEM ................124
TOWING THE VEHICLE ..................124
106
IN AN EMERGENCY
Page 109 of 200
HAZARD WARNING
LIGHTS
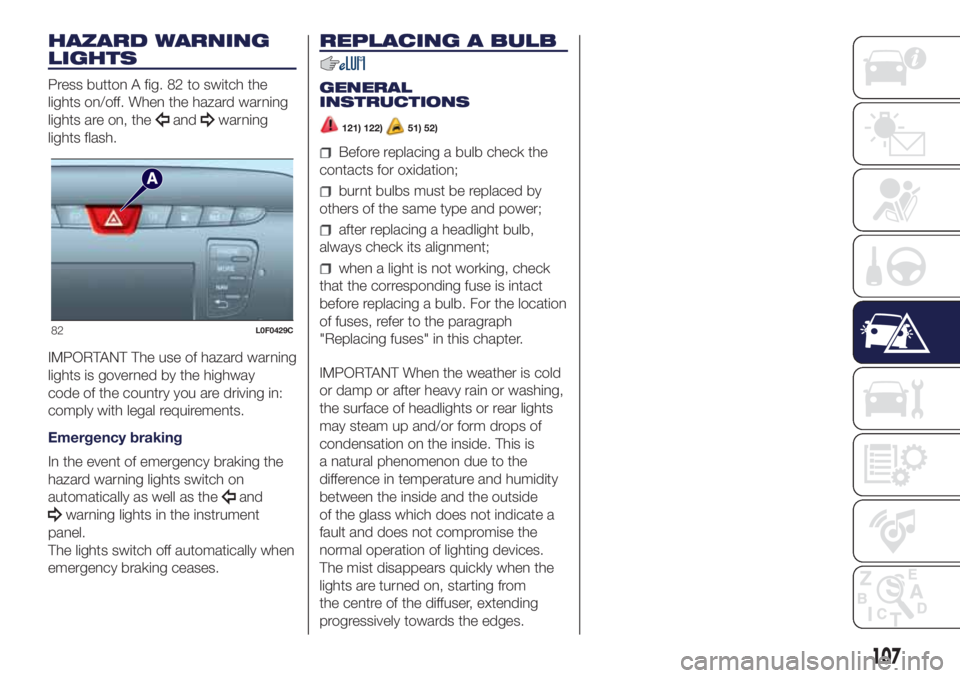
Press button A fig. 82 to switch the
lights on/off. When the hazard warning
lights are on, the
andwarning
lights flash.
IMPORTANT The use of hazard warning
lights is governed by the highway
code of the country you are driving in:
comply with legal requirements.
Emergency braking
In the event of emergency braking the
hazard warning lights switch on
automatically as well as the
and
warning lights in the instrument
panel.
The lights switch off automatically when
emergency braking ceases.
REPLACING A BULB
GENERAL
INSTRUCTIONS
121) 122)51) 52)
Before replacing a bulb check the
contacts for oxidation;
burnt bulbs must be replaced by
others of the same type and power;
after replacing a headlight bulb,
always check its alignment;
when a light is not working, check
that the corresponding fuse is intact
before replacing a bulb. For the location
of fuses, refer to the paragraph
"Replacing fuses" in this chapter.
IMPORTANT When the weather is cold
or damp or after heavy rain or washing,
the surface of headlights or rear lights
may steam up and/or form drops of
condensation on the inside. This is
a natural phenomenon due to the
difference in temperature and humidity
between the inside and the outside
of the glass which does not indicate a
fault and does not compromise the
normal operation of lighting devices.
The mist disappears quickly when the
lights are turned on, starting from
the centre of the diffuser, extending
progressively towards the edges.
82L0F0429C
107
Page 110 of 200

Light bulbs
Use Type Power Ref. Figure
Dipped/main beam headlights H4 55 W D
Front side lights W5W 5 W TO
Daytime running lights (DRL) W21W 21 W B
Rear side lights LED - -
Front direction indicators PY24W 24W B
Side direction indicators W5W 5 W TO
Rear direction indicators PY21W 21 W B
Stop W16W 16 W B
Third brake light LED - -
Fog lights H3 55 W E
Reversing light P21W 21 W B
Rear fog light P21W 21 W B
Number plate W5W 5 W C
Front courtesy light C5W 5 W C
Luggage compartment light W5W 5 W TO
Glove compartment light C5W 5 W C
108
IN AN EMERGENCY
Page 111 of 200

REPLACING AN
EXTERNAL BULB
FRONT LIGHT CLUSTERS
These contain the bulbs for the daytime
running lights (DRL), side lights,
dipped/main beam headlights and
direction indicators.
The bulbs are arranged as follows fig.
83:
Daytime running lights (DRL)
Dipped/main beam headlights and
side lights
Direction indicators
Daytime running lights (DRL)
To replace the bulb, proceed as follows:
remove cover A fig. 83;
turn the snap-fitted bulb holder unit
B fig. 84 anticlockwise, remove bulb
C and replace it;
refit the new bulb then reinsert the
bulb holder B fig. 84 in its housing;
then refit the cover A fig. 83.
Side lights
To replace the bulb, proceed as follows:
remove cover B fig. 83;
remove snap-fitted bulb holder C fig.
85, remove the bulb D and replace it;
refit the new bulb then reinsert
the bulb holder unit C fig. 85 in
its housing;
then refit the cover B fig. 83.
Dipped/main beam headlights
To replace the bulb, proceed as follows:
remove the cover B fig. 83 and
then the snap-fitted bulb holder C fig.
86;
remove bulb D from the connector E
and replace it;
refit the new bulb on the connector
making sure that it is locked correctly,
then reinsert bulb holder C in its
housing;
then refit the cover B fig. 83.
Front direction indicators
To replace the bulb, proceed as follows:
turn the cover C fig. 83
anticlockwise, extract the bulb D fig. 87
from its housing and replace it;
83L0F0033C
84L0F0070C
85L0F0069C
86L0F0068C
109
Page 112 of 200

refit the bulb D in the housing E and
then fit the cover C fig. 83.
Side direction indicators
To replace the bulb, proceed as follows:
adjust the lens A fig. 89 to
compress in the internal catch B, then
pull the unit outwards;
turn the bulb holder C anticlockwise,
extract the bulb and replace it;
refit the bulb holder C in the lens and
turn it clockwise;
refit the cluster making sure that the
internal catch B clips into position.
Front fog lights
(for versions/markets, where provided)
To replace the bulb, proceed as follows:
steer the wheel completely, adjust
the tabs A fig. 89 and remove the
flap B;
adjust the clip C fig. 90 and
disconnect the electrical connector D;
remove the cover E by turning it
clockwise (see the word OFF and the
arrow on the cover);
release the catches F fig. 91
removing them outwards;
release the connector G fig. 92 and
replace the bulb H;
87L0F0071C
88L0F0209C
89L0F0205C
90L0F0206C
91L0F0207C
92L0F0208C
110
IN AN EMERGENCY
Page 113 of 200

refit the new lamp and carry out the
procedure described previously in
reverse.
REAR LIGHT CLUSTERS
These contain the bulbs for the side
lights, brake lights and direction
indicators. The reversing lights and rear
fog lights are located instead in the
rear bumper.
The bulbs are arranged as follows fig.
93:A- Direction indicators
B- Brake lights
Direction indicators/brake lights
Turn the bulb holder in directionO
(open) to replace the bulbs. After
replacing the bulb, turn the bulb holder
in directionC(close).
Side lights
These are LEDs. Contact a Lancia
Dealership for replacement.
THIRD BRAKE LIGHTS
These are located in the tailgate and
are LED lights. Contact a Lancia
Dealership for replacement.
REVERSING LIGHT/REAR FOG
LIGHT
To replace the bulb, proceed as follows:
working from inside the bumper,
turn the bulb holder unit A fig. 94 by a
1/4 turn;
extract the bulb and replace it;
refit the new bulb then reinsert the
bulb holder in its housing.
NUMBER PLATE LIGHTS
To replace the bulbs proceed as
follows:
remove lens A fig. 95;
turn the bulb holder B fig. 96
clockwise, extract the bulb C and
replace it; then refit the lens.
93L0F0034C
94L0F0219C
95L0F0259C
96L0F0214C
111
Page 114 of 200
WARNING
121)Modifications or repairs to the electric
system that are not carried out properly
or do not take the system technical
specifications into account can cause
malfunctions leading to the risk of fire.
122)Halogen bulbs contain pressurised
gas, in the case of breakage they may
burst causing glass fragments to be
projected outwards.
WARNING
51)Halogen bulbs must be handled
holding the metallic part only. Touching the
transparent part of the bulb with your
fingers may reduce the intensity of the
emitted light and even reduce the lifespan
of the bulb. In the event of accidental
contact, wipe the bulb with a cloth
moistened with alcohol and let the bulb
dry.
52)If possible, we recommend that you
have bulbs replaced at a Lancia
Dealership. The correct operation and
direction of the external lights are
absolutely essential for the safety of the car
and of compliance with the law.
REPLACING FUSES
123) 124) 125) 126) 127) 128)
GENERAL
To facilitate fuse replacement, use the
pliers hooked inside the fuse box lid on
the dashboard left-hand side.
ENGINE COMPARTMENT
FUSE BOX
53)
This is located by the side of the
battery. To access the fuses, proceed
as follows:
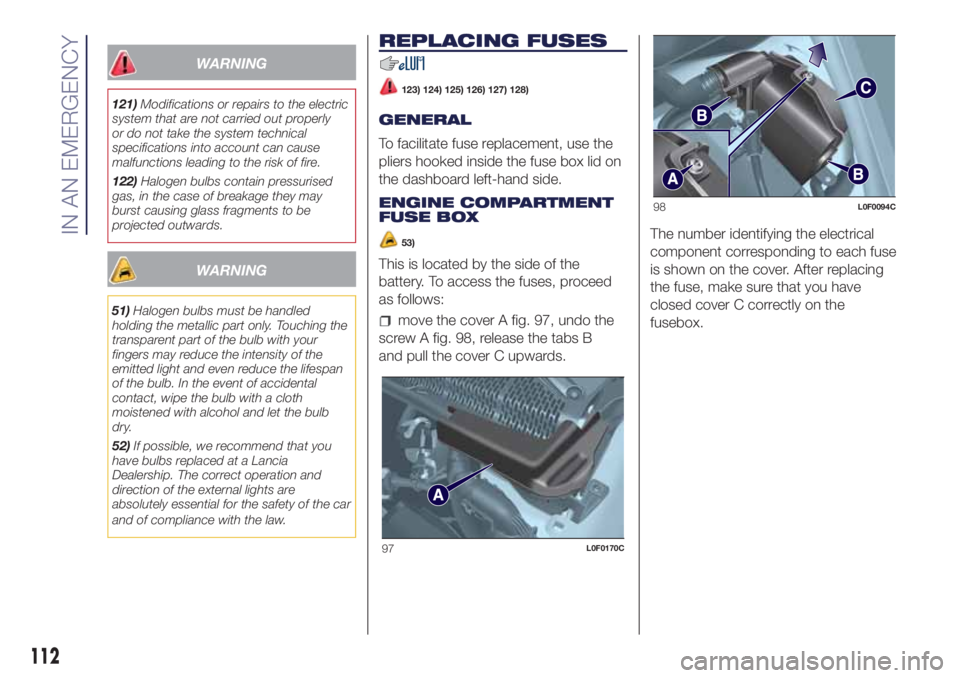
move the cover A fig. 97, undo the
screw A fig. 98, release the tabs B
and pull the cover C upwards.The number identifying the electrical
component corresponding to each fuse
is shown on the cover. After replacing
the fuse, make sure that you have
closed cover C correctly on the
fusebox.
97L0F0170C
98L0F0094C
112
IN AN EMERGENCY
Page 198 of 200
Occupant protection systems
.......71
Official type approvals..............184
Paintwork (cleaning and
maintenance)
....................145
Parking lights.......................18
Parking sensors....................101
Performance (top speed)...........163
Petrol versions service
scheduled plan..................128
Pre-tensioners......................74
Rain sensor
........................21
Rear fog lights.......................19
Rear view mirrors....................16
Rear window washer
rear window washer fluid
level...........................140
Rear Window Wiper
blade replacement.............143
blades.........................143
Rear window wiper/washer..........21
Refuelling
capacities table................158
Refuelling procedure...............103
Emergency refuelling...........104
Refuelling the vehicle...............103
Regular checks....................136Replacing a bulb...................107
Replacing an exterior bulb..........109
Safe Lock (device)
..................12
SBR (Seat Belt Reminder)
system...........................73
Scheduled Servicing...............127
Screen wiper/washer................21
Seat belts...........................72
Seats...............................13
Setup menu.........................42
Side bags...........................90
Side lights..........................18
Snow chains.......................154
Spark plugs (type)..................149
Starting the engine..................94
Steering wheel......................16
Stop/Start system...................98
Sun roof ............................28
Supplementary Restraint System
(SRS) - Airbag....................87
Symbols.............................4
Technical specifications
............148
The keys.............................9
Tips, controls and general
information......................168
Towing the vehicle..................124Towing trailers.....................102
Ty r e s
inflation pressures..............153
UconnectTM5 Radio LIVE. . . . . . . . . .170
Uconnect 5 Radio Nav LIVE . . . . . . .170
"Universal" child restraint system
fitting.............................82
Version with LPG system............33
Version with methane system
(Natural Power)...................35
Warning lights and messages.......44
Weights and loads.................156
Wheels............................152
Wheels and tyres...................145
Window bag........................90
Windows (cleaning)................146
Windscreen washer
windscreen washer fluid level.................................140
Windscreen wiper
blades.........................143
replacing blades................143
Windscreen/rear window wiper.......21
INDEX
FCA Italy S.p.A. - MOPAR - Technical Services - Service Engineering
Largo Senatore G. Agnelli, 3 - 10040 Volvera - Turin (Italy)
Print no. 603.99.852 - 06/2017 - 2 Edition
TM