phone Lancia Ypsilon 2020 Owner handbook (in English)
[x] Cancel search | Manufacturer: LANCIA, Model Year: 2020, Model line: Ypsilon, Model: Lancia Ypsilon 2020Pages: 200, PDF Size: 4.53 MB
Page 93 of 200
Pretensioners and airbags are deployed
in different ways on the basis of the
type of collision. Failure to activate one
or more of the devices does not
indicate a system malfunction.
94) 95) 96) 97) 98) 99) 100) 101) 102) 103) 104) 105)
106)
WARNING
91)Do not apply stickers or other objects
on the steering wheel, on the dashboard in
the passenger side airbag area, on side
upholstery on the roof or on the seats.
Never put objects (e.g. mobile phones) on
the passenger side of the dashboard
since they could interfere with correct
inflation of the passenger airbag and also
cause serious injury to the passengers.
92)Always drive with your hands on the
rim of the steering wheel so that the airbag
can inflate freely if required. Do not drive
with your body bent forward. Keep your
back straight against the backrest.93)When there is an active passenger
airbag, DO NOT install rearward facing
child restraint systems on the front seat.
Deployment of the airbag in an accident
could cause fatal injuries to the child
regardless of the severity of the impact.
Therefore, always deactivate the passenger
side airbag when a rearward facing child
restraint system is installed on the front
passenger seat. The front passenger seat
must also be positioned back as far as
possible in order to prevent the child
restraint system from coming into contact
with the dashboard. Immediately reactivate
the passenger airbag as soon as the child
restraint system has been removed.
94)Do not affix rigid objects to the garment
hooks or support handles.
95)Do not rest your head, arms or elbows
on the door, windows or the area in which
the window bag is located to avoid
possible injury during airbag inflation.
96)Never lean your head, arms or elbows
out of the window.
97)If, when the key is turned to MAR, the
warning light does not switch on or
stays on whilst driving, a fault may have
occurred in the restraint systems. In this
case the airbags or pretensioners may not
be deployed in an impact or, in a lower
number of cases, they may be deployed
accidentally. Before continuing, contact
a Lancia Dealership immediately to have
the system checked.
98)For versions/markets where provided,
in the event of
warning light failure,
thewarning light switches on and the
explosive charges of the passenger airbag
are deactivated.99)On cars with side bags, do not cover
the front seat backrests with extra covers.
100)Do not travel carrying objects in
your lap, in front of your chest or between
your lips (pipe, pencils, etc.): they could
cause severe injury if the airbag is
deployed.
101)If your car has been subject to theft,
attempted theft, vandalism, or flooding,
contact a Lancia Dealership to have the
airbag system checked.
102)The airbags may also be deployed
when the car is not moving, if the key is in
the ignition and turned to MAR-ON or
when the engine is off, if the car is hit by
another moving vehicle. Therefore, even if
the vehicle is stationary, when an active
front passenger airbag is fitted, DO NOT
install rearward facing child restraint
systems on the front passenger seat.
Deployment of the airbag following an
impact could cause fatal injuries to the
child. Therefore, always deactivate the
passenger side airbag when a rearward
facing child restraint system is installed on
the front passenger seat. The front
passenger seat must also be positioned
back as far as possible in order to prevent
the child restraint system from coming
into contact with the dashboard.
Immediately reactivate the passenger
airbag as soon as the child restraint system
has been removed. Also remember that, if
the key is turned to STOP, none of the
safety devices (airbags or pretensioners)
will be deployed in the event of collision.
Non-deployment in such cases does
not indicate a system malfunction.
91
Page 107 of 200
hand the special filler adapter (see
the following description) over to the
qualified LPG refuelling personnel.
IMPORTANT Depending on the country,
there are various types of adapters for
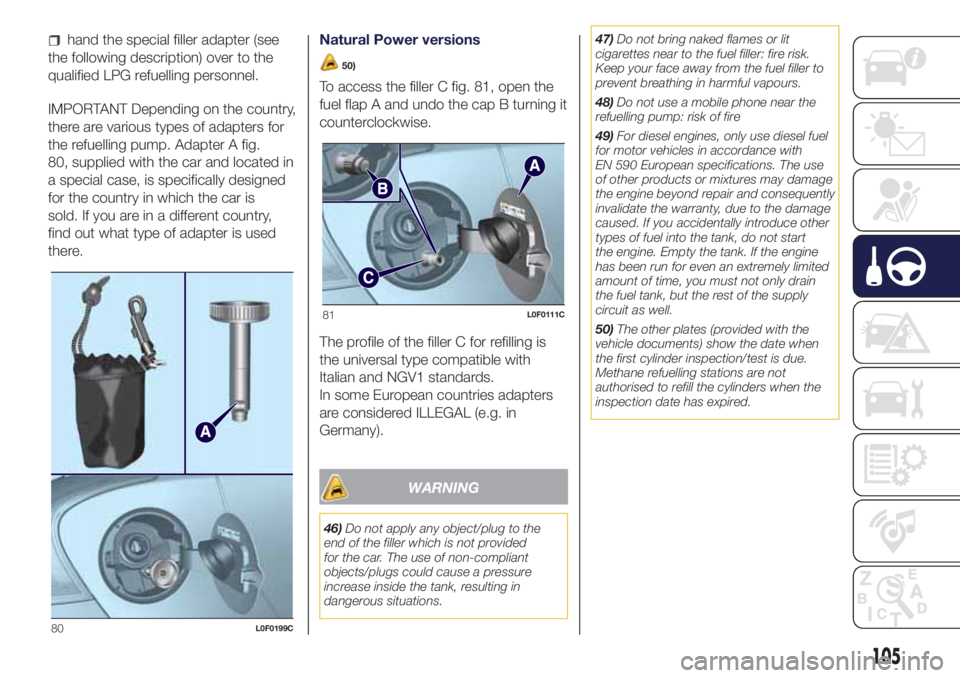
the refuelling pump. Adapter A fig.
80, supplied with the car and located in
a special case, is specifically designed
for the country in which the car is
sold. If you are in a different country,
find out what type of adapter is used
there.Natural Power versions
50)
To access the filler C fig. 81, open the
fuel flap A and undo the cap B turning it
counterclockwise.
The profile of the filler C for refilling is
the universal type compatible with
Italian and NGV1 standards.
In some European countries adapters
are considered ILLEGAL (e.g. in
Germany).
WARNING
46)Do not apply any object/plug to the
end of the filler which is not provided
for the car. The use of non-compliant
objects/plugs could cause a pressure
increase inside the tank, resulting in
dangerous situations.47)Do not bring naked flames or lit
cigarettes near to the fuel filler: fire risk.
Keep your face away from the fuel filler to
prevent breathing in harmful vapours.
48)Do not use a mobile phone near the
refuelling pump: risk of fire
49)For diesel engines, only use diesel fuel
for motor vehicles in accordance with
EN 590 European specifications. The use
of other products or mixtures may damage
the engine beyond repair and consequently
invalidate the warranty, due to the damage
caused. If you accidentally introduce other
types of fuel into the tank, do not start
the engine. Empty the tank. If the engine
has been run for even an extremely limited
amount of time, you must not only drain
the fuel tank, but the rest of the supply
circuit as well.
50)The other plates (provided with the
vehicle documents) show the date when
the first cylinder inspection/test is due.
Methane refuelling stations are not
authorised to refill the cylinders when the
inspection date has expired.
80L0F0199C
81L0F0111C
105
Page 108 of 200
IN AN EMERGENCY
A punctured tyre or a burnt-out bulb?
At times, a problem may interfere
with our journey.
The pages on emergencies can help
you to deal with critical situations
independently and with calm.
In an emergency we recommend that
you call the freephone number found in
the Warranty Booklet.
It is also possible to call the national or
international universal freephone
number to search for the nearest
Dealership.HAZARD WARNING LIGHTS...........107
REPLACING A BULB ......................107
REPLACING FUSES........................112
REPLACING A WHEEL ...................117
"FIX&GO AUTOMATIC" KIT .............120
EMERGENCY STARTING ................122
FUEL CUT-OFF SYSTEM ................124
TOWING THE VEHICLE ..................124
106
IN AN EMERGENCY
Page 144 of 200
64)Incorrect installation of electric and
electronic devices may cause severe
damage to your car. After purchasing your
car, if you wish to install any accessories
(car alarm, car phone etc.), contact a
Lancia Dealership, which will suggest the
most appropriate devices for your vehicle
and will, most importantly, advise you if
a highercapacity battery needs to be
installed.
WARNING
5)Used engine oil and oil filters contain
substances which are harmful to the
environment. You are advised to go to a
Lancia Dealership to have the oil and filters
replaced.
6)Used transmission fluid contains
substances that are harmful to the
environment. We advise going to a Lancia
Dealership to change the oil as they are
equipped to dispose of the used oil in
accordance with the legislation governing
the safeguarding of the environment.
7)Batteries contain substances which are
very dangerous for the environment. For
battery replacement, contact a Lancia
Dealership.
BATTERY
RECHARGING
163)
IMPORTANT The battery recharging
procedure is given as information only.
You are advised to go to a Lancia
Dealership to have this operation
performed.
IMPORTANT After turning the ignition
key to STOP and having closed the
driver's side door, wait at least one
minute before disconnecting and then
reconnecting the electrical supply to the
battery.
Low amperage slow recharging for
approximately 24 hours is advised.
Charging for a longer time may damage
the battery.
VERSIONS WITHOUT
START&STOP SYSTEM
(for versions/markets, where provided)
To recharge, proceed as follows:
disconnect the terminal from the
negative battery pole;
connect the charger cables to the
battery terminals, observing the polarity;
turn on the battery charger;
when it is recharged, turn the
charger off before disconnecting it from
the battery;
reconnect the terminal to the
negative battery pole.
VERSIONS WITH
START&STOP SYSTEM
(for versions/markets, where provided)
To recharge, proceed as follows:
disconnect the connector A fig. 119
(pressing the button B) from the sensor
C monitoring the battery conditions,
on the negative pole D of the battery;
connect the positive cable of the
battery charger to the positive battery
terminal E and the negative cable to
sensor terminal D as shown;
turn on the battery charger. At the
end of the charging process, switch the
battery charger off;
after having disconnected the
battery charger, reconnect connector A
fig. 119 to the sensor C as shown.
142
SERVICING AND CARE
Page 171 of 200
Vehicle radio passport
This document certifies ownership of
the system. The vehicle radio passport
shows the system model, serial number
and secret code.
IMPORTANT Keep the vehicle radio
passport in a safe place so that you
can give the information to the relevant
authorities if the system is stolen.
In case of loss of the car radio
passport, contact the Lancia
Dealership, taking an ID document and
the car ownership documents.
IMPORTANT NOTES
Look at the screen only and when it is
necessary and safe. If you need to look
at the screen for a long time, pull over
to a safe place so as not to be
distracted while driving.
Immediately stop using the system in
the event of a fault. Otherwise the
system might be damaged. Contact a
Lancia Dealership as soon as possible
to have the system repaired.
WARNING
172)Follow the safety rules here below:
otherwise serious injuries may occur to the
occupants or the system may be
damaged.
173)If the volume is too loud this can be
dangerous. Adjust the volume so that
you can still hear background noises (e.g.
horns, ambulances, police vehicles, etc.).
WARNING
70)Only clean the front panel and the
display lens with a soft, clean, dry,
anti-static cloth. Cleaning and polishing
products may damage the surface. Never
use alcohol, petrols and derivatives.
71)Do not use the display as a base for
supports with suction pads or adhesives
for external navigators or smartphones
or similar devices.
169
Page 173 of 200
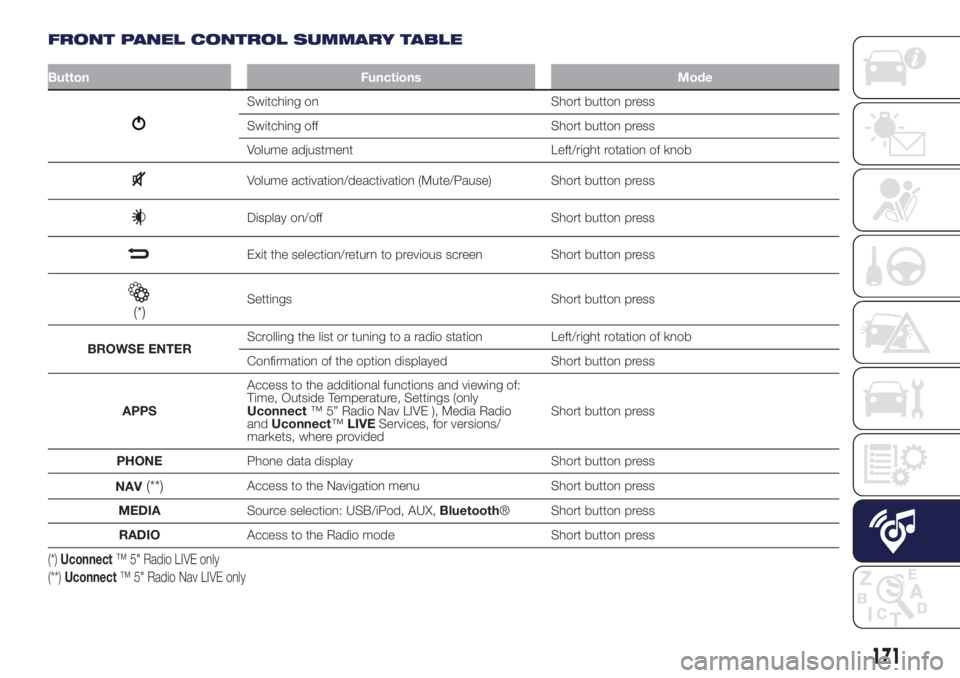
FRONT PANEL CONTROL SUMMARY TABLE
Button Functions Mode
Switching on Short button press
Switching off Short button press
Volume adjustment Left/right rotation of knob
Volume activation/deactivation (Mute/Pause) Short button press
Display on/off Short button press
Exit the selection/return to previous screen Short button press
(*)Settings Short button press
BROWSE ENTERScrolling the list or tuning to a radio station Left/right rotation of knob
Confirmation of the option displayed Short button press
APPSAccess to the additional functions and viewing of:
Time, Outside Temperature, Settings (only
Uconnect™ 5” Radio Nav LIVE ), Media Radio
andUconnect™LIVEServices, for versions/
markets, where providedShort button press
PHONEPhone data display Short button press
NAV
(**)Access to the Navigation menu Short button press
MEDIASource selection: USB/iPod, AUX,Bluetooth® Short button press
RADIOAccess to the Radio mode Short button press
(*)Uconnect™ 5" Radio LIVE only
(**)Uconnect™ 5" Radio Nav LIVE only
171
Page 175 of 200
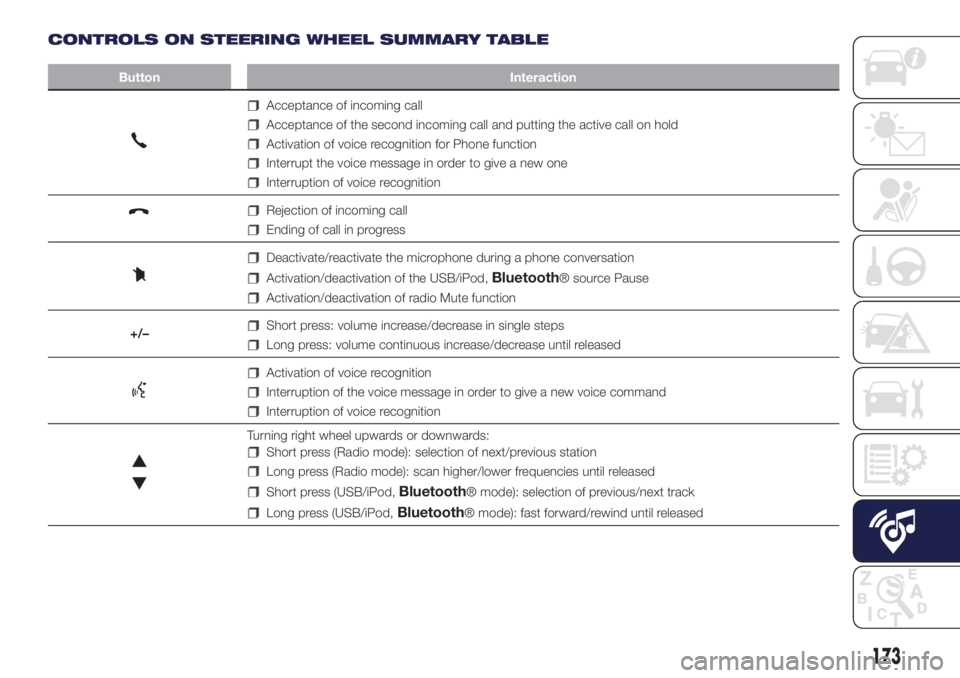
CONTROLS ON STEERING WHEEL SUMMARY TABLE
Button Interaction
Acceptance of incoming call
Acceptance of the second incoming call and putting the active call on hold
Activation of voice recognition for Phone function
Interrupt the voice message in order to give a new one
Interruption of voice recognition
Rejection of incoming call
Ending of call in progress
Deactivate/reactivate the microphone during a phone conversation
Activation/deactivation of the USB/iPod,Bluetooth® source Pause
Activation/deactivation of radio Mute function
+/–
Short press: volume increase/decrease in single steps
Long press: volume continuous increase/decrease until released
Activation of voice recognition
Interruption of the voice message in order to give a new voice command
Interruption of voice recognition
Turning right wheel upwards or downwards:
Short press (Radio mode): selection of next/previous station
Long press (Radio mode): scan higher/lower frequencies until released
Short press (USB/iPod,Bluetooth® mode): selection of previous/next track
Long press (USB/iPod,Bluetooth® mode): fast forward/rewind until released
173
Page 177 of 200
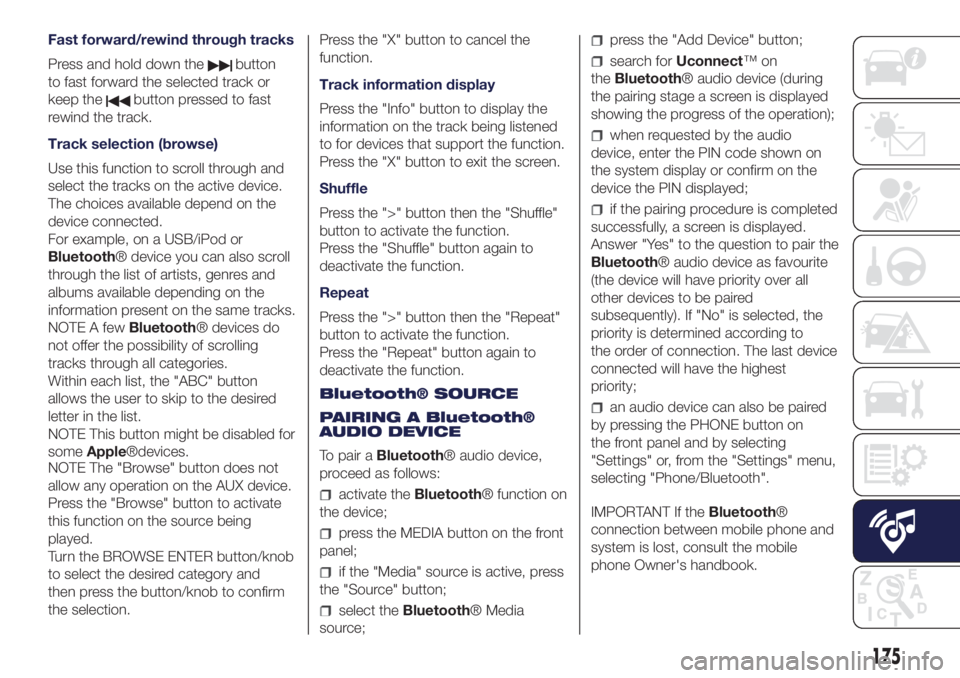
Fast forward/rewind through tracks
Press and hold down the
button
to fast forward the selected track or
keep the
button pressed to fast
rewind the track.
Track selection (browse)
Use this function to scroll through and
select the tracks on the active device.
The choices available depend on the
device connected.
For example, on a USB/iPod or
Bluetooth® device you can also scroll
through the list of artists, genres and
albums available depending on the
information present on the same tracks.
NOTE A fewBluetooth® devices do
not offer the possibility of scrolling
tracks through all categories.
Within each list, the "ABC" button
allows the user to skip to the desired
letter in the list.
NOTE This button might be disabled for
someApple®devices.
NOTE The "Browse" button does not
allow any operation on the AUX device.
Press the "Browse" button to activate
this function on the source being
played.
Turn the BROWSE ENTER button/knob
to select the desired category and
then press the button/knob to confirm
the selection.Press the "X" button to cancel the
function.
Track information display
Press the "Info" button to display the
information on the track being listened
to for devices that support the function.
Press the "X" button to exit the screen.
Shuffle
Press the ">" button then the "Shuffle"
button to activate the function.
Press the "Shuffle" button again to
deactivate the function.
Repeat
Press the ">" button then the "Repeat"
button to activate the function.
Press the "Repeat" button again to
deactivate the function.
Bluetooth® SOURCE
PAIRING A Bluetooth®
AUDIO DEVICE
To pair aBluetooth® audio device,
proceed as follows:
activate theBluetooth® function on
the device;
press the MEDIA button on the front
panel;
if the "Media" source is active, press
the "Source" button;
select theBluetooth® Media
source;
press the "Add Device" button;
search forUconnect™on
theBluetooth® audio device (during
the pairing stage a screen is displayed
showing the progress of the operation);
when requested by the audio
device, enter the PIN code shown on
the system display or confirm on the
device the PIN displayed;
if the pairing procedure is completed
successfully, a screen is displayed.
Answer "Yes" to the question to pair the
Bluetooth® audio device as favourite
(the device will have priority over all
other devices to be paired
subsequently). If "No" is selected, the
priority is determined according to
the order of connection. The last device
connected will have the highest
priority;
an audio device can also be paired
by pressing the PHONE button on
the front panel and by selecting
"Settings" or, from the "Settings" menu,
selecting "Phone/Bluetooth".
IMPORTANT If theBluetooth®
connection between mobile phone and
system is lost, consult the mobile
phone Owner's handbook.
175
Page 178 of 200
NOTE After updating the phone
software, for proper operation, it is
recommended to remove the phone
from the list of devices linked to the
radio, delete the previous system
pairing also from the list ofBluetooth®
devices on the phone and make a
new pairing.
AUX SOURCE
To activate AUX mode, insert an
appropriate device in the AUX socket
on the vehicle.
When a device WITH AUX output is
inserted the system starts reproducing
the AUX source connected, if it is
already being played.
Adjust the volume using the
button/
knob on the front panel or using the
volume adjustment control on the
connected device.
For the "Audio source selection"
function, see the "Media mode"
chapter.
IMPORTANT NOTES
The functions of the device connected
with the AUX socket are directly
managed by the device itself: it is not
possible to change track/folder/playlist
or control playing start/end/pause
with the controls on the front panel or
on the steering wheel.Do not leave the cable of your portable
player connected to the AUX socket
after disconnection, to avoid possible
hiss from the speakers.
USB/iPod SOURCE
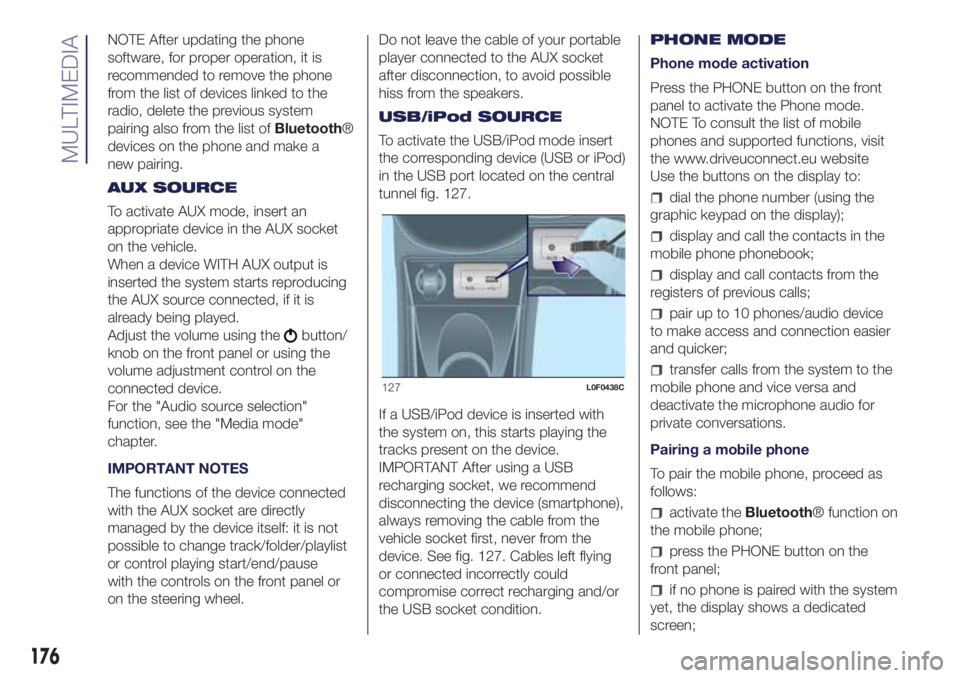
To activate the USB/iPod mode insert
the corresponding device (USB or iPod)
in the USB port located on the central
tunnel fig. 127.
If a USB/iPod device is inserted with
the system on, this starts playing the
tracks present on the device.
IMPORTANT After using a USB
recharging socket, we recommend
disconnecting the device (smartphone),
always removing the cable from the
vehicle socket first, never from the
device. See fig. 127. Cables left flying
or connected incorrectly could
compromise correct recharging and/or
the USB socket condition.PHONE MODE
Phone mode activation
Press the PHONE button on the front
panel to activate the Phone mode.
NOTE To consult the list of mobile
phones and supported functions, visit
the www.driveuconnect.eu website
Use the buttons on the display to:
dial the phone number (using the
graphic keypad on the display);
display and call the contacts in the
mobile phone phonebook;
display and call contacts from the
registers of previous calls;
pair up to 10 phones/audio device
to make access and connection easier
and quicker;
transfer calls from the system to the
mobile phone and vice versa and
deactivate the microphone audio for
private conversations.
Pairing a mobile phone
To pair the mobile phone, proceed as
follows:
activate theBluetooth® function on
the mobile phone;
press the PHONE button on the
front panel;
if no phone is paired with the system
yet, the display shows a dedicated
screen;
127L0F0438C
176
MULTIMEDIA
Page 179 of 200
select "Yes" to start the pairing
procedure, then search for the
Uconnect™ device on the mobile
phone (if "No" is selected, the Phone
main screen is displayed);
when prompted by the mobile
phone, use its keypad to enter the PIN
code shown on the system display
or confirm on the mobile phone the PIN
displayed;
from the "Phone" screen you can
always pair a mobile phone by pressing
the "Settings" button: press the "Add
Device" button and proceed as
described above;
during the pairing stage a screen is
displayed showing the progress of
the operation;
when the pairing procedure is
completed successfully, a screen is
displayed: answer "Yes" to the question
to pair the mobile phone as favourite
(the mobile phone will have priority over
all other mobile phones to be paired
subsequently). If no other devices are
paired, the system will consider the first
associated device as favourite.
Making a phone call
The operations described below can
only be accessed if supported by
the mobile phone in use.A call can be made by:
selecting theicon (mobile
phonebook);
selecting "Recent Calls";
selecting theicon;
pressing the "Redial" button.
Text message reader
The system can read the messages
received by the mobile phone.
To use this function the mobile phone
must support the SMS exchange
function throughBluetooth®.
If this function is not supported by the
phone, the corresponding graphic
button
is deactivated (greyed out).
When a text message is received,
the display will show a screen where
the options "Listen", "Call" or "Ignore"
can be selected.
You can access the SMS message list
received by the cell by pressing the
graphic
button (the list shows
a maximum of 60 received messages).
SMS message options
Default SMS messages are stored in
the system memory and can be sent to
answer a received message or as a
new message.
Yes.
No.
Okay.
I can't talk right now.
Call me.
I'll call you later.
I'm on my way.
Thanks.
I will be late.
Stuck in traffic.
Start without me.
Where are you?
Are you there yet?
I need directions.
I'm lost.
See you later.
I will be 5 (or 10, 15, 20, 25, 30, 45,
60)* minutes late.
See you in 5 (or 10, 15, 20, 25, 30,
45, 60)* minutes.
* Only use the numbers listed,
otherwise the system will not take the
message.
NOTE See the dedicated section for
details on how to send a text message
using the voice commands.
177
phone