change wheel Lancia Ypsilon 2021 Owner handbook (in English)
[x] Cancel search | Manufacturer: LANCIA, Model Year: 2021, Model line: Ypsilon, Model: Lancia Ypsilon 2021Pages: 200, PDF Size: 4.53 MB
Page 21 of 200
FLASHING
To do this, pull the stalk fig. 17 towards
the steering wheel (unstable position)
regardless of the position of ring nut A.
The
warning light switches on in
the instrument panel.
DIRECTION INDICATORS
Bring the stalk fig. 17 to the (stable)
position:
upwards:activates the right direction
indicator;
downwards:activates the left direction
indicator.
Warning light
orwill blink on the
instrument panel.
The direction indicators switch off
automatically when the steering wheel
is straightened.
"Lane Change" function
If you wish to signal a lane change,
place the left stalk in the unstable
position for less than half a second.
The direction indicator on the side
selected will flash five times and then
switch off automatically."FOLLOW ME HOME"
DEVICE
This allows the space in front of the
vehicle to be lit for a set time.
Activation
The "Follow Me Home" device is
activated by pulling the stalk fig. 17
towards the steering wheel, in addition
to the stroke end click.
It is possible to enable this function
within 2 minutes after turning off the
engine. This function allows turning on
lights and low beams.
It is possible to set the headlights
turning on time by pulling the left lever
towards the steering wheel (unstable
position) one or more times. In this case
it is possible to choose between 0, 30,
60, 90 up to a maximum of 210
seconds.
Each time the stalk is operated, the
warning light
on the instrument
panel switches on. The display shows a
message and the time set for the
function. The
warning light comes
on when the stalk is first moved and
stays on until the function is
automatically deactivated.Off
This function is deactivated turning on
again the headlights, sidelights or
pulling the left lever towards the
steering wheel (unstable position) for
more than 2 seconds, or switching the
starter to MAR.
"Follow me home" function with
Uconnect™ system interaction
IfUconnect™ is installed, the function
management remains the same, but
it takes place through interaction with
theUconnect™ menu.
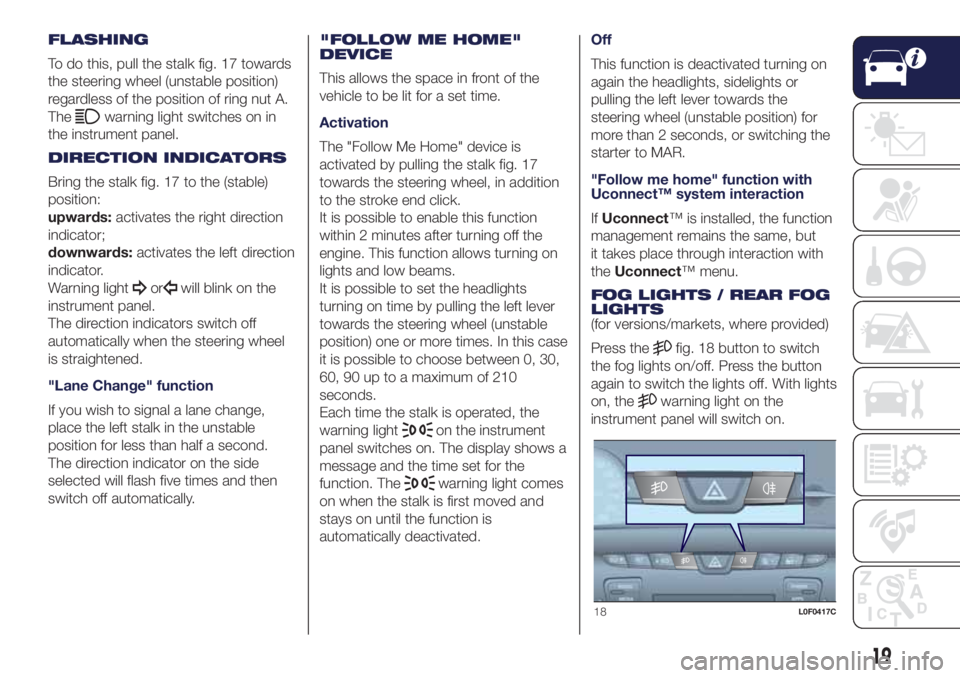
FOG LIGHTS / REAR FOG
LIGHTS
(for versions/markets, where provided)
Press the
fig. 18 button to switch
the fog lights on/off. Press the button
again to switch the lights off. With lights
on, the
warning light on the
instrument panel will switch on.
18L0F0417C
19
Page 72 of 200
DRIVING
ASSISTANCE
SYSTEMS
iTPMS System (indirect
Tyre Pressure
Monitoring System)
(for versions/markets, where provided)
67) 68) 69) 70) 71) 72)
The car can be equipped with the
iTPMS (indirect Tire Pressure
Monitoring System) which monitors the
tyre inflation status thanks to wheel
speed sensors.
The system warns the driver if one or
more tyres are flat by the
warning
light continuously lit on the instrument
panel and a dedicated warning
message on the display.
If one tyre only is flat, the system can
indicate its position: it is in any case
recommended to check the pressure
on all four tyres.
The system does not recognise the tyre
pressure value, but it is able to indicate
if the pressure of one or more tyres
falls below a certain pressure threshold.
This indication is displayed also when
turning the engine off and on again until
the RESET procedure is carried out.Reset procedure
The iTPMS needs an initial "self-
learning" phase (with length depending
on the driving style and road conditions:
optimal conditions being driving on a
straight road at 80 km/h for at least 20
minutes) which starts when the Reset
procedure is carried out.
The Reset procedure must be carried
out:
each time tyre pressure is modified;
when even only one tyre is changed;
when tyres are rotated/inverted;
when the space-saver wheel is
fitted.
Before carrying out the Reset
procedure, inflate the tyres to the rated
pressure values specified in the inflation
pressure table (see "Wheels" paragraph
in the "Technical specifications"
chapter).
If the Reset procedure is not carried
out, in all above cases, the
warning
light may give false indications on
one or more tyres.
To carry out the RESET procedure, with
the car stopped and the ignition device
at MAR, use the Main Menu as follows:
briefly press thebutton: the
display will show Reset;
press thebutton or the
button to select ("Yes" or "No");
briefly press thebutton: the
display will show "Confirm";
pressbutton orto select
("Yes" to Reset or "No" to exit the video
page);
press thebutton again to return
to the standard screen or to the main
menu according to where you are in the
menu.
At the end of the Reset procedure the
display will show the "Reset saved"
message, indicating that the self-
learning has been started and you will
hear an acoustic warning beep.
If the iTPMS self-learning is not properly
executed, the message is not
displayed, and no beep is heard.
Operating conditions
The system is active for speeds above
15 km/h.
In a few situations such as sporty
driving, particular conditions of the road
surface (e.g. icy, snowy, unsurfaced
roads...) the signalling may be delayed
or partial in detecting the contemporary
deflation of more than one tyre.
70
SAFETY
Page 98 of 200
WARNING
110)Never leave children unattended in
the car. Always remove the key from the
ignition when leaving the car and take
it with you.
111)The car should be braked after a few
clicks of the lever, if it is not, contact a
Lancia Dealership to have it adjusted.
112)In the case of parking manoeuvres on
roads on a gradient, the front wheels
must be steered towards the pavement
(when parking downhill), or in the opposite
direction if the vehicle is parked uphill.
Block the wheels with a wedge or a stone if
the car is parked on a steep slope.
MANUAL GEARBOX
113)40)
To engage the gears, press the clutch
pedal fully and put the gear lever into
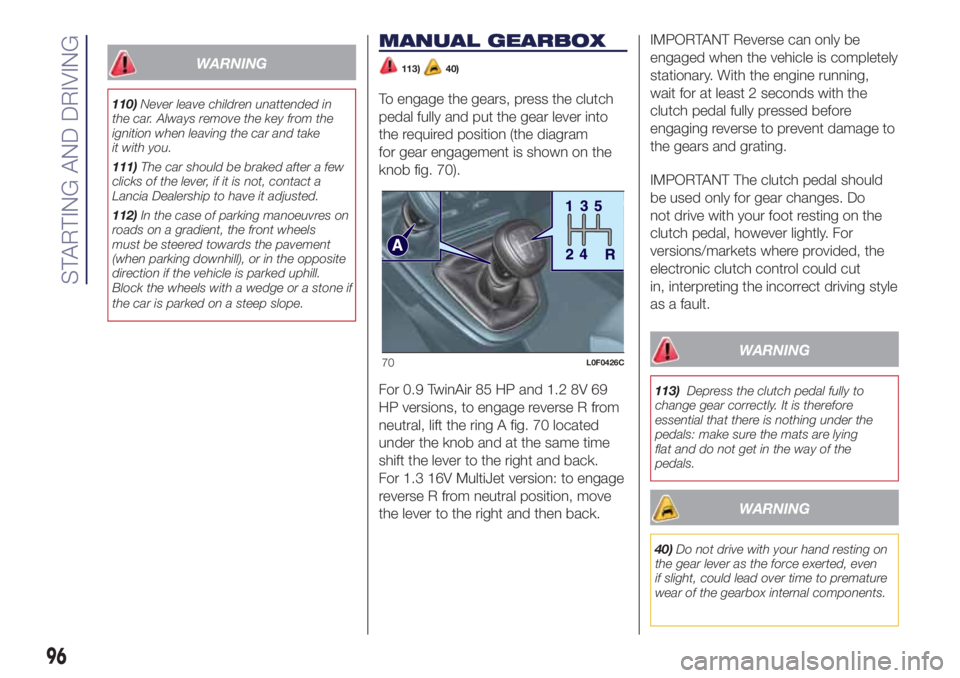
the required position (the diagram
for gear engagement is shown on the
knob fig. 70).
For 0.9 TwinAir 85 HP and 1.2 8V 69
HP versions, to engage reverse R from
neutral, lift the ring A fig. 70 located
under the knob and at the same time
shift the lever to the right and back.
For 1.3 16V MultiJet version: to engage
reverse R from neutral position, move
the lever to the right and then back.IMPORTANT Reverse can only be
engaged when the vehicle is completely
stationary. With the engine running,
wait for at least 2 seconds with the
clutch pedal fully pressed before
engaging reverse to prevent damage to
the gears and grating.
IMPORTANT The clutch pedal should
be used only for gear changes. Do
not drive with your foot resting on the
clutch pedal, however lightly. For
versions/markets where provided, the
electronic clutch control could cut
in, interpreting the incorrect driving style
as a fault.
WARNING
113)Depress the clutch pedal fully to
change gear correctly. It is therefore
essential that there is nothing under the
pedals: make sure the mats are lying
flat and do not get in the way of the
pedals.
WARNING
40)Do not drive with your hand resting on
the gear lever as the force exerted, even
if slight, could lead over time to premature
wear of the gearbox internal components.
70L0F0426C
96
STARTING AND DRIVING
Page 100 of 200

IMPORTANT The use of the “Kick
Down” function is recommended only
when overtaking or accelerating quickly,
in order not to increase fuel
consumption.
STEERING WHEEL CONTROLS
(for versions/markets, where provided)
42)
On some versions, the gearbox can be
managed sequentially using the
steering wheel controls fig. 72.
To use the controls on the steering
wheel, the gear lever must be in the
central position between + and – :
operating the + lever: engage
a higher gear;
operating the – lever: engage a
lower gear.
The engagement of a lower (or higher)
gear is only permitted if the engine
rpm allow it.
WARNING
41)Avoid keeping your hand placed on this
lever in between gear changes or
Auto/Manual mode.
42)Using the paddles incorrectly (paddles
pushed towards the dashboard) could
break them.
STOP/START
SYSTEM
(for versions/markets, where provided)
114) 115)43)
The Stop/Start system automatically
stops the engine each time the vehicle
is stationary and starts it again when
the driver wants to move off. In this
way, the vehicle efficiency is increased,
by reducing consumption, dangerous
gas emissions and sound pollution.
OPERATING MODES
Stopping the engine
With manual gearbox: with the car
stationary, the engine stops with the
gearbox in neutral and the clutch pedal
released.
With Dual FuNction System gearbox:
the engine stops if the vehicle is at
a standstill and the brake pedal is
pressed. This condition can be
maintained even if the brake pedal is
not depressed, if the gear lever is
in position N (Neutral).
NOTE The engine can only be stopped
automatically after exceeding a speed
of about 10 km/h, to prevent the engine
from being repeatedly stopped when
driving at walking pace.
72L0F0431C
98
STARTING AND DRIVING
Page 119 of 200
REPLACING A
WHEEL
129) 130) 131) 132) 133) 134) 135)
54) 55)
JACK
Please note that:
the jack weight is 1,76 kg;
the jack requires no adjustment;
the jack cannot be repaired and in
the event of a fault it must be replaced
by another genuine one;
no tool other than its cranking
device may be fitted on the jack.
CHANGING PROCEDURE
To change a wheel, proceed as follows:
stop the car in a position that is
not dangerous for oncoming traffic
where you can change the wheel safely.
The ground must be flat and sufficiently
compact;
switch off the engine, pull up the
handbrake and engage the 1stgear or
reverse. Wear the reflective safety
jacket (compulsory by law) before
getting out of the car;
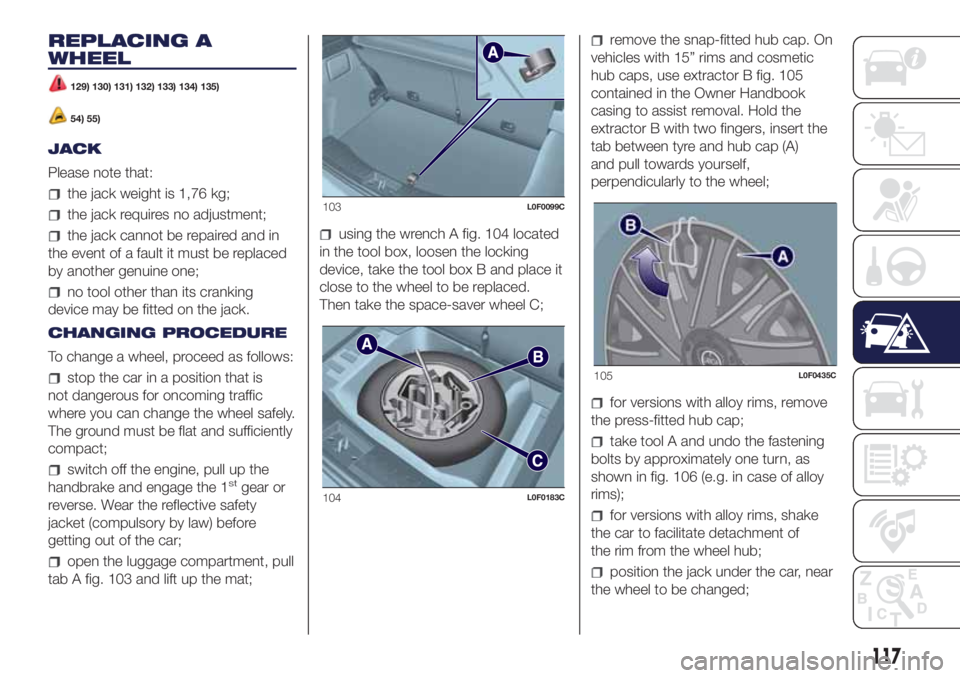
open the luggage compartment, pull
tab A fig. 103 and lift up the mat;
using the wrench A fig. 104 located
in the tool box, loosen the locking
device, take the tool box B and place it
close to the wheel to be replaced.
Then take the space-saver wheel C;
remove the snap-fitted hub cap. On
vehicles with 15” rims and cosmetic
hub caps, use extractor B fig. 105
contained in the Owner Handbook
casing to assist removal. Hold the
extractor B with two fingers, insert the
tab between tyre and hub cap (A)
and pull towards yourself,
perpendicularly to the wheel;
for versions with alloy rims, remove
the press-fitted hub cap;
take tool A and undo the fastening
bolts by approximately one turn, as
shown in fig. 106 (e.g. in case of alloy
rims);
for versions with alloy rims, shake
the car to facilitate detachment of
the rim from the wheel hub;
position the jack under the car, near
the wheel to be changed;
103L0F0099C
104L0F0183C
105L0F0435C
117
Page 121 of 200
fit the standard wheel inserting the 4
bolts into the holes;
using the wrench provided, tighten
the fastening bolts;
lower the vehicle and remove the
jack;
using the wrench provided, fully
tighten the bolts in the sequence
shown previously.
press-fit the wheel cap, aligning the
special splining (on the cap) with the
inflation valve;
place the inner part of the hub cap
on the wheel rim;
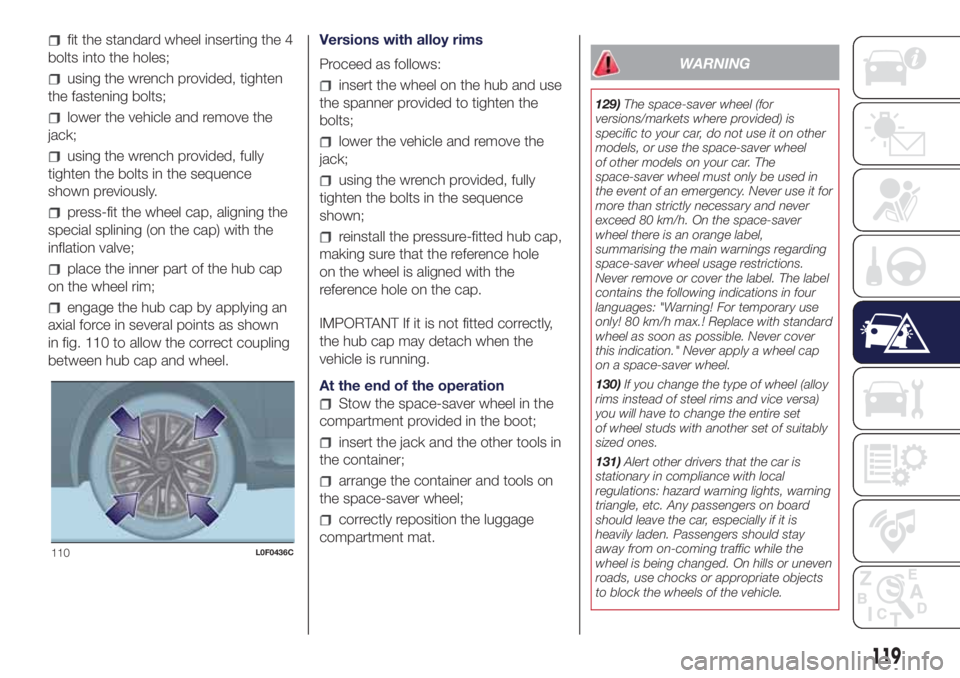
engage the hub cap by applying an
axial force in several points as shown
in fig. 110 to allow the correct coupling
between hub cap and wheel.Versions with alloy rims
Proceed as follows:
insert the wheel on the hub and use
the spanner provided to tighten the
bolts;
lower the vehicle and remove the
jack;
using the wrench provided, fully
tighten the bolts in the sequence
shown;
reinstall the pressure-fitted hub cap,
making sure that the reference hole
on the wheel is aligned with the
reference hole on the cap.
IMPORTANT If it is not fitted correctly,
the hub cap may detach when the
vehicle is running.
At the end of the operation
Stow the space-saver wheel in the
compartment provided in the boot;
insert the jack and the other tools in
the container;
arrange the container and tools on
the space-saver wheel;
correctly reposition the luggage
compartment mat.
WARNING
129)The space-saver wheel (for
versions/markets where provided) is
specific to your car, do not use it on other
models, or use the space-saver wheel
of other models on your car. The
space-saver wheel must only be used in
the event of an emergency. Never use it for
more than strictly necessary and never
exceed 80 km/h. On the space-saver
wheel there is an orange label,
summarising the main warnings regarding
space-saver wheel usage restrictions.
Never remove or cover the label. The label
contains the following indications in four
languages: "Warning! For temporary use
only! 80 km/h max.! Replace with standard
wheel as soon as possible. Never cover
this indication." Never apply a wheel cap
on a space-saver wheel.
130)If you change the type of wheel (alloy
rims instead of steel rims and vice versa)
you will have to change the entire set
of wheel studs with another set of suitably
sized ones.
131)Alert other drivers that the car is
stationary in compliance with local
regulations: hazard warning lights, warning
triangle, etc. Any passengers on board
should leave the car, especially if it is
heavily laden. Passengers should stay
away from on-coming traffic while the
wheel is being changed. On hills or uneven
roads, use chocks or appropriate objects
to block the wheels of the vehicle.
110L0F0436C
119
Page 147 of 200
WHEELS AND TYRES
165) 166) 167) 168) 169)
IMPORTANT NOTES
Take the following precautions to
prevent damage to the tyres:
avoid braking suddenly, racing starts
and violent impact against the curb,
potholes or other obstacles and driving
for extended periods on uneven road
surfaces;
periodically check that the tyres
have no cuts in the side wall, abnormal
swelling or irregular tread wear;
avoid travelling with the vehicle
overloaded. If a tyre is punctured, stop
immediately and change it;
tyres age even if they are not used
much. Cracks in the tread rubber
and at the sides are a sign of ageing. In
any case, if the tyres have been on
the car for over 6 years, they should be
checked by specialised personnel.
Also remember to check the
space-saver wheel very carefully (for
versions/markets, where provided);
alternate the tyres, between front
and rear, every 10-15 thousand
kilometres, keeping them on the same
side of the car so as not to reverse
the direction of rotation;
in the case of replacement, always
fit new tyres, avoiding those of
unknown origin;
if a tyre is changed, also change the
inflation valve.
avoid travelling with partially or
completely deflated tyres as this can
compromise safety and damage the
tyres beyond repair.
WARNING
165)The road holding qualities of the car
also depend on the correct inflation
pressure of the tyres.
166)If tyre pressure is too low, it may
overheat and be severely damaged as a
result.
167)Do not cross switch the tyres, moving
them from the right of the car to the left
and vice versa.
168)Do not repaint alloy wheel rims at
temperatures higher than 150°C. The
mechanical characteristics of the wheels
might be compromised.
169)Travelling with partially or completely
deflated tyres can cause safety problems
and damage the concerned tyre beyond
repair.
BODY
PRESERVING THE
BODYWORK
Paint
Touch up abrasions and scratches
immediately to prevent the formation of
rust.
Maintenance of paintwork consists of
washing the car: the frequency
depends on the conditions and
environment where the car is used. For
example, in highly polluted areas, or if
the roads are spread with salt, it is
advisable to wash the car more
frequently.
To correctly wash the car, proceed as
follows:
remove the aerial from the roof to
prevent damage to it if the car is
washed in an automatic system;
if there is any decorative sticker or if
high pressure jets or cleaners are used
to wash the car, keep a distance of
at least 40 cm from the bodywork to
avoid damage or alteration;
wash the bodywork using a low
pressure jet of water;
wipe a sponge with a slightly soapy
solution over the bodywork, frequently
rinsing the sponge;
145
Page 176 of 200
SWITCHING THE SYSTEM
ON/OFF
The system is switched on/off by
pressing the
(ON/OFF) button/knob.
Turn the button/knob clockwise to
increase the radio volume or
anticlockwise to decrease it.
The system is equipped with the
following tuners: AM, FM and DAB (for
versions/markets, where provided).
RADIO MODE
Press the RADIO button on the front
panel to activate radio mode.
After the desired radio station is
selected, the following information is
shown on the display:
At the top: the list of radio stations
stored (preset) is displayed; the station
currently playing is highlighted.
In the middle: display of the name of
the current radio station and the
buttons for selecting the previous or
next radio station.
At the bottom: display of the following
buttons:
"Browse": list of the radio stations
available;
"AM/FM", "AM/DAB", "FM/DAB":
selection of the desired frequency band
(button reconfigurable according to
the band selected: AM, FM or DAB);
"Tune" : manual radio station tuning
(not available for DAB radios);
"Info": additional information on the
source being listened to;
"Audio": access to the "Audio
settings" screen.
Radio station selection
To search for the desired radio station
press buttons
oron the display
or use the steering wheel controls.
Previous/next radio station search
Briefly press buttons
oron
the display: when the button is released
the previous or the next radio station
is displayed.
Previous/next radio station fast
search
Hold down buttons
oron the
display to start fast search: when the
button is released, the first tunable
radio station can be heard.
Audio menu
To access the "Audio" menu press the
Audio" button located at the bottom
of the display.
The following adjustments can be
carried out using the "Audio" menu:
"Equaliser" (for versions/markets,
where provided);
"Balance/Fader" (left/right and
front/rear audio balance adjustment);
"Speed/Volume" (speed-dependent
automatic volume control);
"Loudness" (for versions/markets,
where provided);
"Auto-On Radio";
"Radio Off Delay".
To exit the "Audio" menu, press the
/Done button.
MEDIA MODE
Audio source selection
Press the "Source" button to select the
desired audio source among those
available: AUX, USB, iPod or
Bluetooth®.
NOTE Applications used on portable
devices may be not compatible with the
Uconnect™system
Track change
Briefly press the
button or turn the
BROWSE ENTER button/knob
clockwise to play the next track or
briefly press the
button or turn the
BROWSE ENTER button/knob
anticlockwise to return to the beginning
of the selected track or to the beginning
of the previous track if it has been
played for less than 3 seconds.
174
MULTIMEDIA
Page 178 of 200
NOTE After updating the phone
software, for proper operation, it is
recommended to remove the phone
from the list of devices linked to the
radio, delete the previous system
pairing also from the list ofBluetooth®
devices on the phone and make a
new pairing.
AUX SOURCE
To activate AUX mode, insert an
appropriate device in the AUX socket
on the vehicle.
When a device WITH AUX output is
inserted the system starts reproducing
the AUX source connected, if it is
already being played.
Adjust the volume using the
button/
knob on the front panel or using the
volume adjustment control on the
connected device.
For the "Audio source selection"
function, see the "Media mode"
chapter.
IMPORTANT NOTES
The functions of the device connected
with the AUX socket are directly
managed by the device itself: it is not
possible to change track/folder/playlist
or control playing start/end/pause
with the controls on the front panel or
on the steering wheel.Do not leave the cable of your portable
player connected to the AUX socket
after disconnection, to avoid possible
hiss from the speakers.
USB/iPod SOURCE
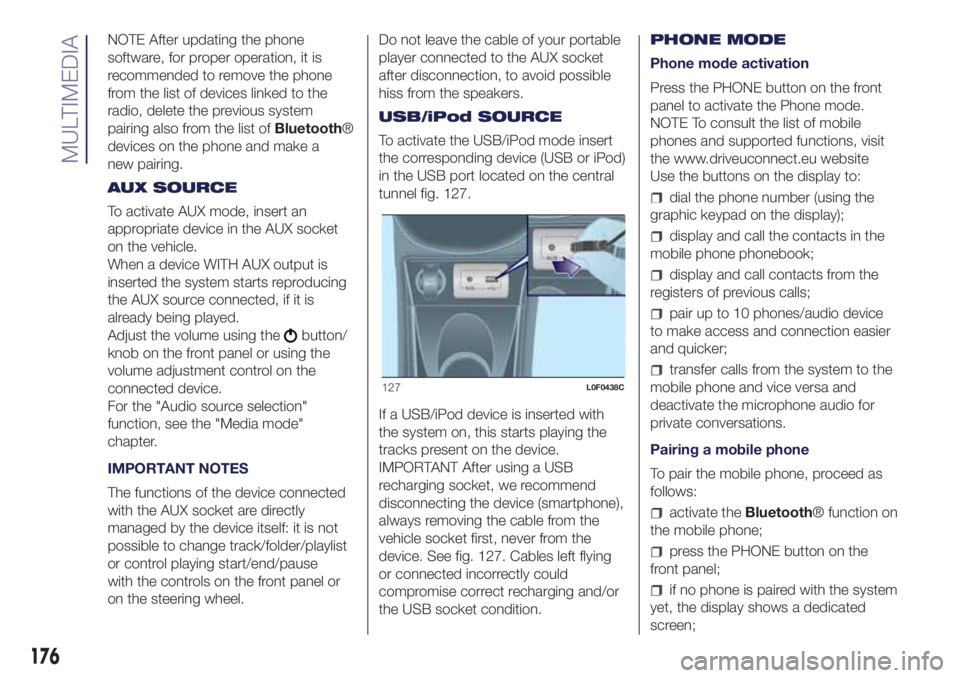
To activate the USB/iPod mode insert
the corresponding device (USB or iPod)
in the USB port located on the central
tunnel fig. 127.
If a USB/iPod device is inserted with
the system on, this starts playing the
tracks present on the device.
IMPORTANT After using a USB
recharging socket, we recommend
disconnecting the device (smartphone),
always removing the cable from the
vehicle socket first, never from the
device. See fig. 127. Cables left flying
or connected incorrectly could
compromise correct recharging and/or
the USB socket condition.PHONE MODE
Phone mode activation
Press the PHONE button on the front
panel to activate the Phone mode.
NOTE To consult the list of mobile
phones and supported functions, visit
the www.driveuconnect.eu website
Use the buttons on the display to:
dial the phone number (using the
graphic keypad on the display);
display and call the contacts in the
mobile phone phonebook;
display and call contacts from the
registers of previous calls;
pair up to 10 phones/audio device
to make access and connection easier
and quicker;
transfer calls from the system to the
mobile phone and vice versa and
deactivate the microphone audio for
private conversations.
Pairing a mobile phone
To pair the mobile phone, proceed as
follows:
activate theBluetooth® function on
the mobile phone;
press the PHONE button on the
front panel;
if no phone is paired with the system
yet, the display shows a dedicated
screen;
127L0F0438C
176
MULTIMEDIA