dashboard Lancia Ypsilon 2021 Owner handbook (in English)
[x] Cancel search | Manufacturer: LANCIA, Model Year: 2021, Model line: Ypsilon, Model: Lancia Ypsilon 2021Pages: 200, PDF Size: 4.53 MB
Page 19 of 200
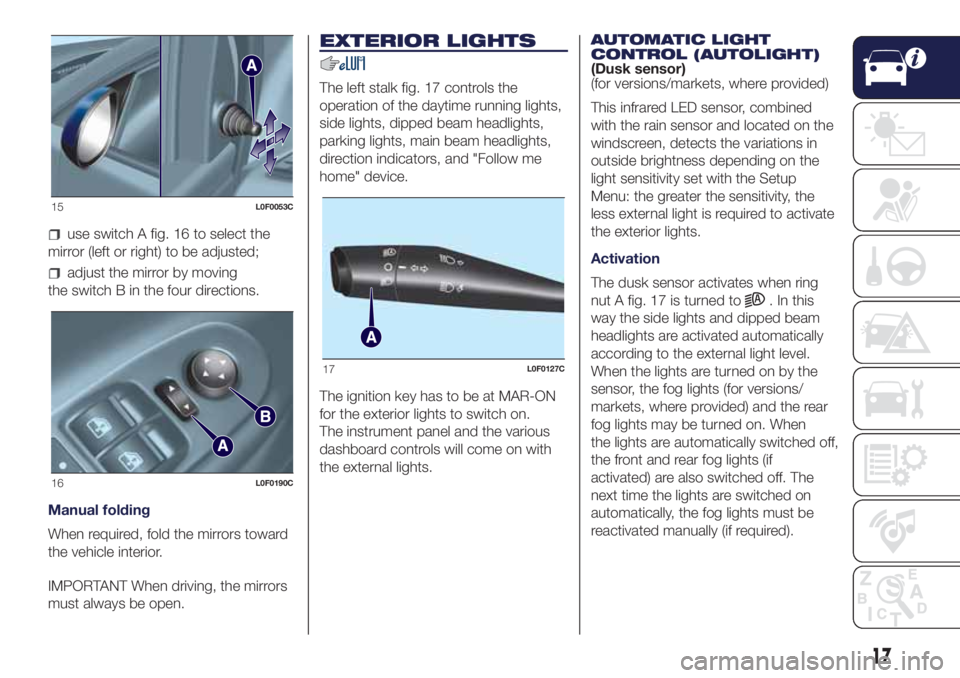
use switch A fig. 16 to select the
mirror (left or right) to be adjusted;
adjust the mirror by moving
the switch B in the four directions.
Manual folding
When required, fold the mirrors toward
the vehicle interior.
IMPORTANT When driving, the mirrors
must always be open.
EXTERIOR LIGHTS
The left stalk fig. 17 controls the
operation of the daytime running lights,
side lights, dipped beam headlights,
parking lights, main beam headlights,
direction indicators, and "Follow me
home" device.
The ignition key has to be at MAR-ON
for the exterior lights to switch on.
The instrument panel and the various
dashboard controls will come on with
the external lights.AUTOMATIC LIGHT
CONTROL (AUTOLIGHT)
(Dusk sensor)
(for versions/markets, where provided)
This infrared LED sensor, combined
with the rain sensor and located on the
windscreen, detects the variations in
outside brightness depending on the
light sensitivity set with the Setup
Menu: the greater the sensitivity, the
less external light is required to activate
the exterior lights.
Activation
The dusk sensor activates when ring
nut A fig. 17 is turned to
. In this
way the side lights and dipped beam
headlights are activated automatically
according to the external light level.
When the lights are turned on by the
sensor, the fog lights (for versions/
markets, where provided) and the rear
fog lights may be turned on. When
the lights are automatically switched off,
the front and rear fog lights (if
activated) are also switched off. The
next time the lights are switched on
automatically, the fog lights must be
reactivated manually (if required).
15L0F0053C
16L0F0190C
17L0F0127C
17
Page 22 of 200
Rear fog lights
Press the
fig. 18 button to switch
the light on/off.
The rear fog light switches on only
when the dipped headlights or
fog lights are switched on. Press the
button again to switch the light off,
or switch off the dipped headlights or
the front fog lights (for versions/
markets, where provided).
WARNING
16)The daytime running lights are an
alternative to the dipped headlights for
driving during the daytime in countries
where it is compulsory to have lights on
during the day; where it is not compulsory,
the use of daytime running lights is
permitted.
17)Daytime running lights cannot replace
dipped beam headlights when driving at
night or through tunnels. The use of
daytime running lights is governed by the
highway code of the country in which
you are driving. Comply with legal
requirements.
INTERIOR LIGHTS
FRONT CEILING LIGHT
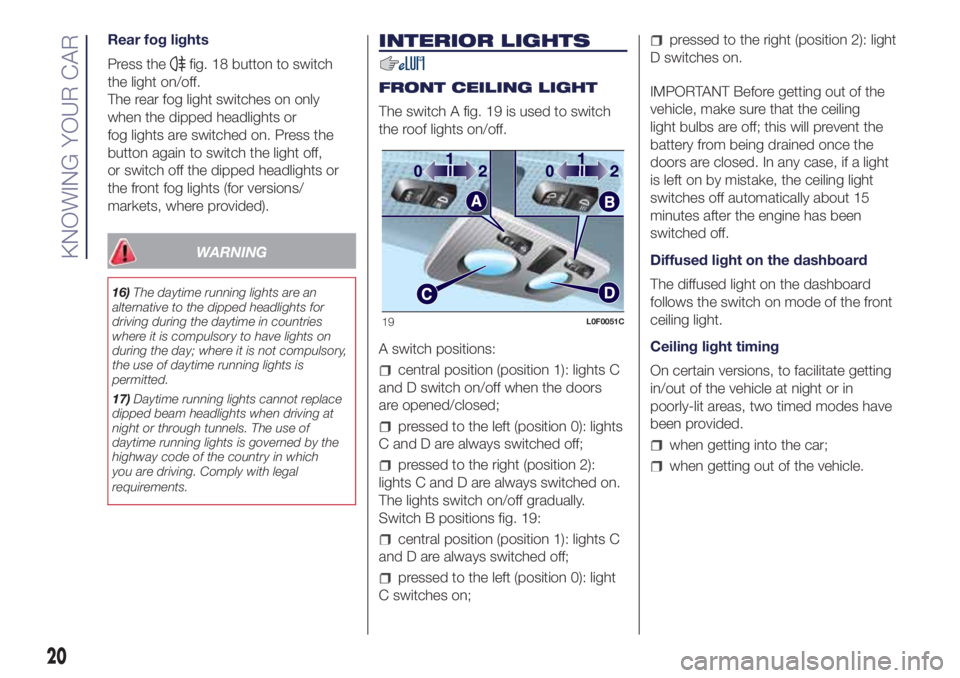
The switch A fig. 19 is used to switch
the roof lights on/off.
A switch positions:
central position (position 1): lights C
and D switch on/off when the doors
are opened/closed;
pressed to the left (position 0): lights
C and D are always switched off;
pressed to the right (position 2):
lights C and D are always switched on.
The lights switch on/off gradually.
Switch B positions fig. 19:
central position (position 1): lights C
and D are always switched off;
pressed to the left (position 0): light
C switches on;
pressed to the right (position 2): light
D switches on.
IMPORTANT Before getting out of the
vehicle, make sure that the ceiling
light bulbs are off; this will prevent the
battery from being drained once the
doors are closed. In any case, if a light
is left on by mistake, the ceiling light
switches off automatically about 15
minutes after the engine has been
switched off.
Diffused light on the dashboard
The diffused light on the dashboard
follows the switch on mode of the front
ceiling light.
Ceiling light timing
On certain versions, to facilitate getting
in/out of the vehicle at night or in
poorly-lit areas, two timed modes have
been provided.
when getting into the car;
when getting out of the vehicle.
19L0F0051C
20
KNOWING YOUR CAR
Page 24 of 200
Pushing the stalk towards the
dashboard (rocking position) will
activate the rear window washer jet.
Keep the stalk pushed for more than
half a second to activate the rear
window wiper as well. Releasing the
stalk will activate the smart washing
function, as described for the
windscreen wiper.
The function stops when the stalk is
released.
WARNING
18)Make sure the device is switched off
whenever the windscreen must be
cleaned.
WARNING
6)Never use the windscreen wipers to
remove layers of snow or ice from the
windscreen. In such conditions, the
windscreen wiper may be subjected to
excessive stress and the motor cut-out
switch, which prevents operation for a few
seconds, may intervene. If operation is
not restored (even after using the key to
restart the engine), contact a Lancia
Dealership.
7)Do not operate the windscreen wiper
with the blades lifted from the windscreen.
8)Do not activate the rain sensor when
washing the car in an automatic car wash.9)Make sure the device is switched off if
there is ice on the windscreen.
10)Do not use the rear window wiper to
remove layers of snow or ice. In such
conditions, the wiper may be subjected to
excessive stress and the motor cut-out
switch, which prevents operation for a few
seconds, may intervene. If afterwards
operation is not restored, contact a Lancia
Dealership.
22
KNOWING YOUR CAR
Page 27 of 200
AUTOMATIC CLIMATE CONTROL SYSTEM
(for versions/markets, where provided)
Controls
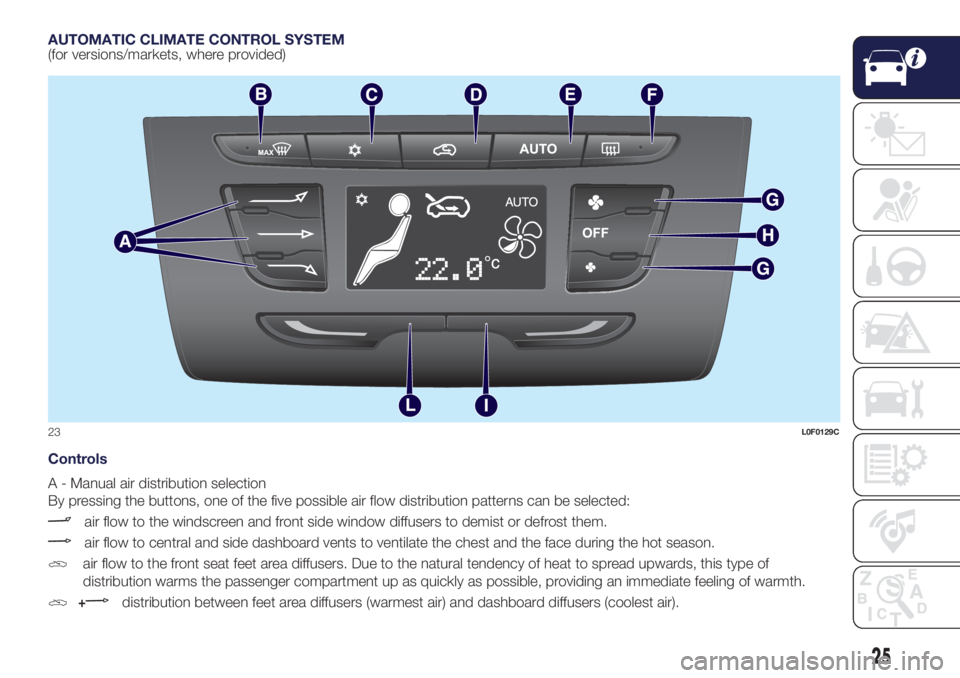
A - Manual air distribution selection
By pressing the buttons, one of the five possible air flow distribution patterns can be selected:
air flow to the windscreen and front side window diffusers to demist or defrost them.
air flow to central and side dashboard vents to ventilate the chest and the face during the hot season.
air flow to the front seat feet area diffusers. Due to the natural tendency of heat to spread upwards, this type of
distribution warms the passenger compartment up as quickly as possible, providing an immediate feeling of warmth.
+distribution between feet area diffusers (warmest air) and dashboard diffusers (coolest air).
23L0F0129C
25
Page 43 of 200
DISPLAY
Multifunctional display
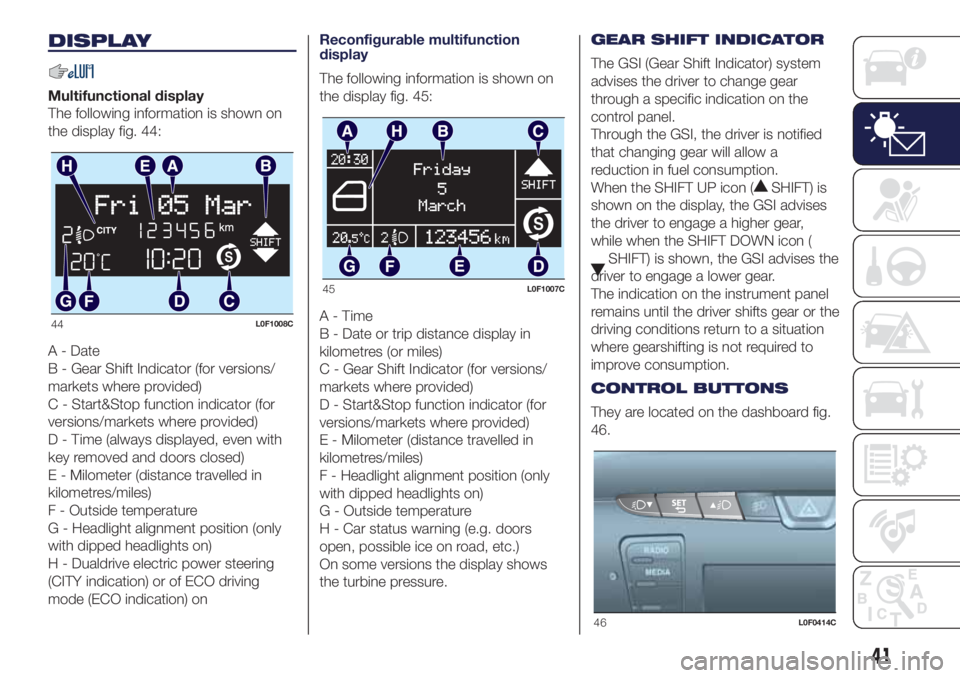
The following information is shown on
the display fig. 44:
A - Date
B - Gear Shift Indicator (for versions/
markets where provided)
C - Start&Stop function indicator (for
versions/markets where provided)
D - Time (always displayed, even with
key removed and doors closed)
E - Milometer (distance travelled in
kilometres/miles)
F - Outside temperature
G - Headlight alignment position (only
with dipped headlights on)
H - Dualdrive electric power steering
(CITY indication) or of ECO driving
mode (ECO indication) onReconfigurable multifunction
display
The following information is shown on
the display fig. 45:
A-Time
B - Date or trip distance display in
kilometres (or miles)
C - Gear Shift Indicator (for versions/
markets where provided)
D - Start&Stop function indicator (for
versions/markets where provided)
E - Milometer (distance travelled in
kilometres/miles)
F - Headlight alignment position (only
with dipped headlights on)
G - Outside temperature
H - Car status warning (e.g. doors
open, possible ice on road, etc.)
On some versions the display shows
the turbine pressure.GEAR SHIFT INDICATOR
The GSI (Gear Shift Indicator) system
advises the driver to change gear
through a specific indication on the
control panel.
Through the GSI, the driver is notified
that changing gear will allow a
reduction in fuel consumption.
When the SHIFT UP icon (
SHIFT) is
shown on the display, the GSI advises
the driver to engage a higher gear,
while when the SHIFT DOWN icon (
SHIFT) is shown, the GSI advises the
driver to engage a lower gear.
The indication on the instrument panel
remains until the driver shifts gear or the
driving conditions return to a situation
where gearshifting is not required to
improve consumption.
CONTROL BUTTONS
They are located on the dashboard fig.
46.
44L0F1008C
45L0F1007C
46L0F0414C
41
Page 64 of 200
Warning light What it means
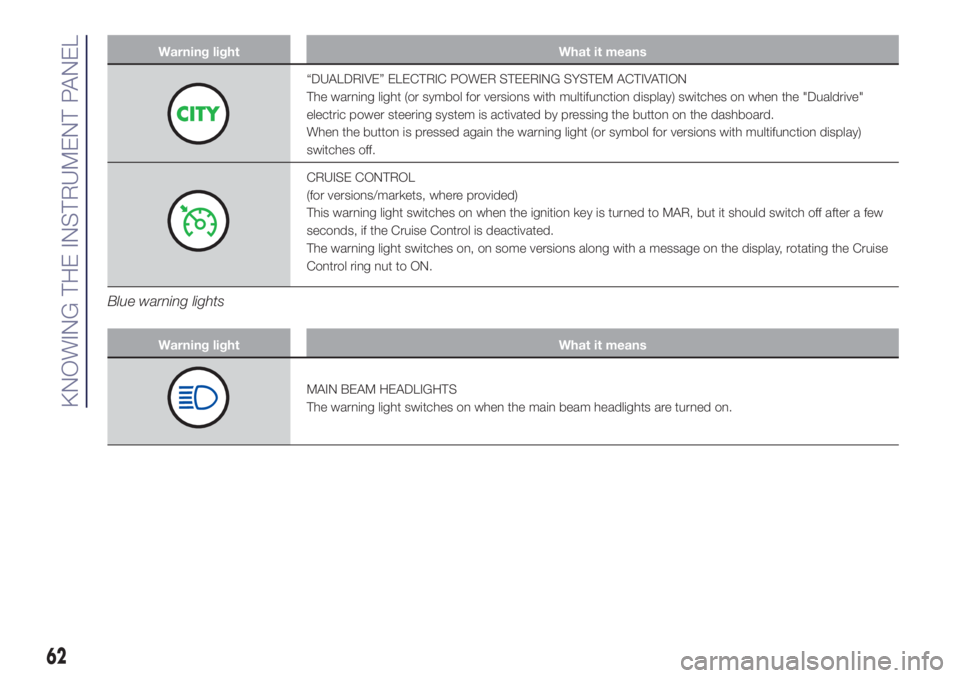
“DUALDRIVE” ELECTRIC POWER STEERING SYSTEM ACTIVATION
The warning light (or symbol for versions with multifunction display) switches on when the "Dualdrive"
electric power steering system is activated by pressing the button on the dashboard.
When the button is pressed again the warning light (or symbol for versions with multifunction display)
switches off.
CRUISE CONTROL
(for versions/markets, where provided)
This warning light switches on when the ignition key is turned to MAR, but it should switch off after a few
seconds, if the Cruise Control is deactivated.
The warning light switches on, on some versions along with a message on the display, rotating the Cruise
Control ring nut to ON.
Blue warning lights
Warning light What it means
MAIN BEAM HEADLIGHTS
The warning light switches on when the main beam headlights are turned on.
62
KNOWING THE INSTRUMENT PANEL
Page 65 of 200

SYMBOLS AND MESSAGES ON THE DISPLAY
Symbols and Messages What it means
POSSIBLE ICE ON ROAD
(for versions/markets, where provided)
On versions equipped with "reconfigurable multifunction display", a message together with
a symbol will appear on the display when the outdoor temperature falls to, or is below,
3°C.
IMPORTANT In the event of outside temperature sensor failure, dashes are shown on the
display instead of the value.
ASR SYSTEM DEACTIVATION
The ASR system can be deactivated by pressing the ASR OFF button.
On versions equipped with reconfigurable multifunction display, the system deactivation is
indicated by the displaying of a dedicated message and a symbol on the display; at the
same time the LED on the ASR OFF button switches on.
PETROL/METHANE SWITCHING
(for versions/markets, where provided)
Warning light on constantly: methane operation.
Warning light off: petrol operation.
The symbol is displayed, along with a dedicated message, in the event of a methane
supply system failure.
In this case, contact a Lancia Dealership as soon as possible, running on petrol
START&STOP SYSTEM ACTIVATION/
DEACTIVATIONStart&Stop system activation
A message will appear on the display when the Start&Stop system is activated.
In this condition the LED on the
button located on the dashboard control panel is off.
Start&Stop system deactivation
The Start & Stop system deactivation is indicated by a message on the display and, for
versions with reconfigurable multifunction display, by the
symbol that switches on.
The LED above the
button is on when the system is deactivated.
63
Page 66 of 200

Symbols and Messages What it means
START&STOP SYSTEM FAILUREThe Start&Stop system failure is indicated by a message on the display and by the
warning light (or symbol)on the instrument panel that switches on.
In the event of a Start&Stop system failure, contact a Lancia Dealership.
ECO FUNCTION ACTIVATION/DEACTIVATION
(0.9 TwinAir 85 HP versions)The ECO function activation/deactivation, by pressing the button on the dashboard, is
indicated by a dedicated message on the display.
SERVICE (SCHEDULED SERVICING) EXPIREDWhen the scheduled servicing is nearly due ("scheduled service deadline"), the display will
show the symbol followed by the number of kilometres/miles until the car must be
serviced. This is displayed automatically, with ignition key at MAR-ON, 2000 km (or
equivalent value in miles) before servicing or, where provided, 30 days before servicing. It is
also displayed each time the key is turned to MAR-ON or, for versions/markets, where
provided, every 200 km (or equivalent value in miles).
Contact a Lancia Dealership where the operations of the "Scheduled Servicing Plan" will
be performed and the message will be reset.
DUAL FUNCTION SYSTEM GEARBOX
MESSAGESFor versions equipped with "Dual Function System" gearbox, the following messages can
be displayed:
Reduce gear changes message
Manual mode not available message
Automatic mode not available message
Clutch overheating message
Press the brake pedal message
Press the brake pedal - delayed start-up message
Press brake and repeat manoeuvre message
Gear not available message
Manoeuvre not permitted message
Place gear lever in N (neutral) message
64
KNOWING THE INSTRUMENT PANEL
Page 88 of 200

Main recommendations to carry
children safely
Install the child restraint systems on
the rear seat, which is the most
protected position in the event of an
impact.
Keep children in rearward facing
child restraint systems for as long as
possible, until 3–4 years old if possible.
Should a rearward facing child
restraint system be installed on the rear
seats, it is advisable to position it as
far forward as the position of the front
seat allows.
If the passenger's front airbag is
deactivated always check the
permanent switching-on of the
dedicated warning light on the
instrument panel to make sure that it
has actually been deactivated.
Carefully follow the instructions
supplied with the child restraint system.
Keep the instructions in the vehicle
along with the other documents and
this handbook. Do not use second-
hand child restraint systems without
instructions.
Only one child is to be strapped into
each restraint system; never carry two
children using one child restraint
system.
Always check that the seat belts do
not rest on the child’s neck.
Always check that the seat belt is
well fastened by pulling on it.
While travelling, do not let the child
sit incorrectly or unfasten the belts.
Never allow a child to put the belt's
diagonal section under an arm or
behind their back.
Never carry children on your lap,
even newborns. No one can hold
a child in the case of an accident.
In the event of an accident, replace
the child restraint system with a new
one.
If child seats facing forward are
used, adjust the headrest of the vehicle
seat in the highest setting position.
WARNING
80)SEVERE DANGER When a front
passenger airbag is fitted, do not install
rearward facing child restraint systems on
the front passenger seat. Deployment of
the airbag in an accident could cause fatal
injuries to the child regardless of the
severity of the collision. It is advisable to
always carry children in a child restraint
system on the rear seat, which is the most
protected position in the event of a
collision.81)On the sun visor there is a label with
suitable symbols reminding the user that it
is compulsory to deactivate the airbag if
a rearward facing child restraint system is
fitted. Always comply with the instructions
on the passenger side sun visor (see the
"Supplementary Restraint System (SRS)
- Airbag" paragraph).
82)Should it be absolutely necessary to
carry a child on the front seat in a
backwards-facing craddle seat, the
passenger's front and side airbags must be
deactivated through the Setup menu.
Deactivation should be verified by checking
the
warning light on the instrument
panel. Move the passenger's seat as far
back as possible to avoid contact between
the child seat and the dashboard.
83)Do not move the front or rear seat if a
child is seated on it or on the dedicated
child restraint system.
84)Incorrect fitting of the child restraint
system may result in an inefficient
protection system. In the event of an
accident the child restraint system may
become loose and the child may be
injured, even fatally. When fitting a restraint
system for newborns or children, strictly
comply with the instructions provided
by the Manufacturer.
85)When the child restraint system is not
used, secure it with the seat belt or with
the ISOFIX anchorages, or remove it from
the vehicle. Do not leave it unsecured
inside the passenger compartment. In this
way, in the case of sudden braking or an
accident, it will not cause injuries to the
occupants.
86
SAFETY
Page 89 of 200
86)After installing a child restraint system,
do not move the seat: always remove
the child restraint system before making
any adjustment.
87)Always make sure that the chest
section of the seat belt does not pass
under the arms or behind the back of the
child. In the event of an accident the seat
belt will not be able to secure the child,
with the risk of injury, including fatal injury.
Therefore the child must always wear
the seat belt correctly.
88)Do not use the same lower anchorage
to install more than one child restraint
system.
89)If a Universal ISOFIX child restraint
system is not fixed to all three anchorages,
it will not be able to protect the child
correctly. In a crash, the child could be
seriously or fatally injured.
90)Fit the child restraint system when the
car is stationary. The child restraint system
is correctly fixed to the brackets when
you hear the click. Follow the instructions
for assembly, disassembly and positioning
that the Manufacturer must supply with
the child restraint system.SUPPLEMENTARY
RESTRAINT SYSTEM
(SRS) - AIRBAG
The vehicle may be equipped with:
front driver airbag;
front passenger airbag;
front side bags for pelvis, chest and
shoulder protection of driver and
passenger (for versions/markets, where
provided);
side bags for head protection of
front seat passengers and rear side
seat passengers (window bag).
FRONT AIRBAGS
91)
The front (driver and passenger) airbags
protect the front seat occupants in the
event of head-on crashes of medium-
high severity, by placing the cushion
between the occupant and the steering
wheel or dashboard.
Therefore non-activation of airbags in
other types of collisions (side impacts,
rear shunts, roll-overs, etc.) does not
indicate a system malfunction.
Driver and passenger front airbags are
not a replacement of but
complementary to the seat belts, which
should always be worn, as specified
by law in Europe and most non-
European countries.In the event of impact, those not
wearing a seat belt are projected
forwards and may come into contact
with the bag which is still inflating. The
protection offered by the bag is
compromised in these circumstances.
The front airbags may not activate in
the following cases: frontal impact
against highly deformable objects not
involving the front surface of the vehicle
(e.g. wing collision against guard rail);
in the case of the vehicle wedging
under other vehicles or protective
barriers (e.g. under trucks or guard
rails).
Failure to activate in the conditions
described above is due to the fact that
they may not provide any additional
protection compared with seat belts, so
their activation would be inappropriate.
In these cases, non-deployment does
not indicate a system malfunction.
Driver's side front airbag
92)
This consists of an instantly inflating
cushion contained in a special
compartment in the centre of the
steering wheel fig. 63.
87