relay LAND ROVER DISCOVERY 1999 Service Manual
[x] Cancel search | Manufacturer: LAND ROVER, Model Year: 1999, Model line: DISCOVERY, Model: LAND ROVER DISCOVERY 1999Pages: 1529, PDF Size: 34.8 MB
Page 874 of 1529

BRAKES
DESCRIPTION AND OPERATION 70-21
ETC
The ETC function uses brake intervention to prevent wheel spin and maintain even torque distribution to the wheels.
ETC is automatically enabled while the brakes are off at speeds up to 62.5 mph (100 km/h), and operates the brakes
either individually or in axle pairs:
lAt speeds up to 31.3 mph (50 km/h), ETC uses individual brake intervention to maintain even torque distribution
between wheels on the same axle.
lVehicles up to 03 model year – At speeds between 0 and 62.5 mph (0 and 100 km/h), ETC also uses brake
intervention in axle pairs to maintain even torque distribution between the front and rear axles. In effect, this mode
of operation replaces the centre differential lock of the transfer box which, although still incorporated, is non
operational under normal driving conditions.
+ TRANSFER BOX - LT230SE, DESCRIPTION AND OPERATION, Description. If the centre differential
lock is in the locked condition, the SLABS ECU illuminates the ABS and ETC warning lamps and inhibits the ETC
function (the ABS, EBD and HDC functions are retained, but at degraded performance levels).
lVehicles from 03 model year (with differential lock fitted) – At speeds between 0 and 62.5 mph (0 and 100
km/h), ETC uses brake intervention in axle pairs to maintain even torque distribution between the front and rear
axles. If the centre differential lock is in the locked condition, the differential lock warning lamp in the instrument
pack is illuminated. The ABS, EBD, ETC and HDC functions are retained, but with revised parameters to suit the
locked differential.
While the ETC function is enabled, if the SLABS ECU detects a wheel accelerating faster than the average, indicating
loss of traction, it operates the ABS modulator in the active braking mode. Depending on the vehicle speed, active
braking is employed for either the brake of the affected wheel or for both brakes on the affected axle, until all four
wheels are driven at approximately the same speed again. During active braking the SLABS ECU also illuminates the
ETC warning lamp, for a minimum of 2 seconds or for the duration that ETC is active. ETC operation is desensitised
during 'hard' cornering.
HDC
HDC uses brake intervention to provide a controlled descent ability in off road conditions when engine braking is
insufficient to maintain a comfortable speed. This allows the driver to leave HDC selected and to control the vehicle's
descent speed, down to the system's minimum target speed, using only the accelerator pedal. The HDC function is
selected on/off by a switch on the fascia. When selected on, HDC is enabled in all forward gears and reverse provided:
lVehicle speed is below 31.3 mph (50 km/h).
lThe transfer box is in low range.
lOn manual gearbox vehicles, the clutch is engaged.
When HDC is enabled, the HDC information warning lamp illuminates. If HDC is selected outside the above
conditions, the HDC information warning lamp flashes and the audible warning sounds continuously.
When HDC is enabled, the SLABS ECU calculates a target speed from the throttle position element of the engine data
input, and compares this with actual speed. If the actual speed is higher than the target speed, the SLABS ECU
operates the ABS modulator in the active braking mode to slow the vehicle down to the target speed. While the braking
force is being applied, the SLABS ECU also energizes the brake lamp relay to put the brake lamps on. Active braking
is discontinued while vehicle speed is below the target speed or if the foot brakes are applied. Applying the foot brakes
during active braking may result in a pulse through the brake pedal, which is normal.
During active braking, the brakes are operated predominantly on the wheels of the leading axle, but if that is not
sufficient to achieve the required deceleration the brakes of the trailing axle are also applied. The deceleration rate is
dependent on the speed differential between initial vehicle speed and the target speed. The deceleration rates are
relatively low at higher speed differentials, then progressively increase as vehicle speed approaches the target speed.
Anti-lock braking is also enabled during active braking, but at very low speeds some wheel lock can occur.
The target speed increases as the accelerator pedal is pressed, from a programmed minimum with the accelerator
pedal released, up to a maximum of 31.3 mph (50 km/h). For any given accelerator pedal position, while travelling
uphill or on level ground the target speed is always greater than the corresponding vehicle speed, which allows the
vehicle to be driven normally without HDC intervention. However, when travelling downhill, the gravitational effect on
the vehicle means that for any given accelerator pedal position the target speed is less than the corresponding vehicle
speed, and HDC intervenes to limit vehicle speed to the target speed.
Page 876 of 1529

BRAKES
DESCRIPTION AND OPERATION 70-23
Typical disabled times
Diagnostics
While the ignition is on, the diagnostics function of the SLABS ECU monitors the system for faults. In addition, the
return pump is tested by pulsing it briefly immediately after the engine starts provided vehicle speed exceeded 4.4
mph (7 km/h) during the previous ignition cycle. If a fault exists in a warning lamp circuit, the lamp will not illuminate
during the lamp check at ignition on but, provided there are no other faults, the related function will otherwise be fully
operational. If a fault is detected during the power up, the SLABS ECU stores a related fault code in memory and
illuminates the appropriate fault warning lamps. If a fault is detected later in the drive cycle, the SLABS ECU also
sounds the audible warning three times.
Fault codes and diagnostic routines can be accessed by connecting Testbook to the vehicle's diagnostic connector
in the driver's footwell.
Warning lamp fault operation
After detecting a fault, the SLABS ECU selects an appropriate default strategy which, where possible, retains some
operational capability. A shuttle valve switch fault and throttle position signal fault are classified as permanent faults.
If a permanent fault is detected, the related warning lamp illumination and default strategies are automatically
employed in subsequent ignition cycles, even if the fault is intermittent, until the fault has been rectified and cleared
from memory. If a non permanent fault is detected, the related warning lamp illumination and default strategies will
only be employed in subsequent ignition cycles if the fault is still present.
After rectification of an ABS sensor fault, the ABS and ETC functions are disabled, and the ABS warning lamp remains
illuminated after the lamp check, until vehicle speed exceeds 9.4 mph (15 km/h) (to allow additional checks to be
performed).
Vehicle speed, mph (km/h) Time, minutes
1.3 (2) 40
12.5 (20) 33
15.6 (25) 17
25.0 (40) 9
31.3 (50) 6
Item Check Warning lamp
ABS Brake ETC HDC
fault
ABS sensors Resistance (to check status) On On On On
Brake lamps relay Open/Short circuit Off Off Off On
Engine data Sticking throttle, signal failure, data corruption Off Off On On
Inlet solenoid valves Open/Short circuit On On On On
Outlet solenoid valves Open/Short circuit On On On On
Reference earth Connection to earth On On On On
Return pump monitor Correct pump operation On On On On
Return pump relay Open/Short circuit On On On On
Shuttle valve switches Open/Short circuit On On On On
SLABS ECU Internal failure On On On On
Supply voltages Range (10 to 16 V) On On On On
Page 877 of 1529

BRAKES
70-24 DESCRIPTION AND OPERATION
Default strategies
Electrical data
Nominal resistance values for applicable brake control components are as detailed below:
Fault Default strategy
Brake lamps relay ABS: Enabled.
ETC: Enabled.
EBD: Enabled.
HDC: Enabled.
Throttle position signal failure ABS: Enabled.
ETC: Disabled.
EBD: Enabled.
HDC: Immediately disabled if not in active braking mode; faded out then disabled if in active
braking mode.
No reference earth ABS: Disabled.
ETC: Disabled.
EBD: Partly disabled.
HDC: Disabled.
Return pump or relay fault ABS: Disabled.
ETC: Disabled.
EBD: Partly disabled.
HDC: Disabled.
Shuttle valve switch failure ABS: Deceleration threshold increased; return pump activated if sum of output valve
actuation on one axle exceeds 140 milliseconds.
ETC: Disabled.
EBD: Inlet valves of rear axle close at vehicle deceleration rates of 0.3 g and above.
HDC: Disabled.
SLABS ECU internal failure ABS: Disabled.
ETC: Disabled.
EBD: Disabled.
HDC: Disabled.
Supply voltage out of limits ABS: Disabled.
ETC: Disabled.
EBD: Disabled.
HDC: Disabled.
Component Resistance, ohms
Brake lamp relay coil117 - 143
Return pump relay coil82.8 - 101.2
ABS sensor950 - 1100
Shuttle valve switches, both open (brakes off) 2977 - 3067
Shuttle valve switches, both closed (brakes on) 1007 - 1037
Shuttle valve switches, one open, one closed 1992 - 2052
Inlet solenoid valve5.9 - 7.3
Outlet solenoid valve3.0 - 3.6
Page 998 of 1529

SEATS
DESCRIPTION AND OPERATION 76-5-1
SEATS DESCRIPTION AND OPERAT ION
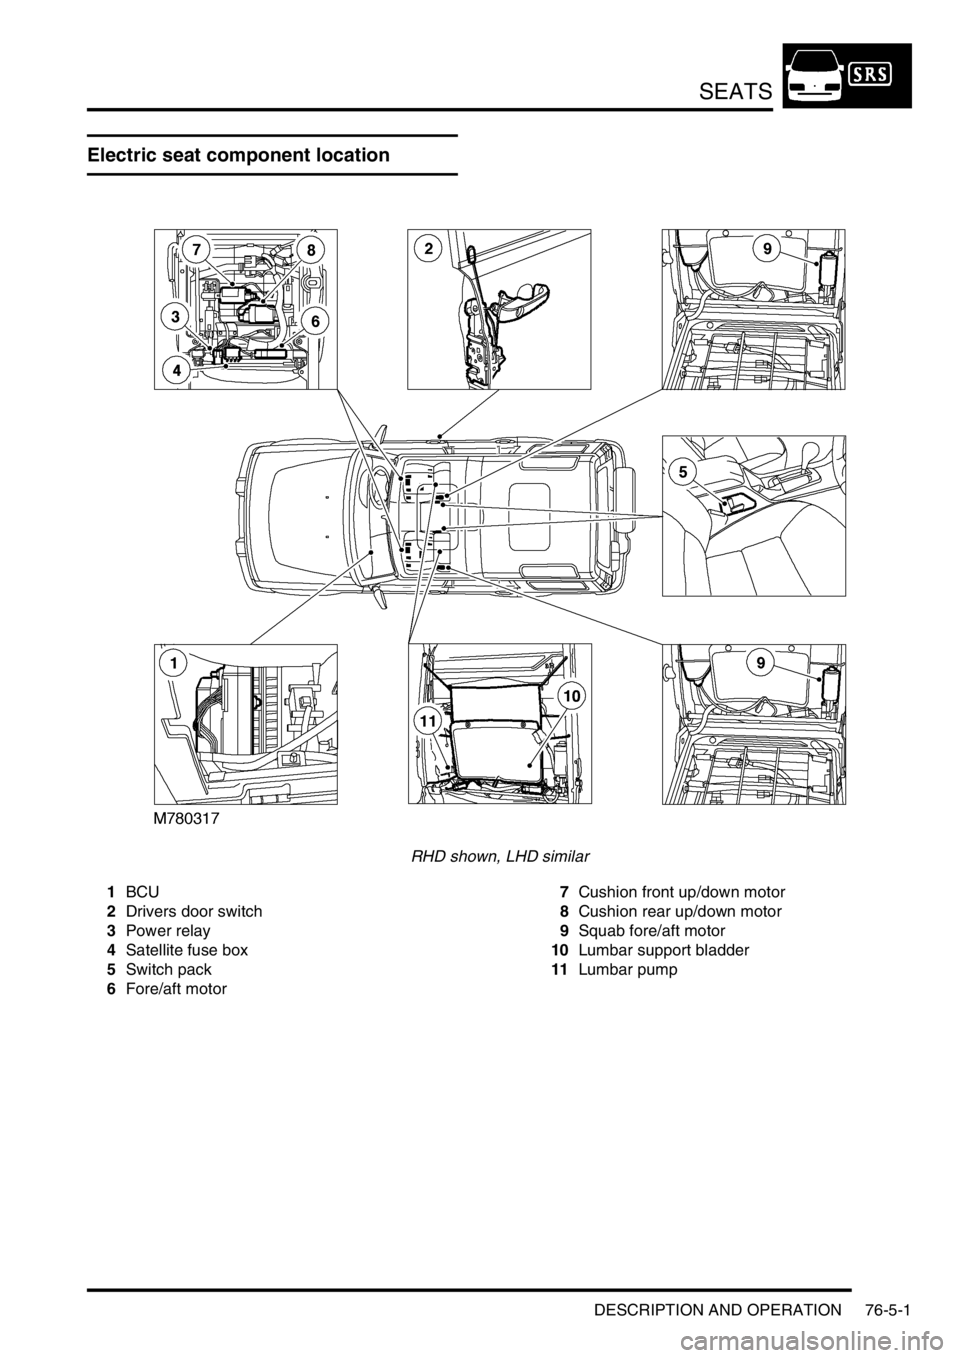
Electric seat component location
RHD shown, LHD similar
1BCU
2Drivers door switch
3Power relay
4Satellite fuse box
5Switch pack
6Fore/aft motor7Cushion front up/down motor
8Cushion rear up/down motor
9Squab fore/aft motor
10Lumbar support bladder
11Lumbar pump
Page 1000 of 1529

SEATS
DESCRIPTION AND OPERATION 76-5-3
1Ignition switch
2BCU
3Driver door switch
4Left seat power relay
5Left seat satellite fuse box
6Left seat switch pack
7Left seat fore/ aft motor
8Left seat cushion front up/ down motor
9Left seat cushion rear up/ down motor
10Left seat squab fore/ aft motor
11Left seat lumbar pump12Left seat lumbar deflate solenoid
13Right seat power relay
14Right seat satellite fuse box
15Right seat switch pack
16Right seat fore/ aft motor
17Right seat cushion front up/ down motor
18Right seat cushion rear up/ down motor
19Right seat squab fore/ aft motor
20Right seat lumbar pump
21Right seat lumbar deflate solenoid
22Passenger front door switch
Page 1001 of 1529

SEATS
76-5-4 DESCRIPTION AND OPERATION
Description - electric seats
General
All markets use the same electric seat system. Electically operated lumbar support is optional. The system consists
of an electrical sub-system and a mechanical sub-system.
The electrical sub-system consists of the following components:
lBCU.
lSeat power relays.
lSeat switch packs.
lSeat fore/ aft motors.
lSeat cushion front up/ down motors.
lSeat cushion rear up/ down motors.
lSeat squab motor.
lLumbar pump.
lLumbar deflate solenoid.
The mechanical sub-system consist of the following components:
lGear wheels.
lRack and pinion assemblies.
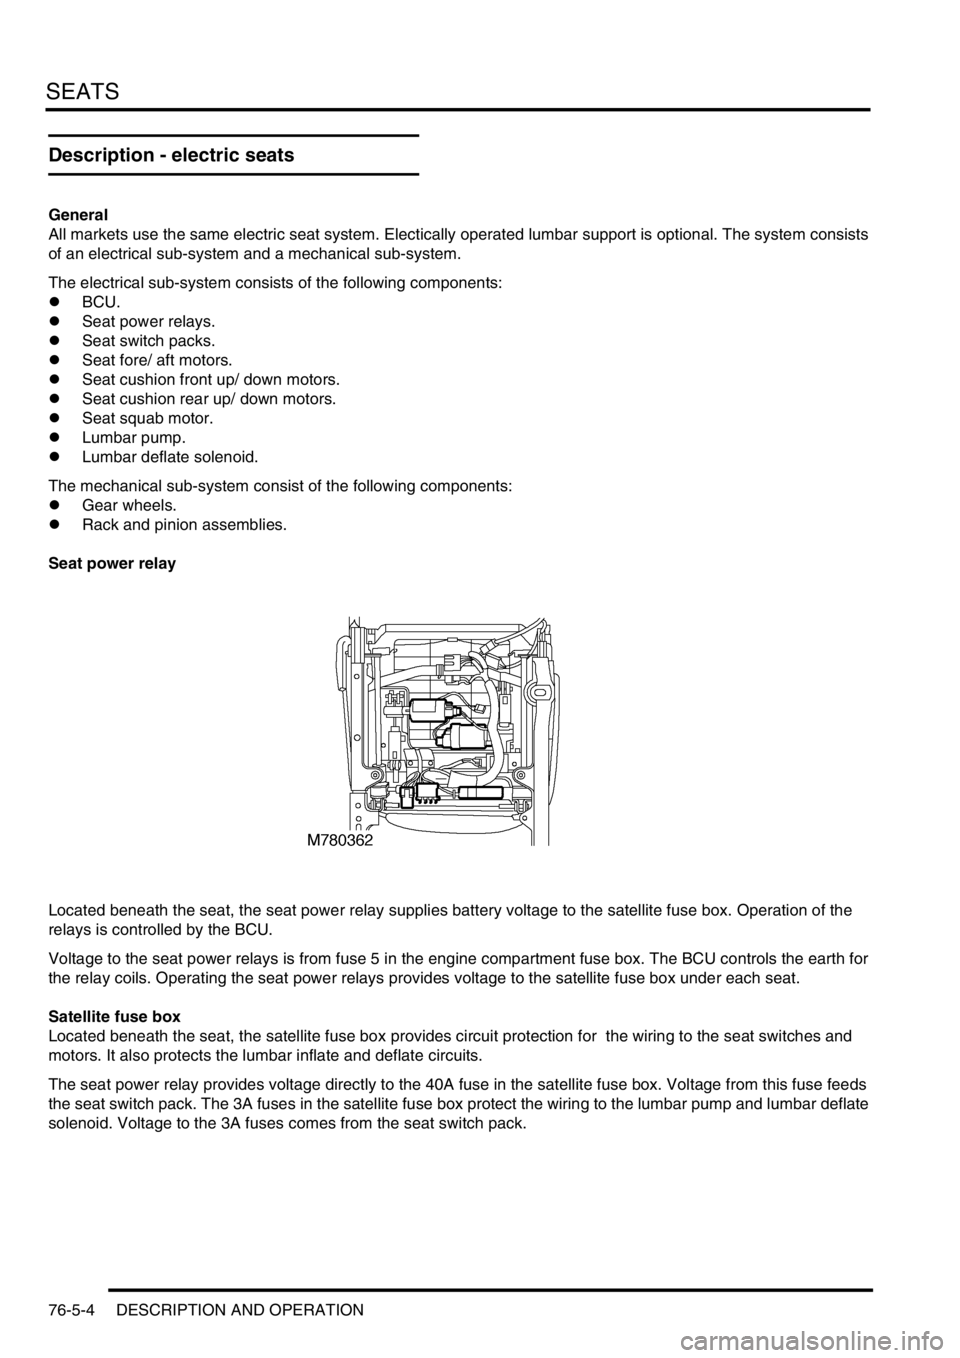
Seat power relay
Located beneath the seat, the seat power relay supplies battery voltage to the satellite fuse box. Operation of the
relays is controlled by the BCU.
Voltage to the seat power relays is from fuse 5 in the engine compartment fuse box. The BCU controls the earth for
the relay coils. Operating the seat power relays provides voltage to the satellite fuse box under each seat.
Satellite fuse box
Located beneath the seat, the satellite fuse box provides circuit protection for the wiring to the seat switches and
motors. It also protects the lumbar inflate and deflate circuits.
The seat power relay provides voltage directly to the 40A fuse in the satellite fuse box. Voltage from this fuse feeds
the seat switch pack. The 3A fuses in the satellite fuse box protect the wiring to the lumbar pump and lumbar deflate
solenoid. Voltage to the 3A fuses comes from the seat switch pack.
Page 1002 of 1529

SEATS
DESCRIPTION AND OPERATION 76-5-5
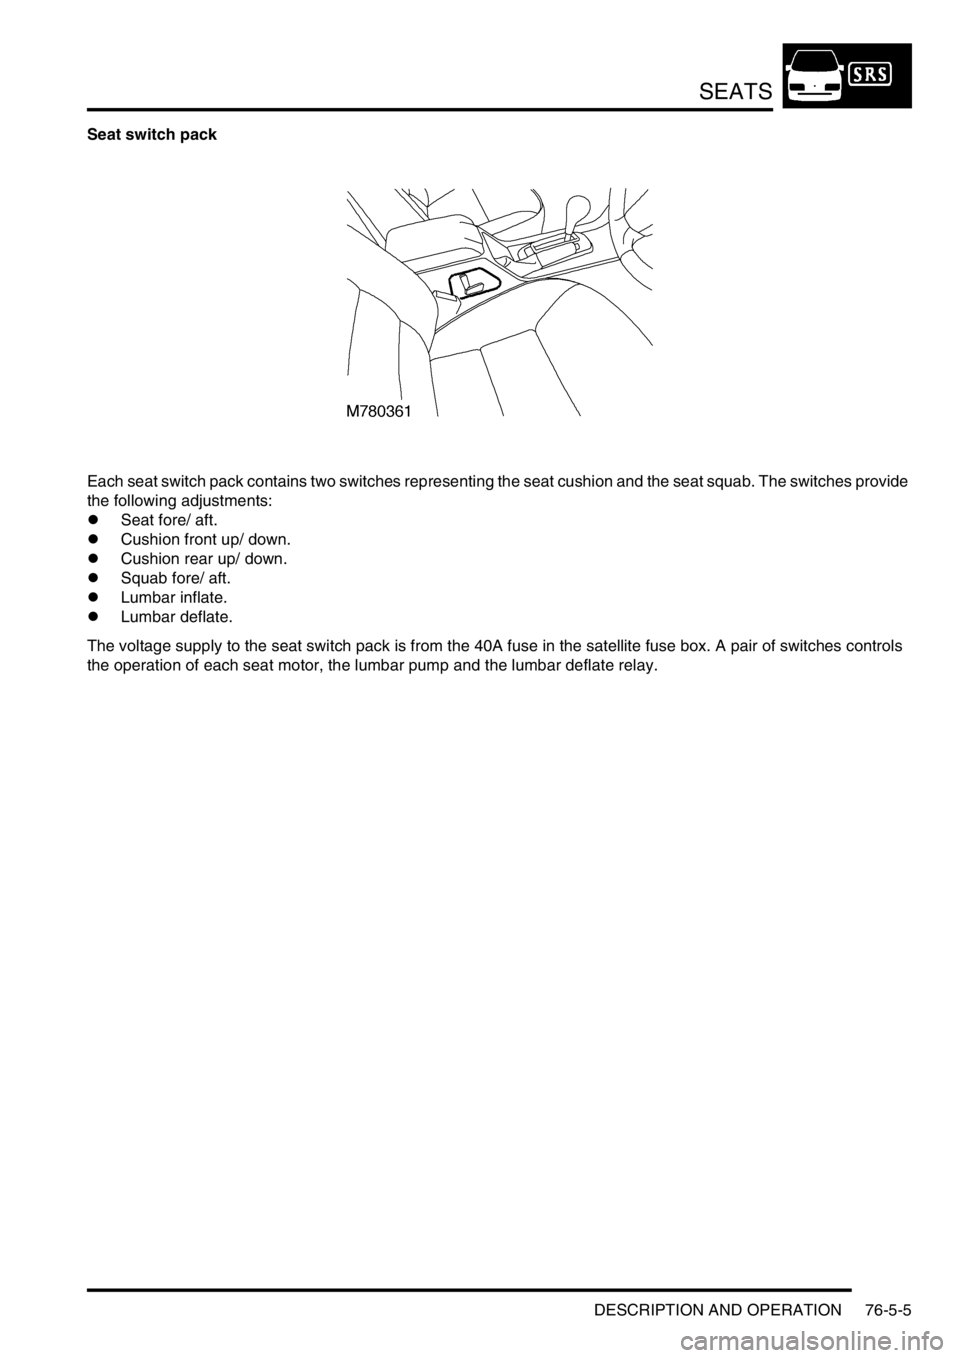
Seat switch pack
Each seat switch pack contains two switches representing the seat cushion and the seat squab. The switches provide
the following adjustments:
lSeat fore/ aft.
lCushion front up/ down.
lCushion rear up/ down.
lSquab fore/ aft.
lLumbar inflate.
lLumbar deflate.
The voltage supply to the seat switch pack is from the 40A fuse in the satellite fuse box. A pair of switches controls
the operation of each seat motor, the lumbar pump and the lumbar deflate relay.
Page 1005 of 1529

SEATS
76-5-8 DESCRIPTION AND OPERATION
Operation - electric seats
Seat power relay enable line
The BCU provides the seat power relays with an earth supply to the relay coil that enables the relay operation. When
this seat power relay enable line is active, the seat power relay energises allowing seat operation.
In order for the seat power relay to be active the BCU must detect either of the following condition options:
lIgnition switch in position II.
lIgnition switch in position II or driver's door within 45 seconds of opening.
Seat fore/ aft movement
When the cushion switch is operated and the seat power relay enable line is operating, power and earth are supplied
to the motor in the seat, allowing the seat to move forward or backward depending on switch position. The motor
drives a gear wheel along a gear rack connected to the seat base. Sliding the cushion switch forward causes the motor
to drive the seat forward. Sliding the cushion switch rearward reverses polarity of the voltage at the seat motor, driving
the seat rearward.
Seat cushion front up/ down movement
When the cushion switch is operated and the seat power relay enable line is operating, power and earth are supplied
to the motor in the seat, allowing the front of the seat cushion to move upward or downward depending on switch
position. The motor drives a gear wheel along a gear rack connected to the seat base. Sliding the front of the cushion
switch upward causes the motor to drive the seat upward. Sliding the front of the cushion switch downward reverses
polarity of the voltage at the seat motor driving the seat downward.
Seat cushion rear up/ down movement
When the cushion switch is operated and the seat power relay enable line is operating, power and earth are supplied
to the motor in the seat, allowing the seat to move upwards or downwards depending on switch position. The motor
drives a gear wheel along a gear rack connected to the seat base. Sliding the rear of the cushion switch upward
causes the motor to drive the seat upward. Sliding the rear of the cushion switch downward reverses polarity of the
voltage at the seat motor driving the seat downward.
Squab fore/ aft movement
When the squab switch is operated and the seat power relay enable line is operating, power and earth is supplied to
the motor in the squab, allowing the squab to move forward or backward depending on switch position. The motor
drives a gear wheel along a rotary gear rack connected to the squab. Sliding the squab switch forward causes the
motor to drive the squab forward. Sliding the squab switch rearward reverses polarity of the voltage at the seat motor
driving the squab rearward.
Lumbar inflate/ deflate
Sliding the squab switch upwards when the seat power relay enable line is operating applies voltage to the lumbar
pump. The lumbar pump inflates the lumbar bladder, increasing lumbar support. The lumbar pump and the normally
closed lumbar deflate solenoid hold the air in the bladder. Sliding the squab switch downwards applies voltage to the
deflate solenoid, venting the air in the lumbar bladder to atmosphere, decreasing lumbar support.
Diagnostics
TestBook can only verify that the seat power relay line is enabled. It cannot determine the status of the system or any
of the components.
Page 1161 of 1529

HEATING AND VENTILATION
80-4DESCRIPTION AND OPERATION
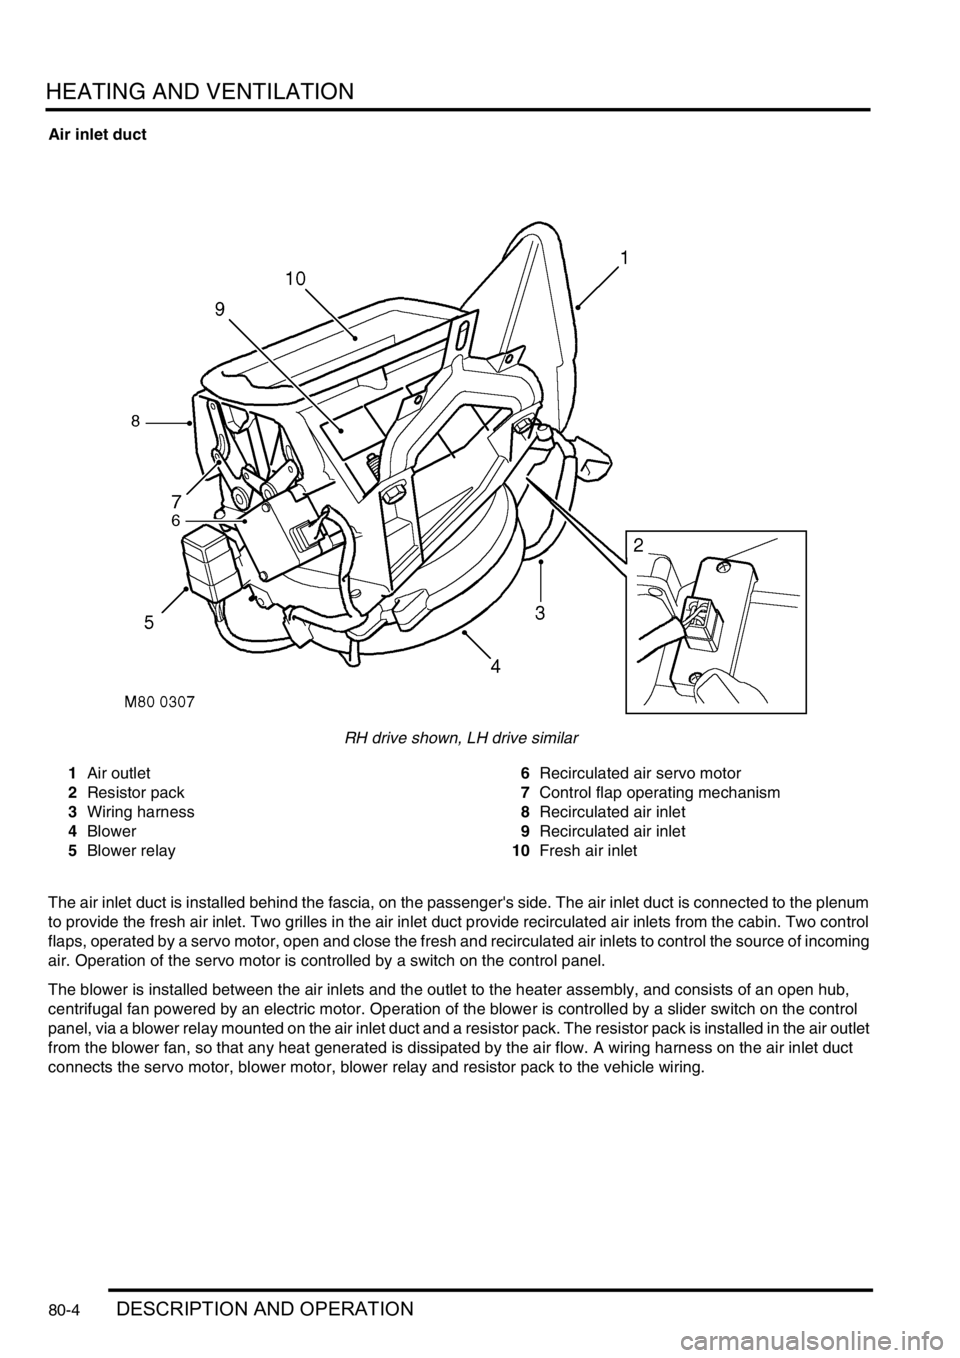
Air inlet duct
RH drive shown, LH drive similar
1Air outlet
2Resistor pack
3Wiring harness
4Blower
5Blower relay6Recirculated air servo motor
7Control flap operating mechanism
8Recirculated air inlet
9Recirculated air inlet
10Fresh air inlet
The air inlet duct is installed behind the fascia, on the passenger's side. The air inlet duct is connected to the plenum
to provide the fresh air inlet. Two grilles in the air inlet duct provide recirculated air inlets from the cabin. Two control
flaps, operated by a servo motor, open and close the fresh and recirculated air inlets to control the source of incoming
air. Operation of the servo motor is controlled by a switch on the control panel.
The blower is installed between the air inlets and the outlet to the heater assembly, and consists of an open hub,
centrifugal fan powered by an electric motor. Operation of the blower is controlled by a slider switch on the control
panel, via a blower relay mounted on the air inlet duct and a resistor pack. The resistor pack is installed in the air outlet
from the blower fan, so that any heat generated is dissipated by the air flow. A wiring harness on the air inlet duct
connects the servo motor, blower motor, blower relay and resistor pack to the vehicle wiring.
Page 1170 of 1529

HEATING AND VENTILATION
DESCRIPTION AND OPERATION 80-13
Operation
Air distribution
Turning the distribution knob on the control panel turns the control flaps in the heater assembly to direct air to the
corresponding fascia and footwell outlets.
Air temperature
Turning the LH or RH temperature knob on the control panel turns the related blend flaps in the heater assembly. The
blend flaps vary the proportion of air going through the cold air bypass and the heater matrix. The proportion varies,
between full bypass no heat and no bypass full heat, to correspond with the position of the temperature knob.
Blower speed
The blower can be selected off or to run at one of four speeds. While the ignition is on, when the blower switch is set
to positions 1, 2, 3, or 4, ignition power energises the blower relay, which supplies battery power to the blower. At
switch positions 1, 2 and 3, the blower switch also connects the blower to different earth paths through the resistor
pack, to produce corresponding differences of blower operating voltage and speed. At position 4, the blower switch
connects an earth direct to the blower, bypassing the resistor pack, and full battery voltage drives the blower at
maximum speed.
Fresh/Recirculated inlet air
When the recirculated air switch is latched in, the amber indicator LED in the switch illuminates and an earth is
connected to the recirculated air side of the fresh/recirculated air servo motor. The fresh/recirculated air servo motor
then turns the control flaps in the air inlet duct to close the fresh air inlet and open the recirculated air inlets.
When the latch of the recirculated air switch is released, the amber indicator LED in the switch extinguishes and the
earth is switched from the recirculated air side to the fresh air side of the fresh/recirculated air servo motor. The fresh/
recirculated air servo motor then turns the control flaps in the air inlet duct to open the fresh air inlet and close the
recirculated air inlets.
FBH system (where fitted)
The FBH system operates only while the engine is running and the ambient temperature is less than 5 °C (41 °F).
With the engine running and the ambient temperature below 5 °C (41 °F), the air temperature sensor connects the
alternator power supply to the ECU in the FBH unit. On receipt of the alternator power supply, the ECU starts the
circulation pump and, depending on the input from the temperature sensor in the heat exchanger, enters either a
standby or active mode of operation. If the heat exchanger casing temperature is 65 °C (149 °F) or above, the ECU
enters a standby mode of operation. If the heat exchanger casing temperature is below 65 °C (149 °F), the ECU enters
an active mode of operation. In the standby mode, the ECU monitors the heat exchanger casing temperature and
enters the active mode if it drops below 65 °C (149 °F). In the active mode, the ECU initiates a start sequence and
then operates the system at full or part load combustion to provide the required heat input to the coolant.
Start sequence
At the beginning of the start sequence the ECU energises the glow plug function of the glow plug/flame sensor, to
preheat the combustion chamber, and starts the combustion air fan at slow speed. After 30 seconds, the ECU
energises the FBH fuel pump at the starting sequence speed. The fuel delivered by the FBH fuel pump evaporates in
the combustion chamber, mixes with air from the combustion air fan and is ignited by the glow plug/flame sensor. The
ECU then progressively increases the speed of the FBH fuel pump and the combustion air fan to either part or full
load speed, as required by the system. Once full or part load speed is achieved, the ECU switches the glow plug/flame
sensor from the glow plug function to the flame sensing function to monitor combustion. From the beginning of the
start sequence to stable combustion takes approximately 90 seconds for a start to part load combustion and 150
seconds for a start to full load combustion.