spark plugs LAND ROVER DISCOVERY 2002 User Guide
[x] Cancel search | Manufacturer: LAND ROVER, Model Year: 2002, Model line: DISCOVERY, Model: LAND ROVER DISCOVERY 2002Pages: 1672, PDF Size: 46.1 MB
Page 303 of 1672
ENGINE - V8
12-2-60 OVERHAUL
Reassembly
1.Reassemble rocker shafts, ensuring that
components are returned to their original
positions, secure plain washers with new split
pins.
2.Ensure shaft identification groove is positioned
at one o'clock, with push rod locations of rocker
arms to the right. Oil feed restriction will
result if rocker shafts are incorrectly
assembled.
3.Position rocker shaft assembly to cylinder
head ensuring push rods are engaged in
rocker arms.
4.Fit rocker shaft bolts and progressively tighten
to 40 Nm (30 lbf.ft).
5.Clean mating faces of rocker covers and
cylinder heads.
6.Fit new rocker cover gaskets, dry, position
rocker cover, fit bolts and working in diagonal
sequence, tighten to:
lStage 1 - 3 Nm (2.5 lbf.ft)
lStage 2 - 8 Nm (6 lbf.ft)
7.Ensure that gasket is correctly positioned
around periphery of rocker cover.
8.Secure ht leads to rocker cover.
Gasket - cylinder head
$% 12.29.02.01
Disassembly
1.Remove inlet manifold gasket.
+ ENGINE - V8, OVERHAUL, Gasket -
inlet manifold.
2. RH cylinder head: Remove auxiliary drive belt
tensioner.
3. RH cylinder head: Remove bolts securing
alternator mounting bracket and remove
bracket.
4.Noting their fitted order, disconnect ht leads
from spark plugs.
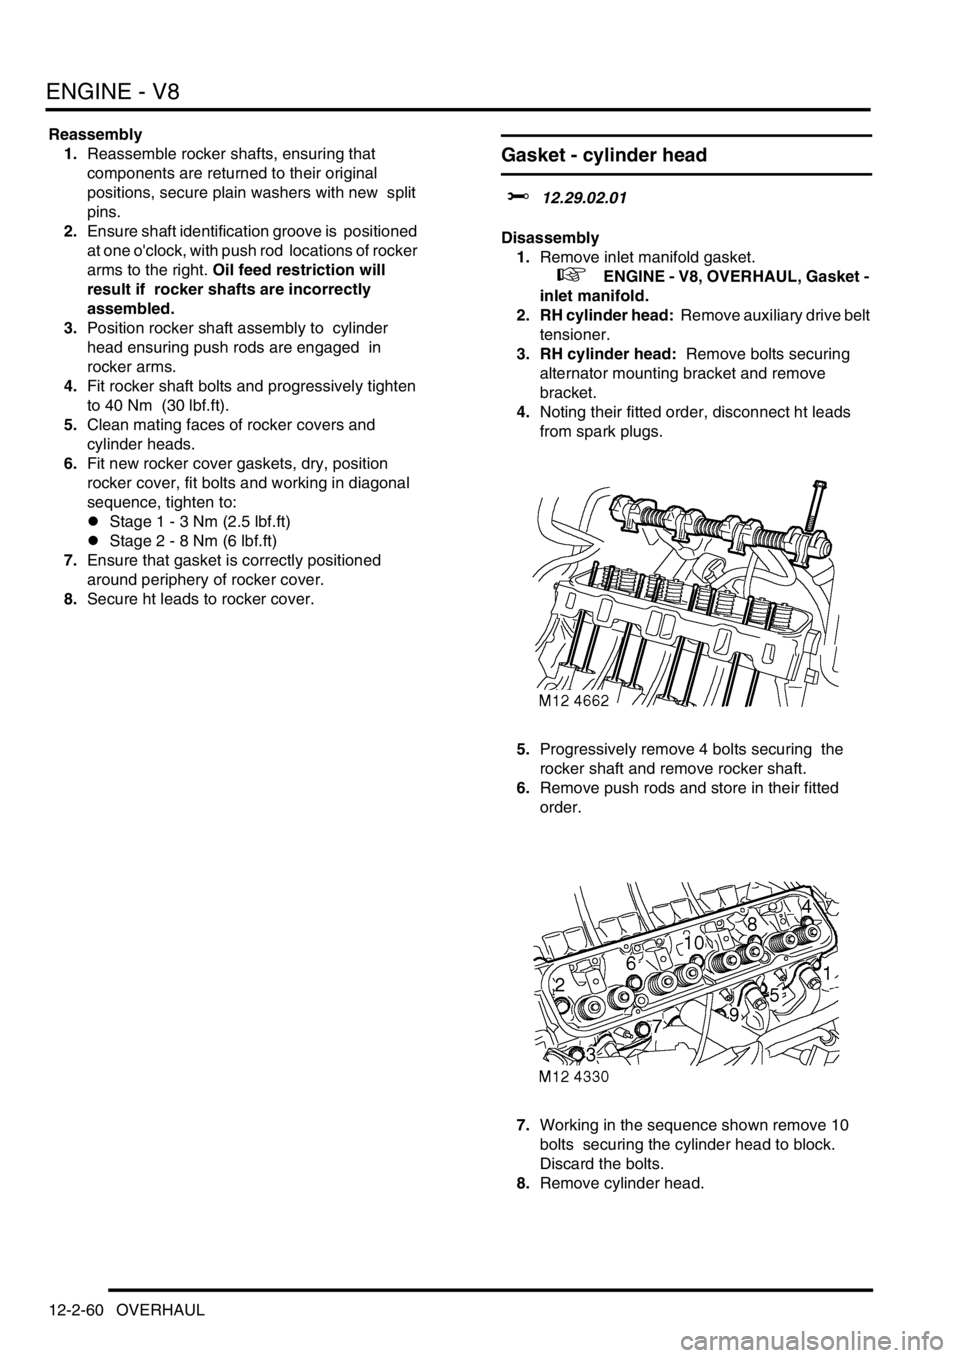
5.Progressively remove 4 bolts securing the
rocker shaft and remove rocker shaft.
6.Remove push rods and store in their fitted
order.
7.Working in the sequence shown remove 10
bolts securing the cylinder head to block.
Discard the bolts.
8.Remove cylinder head.
Page 304 of 1672
ENGINE - V8
OVERHAUL 12-2-61
9.Remove cylinder head gasket.
CAUTION: Support both ends of cylinder
head on blocks of wood.
Inspect
1.Clean mating faces of cylinder block and head
using suitable gasket removal spray and a
plastic scraper, ensure that bolt holes in block
are clean and dry.
CAUTION: Do not use a metal scraper or
machined surfaces may be damaged.
2.Check head and block faces for warping and
pitting.
lMaximum cylinder head warp = 0.05 mm
(0.002 in).
Note: Cylinder head can be refaced to 0.50
mm (0.02 in) maximum below head height –
See cylinder head overhaul.Reassembly
1.Fit cylinder head gasket with the word TOP
uppermost.
CAUTION: Gaskets must be fitted dry.
2.Carefully fit cylinder head and locate on
dowels.
3.Lightly lubricate new cylinder head bolt threads
with clean engine oil.
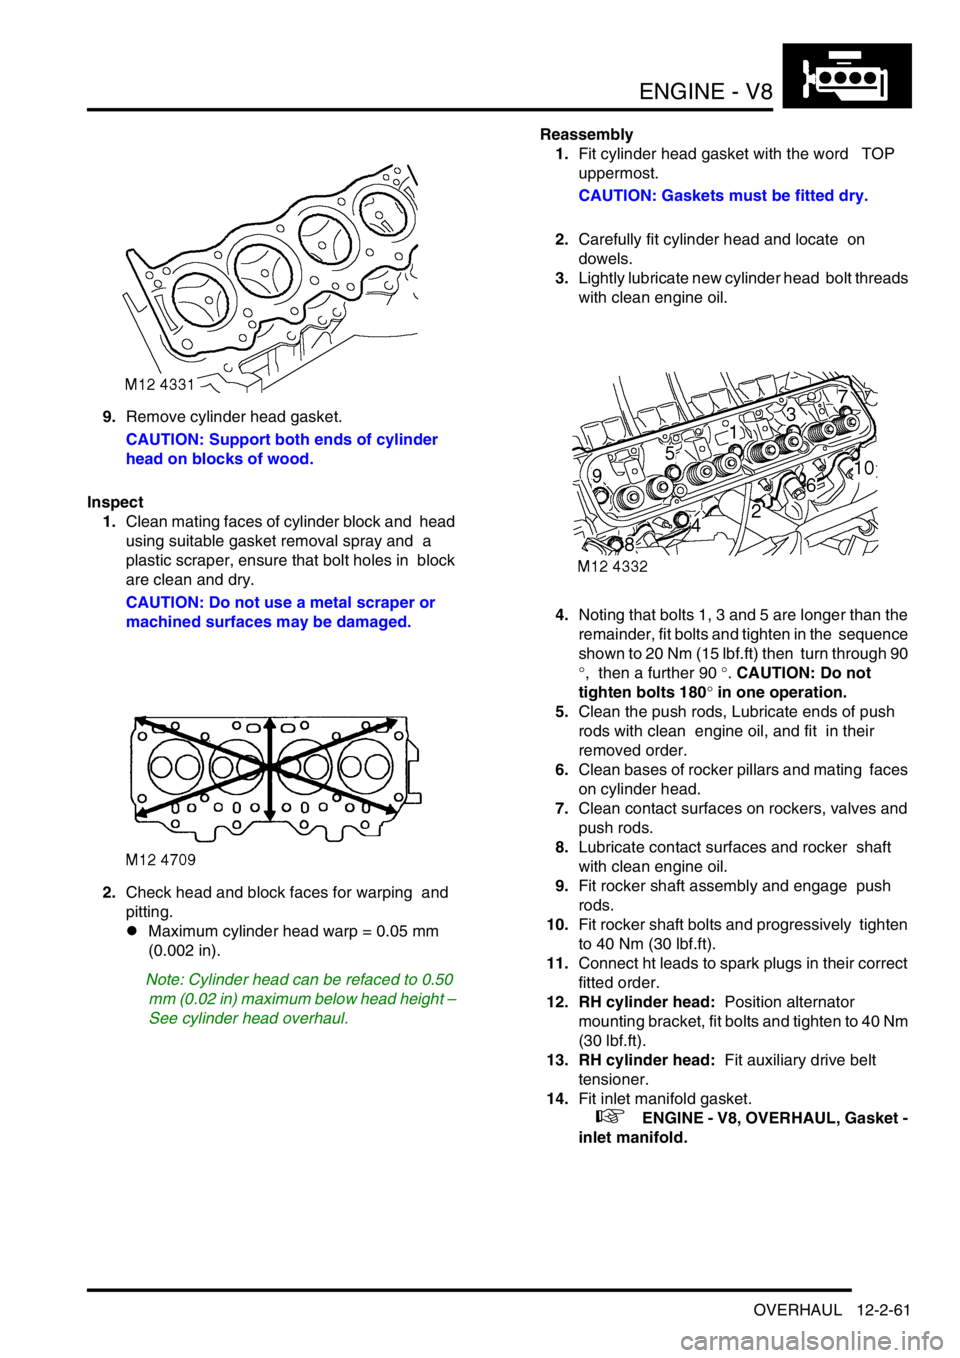
4.Noting that bolts 1, 3 and 5 are longer than the
remainder, fit bolts and tighten in the sequence
shown to 20 Nm (15 lbf.ft) then turn through 90
°, then a further 90 °. CAUTION: Do not
tighten bolts 180
° in one operation.
5.Clean the push rods, Lubricate ends of push
rods with clean engine oil, and fit in their
removed order.
6.Clean bases of rocker pillars and mating faces
on cylinder head.
7.Clean contact surfaces on rockers, valves and
push rods.
8.Lubricate contact surfaces and rocker shaft
with clean engine oil.
9.Fit rocker shaft assembly and engage push
rods.
10.Fit rocker shaft bolts and progressively tighten
to 40 Nm (30 lbf.ft).
11.Connect ht leads to spark plugs in their correct
fitted order.
12. RH cylinder head: Position alternator
mounting bracket, fit bolts and tighten to 40 Nm
(30 lbf.ft).
13. RH cylinder head: Fit auxiliary drive belt
tensioner.
14.Fit inlet manifold gasket.
+ ENGINE - V8, OVERHAUL, Gasket -
inlet manifold.
Page 460 of 1672
ENGINE MANAGEMENT SYSTEM - V8
DESCRIPTION AND OPERATION 18-2-3
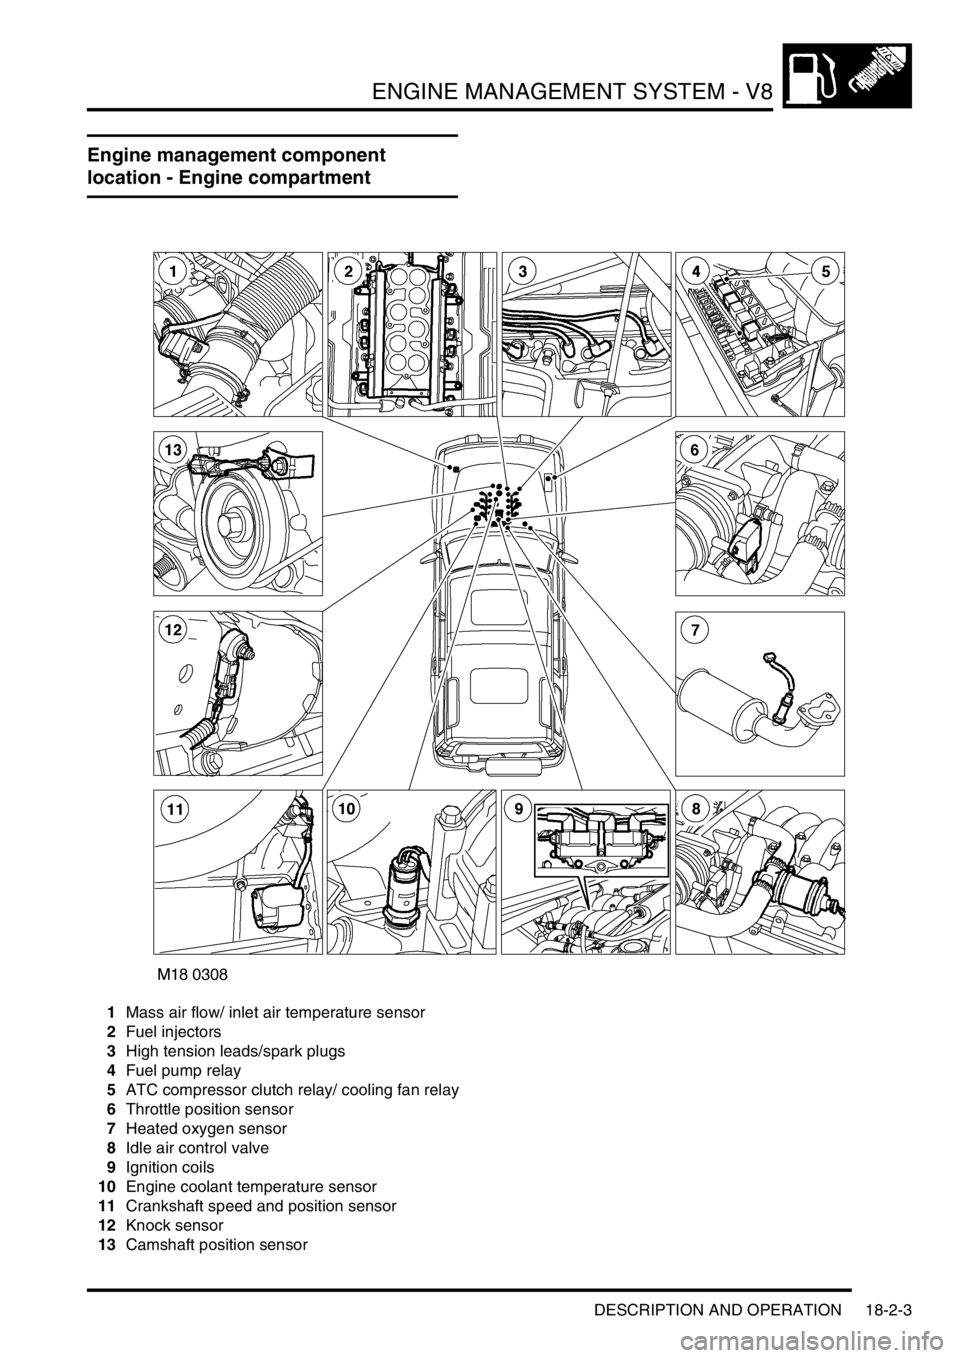
Engine management component
location - Engine compartment
1Mass air flow/ inlet air temperature sensor
2Fuel injectors
3High tension leads/spark plugs
4Fuel pump relay
5ATC compressor clutch relay/ cooling fan relay
6Throttle position sensor
7Heated oxygen sensor
8Idle air control valve
9Ignition coils
10Engine coolant temperature sensor
11Crankshaft speed and position sensor
12Knock sensor
13Camshaft position sensor
Page 462 of 1672

ENGINE MANAGEMENT SYSTEM - V8
DESCRIPTION AND OPERATION 18-2-5
1Engine control module
2Crankshaft speed and position sensor
3Camshaft position sensor
4Engine coolant temperature sensor
5Mass air flow/ inlet air temperature sensor
6Throttle position sensor
7Heated oxygen sensors
8Fuel injectors
9Idle air control valve
10Fuel pump relay
11EVAP canister
12EVAP canister vent valve
13EVAP canister purge valve
14Fuel tank pressure sensor
15Ignition coils
16Knock sensor
17Spark plugs
18High/ Low ratio switch
19Malfunction indication lamp
20Diagnostic connector
21Air temperature control clutch relay
22Air temperature control cooling fan relay
23ATC ECU
24CAN link to EAT
25SLABS ECU
26BCU
27Instrument cluster
28Thermostat monitoring sensor (where fitted)
Page 464 of 1672
ENGINE MANAGEMENT SYSTEM - V8
DESCRIPTION AND OPERATION 18-2-7
The ECM controls the following outputs:
lFuel injectors (1 per cylinder).
lIgnition coils/ high tension leads/ spark plugs.
lFuel pump relay.
lIdle air control valve.
lHeated oxygen sensors.
lEVAP canister purge valve.
lEVAP canister vent solenoid (CVS) valve (where fitted).
lMalfunction Indicator Lamp (MIL)/ service engine soon lamp (where fitted).
lHill descent control (via SLABS interface).
lEVAP system fuel leak detection pump (where fitted)
lSecondary air injection pump (where fitted)
The ECM also interfaces with the following:
lDiagnostics via diagnostic connector with TestBook.
lController Area Network (CAN) link to EAT ECU.
lAir conditioning system.
lSelf Levelling & Anti-lock Braking System (SLABS) ECU.
lImmobilisation system via the body control unit (BCU).
lInstrument cluster.
lCruise control ECU
lActive Cornering Enhancement (ACE) ECU
Engine Control Module (ECM)
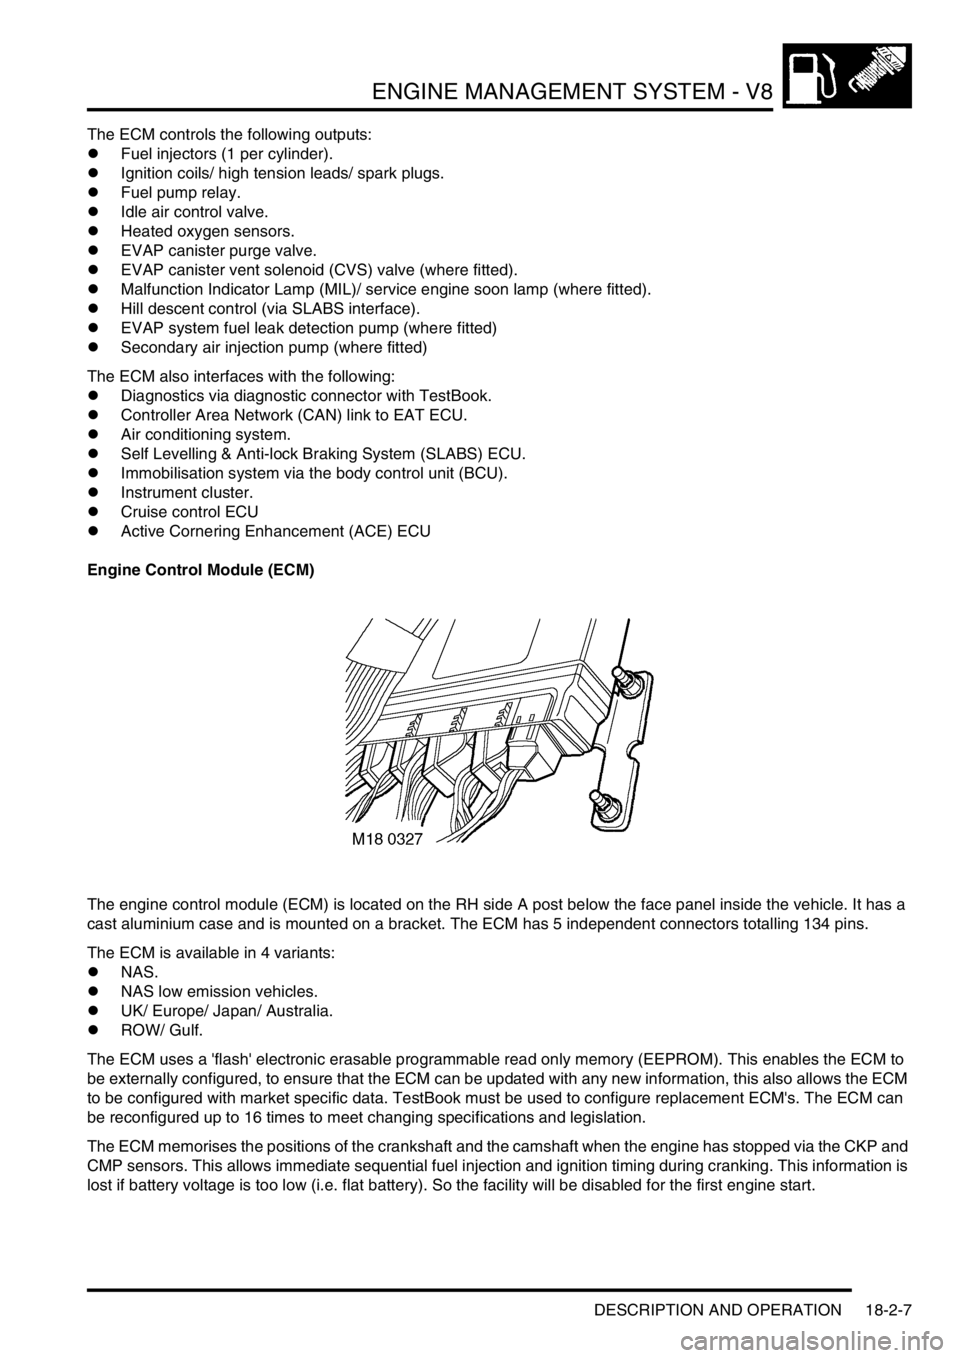
The engine control module (ECM) is located on the RH side A post below the face panel inside the vehicle. It has a
cast aluminium case and is mounted on a bracket. The ECM has 5 independent connectors totalling 134 pins.
The ECM is available in 4 variants:
lNAS.
lNAS low emission vehicles.
lUK/ Europe/ Japan/ Australia.
lROW/ Gulf.
The ECM uses a 'flash' electronic erasable programmable read only memory (EEPROM). This enables the ECM to
be externally configured, to ensure that the ECM can be updated with any new information, this also allows the ECM
to be configured with market specific data. TestBook must be used to configure replacement ECM's. The ECM can
be reconfigured up to 16 times to meet changing specifications and legislation.
The ECM memorises the positions of the crankshaft and the camshaft when the engine has stopped via the CKP and
CMP sensors. This allows immediate sequential fuel injection and ignition timing during cranking. This information is
lost if battery voltage is too low (i.e. flat battery). So the facility will be disabled for the first engine start.
Page 495 of 1672
ENGINE MANAGEMENT SYSTEM - V8
18-2-38 DESCRIPTION AND OPERATION
Spark plugs
The spark plugs are platinum tipped on both centre and earth electrodes. The platinum tips give a long maintenance
free life.
Cleaning or resetting the spark plug gap is not recommended as this could result in damaging the platinum tips and
thereby reducing reliability.
The misfire detection system will malfunction and store erroneous codes if the incorrect spark plugs are used.
Input/Output
The ignition coils provide a voltage to the spark plugs via the ht leads. The cylinder head via the individual thread of
each spark plug provides the earth path.
The spark plugs can fail in the following ways:
lFaulty component.
lConnector or wiring fault.
lBreakdown of high tension lead causing tracking to chassis earth.
lIncorrect spark plugs fitted.
In the event of a spark plug failure, misfire on specific cylinder may be observed:
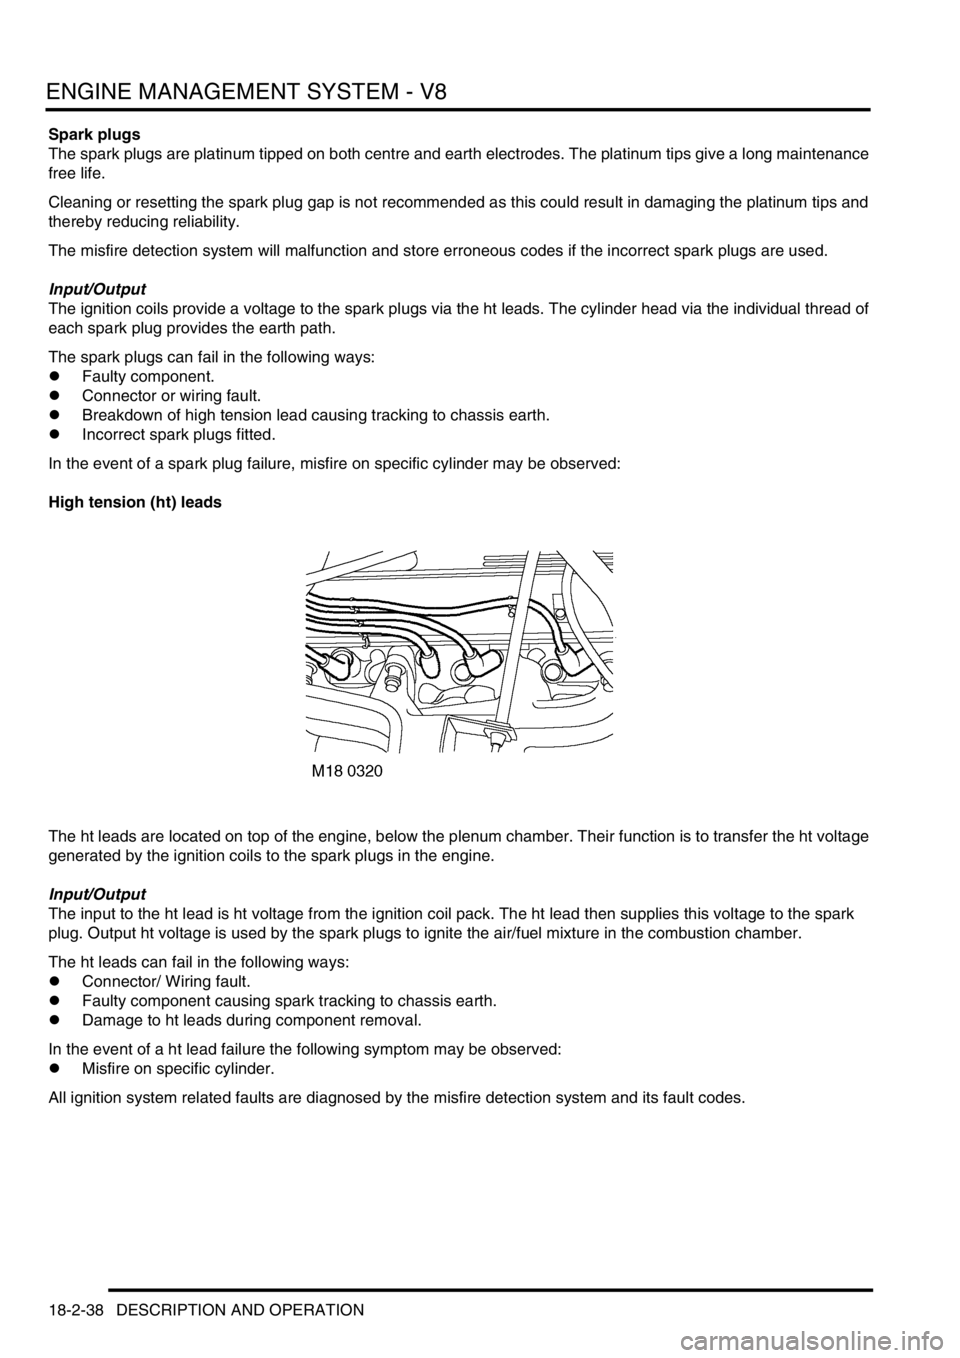
High tension (ht) leads
The ht leads are located on top of the engine, below the plenum chamber. Their function is to transfer the ht voltage
generated by the ignition coils to the spark plugs in the engine.
Input/Output
The input to the ht lead is ht voltage from the ignition coil pack. The ht lead then supplies this voltage to the spark
plug. Output ht voltage is used by the spark plugs to ignite the air/fuel mixture in the combustion chamber.
The ht leads can fail in the following ways:
lConnector/ Wiring fault.
lFaulty component causing spark tracking to chassis earth.
lDamage to ht leads during component removal.
In the event of a ht lead failure the following symptom may be observed:
lMisfire on specific cylinder.
All ignition system related faults are diagnosed by the misfire detection system and its fault codes.
Page 528 of 1672
ENGINE MANAGEMENT SYSTEM - V8
REPAIRS 18-2-71
REPAIRS
Spark plugs
$% 18.20.02
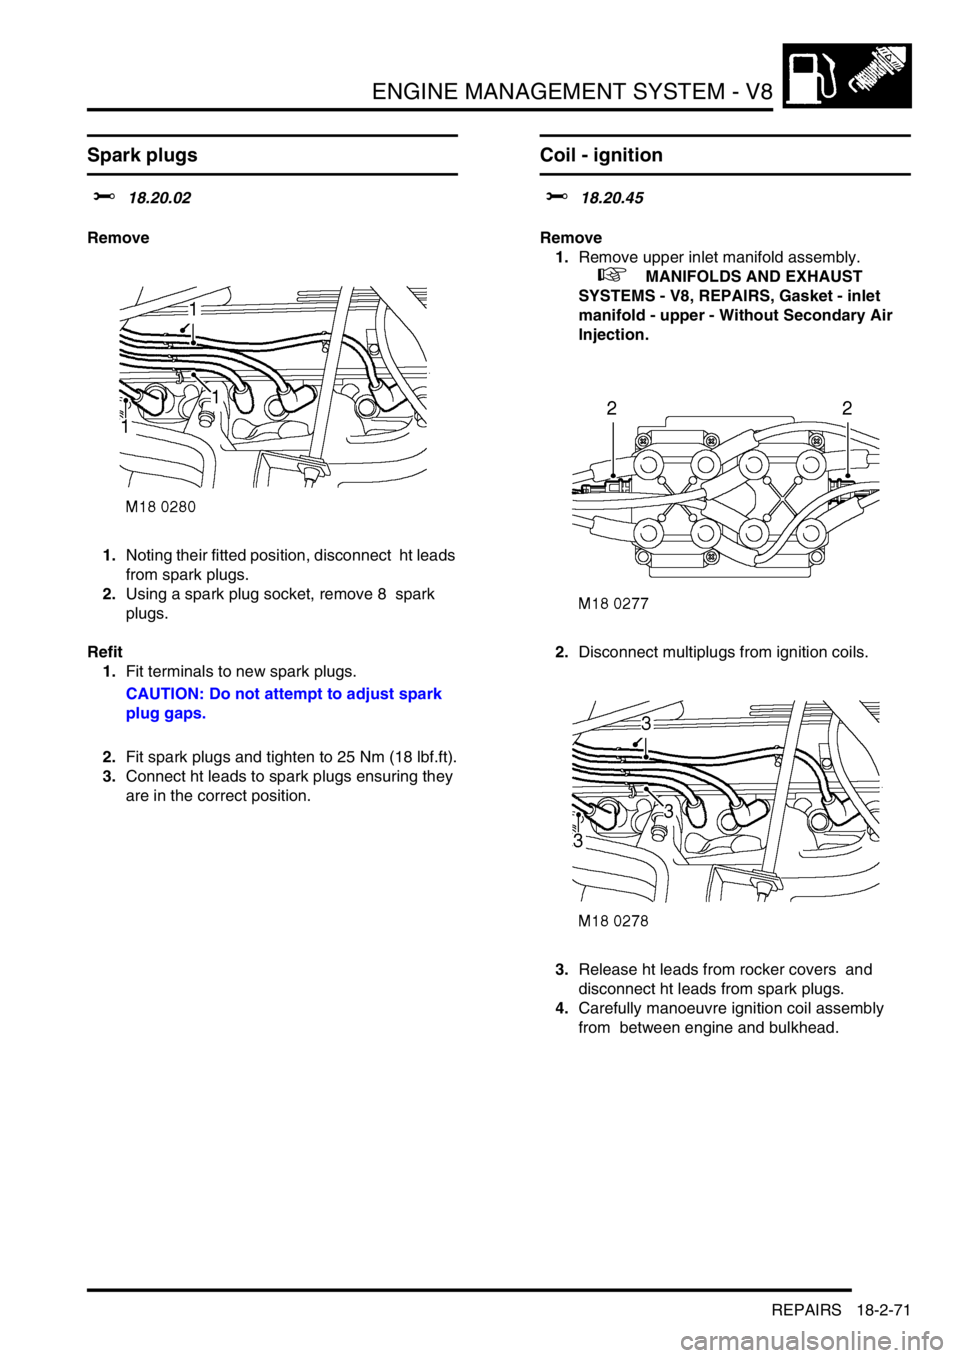
Remove
1.Noting their fitted position, disconnect ht leads
from spark plugs.
2.Using a spark plug socket, remove 8 spark
plugs.
Refit
1.Fit terminals to new spark plugs.
CAUTION: Do not attempt to adjust spark
plug gaps.
2.Fit spark plugs and tighten to 25 Nm (18 lbf.ft).
3.Connect ht leads to spark plugs ensuring they
are in the correct position.
Coil - ignition
$% 18.20.45
Remove
1.Remove upper inlet manifold assembly.
+ MANIFOLDS AND EXHAUST
SYSTEMS - V8, REPAIRS, Gasket - inlet
manifold - upper - Without Secondary Air
Injection.
2.Disconnect multiplugs from ignition coils.
3.Release ht leads from rocker covers and
disconnect ht leads from spark plugs.
4.Carefully manoeuvre ignition coil assembly
from between engine and bulkhead.
Page 529 of 1672
ENGINE MANAGEMENT SYSTEM - V8
18-2-72 REPAIRS
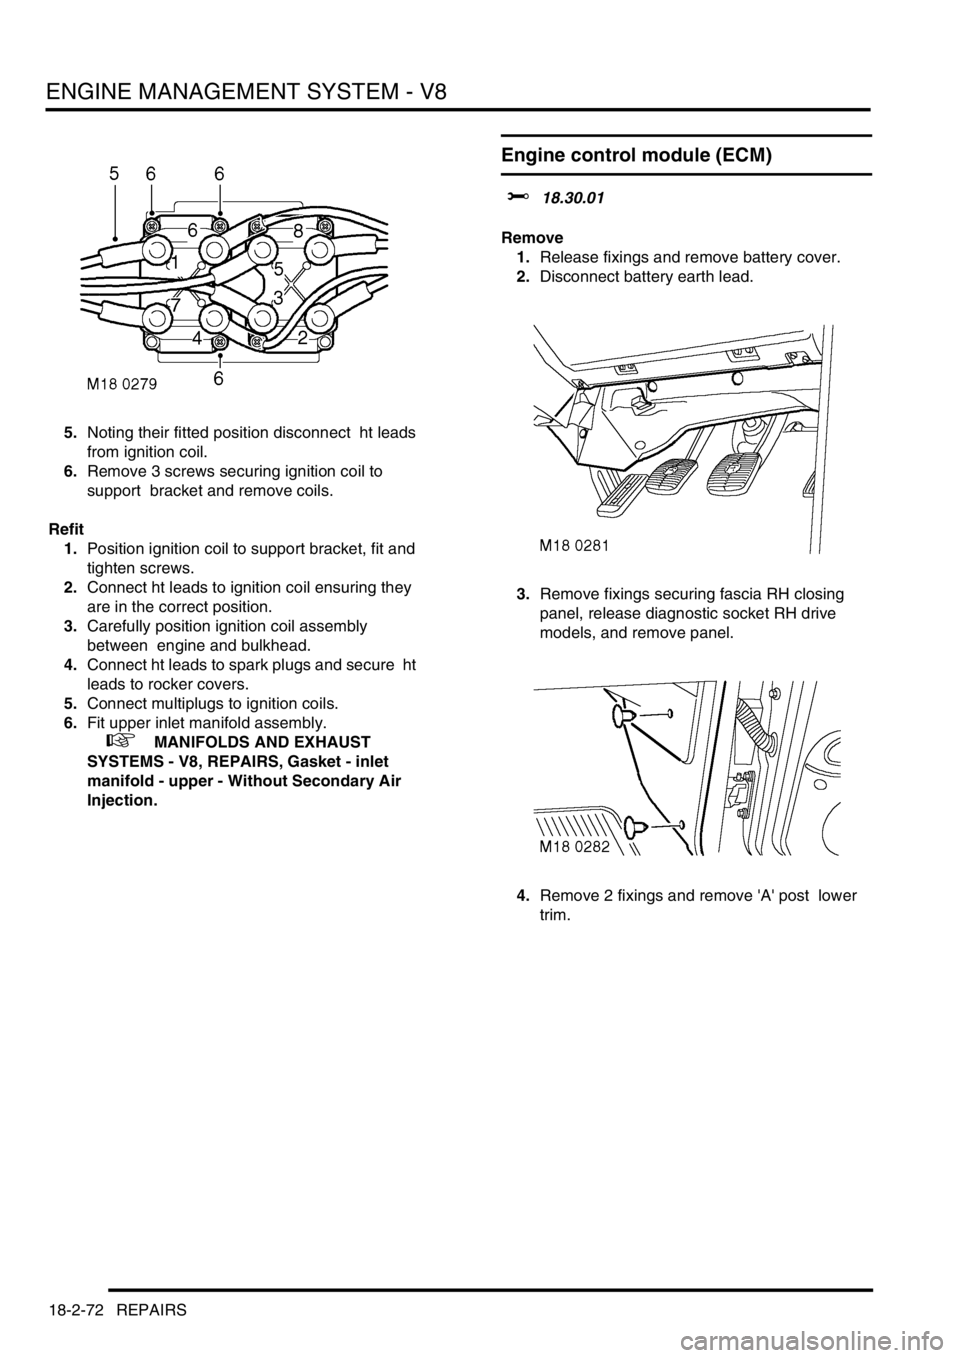
5.Noting their fitted position disconnect ht leads
from ignition coil.
6.Remove 3 screws securing ignition coil to
support bracket and remove coils.
Refit
1.Position ignition coil to support bracket, fit and
tighten screws.
2.Connect ht leads to ignition coil ensuring they
are in the correct position.
3.Carefully position ignition coil assembly
between engine and bulkhead.
4.Connect ht leads to spark plugs and secure ht
leads to rocker covers.
5.Connect multiplugs to ignition coils.
6.Fit upper inlet manifold assembly.
+ MANIFOLDS AND EXHAUST
SYSTEMS - V8, REPAIRS, Gasket - inlet
manifold - upper - Without Secondary Air
Injection.
Engine control module (ECM)
$% 18.30.01
Remove
1.Release fixings and remove battery cover.
2.Disconnect battery earth lead.
3.Remove fixings securing fascia RH closing
panel, release diagnostic socket RH drive
models, and remove panel.
4.Remove 2 fixings and remove 'A' post lower
trim.