drain bolt LAND ROVER DISCOVERY 2002 Owner's Manual
[x] Cancel search | Manufacturer: LAND ROVER, Model Year: 2002, Model line: DISCOVERY, Model: LAND ROVER DISCOVERY 2002Pages: 1672, PDF Size: 46.1 MB
Page 209 of 1672

ENGINE - TD5
12-1-70 OVERHAUL
Gasket - exhaust manifold
$% 30.15.12.01
Disassembly
Note: The following procedure covers engines
fitted with or without an EGR cooler. The EGR
cooler is bolted to the front of the cylinder head.
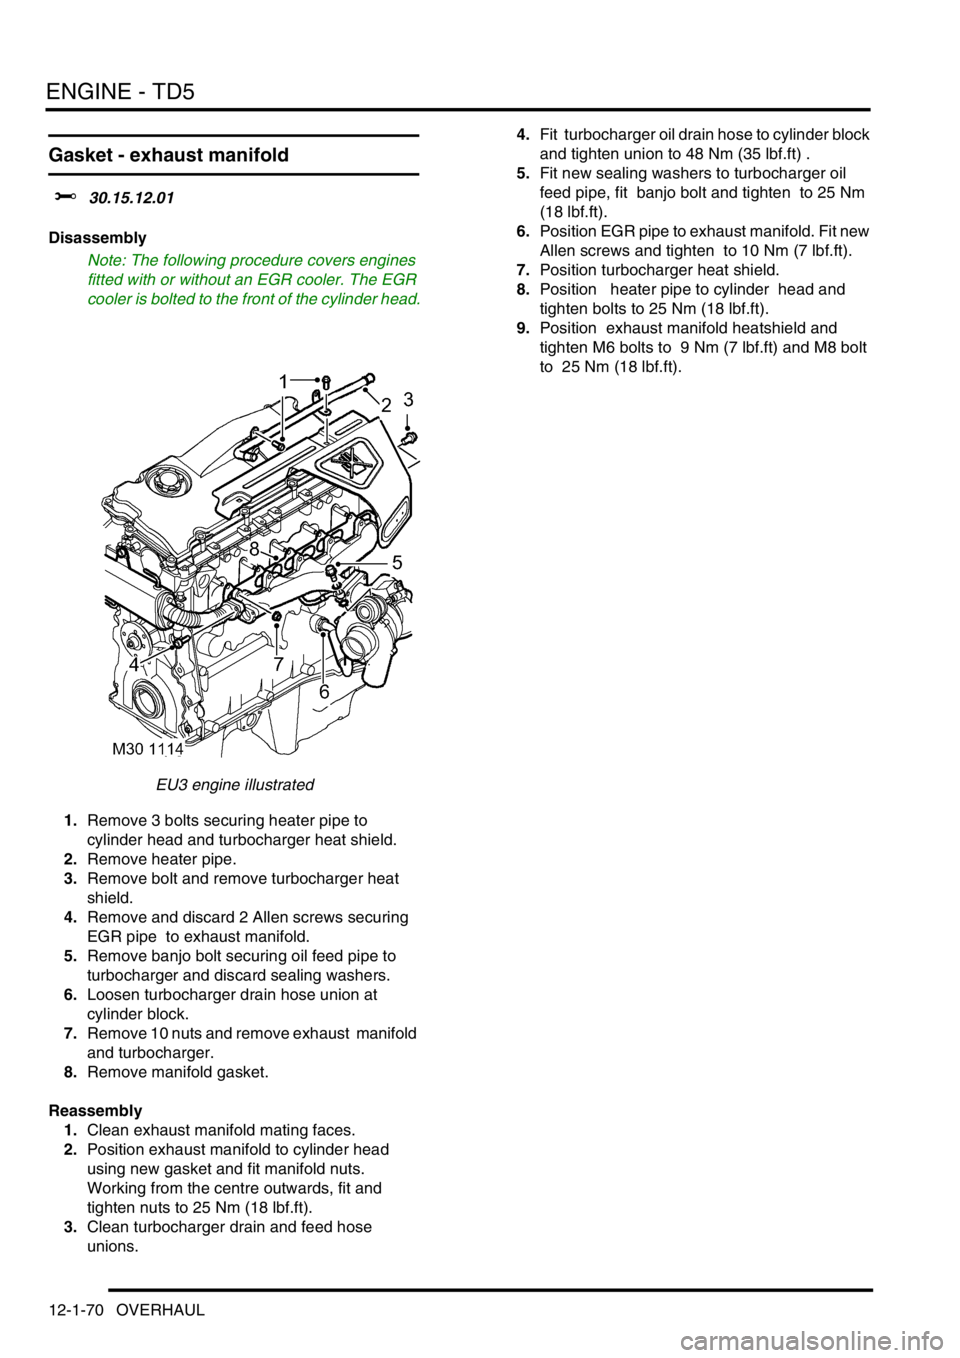
EU3 engine illustrated
1.Remove 3 bolts securing heater pipe to
cylinder head and turbocharger heat shield.
2.Remove heater pipe.
3.Remove bolt and remove turbocharger heat
shield.
4.Remove and discard 2 Allen screws securing
EGR pipe to exhaust manifold.
5.Remove banjo bolt securing oil feed pipe to
turbocharger and discard sealing washers.
6.Loosen turbocharger drain hose union at
cylinder block.
7.Remove 10 nuts and remove exhaust manifold
and turbocharger.
8.Remove manifold gasket.
Reassembly
1.Clean exhaust manifold mating faces.
2.Position exhaust manifold to cylinder head
using new gasket and fit manifold nuts.
Working from the centre outwards, fit and
tighten nuts to 25 Nm (18 lbf.ft).
3.Clean turbocharger drain and feed hose
unions. 4.Fit turbocharger oil drain hose to cylinder block
and tighten union to 48 Nm (35 lbf.ft) .
5.Fit new sealing washers to turbocharger oil
feed pipe, fit banjo bolt and tighten to 25 Nm
(18 lbf.ft).
6.Position EGR pipe to exhaust manifold. Fit new
Allen screws and tighten to 10 Nm (7 lbf.ft).
7.Position turbocharger heat shield.
8.Position heater pipe to cylinder head and
tighten bolts to 25 Nm (18 lbf.ft).
9.Position exhaust manifold heatshield and
tighten M6 bolts to 9 Nm (7 lbf.ft) and M8 bolt
to 25 Nm (18 lbf.ft).
Page 223 of 1672

ENGINE - TD5
12-1-84 OVERHAUL
30.Fit new fuel filter, 'O' ring, and gasket.
CAUTION: Gasket must be fitted dry.
31. If fitted: Fit fuel connector spacer block and
gasket.
32.Fit fuel connector block, fit bolts and tighten to
25 Nm (18 lbf.ft).
33.Clean glow plugs.
34.Fit glow plugs to cylinder head and tighten to
16 Nm (12 lbf.ft).
35.Fit new cylinder head gasket.
+ ENGINE - Td5, OVERHAUL, Gasket
- cylinder head.
36. Engine Serial No. Prefixes 15P to
19P:Lubricate new 'O' rings with engine oil and
fit to spill return pipe, fit pipe and tighten
connectors to 20 Nm (15 lbf.ft).
37.Before fitting the camshaft cover, the fuel
injector rockers must be adjusted following the
procedures given in Cylinder head gasket -
Refit.
+ ENGINE - Td5, OVERHAUL, Gasket
- cylinder head.
Gasket - engine sump
$% 12.60.38.01
Disassembly
1.Remove 2 bolts securing centrifuge oil drain
pipe to sump, remove and discard gasket.
2.Using sequence shown and noting their fitted
positions, remove 20 bolts securing sump to
cylinder block.
3.Release sump from locating dowels, remove
sump; remove and discard gasket.
Reassembly
1.Clean sump and mating faces, ensure bolt
holes in cylinder block are clean and dry.
2.Using suitable solvent, remove all traces of
sealant from joint faces of timing chain cover
and crankshaft rear oil seal housing.
3.Clean centrifuge oil drain pipe and mating
faces.
Page 224 of 1672

ENGINE - TD5
OVERHAUL 12-1-85
4.Apply a bead of sealant, Part No. STC 3254 to
joint faces of timing chain cover and crankshaft
rear oil seal housing.
CAUTION: Assembly and bolt tightening
must be completed within 20 minutes of
applying sealant.
5.Position new sump gasket.
CAUTION: Gasket must be fitted dry.
6.Position sump, fit and lightly tighten bolts
ensuring they are in their original fitted
positions.
7.Using sequence shown, tighten sump bolts to
25 Nm (18 lbf.ft).8.Fit new centrifuge oil drain pipe gasket.
CAUTION: Gasket must be fitted dry.
9.Fit centrifuge oil drain pipe, fit bolts and tighten
to 10 Nm (7 lbf.ft).
Page 248 of 1672

ENGINE - V8
DESCRIPTION AND OPERATION 12-2-5
1Core plugs
2Cylinder block
3Camshaft
4Dipstick tube, clamp and bolt
5Woodruff key
6Timing chain
7Camshaft timing gear
8Washer
9Bolt - camshaft timing gear
10Thrust plate - camshaft end-float
11Bolt - camshaft thrust plate
12Gasket - timing cover
13Timing cover
14Oil pressure switch
15Bolt
16Crankshaft front oil seal
17Oil filter element
18Crankshaft front pulley
19Washer
20Bolt - crankshaft front pulley
21Upper main bearing shell
22Upper centre main bearing shell and thrust
washer
23Crankshaft
24Woodruff key
25Crankshaft timing gear
26Lower main bearing shells
27Numbers 1, 2 and 3 main bearing caps
28Bolt - main bearing caps
29Oil pick-up pipe and strainer
30'O' ring31Bolt - oil pick-up pipe
32Gasket - sump
33Sump
34Bolt - sump
35Sump oil drain plug
36Sealing washer
37Spacer, washers and nut - oil pick-up pipe
38Number 4 main bearing cap
39Bolt - connecting rod big-end bearing cap
40Connecting rod big-end bearing shell - lower
41Connecting rod big-end bearing cap
42Number 5 - rear main bearing cap
43Cruciform seal - rear main bearing cap
44Number 5 - rear main bearing shell
45Crankshaft rear oil seal
46Crankshaft knock sensor
47Side bolt - main bearing cap
48Side Allen bolt - main bearing cap
49Dowty washers
50Connecting rod big-end bearing shell - upper
51Connecting rod
52Piston
53Gudgeon pin
54Oil control ring
55Top compression ring
562nd compression ring
57Flywheel/drive plate and starter ring gear
58Bolt - flywheel/drive plate
Page 250 of 1672

ENGINE - V8
DESCRIPTION AND OPERATION 12-2-7
Oil sump
The oil sump is bolted to the bottom of the cylinder block and the timing cover and is sealed to both components with
a one piece gasket. A removable baffle to prevent oil surge is fitted in the sump. The oil pick-up pipe and strainer
assembly is positioned within the sump and is attached at the pick-up end to a stud screwed into number four main
bearing cap and at the delivery end to the oil pump. The oil drain plug is located in the bottom of the sump and is
sealed with a washer.
Pistons and connecting rods
Each of the aluminium alloy pistons has two compression rings and an oil control ring. The pistons are secured to the
connecting rods by semi-floating gudgeon pins. Each gudgeon pin is offset by 0.5 mm (0.02 in). The top of each piston
is recessed, the depth of recess determining the compression ratio of the engine. Plain, big-end bearing shells are
fitted to each connecting rod and cap.
Page 263 of 1672

ENGINE - V8
12-2-20 REPAIRS
8. Models with air conditioning: Position fan
cowl and secure clips.
9.Fit upper inlet manifold.
+ MANIFOLDS AND EXHAUST
SYSTEMS - V8, REPAIRS, Gasket - inlet
manifold - upper - Without Secondary Air
Injection.
Gasket - rocker cover - RH
$% 12.29.41
Remove
1.Drain cooling system.
+ COOLING SYSTEM - V8,
ADJUSTMENTS, Drain and refill.
2.Remove upper inlet manifold gasket.
+ MANIFOLDS AND EXHAUST
SYSTEMS - V8, REPAIRS, Gasket - inlet
manifold - upper - Without Secondary Air
Injection.
3. Models with SAI: Disconnect 2 air manifold
unions from adapters in cylinder head and
remove manifold.
4.Remove 2 bolts securing coolant rails to inlet
manifold.
Page 264 of 1672

ENGINE - V8
REPAIRS 12-2-21
5.Release coolant rail from inlet manifold and
discard 'O' ring.
6.Remove nuts securing alternator cables and
release cables from alternator.
7.Disconnect multiplugs from RH bank of
injectors and release harness from fuel rail.
8.Release ht leads from clips on rocker cover.
9.Remove 4 bolts securing rocker cover.
10.Remove rocker cover and collect gasket. Refit
1.Clean mating faces of rocker cover and
cylinder head.
2.Using a new gasket, fitted dry, position rocker
cover ensuring gasket is correctly located.
3.Fit rocker cover bolts and working in diagonal
sequence, tighten to:
lStage 1 - 3 Nm (2.5 lbf.ft)
lStage 2 - 8 Nm (6 lbf.ft)
4.Ensure that outer rim of gasket is correctly
positioned around periphery of rocker cover.
5.Secure ht leads in rocker cover clips.
6.Secure injector harness to fuel rail and connect
multiplugs to injectors.
7.Position alternator cables, and tighten terminal
B+ nut to 18 Nm (13 lbf.ft) and terminal D+ nut
to 5 Nm (3 lbf.ft).
8.Clean coolant rail 'O' ring recess.
9.Lubricate and fit new 'O' ring to coolant rail,
position coolant rails, fit bolts and tighten to 22
Nm (16 lbf.ft).
10. Models with SAI: Clean air manifold unions,
position manifold and tighten unions nuts to 25
Nm (18 lbf.ft).
11.Fit upper inlet manifold.
+ MANIFOLDS AND EXHAUST
SYSTEMS - V8, REPAIRS, Gasket - inlet
manifold - upper - Without Secondary Air
Injection.
12.Refill cooling system.
+ COOLING SYSTEM - V8,
ADJUSTMENTS, Drain and refill.
Page 269 of 1672

ENGINE - V8
12-2-26 REPAIRS
Engine assembly
$% 12.41.01.99
Remove
1.Drain engine oil and remove oil filter.
2.Remove radiator.
+ COOLING SYSTEM - V8, REPAIRS,
Radiator.
3.Remove upper inlet manifold.
+ MANIFOLDS AND EXHAUST
SYSTEMS - V8, REPAIRS, Gasket - inlet
manifold - upper - Without Secondary Air
Injection.
4.Remove ignition coil assemblies.
5.Position absorbent material to catch spillage
and disconnect fuel pipe from fuel rail.
CAUTION: Always fit plugs to open
connections to prevent contamination.
6.Release 2 hose clips and remove top hose.
7.Using a 15 mm spanner, release auxiliary drive
belt tension and remove drive belt. 8.Remove 3 bolts securing ACE pump, release
pump and tie aside.
9.Disconnect multiplug from A/C compressor.
10.Remove 4 bolts securing A/C compressor,
release compressor and tie aside.
Page 279 of 1672

ENGINE - V8
12-2-36 REPAIRS
8.Clean coolant pump and mating face.
9.Use a new gasket and fit coolant pump.
Tighten bolts securing coolant pump to 25 Nm
(19 lbf.ft).
10.Ensure CMP sensor is clean and fit sensor to
cover.
11.Fit clamp to CMP sensor and tighten bolt to 8
Nm (6 lbf.ft).
12.Fit timing gear cover gasket.
+ ENGINE - V8, REPAIRS, Gasket -
timing gear cover.
Gasket - sump
$% 12.60.38
Remove
1.Release fixings and remove battery cover.
2.Disconnect battery earth lead.
3.Remove dipstick.
4.Raise the vehicle on a ramp.
5.Drain engine oil.
+ MAINTENANCE, PROCEDURES,
Engine oil - V8 engine.
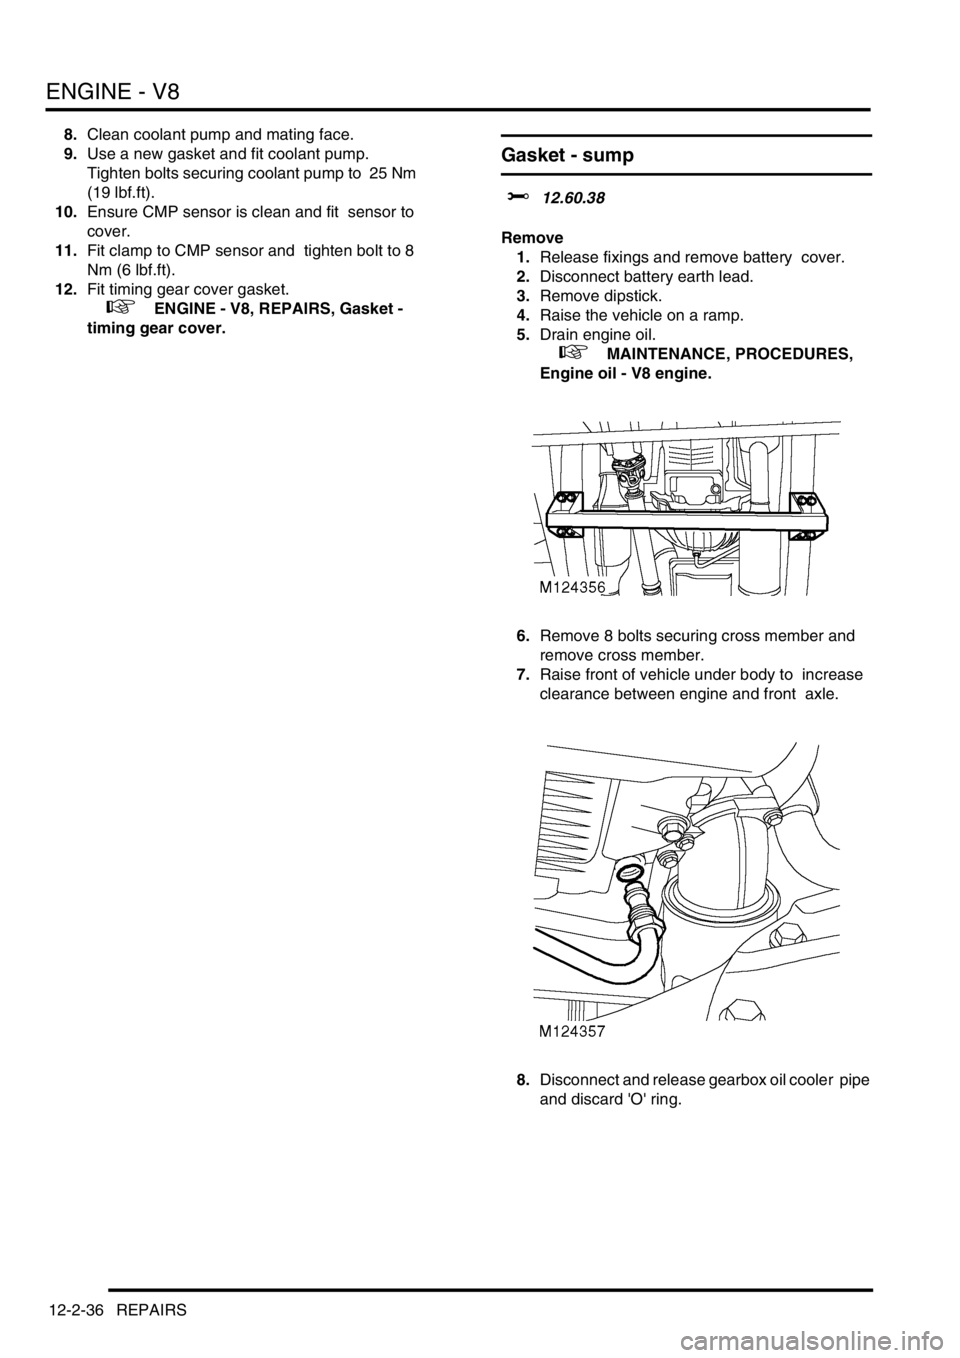
6.Remove 8 bolts securing cross member and
remove cross member.
7.Raise front of vehicle under body to increase
clearance between engine and front axle.
8.Disconnect and release gearbox oil cooler pipe
and discard 'O' ring.
Page 283 of 1672

ENGINE - V8
12-2-40 REPAIRS
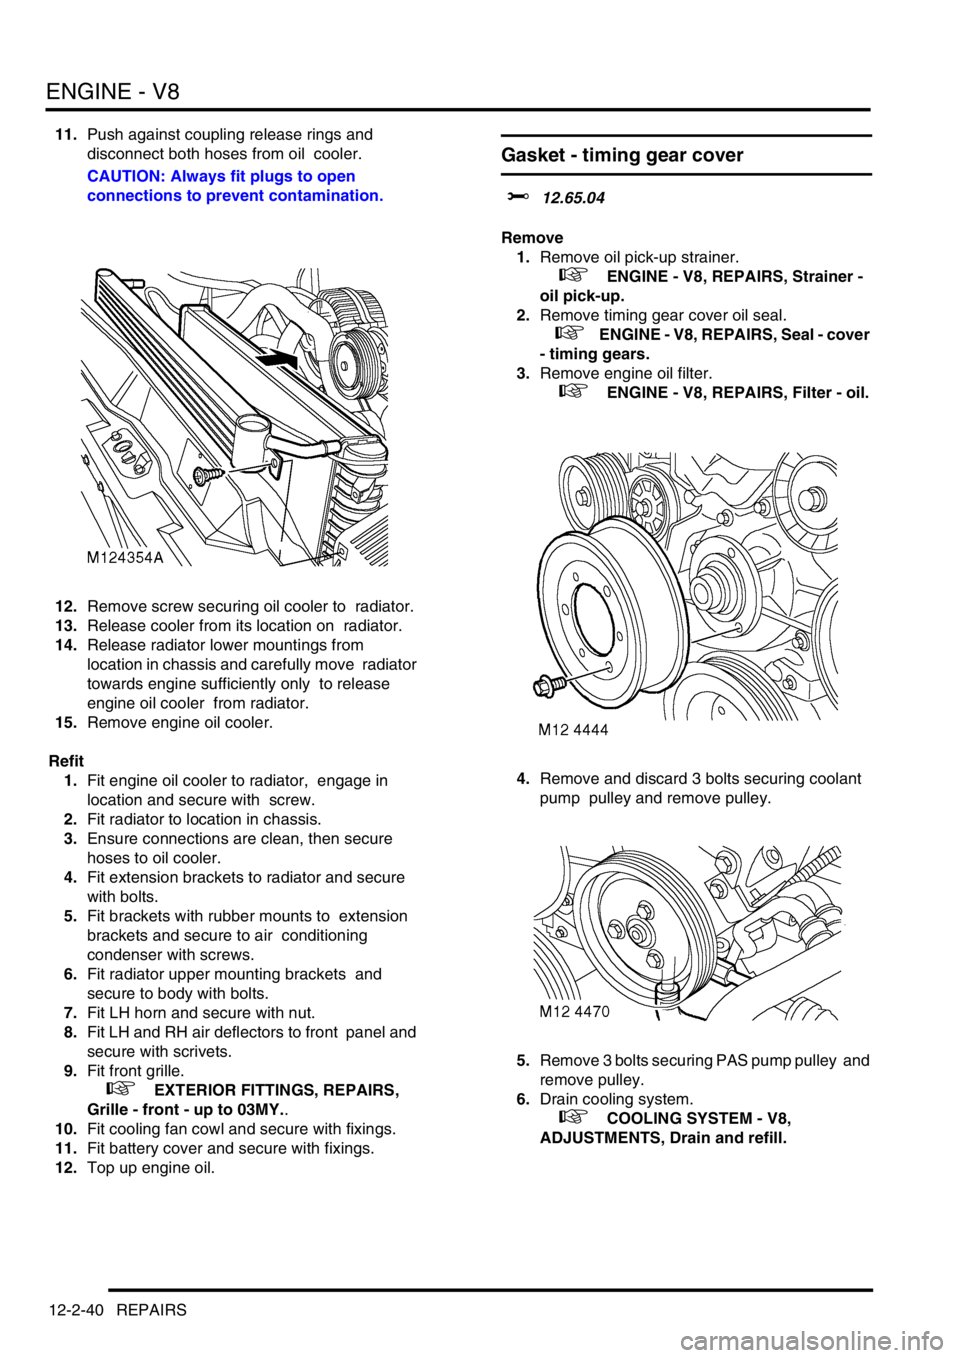
11.Push against coupling release rings and
disconnect both hoses from oil cooler.
CAUTION: Always fit plugs to open
connections to prevent contamination.
12.Remove screw securing oil cooler to radiator.
13.Release cooler from its location on radiator.
14.Release radiator lower mountings from
location in chassis and carefully move radiator
towards engine sufficiently only to release
engine oil cooler from radiator.
15.Remove engine oil cooler.
Refit
1.Fit engine oil cooler to radiator, engage in
location and secure with screw.
2.Fit radiator to location in chassis.
3.Ensure connections are clean, then secure
hoses to oil cooler.
4.Fit extension brackets to radiator and secure
with bolts.
5.Fit brackets with rubber mounts to extension
brackets and secure to air conditioning
condenser with screws.
6.Fit radiator upper mounting brackets and
secure to body with bolts.
7.Fit LH horn and secure with nut.
8.Fit LH and RH air deflectors to front panel and
secure with scrivets.
9.Fit front grille.
+ EXTERIOR FITTINGS, REPAIRS,
Grille - front - up to 03MY..
10.Fit cooling fan cowl and secure with fixings.
11.Fit battery cover and secure with fixings.
12.Top up engine oil.
Gasket - timing gear cover
$% 12.65.04
Remove
1.Remove oil pick-up strainer.
+ ENGINE - V8, REPAIRS, Strainer -
oil pick-up.
2.Remove timing gear cover oil seal.
+ ENGINE - V8, REPAIRS, Seal - cover
- timing gears.
3.Remove engine oil filter.
+ ENGINE - V8, REPAIRS, Filter - oil.
4.Remove and discard 3 bolts securing coolant
pump pulley and remove pulley.
5.Remove 3 bolts securing PAS pump pulley and
remove pulley.
6.Drain cooling system.
+ COOLING SYSTEM - V8,
ADJUSTMENTS, Drain and refill.