Fuel system LAND ROVER DISCOVERY 2002 Service Manual
[x] Cancel search | Manufacturer: LAND ROVER, Model Year: 2002, Model line: DISCOVERY, Model: LAND ROVER DISCOVERY 2002Pages: 1672, PDF Size: 46.1 MB
Page 349 of 1672

EMISSION CONTROL - V8
17-2-12 DESCRIPTION AND OPERATION
The catalytic converter's housings are fabricated from stainless steel and are fully welded at all joints. Each catalytic
converter contains two elements comprising of an extruded ceramic substrate which is formed into a honeycomb of
small cells with a density of 62 cells / cm
2. The ceramic element is coated with a special surface treatment called
'washcoat' which increases the surface area of the catalyst element by approximately 7000 times. A coating is applied
to the washcoat which contains the precious elements Platinum, Palladium and Rhodium in the following relative
concentrations: 1 Pt : 21.6 PD : 1 Rh
Catalytic converters for NAS low emission vehicles (LEVs) from 2000MY have active constituents of
palladium and rhodium only. The active constituents are 14PD: 1Rh and the palladium coating is used to
oxidise the carbon monoxide and hydrocarbons in the exhaust gas.
The metallic coating of platinum and palladium oxidize the carbon monoxide and hydrocarbons and convert them into
water (H
2O) and carbon dioxide (CO2). The coating of rhodium removes the oxygen from nitrogen oxide (NOx) and
converts it into nitrogen (N
2).
CAUTION: Catalytic converters contain ceramic material, which is very fragile. Avoid heavy impacts on the
converter casing.
Downstream of the catalytic converters, the exhaust front pipes merge into a single pipe terminating at a flange joint
which connects to the exhaust intermediate pipe.
WARNING: To prevent personal injury from a hot exhaust system, do not attempt to disconnect any
components until the exhaust system has cooled down.
CAUTION: Serious damage to the catalytic converter will occur if leaded fuel is used. The fuel tank filler neck
is designed to accommodate only unleaded fuel pump nozzles.
CAUTION: Serious damage to the engine may occur if a lower octane number fuel than recommended is used.
Serious damage to the catalytic converter will occur if leaded fuel is used.
Heated oxygen sensor
1Connection cable
2Disc spring
3Ceramic support tube
4Protective sleeve
5Clamp connection for heating element
6Heating element
7Contact element8Sensor housing
9Active sensor ceramic
10Protective tube
11Post-catalytic converter sensor (NAS spec.
only)
12Pre-catalytic converter sensor
Page 350 of 1672

EMISSION CONTROL - V8
DESCRIPTION AND OPERATION 17-2-13
The heated oxygen sensor is an integral part of the exhaust emission control system and is used in conjunction with
the catalytic converters and the engine management control unit to ensure that the air:fuel mixture ratio stays around
the stoichiometric point of
λ = 1, where the catalytic converters are most effective. Combinations of four (NAS only)
or two heated lambda sensors are used in the exhaust system dependent on market legislation.
The heated oxygen sensor is screwed into threaded mountings welded into the top of the front exhaust pipes at
suitable locations. They are used to detect the level of residual oxygen in the exhaust gas to provide an instantaneous
indication of whether combustion is complete. By positioning sensors in the stream of exhaust gases from each
separate bank of the exhaust manifold, the engine management system is better able to control the fuelling
requirements on each bank independently of the other, so allowing much closer control of the air:fuel ratio and
optimising catalytic converter efficiency.
Two pre-catalytic converter heated oxygen sensors are mounted in the front pipes for monitoring the oxygen content
of the exhaust gas. NAS models also have two additional post-catalytic converter heated oxygen sensors in the
exhaust front pipe.
CAUTION: HO2 sensors are easily damaged by dropping, over torquing, excessive heat or contamination.
Care must be taken not to damage the sensor housing or tip.
The oxygen sensors consist of a ceramic body (Galvanic cell) which is a practically pure oxygen-ion conductor made
from a mixed oxide of zirconium and yttrium. The ceramic is then coated with gas-permeable platinum, which when
heated to a sufficiently high temperature (
≥ 350° C) generates a voltage which is proportional to the oxygen content
in the exhaust gas stream.
The heated oxygen sensor is protected by an outer tube with a restricted flow opening to prevent the sensor's
ceramics from being cooled by low temperature exhaust gases at start up. The post-catalytic sensors have improved
signal quality, but a slower response rate.
The pre-catalytic and post-catalytic converter sensors are not interchangeable, and although it is possible to mount
them in transposed positions, their harness connections are of different gender and colour. It is important not to
confuse the sensor signal pins; the signal pins are gold plated, whilst the heater supply pins are tinned,
mixing them up will cause contamination and adversely affect system performance.
Each of the heated oxygen sensors have a four pin connector with the following wiring details:
lSensor signal ground (grey wire – connects to engine management ECM)
lSensor signal (black wire – connects to engine management ECM)
lHeater drive (white wire – connects to engine management ECM)
lHeater supply (white wire – connects to fuse 2, underbonnet fuse box)
The ECM connector pins for exhaust emission control are listed in the following table:
ECM Connector 2 (C635) pin-out details for exhaust emission control system
Pin Number Function Signal Type Control
2-01 Post-cat sensor heater (RH) - NAS only Output, Drive PWM, 12 - 0V
2-07 Post-cat sensor heater (LH) - NAS only Output, Drive PWM, 12 - 0V
2-08 Post-cat sensor (RH) - NAS only Ground, Signal 0V
2-09 Pre-cat sensor (LH) Ground, Signal 0V
2-10 Pre-cat sensor (RH) Ground, Signal 0V
2-11 Post-cat sensor (LH) - NAS only Ground, Signal 0V
2-13 Pre-cat sensor heater (RH) Output, Drive PWM, 12 - 0V
2-14 Post-cat sensor (RH) - NAS only Input, Signal Analogue, 0 - 1V
2-15 Pre-cat sensor (LH) Input, Signal Analogue, 0 - 1V
2-16 Pre-cat sensor (RH) Input, Signal Analogue, 0 - 1V
2-17 Post-cat sensor (LH) - NAS only Input, Signal Analogue, 0 - 1V
2-19 Pre-cat sensor heater (LH) Output, Drive PWM, 12 - 0V
Page 352 of 1672

EMISSION CONTROL - V8
DESCRIPTION AND OPERATION 17-2-15
Evaporative emission control system
The evaporation emission control (EVAP) system is used to reduce the level of hydrocarbons emitted into the
atmosphere from the fuel system. The system comprises an EVAP canister which stores the hydrocarbons from the
fuel tank, pressure valves, vent lines and a purge control solenoid valve.
Fuel vapour is stored in the canister until it is ready to be purged to the inlet manifold under the control of the Engine
Control Module (ECM).
A two-way valve is included in the vent line between the fuel tank and the EVAP canister in all markets except NAS.
A fuel vapour separator is fitted next to the fuel filler neck, the construction is different between NAS and ROW
vehicles; the liquid vapour separator (LVS) on NAS vehicles is an L-shaped metal tube and for all other markets it is
an integral part of the moulded plastic filler neck.
+ FUEL DELIVERY SYSTEM - V8, DESCRIPTION AND OPERATION, Description.
NAS vehicles have stainless steel filler necks whilst all other markets use moulded plastic filler necks. On NAS fillers,
a valve closes the roll-over valve (ROV) vent line when the fuel filler cap is removed; for all other markets a pressure
relief valve is fitted into the ROV vent line.
+ FUEL DELIVERY SYSTEM - V8, DESCRIPTION AND OPERATION, Description.
Four ROV's are fitted to the fuel tank, for NAS vehicles the valves are fitted inside the fuel tank and for ROW vehicles
the ROV's are welded external to the fuel tank. Nylon vent lines from the ROV's connect to the liquid vapour separator
allowing vapour to pass to the EVAP canister via the LVS. To prevent the canister from being overloaded (particularly
in hot ambient conditions) and to prevent wastage of fuel, the vapour is allowed to condense within the LVS and flow
back through the ROVs into the tank.
+ FUEL DELIVERY SYSTEM - V8, DESCRIPTION AND OPERATION, Description.
Pressure / vacuum relief valves are incorporated into the fuel filler cap which operate in the event of an evaporation
system failure (e.g. blockage in the evaporation system line to atmosphere). The cap relieves fuel tank pressure to
atmosphere at approximately 1.8 to 2.0 psi (12 to 14 kPa) and opens in the opposite direction at approximately – 0.7
psi (- 5kPa) vacuum. All plastic bodied fuel fillers are fitted with a tank overpressure relief valve.
A vent line flow restrictor (anti-trickle valve) is fitted to the filler pipe in the line between the tank and the canister on
NAS vehicles. The purpose of the anti-trickle valve is to preserve the vapour space in the tank by blocking the vent
line during the fuel filling process. The valve is operated by the action of inserting the filler gun, so that when the fuel
in the tank reaches the level of the filling breather, flow cut off occurs due to fuel filling the filler pipe.
+ FUEL DELIVERY SYSTEM - V8, DESCRIPTION AND OPERATION, Description.
The breather ports from the EVAP canister are located high up in the engine bay (CVS unit on NAS vehicles with
vacuum type, fuel evaporation leak detection capability; via an air filter on NAS vehicles with positive pressure type,
fuel evaporation leak detection capability; snorkel tubes on ROW vehicles), to prevent water ingress during vehicle
wading.
The ECM connectors and pins which are pertinent to evaporative emission control are listed in the following table:
Connector / Pin No. Function Signal type Control
C0635-23 Main relay output Output drive Switch to ground
C0635-24 Leak detection pump motor (NAS vehicles
with positive pressure type EVAP system
leak detection only)Output drive Switch to ground
C0636-3 Purge valve drive Output signal PWM 12 - 0V
C0636-6 Fuel tank pressure sensor (NAS vehicles
with vacuum type EVAP system leak
detection only)Ground 0V
C0636-30 Canister vent solenoid (CVS) valve (NAS
vehicles with vacuum type EVAP system
leak detection only) / Fuel leak detection
pump (NAS vehicles with positive pressure
type EVAP system leak detection only)Output drive Switch to ground
Page 353 of 1672

EMISSION CONTROL - V8
17-2-16 DESCRIPTION AND OPERATION
Fuel leak detection system (vacuum type) – NAS only
The advanced evaporative loss control system equipped with a vacuum type, fuel evaporation leak detection
capability is similar to the standard evaporative loss system, but also includes additional components to enable the
engine control module (ECM) to perform a fuel evaporation leak detection test. The system includes an EVAPs
canister and purge valve, and in addition, a canister vent solenoid (CVS) valve and a fuel tank pressure sensor.
The function of the CVS valve is to block the atmospheric vent side of the EVAP canister under the control of the ECM
so that an evaporation system leak check can be performed. The test is carried out when the vehicle is stationary and
the engine is running at idle speed. The system test uses the natural rate of fuel evaporation and engine manifold
depression. Failure of the leak check will result in illumination of the Malfunction Indicator Lamp (MIL).
The fuel evaporation leak detection is part of the On-Board Diagnostics (OBD) strategy and it is able to determine
vapour leaks from holes or breaks greater than 1 mm (0.04 in.) in diameter. Any fuel evaporation system leaks which
occur between the output of the purge valve and the connection to the inlet manifold cannot be determined using this
test, but these will be detected through the fuelling adaption diagnostics.
Fuel leak detection system (positive pressure type) – NAS only
The evaporative loss control system equipped with a positive pressure type, fuel evaporation leak detection capability
is similar to the vacuum type, but it is capable of detecting smaller leaks by placing the evaporation system under the
influence of positive air pressure. The system includes an EVAPs canister and purge valve, and in addition, a leak
detection pump comprising a motor and solenoid valve.
The solenoid valve contained in the leak detection pump assembly performs a similar function to the CVS valve
utilised on the vacuum type pressure test. The solenoid valve is used to block the atmospheric vent side of the EVAP
canister under the control of the ECM so that an EVAP system leak check can be performed. At the same time,
pressurised air from the pump is allowed past the valve into the EVAP system to set up a positive pressure. The test
is carried out at the end of a drive cycle when the vehicle is stationary and the ignition is switched off. The test is
delayed for a brief period (approximately 10 seconds) after the engine is switched off to allow any slosh in the fuel
tank to stabilise. Component validity checks and pressure signal reference checking takes a further 10 seconds before
the pressurised air is introduced into the EVAP system.
During reference checking, the purge valve is closed and the leak detection pump solenoid valve is not energised,
while the leak detection pump is operated. The pressurised air is bypassed through a restrictor which corresponds to
a 0.5 mm (0.02 in) leak while the current consumption of the leak detection pump motor is monitored.
The system test uses the leak detection pump to force air into the EVAP system when the purge valve and solenoid
valves are both closed (solenoid valve energised), to put the evaporation lines, components and fuel tank under the
influence of positive air pressure. Air is drawn into the pump through an air filter which is located in the engine
compartment.
The fuel leak detection pump current consumption is monitored by the ECM while the EVAP system is under pressure,
and compared to the current noted during the reference check. A drop in the current drawn by the leak detection pump
motor, indicates that air is being lost through holes or leaks in the system which are greater than the reference value
of 0.5 mm (0.02 in). An increase in the current drawn by the leak detection pump motor, indicates that the EVAP
system is well sealed and that there are no leaks present which are greater than 0.5 mm (0.02 in).
The presence of leakage points indicates the likelihood of hydrocarbon emissions to atmosphere from the
evaporation system outside of test conditions and the necessity for rectification work to be conducted to seal the
system. Failure of the leak check will result in illumination of the Malfunction Indicator Lamp (MIL).
C0637-9 Fuel tank pressure sensor (NAS vehicles
with vacuum type EVAP system leak
detection only)Output reference 5V
C0637-12 Analogue fuel level (NAS vehicles with
positive pressure type EVAP system leak
detection only)Input Analogue 0 - 5V
C0637-14 Fuel tank pressure sensor (NAS vehicles
with vacuum type EVAP system leak
detection only)Input signal Analogue 0 - 5V
C0637-20 MIL "ON" Output drive Switch to ground Connector / Pin No. Function Signal type Control
Page 354 of 1672
EMISSION CONTROL - V8
DESCRIPTION AND OPERATION 17-2-17
The fuel evaporation leak detection is part of the On-Board Diagnostics (OBD) strategy and it is able to determine
vapour leaks from holes or breaks down to 0.5 mm (0.02 in.) diameter. Any fuel evaporation leaks which occur
between the output of the purge valve and the connection to the inlet manifold cannot be determined using this test,
but these will be detected through the fuelling adaption diagnostics.
Evaporative emission control components
The evaporative emission control components and the fuel evaporation leak detection test components (NAS only)
are described below:
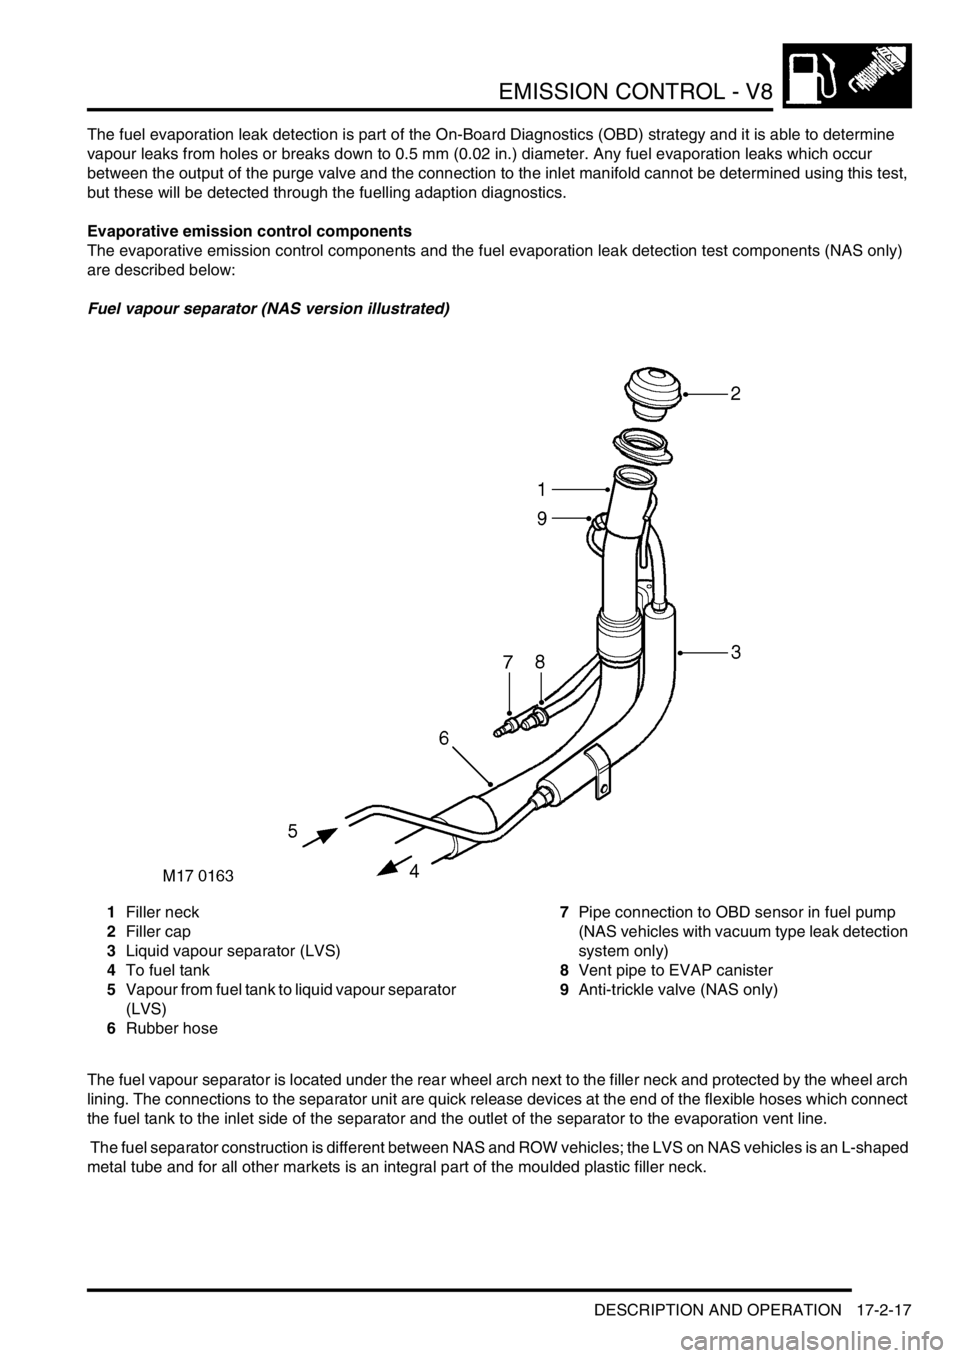
Fuel vapour separator (NAS version illustrated)
1Filler neck
2Filler cap
3Liquid vapour separator (LVS)
4To fuel tank
5Vapour from fuel tank to liquid vapour separator
(LVS)
6Rubber hose7Pipe connection to OBD sensor in fuel pump
(NAS vehicles with vacuum type leak detection
system only)
8Vent pipe to EVAP canister
9Anti-trickle valve (NAS only)
The fuel vapour separator is located under the rear wheel arch next to the filler neck and protected by the wheel arch
lining. The connections to the separator unit are quick release devices at the end of the flexible hoses which connect
the fuel tank to the inlet side of the separator and the outlet of the separator to the evaporation vent line.
The fuel separator construction is different between NAS and ROW vehicles; the LVS on NAS vehicles is an L-shaped
metal tube and for all other markets is an integral part of the moulded plastic filler neck.
Page 355 of 1672
EMISSION CONTROL - V8
17-2-18 DESCRIPTION AND OPERATION
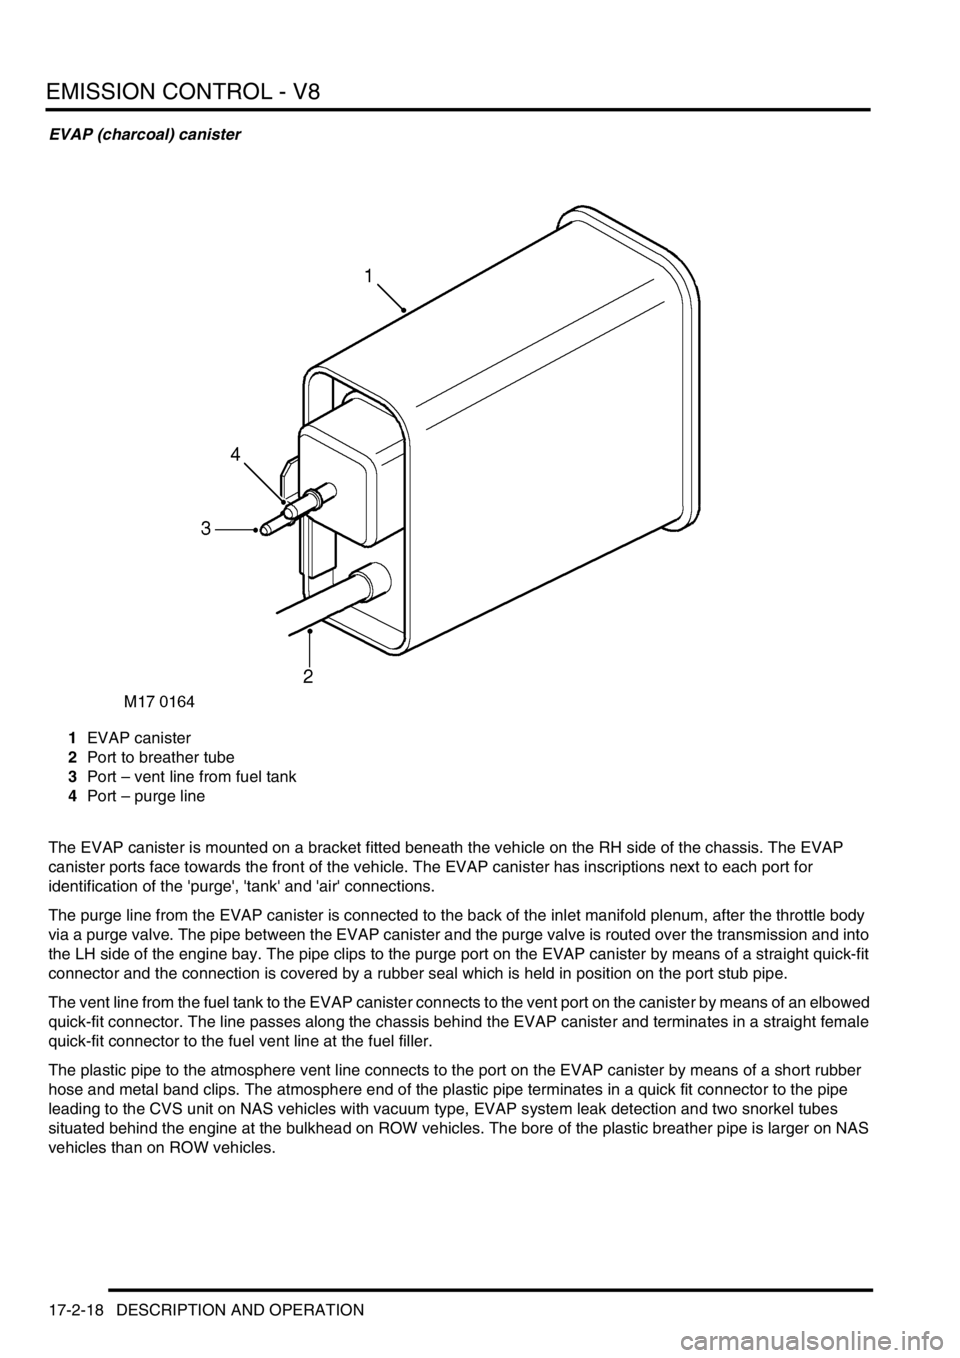
EVAP (charcoal) canister
1EVAP canister
2Port to breather tube
3Port – vent line from fuel tank
4Port – purge line
The EVAP canister is mounted on a bracket fitted beneath the vehicle on the RH side of the chassis. The EVAP
canister ports face towards the front of the vehicle. The EVAP canister has inscriptions next to each port for
identification of the 'purge', 'tank' and 'air' connections.
The purge line from the EVAP canister is connected to the back of the inlet manifold plenum, after the throttle body
via a purge valve. The pipe between the EVAP canister and the purge valve is routed over the transmission and into
the LH side of the engine bay. The pipe clips to the purge port on the EVAP canister by means of a straight quick-fit
connector and the connection is covered by a rubber seal which is held in position on the port stub pipe.
The vent line from the fuel tank to the EVAP canister connects to the vent port on the canister by means of an elbowed
quick-fit connector. The line passes along the chassis behind the EVAP canister and terminates in a straight female
quick-fit connector to the fuel vent line at the fuel filler.
The plastic pipe to the atmosphere vent line connects to the port on the EVAP canister by means of a short rubber
hose and metal band clips. The atmosphere end of the plastic pipe terminates in a quick fit connector to the pipe
leading to the CVS unit on NAS vehicles with vacuum type, EVAP system leak detection and two snorkel tubes
situated behind the engine at the bulkhead on ROW vehicles. The bore of the plastic breather pipe is larger on NAS
vehicles than on ROW vehicles.
Page 356 of 1672
EMISSION CONTROL - V8
DESCRIPTION AND OPERATION 17-2-19
For NAS vehicles with positive pressure, EVAP system leak detection capability, the atmosphere vent line from the
EVAP canister connects to a port on the fuel leak detection pump via a short, large bore hose which is secured to the
component ports by crimped metal clips at each end. A large bore plastic hose from the top of the leak detection pump
is routed to the RH side of the engine bay where it connects to an air filter canister. Under normal operating conditions
(when the fuel leak detection solenoid valve is not energised), the EVAP canister is able to take in clean air via the
air filter, through the pipework and past the open solenoid valve to allow normal purge operation to take place and
release any build up of EVAP system pressure to atmosphere.
The EVAP system pipes are clipped at various points along the pipe runs and tied together with tie straps at suitable
points along the runs.
The NAS and ROW EVAP canisters are of similar appearance, but use charcoal of different consistency. The ROW
vehicles use granular charcoal of 11 bwc (butane working capacity) and NAS vehicles use pelletised charcoal with a
higher absorption capacity of 15 bwc. All canisters are of rectangular shape and have capacities of 1.8 litres (3 1/8
imp. pts) with purge foam retention.
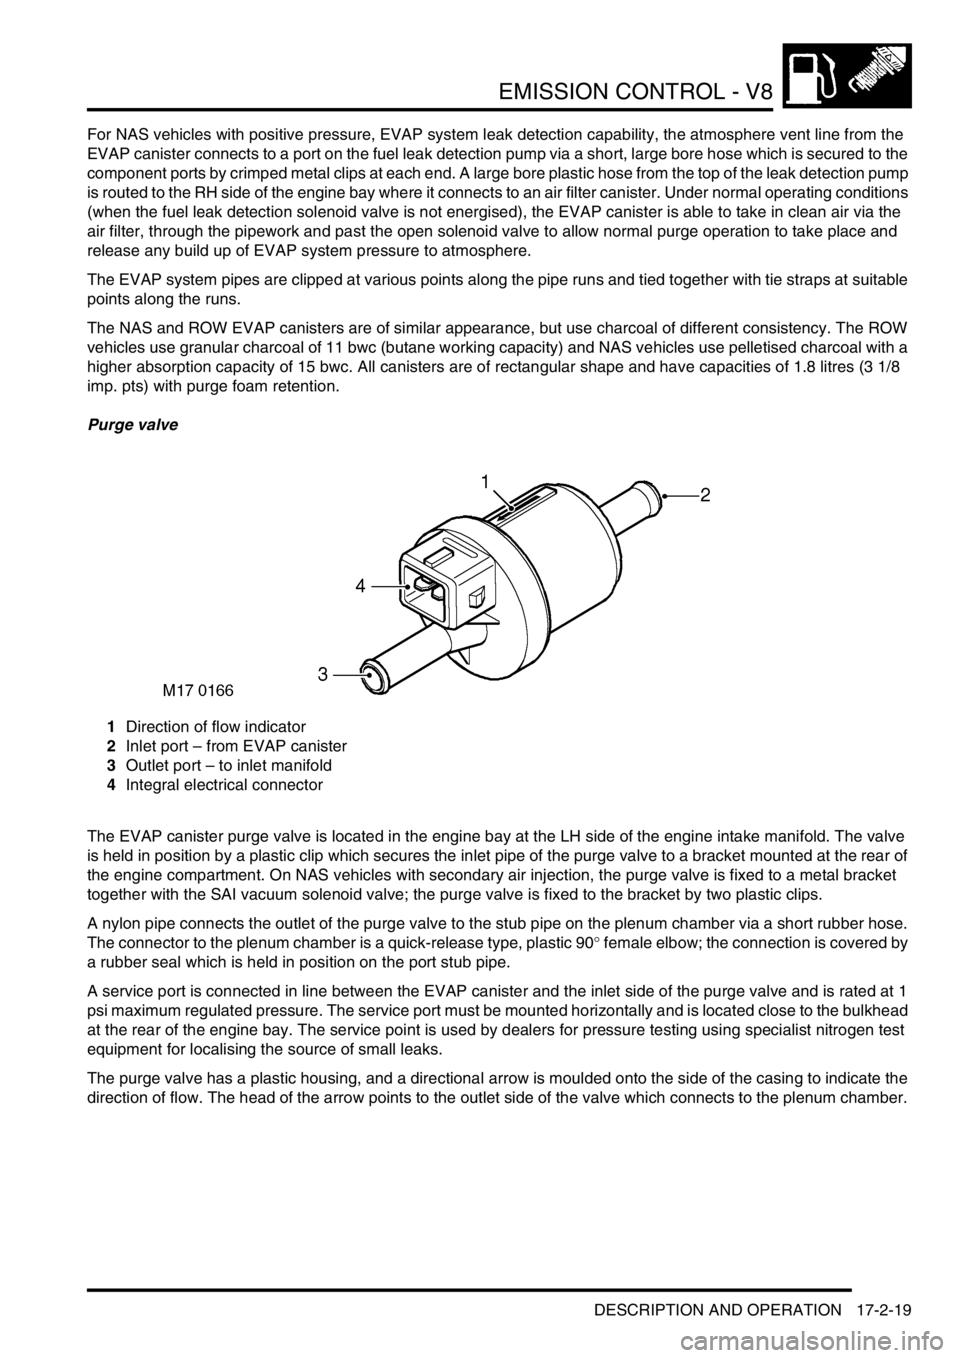
Purge valve
1Direction of flow indicator
2Inlet port – from EVAP canister
3Outlet port – to inlet manifold
4Integral electrical connector
The EVAP canister purge valve is located in the engine bay at the LH side of the engine intake manifold. The valve
is held in position by a plastic clip which secures the inlet pipe of the purge valve to a bracket mounted at the rear of
the engine compartment. On NAS vehicles with secondary air injection, the purge valve is fixed to a metal bracket
together with the SAI vacuum solenoid valve; the purge valve is fixed to the bracket by two plastic clips.
A nylon pipe connects the outlet of the purge valve to the stub pipe on the plenum chamber via a short rubber hose.
The connector to the plenum chamber is a quick-release type, plastic 90
° female elbow; the connection is covered by
a rubber seal which is held in position on the port stub pipe.
A service port is connected in line between the EVAP canister and the inlet side of the purge valve and is rated at 1
psi maximum regulated pressure. The service port must be mounted horizontally and is located close to the bulkhead
at the rear of the engine bay. The service point is used by dealers for pressure testing using specialist nitrogen test
equipment for localising the source of small leaks.
The purge valve has a plastic housing, and a directional arrow is moulded onto the side of the casing to indicate the
direction of flow. The head of the arrow points to the outlet side of the valve which connects to the plenum chamber.
Page 357 of 1672

EMISSION CONTROL - V8
17-2-20 DESCRIPTION AND OPERATION
Purge valve operation is controlled by the engine control module (ECM). The purge valve has a two-pin electrical
connector which links to the ECM via the engine harness. Pin-1 of the connector is the power supply source from fuse
2 in the engine compartment fusebox, and pin-2 of the connector is the switched earth from the ECM (pulse width
modulated (PWM) signal) which is used to control the purge valve operation time. Note that the harness connector
for the purge valve is black, and must not be confused with the connector for the Secondary Air Injection
vacuum solenoid valve which is grey.
When the purge valve is earthed by the ECM, the valve opens to allow hydrocarbons stored in the EVAP canister to
be purged to the engine inlet manifold for combustion.
If the purge valve breaks or becomes stuck in the open or closed position, the EVAP system will cease to function
and there are no default measures available. The ECM will store the fault in memory and illuminate the MIL warning
lamp if the correct monitoring conditions have been achieved (i.e. valve status unchanged for 45 seconds after engine
has been running for 15 minutes). If the purge valve is stuck in the open position, a rich air:fuel mixture is likely to
result at the intake manifold, this could cause the engine to misfire and the fuelling adaptions will change.
The following failure modes are possible:
lSticking valve
lValve blocked
lConnector or harness wiring fault (open or short circuit)
lValve stuck open
If the purge valve malfunctions, the following fault codes may be stored in the ECM diagnostic memory, which can be
retrieved using 'Testbook':
P-code Description
P0440Purge valve not sealing
P0444Purge valve open circuit
P0445Purge valve short circuit to ground
P0443Purge valve short circuit to battery voltage
Page 358 of 1672
EMISSION CONTROL - V8
DESCRIPTION AND OPERATION 17-2-21
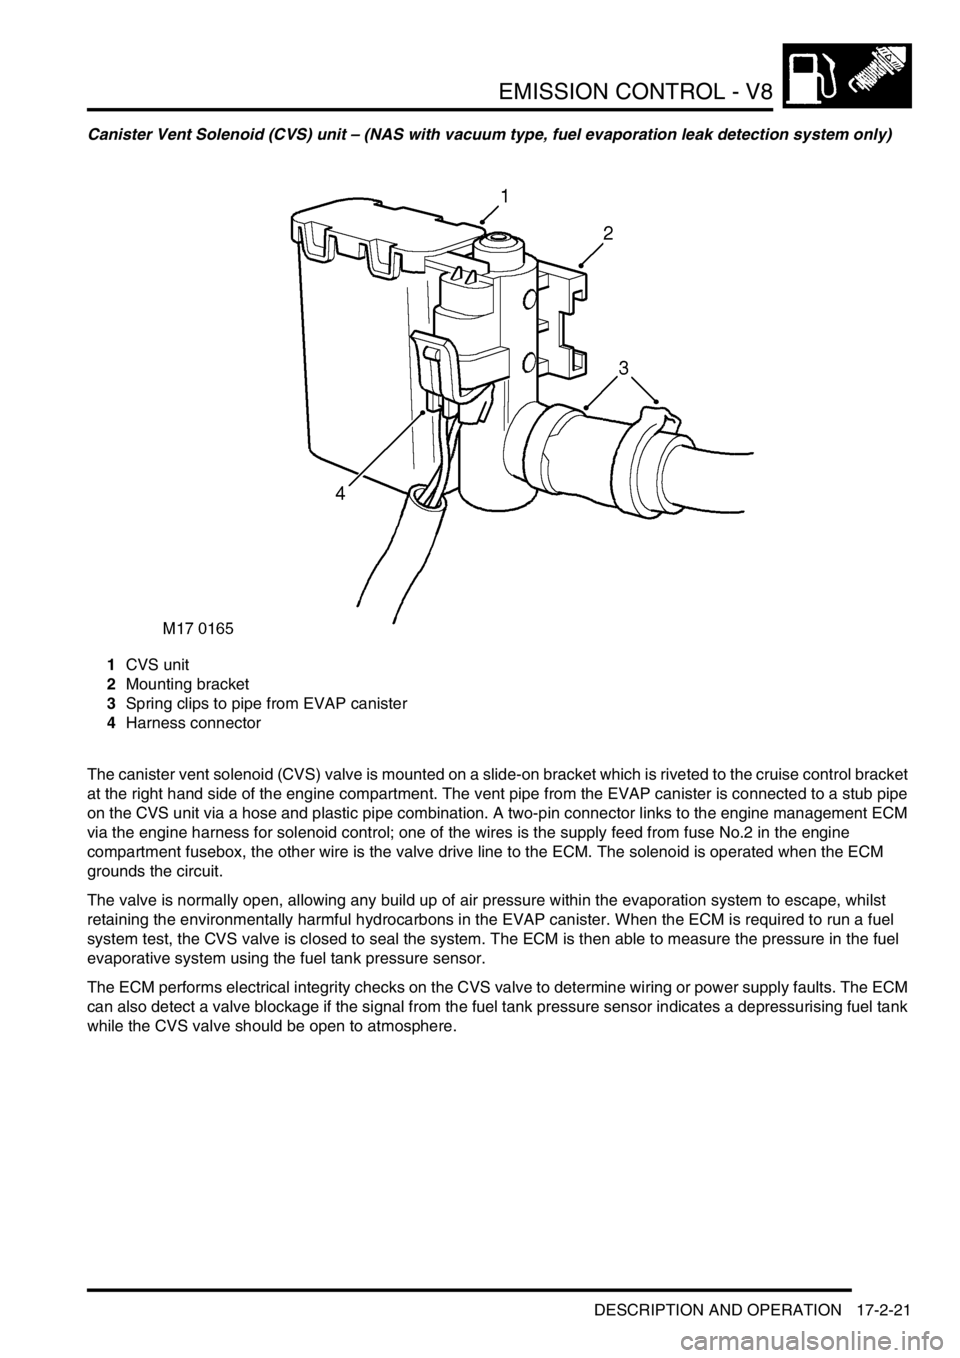
Canister Vent Solenoid (CVS) unit – (NAS with vacuum type, fuel evaporation leak detection system only)
1CVS unit
2Mounting bracket
3Spring clips to pipe from EVAP canister
4Harness connector
The canister vent solenoid (CVS) valve is mounted on a slide-on bracket which is riveted to the cruise control bracket
at the right hand side of the engine compartment. The vent pipe from the EVAP canister is connected to a stub pipe
on the CVS unit via a hose and plastic pipe combination. A two-pin connector links to the engine management ECM
via the engine harness for solenoid control; one of the wires is the supply feed from fuse No.2 in the engine
compartment fusebox, the other wire is the valve drive line to the ECM. The solenoid is operated when the ECM
grounds the circuit.
The valve is normally open, allowing any build up of air pressure within the evaporation system to escape, whilst
retaining the environmentally harmful hydrocarbons in the EVAP canister. When the ECM is required to run a fuel
system test, the CVS valve is closed to seal the system. The ECM is then able to measure the pressure in the fuel
evaporative system using the fuel tank pressure sensor.
The ECM performs electrical integrity checks on the CVS valve to determine wiring or power supply faults. The ECM
can also detect a valve blockage if the signal from the fuel tank pressure sensor indicates a depressurising fuel tank
while the CVS valve should be open to atmosphere.
Page 359 of 1672
EMISSION CONTROL - V8
17-2-22 DESCRIPTION AND OPERATION
The following failure modes are possible:
lConnector or harness wiring fault (open or short circuit)
lValve stuck open or shut
lValve blocked
If the CVS valve malfunctions, the following fault codes may be stored in the ECM diagnostic memory, which can be
retrieved using 'Testbook':
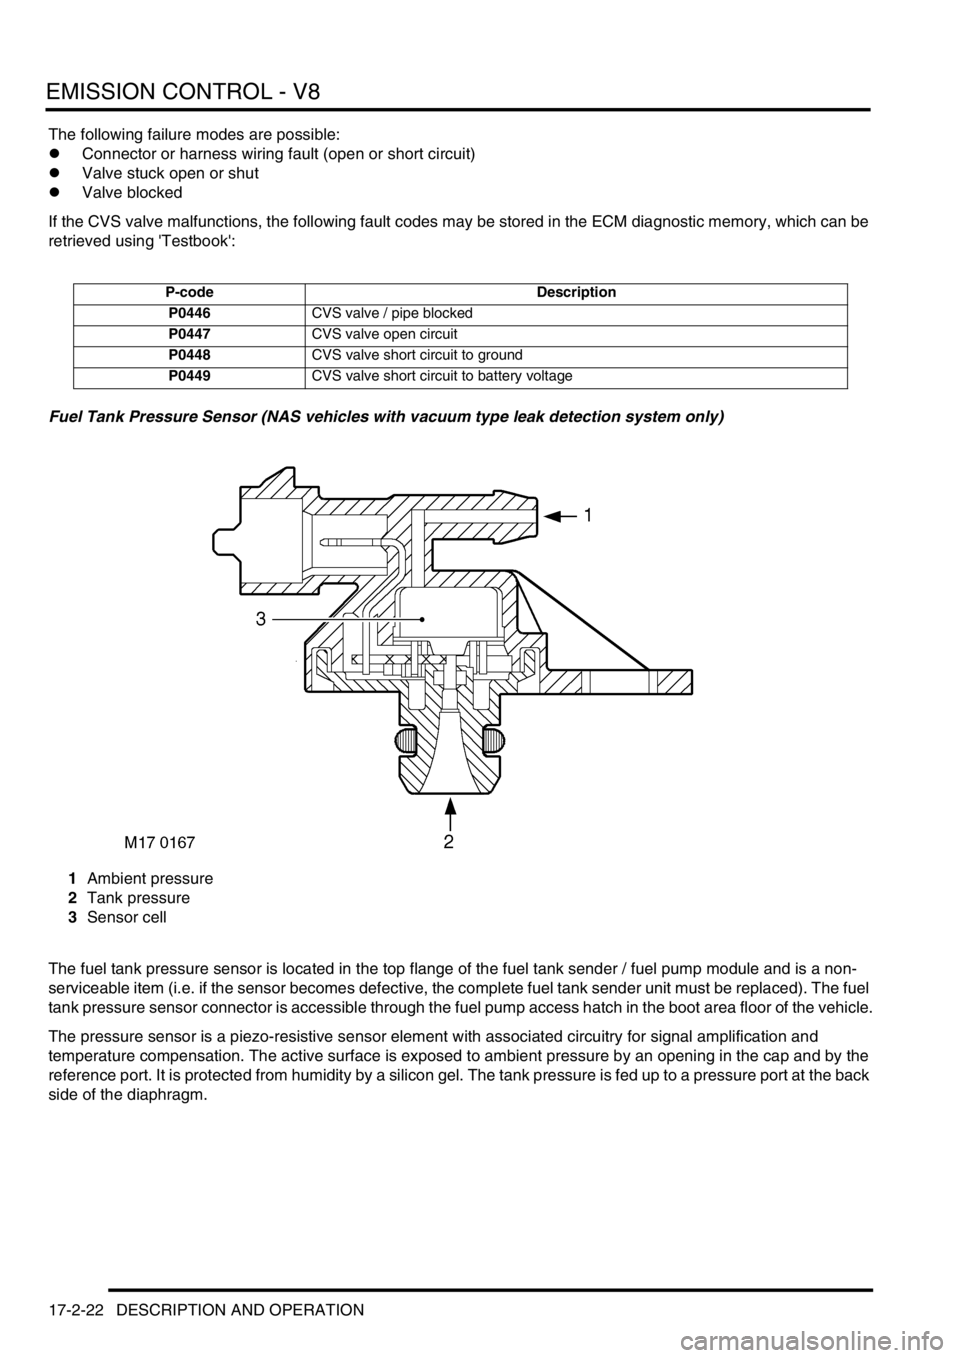
Fuel Tank Pressure Sensor (NAS vehicles with vacuum type leak detection system only)
1Ambient pressure
2Tank pressure
3Sensor cell
The fuel tank pressure sensor is located in the top flange of the fuel tank sender / fuel pump module and is a non-
serviceable item (i.e. if the sensor becomes defective, the complete fuel tank sender unit must be replaced). The fuel
tank pressure sensor connector is accessible through the fuel pump access hatch in the boot area floor of the vehicle.
The pressure sensor is a piezo-resistive sensor element with associated circuitry for signal amplification and
temperature compensation. The active surface is exposed to ambient pressure by an opening in the cap and by the
reference port. It is protected from humidity by a silicon gel. The tank pressure is fed up to a pressure port at the back
side of the diaphragm.
P-code Description
P0446CVS valve / pipe blocked
P0447CVS valve open circuit
P0448CVS valve short circuit to ground
P0449CVS valve short circuit to battery voltage