ac compre LAND ROVER DISCOVERY 2002 Service Manual
[x] Cancel search | Manufacturer: LAND ROVER, Model Year: 2002, Model line: DISCOVERY, Model: LAND ROVER DISCOVERY 2002Pages: 1672, PDF Size: 46.1 MB
Page 269 of 1672

ENGINE - V8
12-2-26 REPAIRS
Engine assembly
$% 12.41.01.99
Remove
1.Drain engine oil and remove oil filter.
2.Remove radiator.
+ COOLING SYSTEM - V8, REPAIRS,
Radiator.
3.Remove upper inlet manifold.
+ MANIFOLDS AND EXHAUST
SYSTEMS - V8, REPAIRS, Gasket - inlet
manifold - upper - Without Secondary Air
Injection.
4.Remove ignition coil assemblies.
5.Position absorbent material to catch spillage
and disconnect fuel pipe from fuel rail.
CAUTION: Always fit plugs to open
connections to prevent contamination.
6.Release 2 hose clips and remove top hose.
7.Using a 15 mm spanner, release auxiliary drive
belt tension and remove drive belt. 8.Remove 3 bolts securing ACE pump, release
pump and tie aside.
9.Disconnect multiplug from A/C compressor.
10.Remove 4 bolts securing A/C compressor,
release compressor and tie aside.
Page 273 of 1672

ENGINE - V8
12-2-30 REPAIRS
Refit
1.Clean mating faces of engine and gearbox,
dowel and dowel holes.
2.Lubricate splines and bearing surface on first
motion shaft with grease.
3.With assistance position engine in engine bay,
align to gearbox and locate on dowels.
4.Position support brackets, fit bell housing bolts
and tighten to 50 Nm (37 lbf.ft).
5.Position engine mountings, fit nuts and tighten
to 85 Nm (63 lbf.ft).
6.Lower lifting equipment and remove from
engine.
7. Models with automatic gearbox: Align torque
converter to drive plate, fit bolts and tighten to
50 Nm (37 lbf.ft). Fit access plug.
8.Fit exhaust front pipe.
+ MANIFOLDS AND EXHAUST
SYSTEMS - V8, REPAIRS, Front pipe.
9.Position oil cooling pipe saddle clamps and
tighten bolts.
10.Position engine harness into foot well.
11.Connect 5 multiplugs to ECM.
12.Fit toe board and secure with trim fixings.
13.Connect engine harness earth to body and
secure with nut.
14.Connect engine harness to main harness
multiplug.
15.Connect multiplug to EVAP purge valve.
16.Connect engine harness multiplugs to fuse
box.
17.Connect starter lead to fuse box and secure
with nut.
18.Connect engine harness positive lead to
battery and tighten nut.
19.Fit fuse box cover.
20.Position engine earth lead and secure with
bolt.
21.Position coolant rail and secure with bolt.
22.Connect harness clips to coolant rail.
23.Connect hose to coolant rail and coolant pump
and secure with clips.
24.Connect PAS pump high and low pressure
pipes and secure with clips.
25.Position oil cooling pipe saddle clamp to PAS
pump housing and secure with bolt.
26.Clean A/C compressor and housing mating
faces, dowels and dowel holes. 27.Position A/C compressor, fit bolts and tighten
to 22 Nm (16 lbf.ft).
28.Connect multiplug to A/C compressor.
29.Clean ACE pump and housing mating faces,
dowels and dowel holes.
30.Position ACE pump, fit bolts and tighten to 22
Nm (16 lbf.ft).
31.Clean all pulley 'V's, fit auxiliary drive belt,
using a 15mm spanner, release belt tensioner
secure belt and re-tension drive belt .
32.Ensure auxiliary drive belt is correctly located
on all pulleys.
33.Fit radiator.
+ COOLING SYSTEM - V8, REPAIRS,
Radiator.
34.Fit top hose and secure with clips.
35.Connect fuel pipe to fuel rail.
36.Position ignition coils and connect ht leads.
37.Fit upper inlet manifold.
+ MANIFOLDS AND EXHAUST
SYSTEMS - V8, REPAIRS, Gasket - inlet
manifold - upper - Without Secondary Air
Injection.
38.Fit new oil filter and refill engine with oil.
+ ENGINE - V8, REPAIRS, Filter - oil.
+ MAINTENANCE, PROCEDURES,
Engine oil - V8 engine.
39.Top up gearbox oil.
+ MAINTENANCE, PROCEDURES,
Automatic gearbox.
Page 305 of 1672

ENGINE - V8
12-2-62 OVERHAUL
Cylinder head - overhaul
$% 12.29.19.01
Disassembly
1.Remove cylinder head gasket.
+ ENGINE - V8, OVERHAUL, Gasket -
cylinder head.
2.Loosen screw on tool LRT-12-034.
3.Fit tool LRT-12-034 to valve and tighten screw
to compress valve spring sufficiently to release
collets from valve spring cap.
4.Remove 2 collets and release valve spring
compressor.
5.Remove valve spring cap and valve spring.
6.Remove valve from cylinder head.
7.Remove and discard valve stem oil seal.
8.Repeat above operations for remaining valves.
9.Keep valves, springs, caps and collets in their
fitted order. Inspect
1.Clean mating faces of cylinder block and head
using suitable gasket removal spray and a
plastic scraper, ensure that bolt holes in block
are clean and dry.
CAUTION: Do not use a metal scraper or
machined surfaces may be damaged.
2.Clean cylinder head, valve springs, valves and
inlet valve guide bores. Ensure all loose
particles of carbon are removed on completion.
3.Check head and block faces for warping and
pitting. Maximum warp = 0.05 mm (0.002 in).
4.Check cylinder head height at each end of
head. Renew a head which is outside limits.
a22.94 mm (0.903 in) - New
b62.56 mm (2.463 in) - New
5.Cylinder head can be refaced to 0.50 mm (0.02
in) max. below head height.
Page 309 of 1672
ENGINE - V8
12-2-66 OVERHAUL
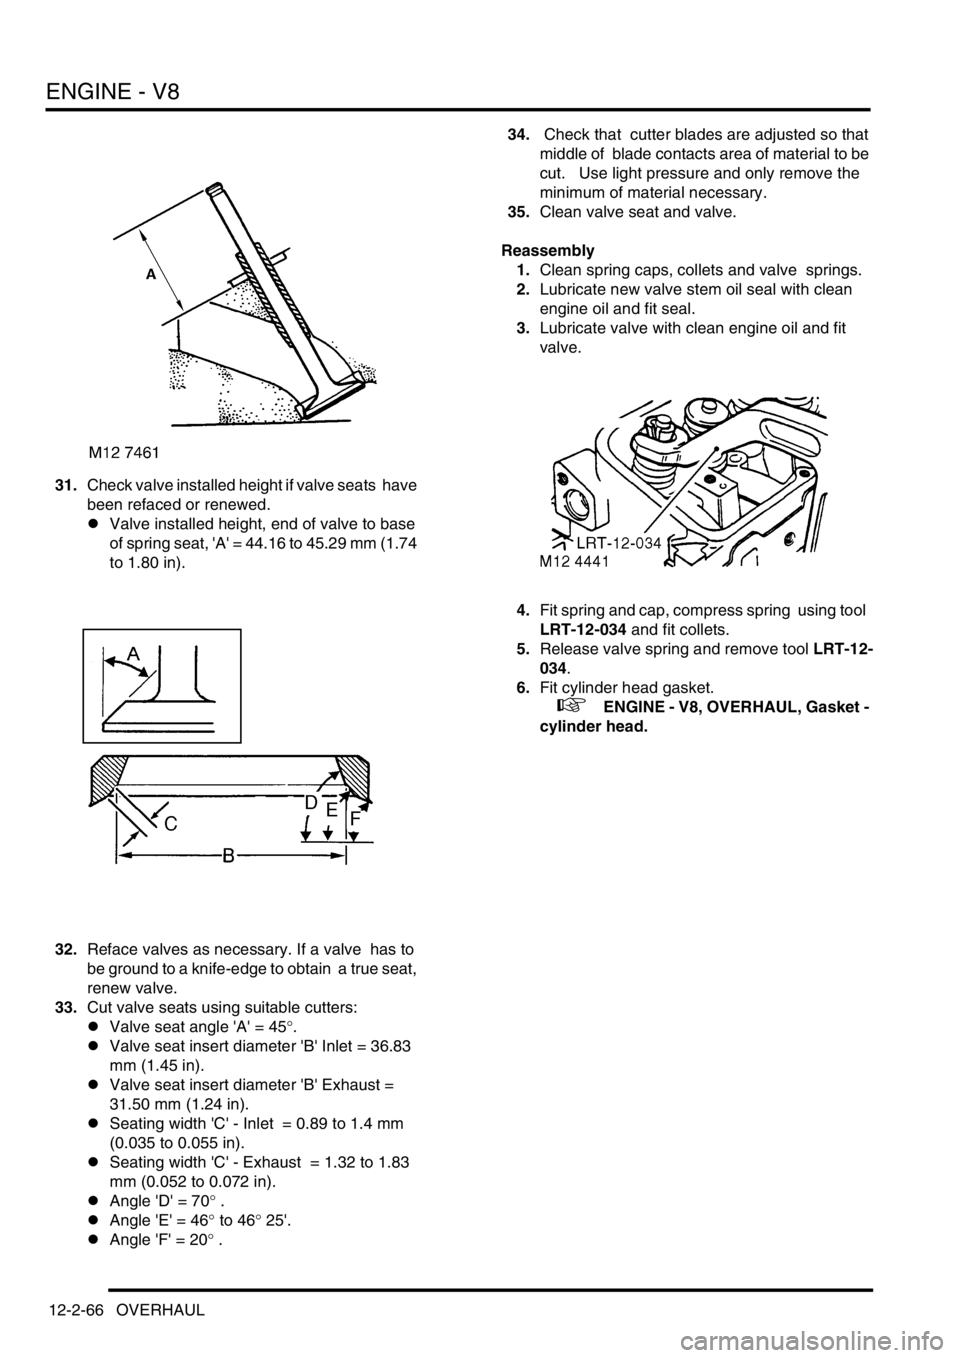
31.Check valve installed height if valve seats have
been refaced or renewed.
lValve installed height, end of valve to base
of spring seat, 'A' = 44.16 to 45.29 mm (1.74
to 1.80 in).
32.Reface valves as necessary. If a valve has to
be ground to a knife-edge to obtain a true seat,
renew valve.
33.Cut valve seats using suitable cutters:
lValve seat angle 'A' = 45
°.
lValve seat insert diameter 'B' Inlet = 36.83
mm (1.45 in).
lValve seat insert diameter 'B' Exhaust =
31.50 mm (1.24 in).
lSeating width 'C' - Inlet = 0.89 to 1.4 mm
(0.035 to 0.055 in).
lSeating width 'C' - Exhaust = 1.32 to 1.83
mm (0.052 to 0.072 in).
lAngle 'D' = 70
° .
lAngle 'E' = 46
° to 46° 25'.
lAngle 'F' = 20
° .34. Check that cutter blades are adjusted so that
middle of blade contacts area of material to be
cut. Use light pressure and only remove the
minimum of material necessary.
35.Clean valve seat and valve.
Reassembly
1.Clean spring caps, collets and valve springs.
2.Lubricate new valve stem oil seal with clean
engine oil and fit seal.
3.Lubricate valve with clean engine oil and fit
valve.
4.Fit spring and cap, compress spring using tool
LRT-12-034 and fit collets.
5.Release valve spring and remove tool LRT-12-
034.
6.Fit cylinder head gasket.
+ ENGINE - V8, OVERHAUL, Gasket -
cylinder head.
Page 312 of 1672
ENGINE - V8
OVERHAUL 12-2-69
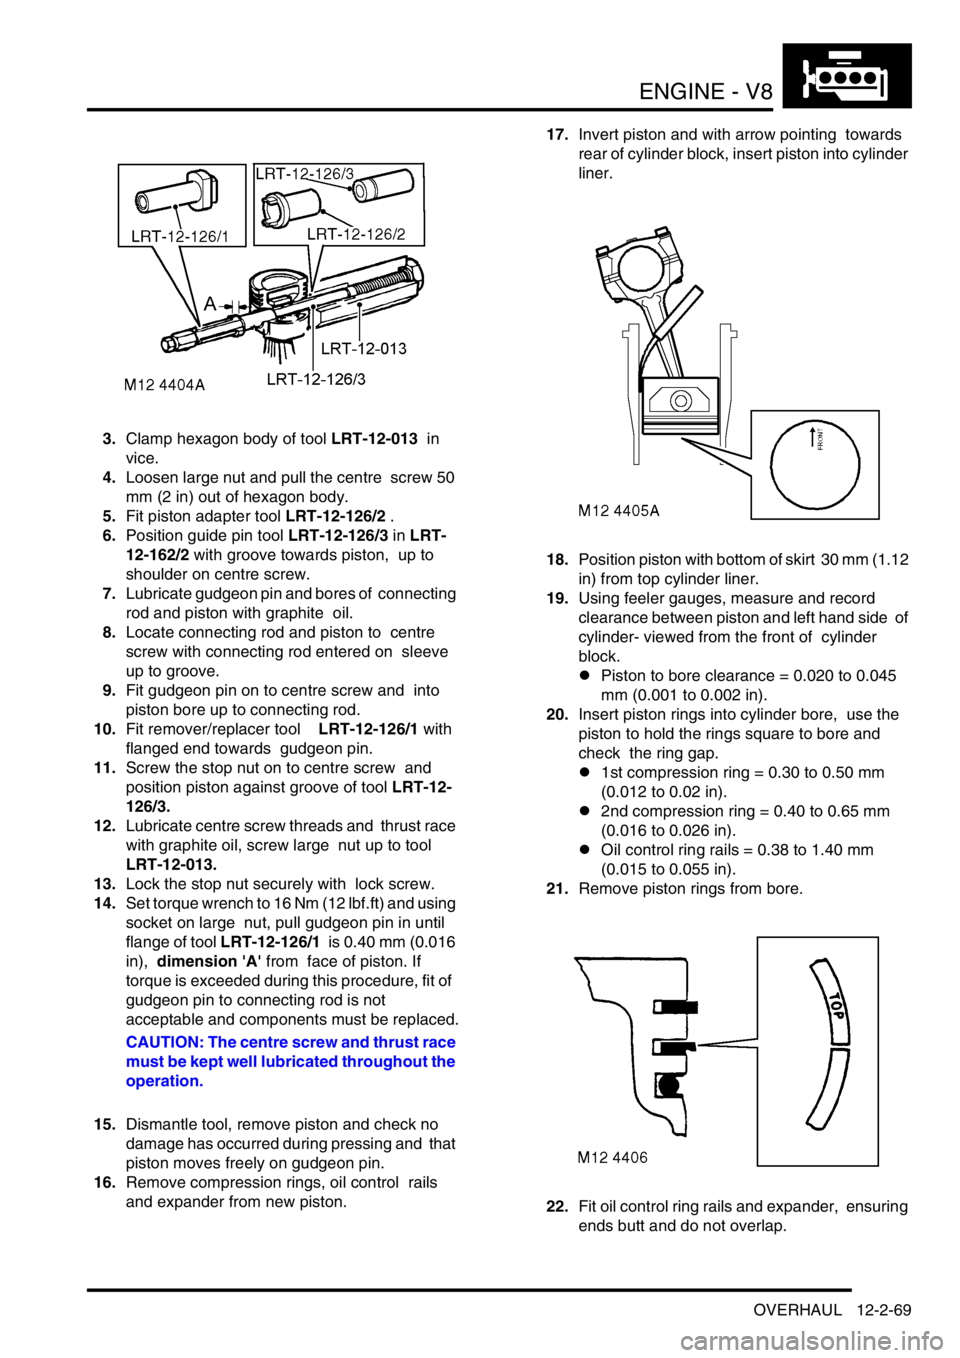
3.Clamp hexagon body of tool LRT-12-013 in
vice.
4.Loosen large nut and pull the centre screw 50
mm (2 in) out of hexagon body.
5.Fit piston adapter tool LRT-12-126/2 .
6.Position guide pin tool LRT-12-126/3 in LRT-
12-162/2 with groove towards piston, up to
shoulder on centre screw.
7.Lubricate gudgeon pin and bores of connecting
rod and piston with graphite oil.
8.Locate connecting rod and piston to centre
screw with connecting rod entered on sleeve
up to groove.
9.Fit gudgeon pin on to centre screw and into
piston bore up to connecting rod.
10.Fit remover/replacer tool LRT-12-126/1 with
flanged end towards gudgeon pin.
11.Screw the stop nut on to centre screw and
position piston against groove of tool LRT-12-
126/3.
12.Lubricate centre screw threads and thrust race
with graphite oil, screw large nut up to tool
LRT-12-013.
13.Lock the stop nut securely with lock screw.
14.Set torque wrench to 16 Nm (12 lbf.ft) and using
socket on large nut, pull gudgeon pin in until
flange of tool LRT-12-126/1 is 0.40 mm (0.016
in), dimension 'A' from face of piston. If
torque is exceeded during this procedure, fit of
gudgeon pin to connecting rod is not
acceptable and components must be replaced.
CAUTION: The centre screw and thrust race
must be kept well lubricated throughout the
operation.
15.Dismantle tool, remove piston and check no
damage has occurred during pressing and that
piston moves freely on gudgeon pin.
16.Remove compression rings, oil control rails
and expander from new piston. 17.Invert piston and with arrow pointing towards
rear of cylinder block, insert piston into cylinder
liner.
18.Position piston with bottom of skirt 30 mm (1.12
in) from top cylinder liner.
19.Using feeler gauges, measure and record
clearance between piston and left hand side of
cylinder- viewed from the front of cylinder
block.
lPiston to bore clearance = 0.020 to 0.045
mm (0.001 to 0.002 in).
20.Insert piston rings into cylinder bore, use the
piston to hold the rings square to bore and
check the ring gap.
l1st compression ring = 0.30 to 0.50 mm
(0.012 to 0.02 in).
l2nd compression ring = 0.40 to 0.65 mm
(0.016 to 0.026 in).
lOil control ring rails = 0.38 to 1.40 mm
(0.015 to 0.055 in).
21.Remove piston rings from bore.
22.Fit oil control ring rails and expander, ensuring
ends butt and do not overlap.
Page 313 of 1672
ENGINE - V8
12-2-70 OVERHAUL
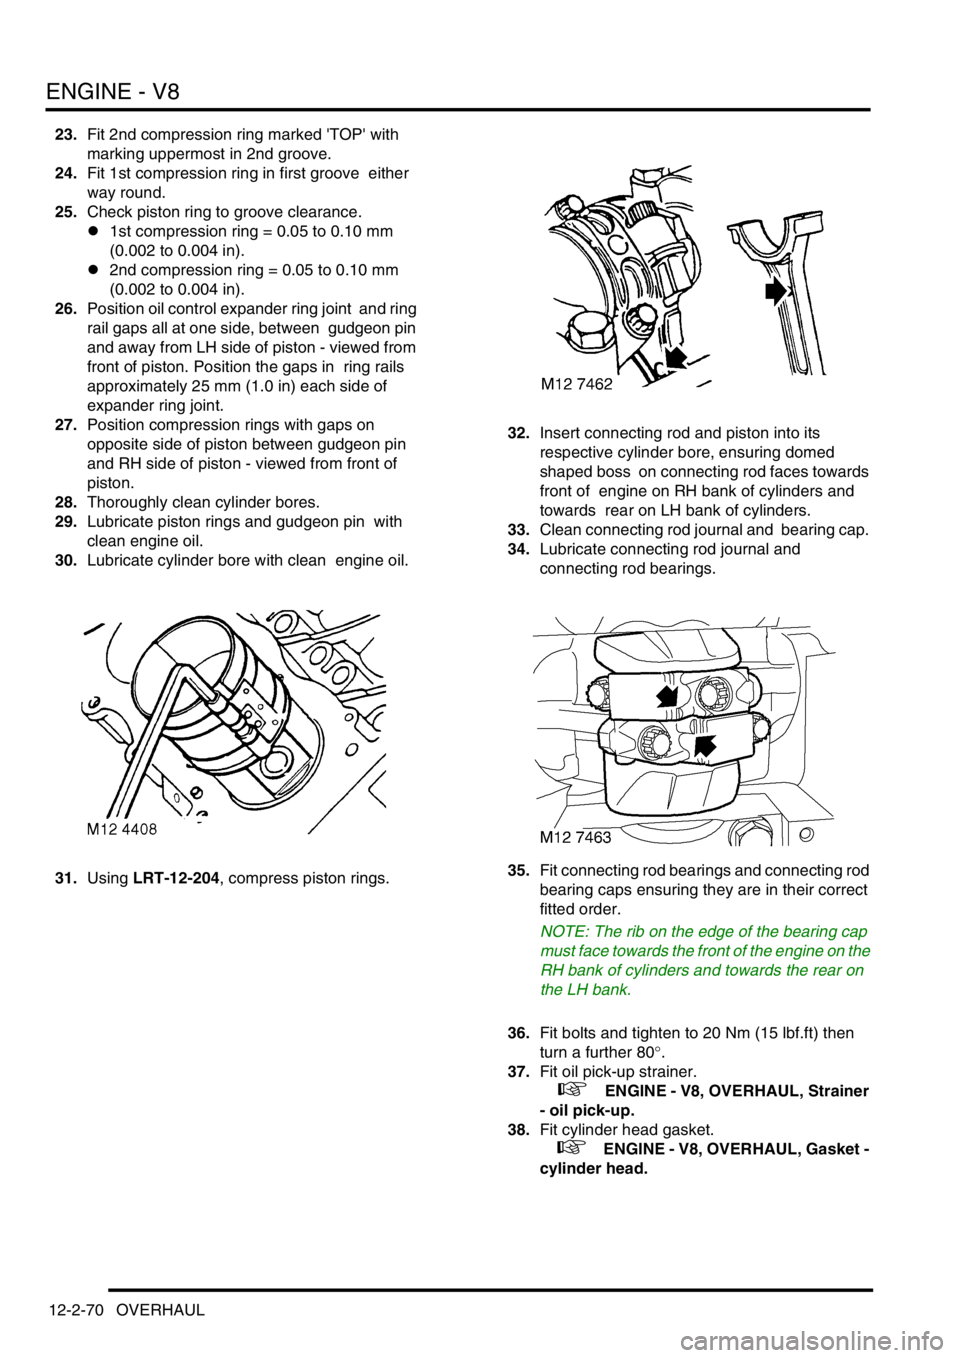
23.Fit 2nd compression ring marked 'TOP' with
marking uppermost in 2nd groove.
24.Fit 1st compression ring in first groove either
way round.
25.Check piston ring to groove clearance.
l1st compression ring = 0.05 to 0.10 mm
(0.002 to 0.004 in).
l2nd compression ring = 0.05 to 0.10 mm
(0.002 to 0.004 in).
26.Position oil control expander ring joint and ring
rail gaps all at one side, between gudgeon pin
and away from LH side of piston - viewed from
front of piston. Position the gaps in ring rails
approximately 25 mm (1.0 in) each side of
expander ring joint.
27.Position compression rings with gaps on
opposite side of piston between gudgeon pin
and RH side of piston - viewed from front of
piston.
28.Thoroughly clean cylinder bores.
29.Lubricate piston rings and gudgeon pin with
clean engine oil.
30.Lubricate cylinder bore with clean engine oil.
31.Using LRT-12-204, compress piston rings. 32.Insert connecting rod and piston into its
respective cylinder bore, ensuring domed
shaped boss on connecting rod faces towards
front of engine on RH bank of cylinders and
towards rear on LH bank of cylinders.
33.Clean connecting rod journal and bearing cap.
34.Lubricate connecting rod journal and
connecting rod bearings.
35.Fit connecting rod bearings and connecting rod
bearing caps ensuring they are in their correct
fitted order.
NOTE: The rib on the edge of the bearing cap
must face towards the front of the engine on the
RH bank of cylinders and towards the rear on
the LH bank.
36.Fit bolts and tighten to 20 Nm (15 lbf.ft) then
turn a further 80
°.
37.Fit oil pick-up strainer.
+ ENGINE - V8, OVERHAUL, Strainer
- oil pick-up.
38.Fit cylinder head gasket.
+ ENGINE - V8, OVERHAUL, Gasket -
cylinder head.
Page 425 of 1672
ENGINE MANAGEMENT SYSTEM - TD5
18-1-32 DESCRIPTION AND OPERATION
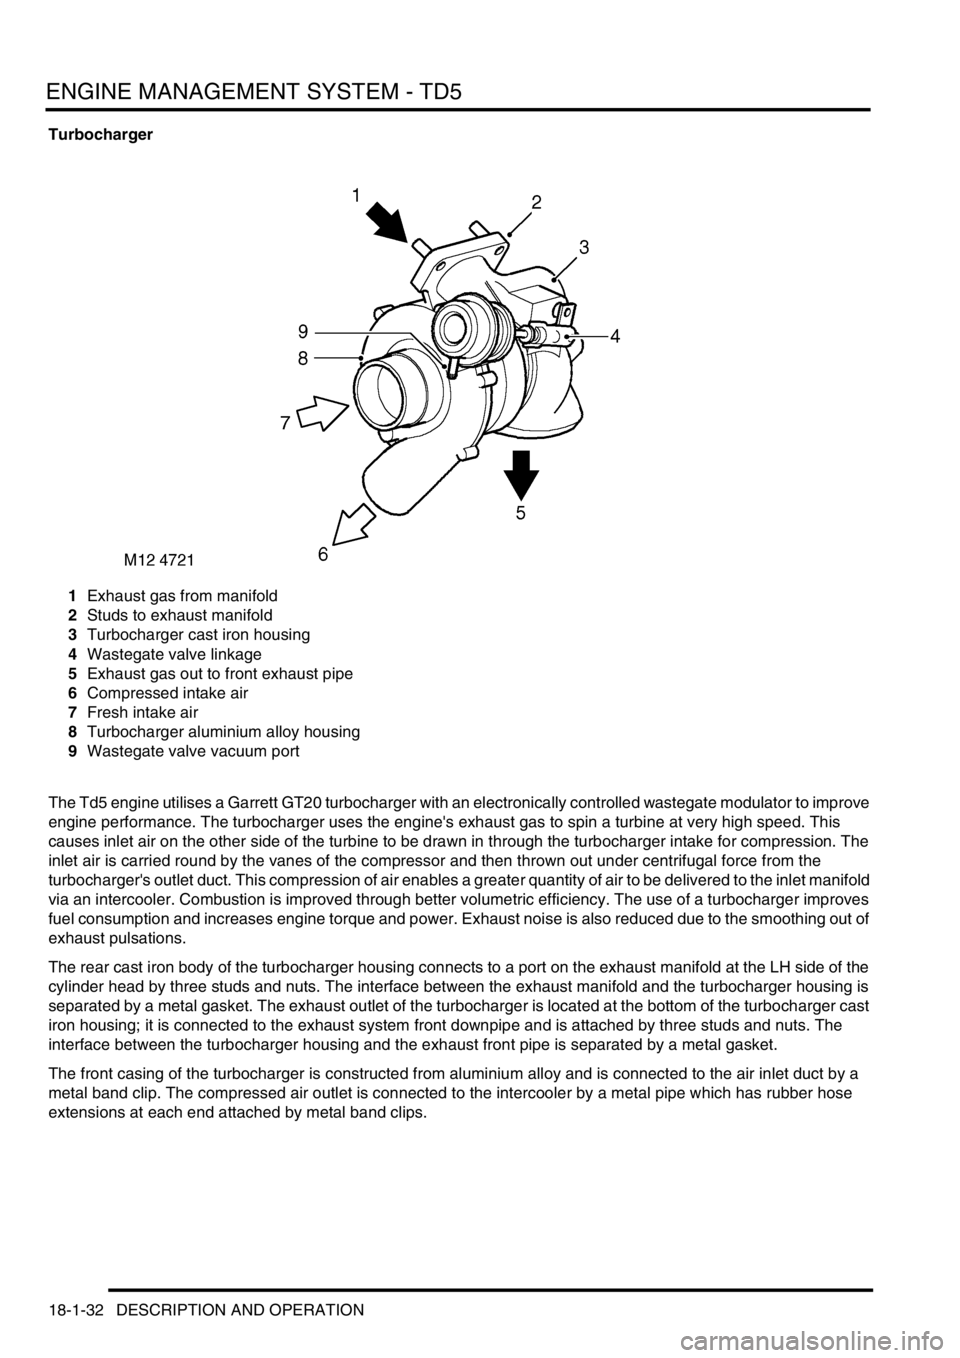
Turbocharger
1Exhaust gas from manifold
2Studs to exhaust manifold
3Turbocharger cast iron housing
4Wastegate valve linkage
5Exhaust gas out to front exhaust pipe
6Compressed intake air
7Fresh intake air
8Turbocharger aluminium alloy housing
9Wastegate valve vacuum port
The Td5 engine utilises a Garrett GT20 turbocharger with an electronically controlled wastegate modulator to improve
engine performance. The turbocharger uses the engine's exhaust gas to spin a turbine at very high speed. This
causes inlet air on the other side of the turbine to be drawn in through the turbocharger intake for compression. The
inlet air is carried round by the vanes of the compressor and then thrown out under centrifugal force from the
turbocharger's outlet duct. This compression of air enables a greater quantity of air to be delivered to the inlet manifold
via an intercooler. Combustion is improved through better volumetric efficiency. The use of a turbocharger improves
fuel consumption and increases engine torque and power. Exhaust noise is also reduced due to the smoothing out of
exhaust pulsations.
The rear cast iron body of the turbocharger housing connects to a port on the exhaust manifold at the LH side of the
cylinder head by three studs and nuts. The interface between the exhaust manifold and the turbocharger housing is
separated by a metal gasket. The exhaust outlet of the turbocharger is located at the bottom of the turbocharger cast
iron housing; it is connected to the exhaust system front downpipe and is attached by three studs and nuts. The
interface between the turbocharger housing and the exhaust front pipe is separated by a metal gasket.
The front casing of the turbocharger is constructed from aluminium alloy and is connected to the air inlet duct by a
metal band clip. The compressed air outlet is connected to the intercooler by a metal pipe which has rubber hose
extensions at each end attached by metal band clips.
Page 426 of 1672

ENGINE MANAGEMENT SYSTEM - TD5
DESCRIPTION AND OPERATION 18-1-33
The turbocharger is exposed to extremely high operating temperatures (up to 1,000 °C (1832 °F)) because of the hot
exhaust gases and the high speed revolution of the turbine (up to 150,000 rev/min). In order to resist wear of the
turbine bearings a flow of lubrication oil is supplied from the engine lubrication system to keep the bearings cool. Oil
is supplied from a tapping at the front of the full-flow filter adaptor housing via a metal pipe with banjo connections.
Oil is returned to the sump via a metal pipe which connects to the cylinder block at a port below the turbocharger
assembly.
A heatshield is attached to the left hand side of the engine to protect adjacent components from the heat generated
at the turbocharger. The heatshield is attached to the engine by two bolts an additional bolt attaches the heatshield
to the turbocharger casting.
The engine control module controls the amount of boost pressure the engine receives by way of the turbocharger.
When full boost is reached a control signal is sent to the wastegate modulator, and a vacuum is applied to the
wastegate valve. The wastegate valve opens, bypassing some of the exhaust gas away from the turbine to be output
to the exhaust system.
The engine should be allowed to idle for 15 seconds following engine start up and before the engine is switched off
to protect the turbocharger by maintaining oil supply to the turbine bearings.
Intercooler
The intercooler is an air-to-air heat exchanger which lowers the intake air temperature to obtain a higher air density
for better combustion efficiency. The intercooler receives compressed air from the turbocharger via a metal pipe; it
cools the intake air via the intercooler matrix and delivers it to the intake manifold by means of a rubber hose which
connects between the intercooler outlet and the intake manifold outlet. The rubber hose is connected to ports at each
end by metal band clips.
+ COOLING SYSTEM - Td5, DESCRIPTION AND OPERATION, Description.
The intercooler is located at the front of the engine bay, forward of the radiator.
Page 436 of 1672

ENGINE MANAGEMENT SYSTEM - TD5
DESCRIPTION AND OPERATION 18-1-43
Air Conditioning (A/C)
The ECM controls operation of the A/C compressor and the engine's electric cooling fan in response to requests from
the Automatic Temperature Control (ATC) ECU.
A/C request
When the ATC ECU supplies the ECM with an A/C request, the ECM energises the compressor clutch relay. The
compressor clutch relay is located in the engine compartment fuse box. It is a four pin normally open relay. This means
that the relay must be energised to drive the compressor clutch. During periods of high driver demand such as hard
acceleration or maximum rev/min the ECM will disable the compressor clutch for a short time. This is to reduce the
load on the engine.
The operation of the A/C request is via a switch being connected to earth. Voltage is supplied via pin 9 of connector
C0658 of the ECM, at the point at which the switch is pressed the connection to the earth path is made and the
compressor clutch is engaged.
The ECM provides the earth for the relay windings to allow the compressor clutch relay contacts to close and the
compressor clutch drive to receive battery voltage. The ECM uses a transistor as a switch to generate an open circuit
in the earth path of the relay windings. When the ECM closes down the earth path, the return spring in the relay will
pull the contacts apart to shut down the compressor clutch drive. Fuse 6, located in the engine compartment fuse box,
provides voltage to the compressor clutch relay switching contacts. The relay windings are supplied with battery
voltage from the main relay, also located in the engine compartment fuse box. The earth path for the relay windings
is via pin 29 of the ECM connector C0658. When the relay is energised the output from the switching contacts is
directly to the compressor clutch.
Cooling fan request
The A/C fan request is an input to the ECM from the ATC ECU to request that the engine's electric cooling fan is
activated to provide additional cooling for the A/C condenser.
The cooling fan relay is located in the engine compartment fuse box and is also controlled by the ECM. It is a four pin
normally open relay. This means that the relay must be energised to drive the cooling fan. The cooling fan is used
especially when the engine is operating at excessively high temperatures. It is also used as a part of the ECM backup
strategy if the ECT sensor fails.
The operation of the cooling fan request is via a switch being connected to earth. Voltage is supplied via pin 23 of
connector C0658 of the ECM, at the point at when the switch is pressed the connection to the earth path is made and
the cooling fan is engaged.
The ECM provides the earth for the cooling fan relay windings to allow the relay contacts to close and the cooling fan
motor to receive battery voltage. The ECM uses a transistor as a switch to generate an open circuit in the earth path
of the relay windings. When the ECM closes down the earth path, the return spring in the relay will pull the contacts
apart to shut down the cooling fan motor drive. Input to the A/C cooling fan relay switching contacts is via fuse 4
located in the engine compartment fuse box. The relay windings are supplied with battery voltage from the main relay,
also located in the engine compartment fuse box. The earth path for the relay windings is via pin 4 of the ECM
connector C0658. When the relay is energised the output from the switching contacts is directly to the cooling fan
motor.
Page 460 of 1672
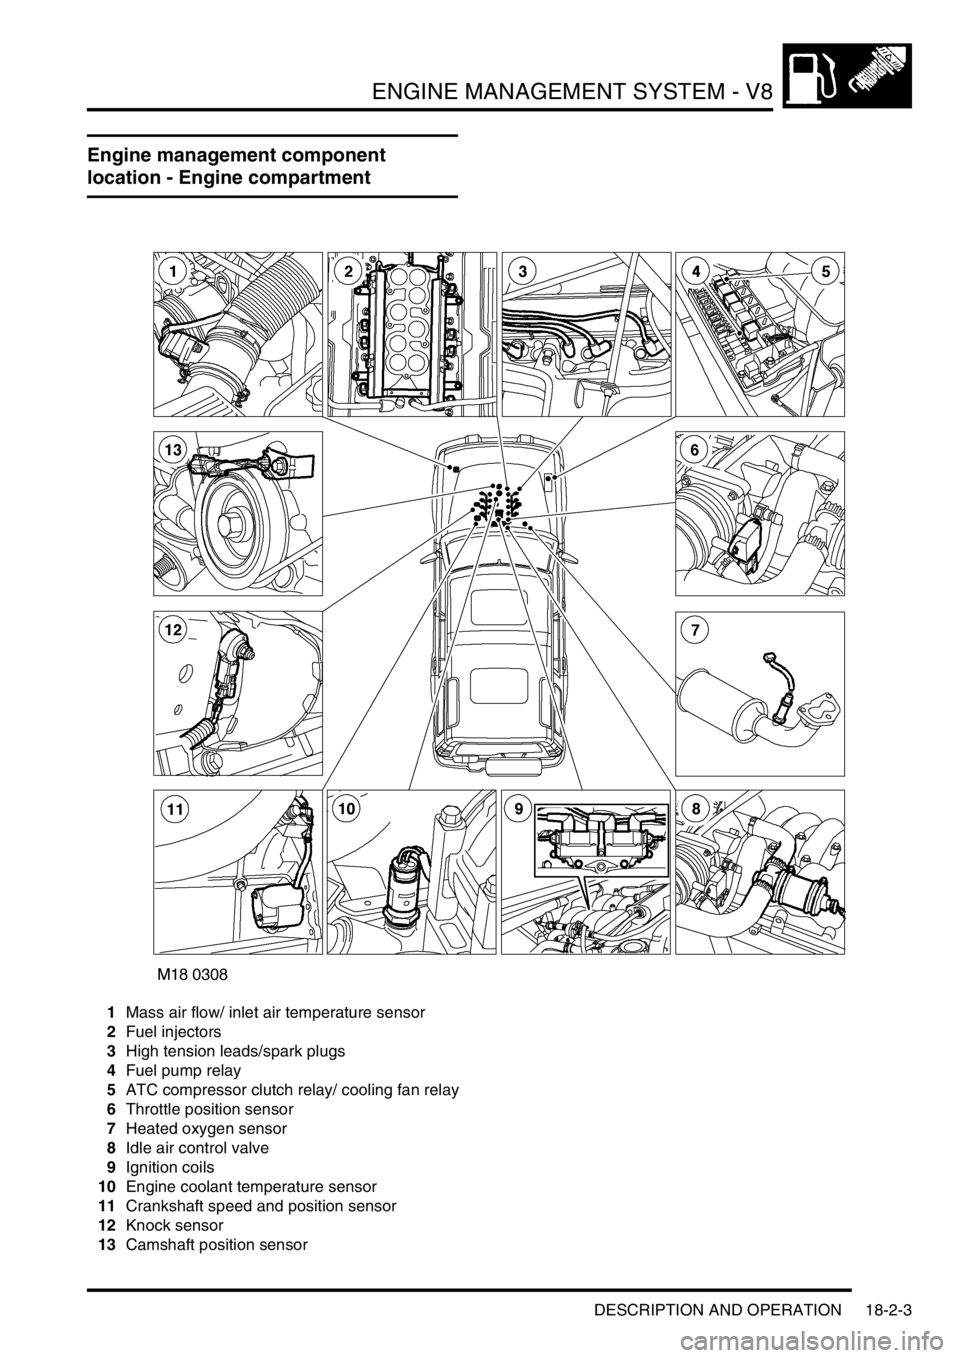
ENGINE MANAGEMENT SYSTEM - V8
DESCRIPTION AND OPERATION 18-2-3
Engine management component
location - Engine compartment
1Mass air flow/ inlet air temperature sensor
2Fuel injectors
3High tension leads/spark plugs
4Fuel pump relay
5ATC compressor clutch relay/ cooling fan relay
6Throttle position sensor
7Heated oxygen sensor
8Idle air control valve
9Ignition coils
10Engine coolant temperature sensor
11Crankshaft speed and position sensor
12Knock sensor
13Camshaft position sensor