ac compre LAND ROVER DISCOVERY 2002 Repair Manual
[x] Cancel search | Manufacturer: LAND ROVER, Model Year: 2002, Model line: DISCOVERY, Model: LAND ROVER DISCOVERY 2002Pages: 1672, PDF Size: 46.1 MB
Page 781 of 1672

TRANSFER BOX - LT230SE
41-48 OVERHAUL
11.Check differential lock selector fork for cracks
and wear.
12.Check selector fork finger width.
lFinger width = 7.92 to 7.97 mm (0.311 to
0.313 in).
13.Check differential lock selector fork clips for
wear and damage. Check spring for distortion
and free length.
lSpring free length = 84.58 mm (3.33 in).
14.Check dog clutch internal teeth and grooves
and teeth on output shaft for wear and
damage. Check selector fork groove width.
lGroove width = 8.05 to 8.20 mm (0.32 to
0.33 in).
15.Carry out the following inspection procedures
for all transfer boxes.
16.Check threads and splines of output shaft for
damage and wear. Check dog clutch teeth on
shaft for wear and damage.17.03 MY onwards: Compress high/low selector
fork spring and remove retaining clips from
each end of spring, remove high/low selector
shaft.
18.Check detent grooves in high/low selector shaft
for wear. Do not remove fork from shaft
unless either component is being renewed.
If fork is removed from shaft, coat the
threads of the set screw with Loctite 290
prior to assembling.
Note: High/low selector shaft fitted to pre 03 MY
illustrated.
Page 788 of 1672
TRANSFER BOX - LT230SE
OVERHAUL 41-55
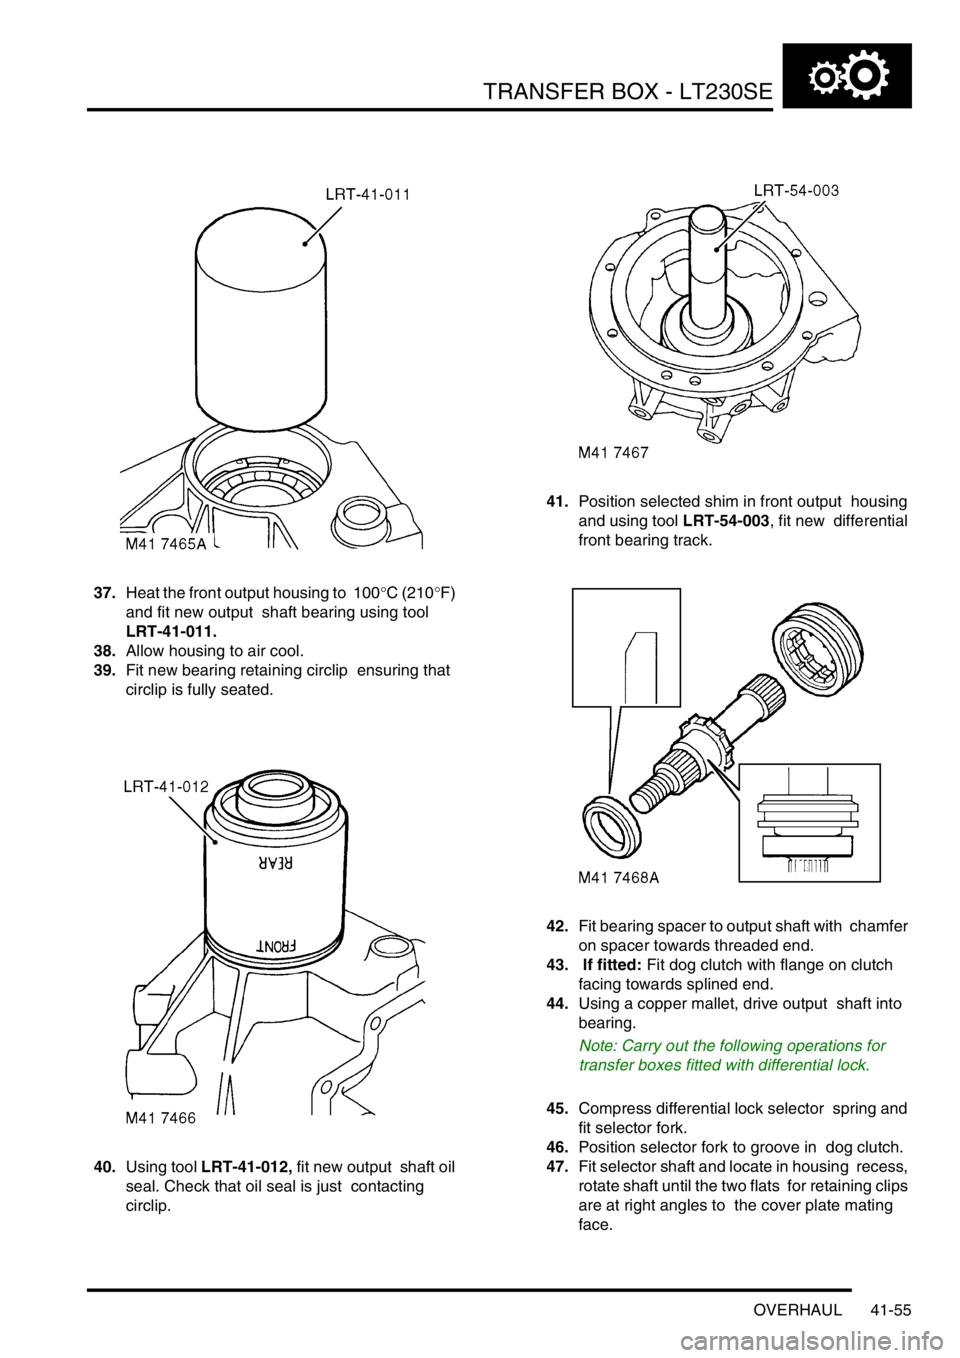
37.Heat the front output housing to 100°C (210°F)
and fit new output shaft bearing using tool
LRT-41-011.
38.Allow housing to air cool.
39.Fit new bearing retaining circlip ensuring that
circlip is fully seated.
40.Using tool LRT-41-012, fit new output shaft oil
seal. Check that oil seal is just contacting
circlip. 41.Position selected shim in front output housing
and using tool LRT-54-003, fit new differential
front bearing track.
42.Fit bearing spacer to output shaft with chamfer
on spacer towards threaded end.
43. If fitted: Fit dog clutch with flange on clutch
facing towards splined end.
44.Using a copper mallet, drive output shaft into
bearing.
Note: Carry out the following operations for
transfer boxes fitted with differential lock.
45.Compress differential lock selector spring and
fit selector fork.
46.Position selector fork to groove in dog clutch.
47.Fit selector shaft and locate in housing recess,
rotate shaft until the two flats for retaining clips
are at right angles to the cover plate mating
face.
Page 789 of 1672
TRANSFER BOX - LT230SE
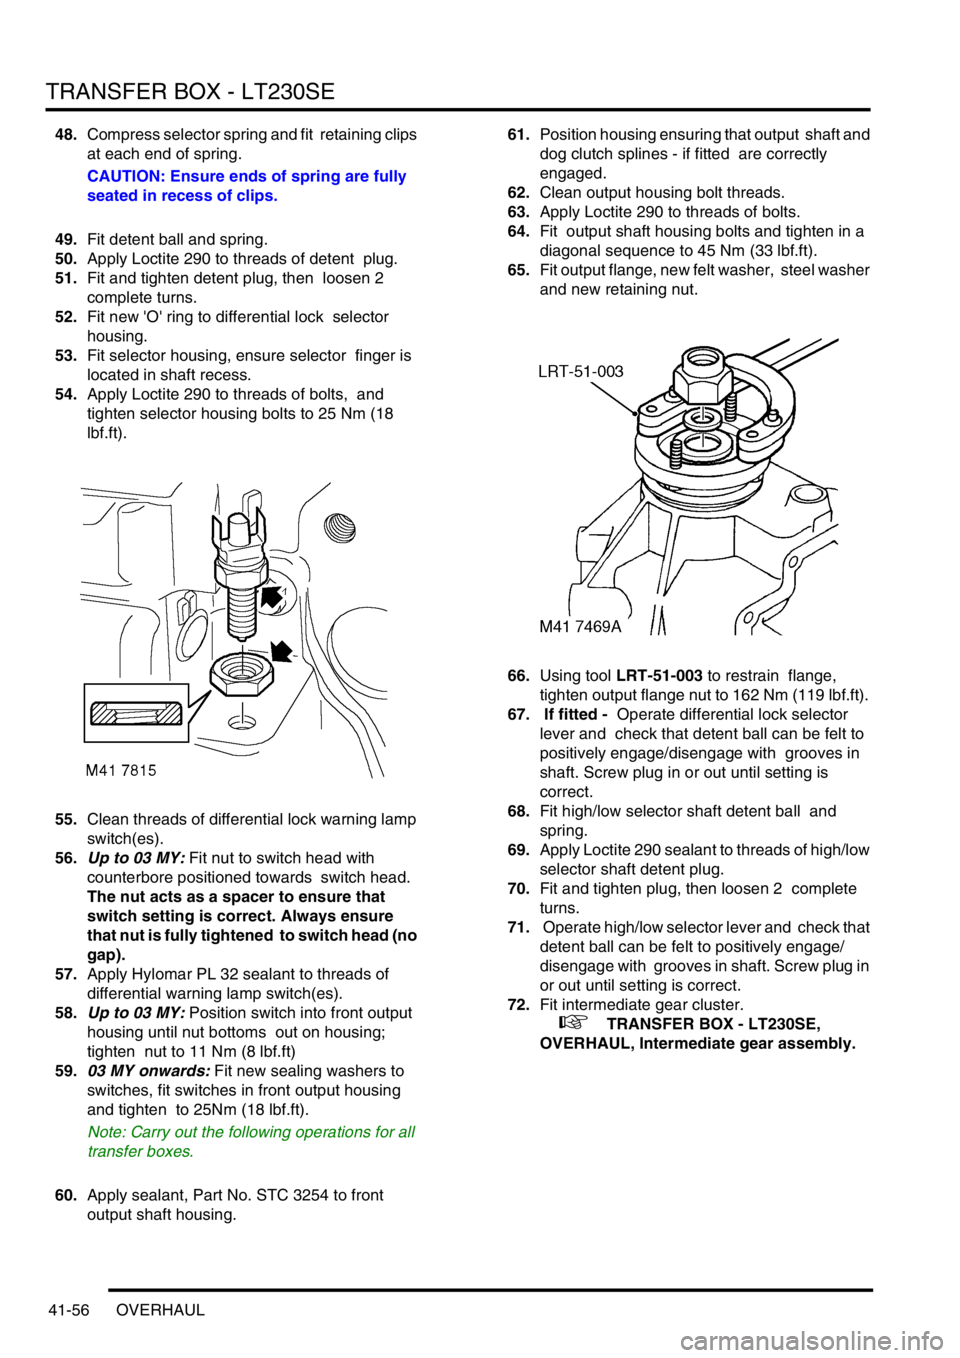
41-56 OVERHAUL
48.Compress selector spring and fit retaining clips
at each end of spring.
CAUTION: Ensure ends of spring are fully
seated in recess of clips.
49.Fit detent ball and spring.
50.Apply Loctite 290 to threads of detent plug.
51.Fit and tighten detent plug, then loosen 2
complete turns.
52.Fit new 'O' ring to differential lock selector
housing.
53.Fit selector housing, ensure selector finger is
located in shaft recess.
54.Apply Loctite 290 to threads of bolts, and
tighten selector housing bolts to 25 Nm (18
lbf.ft).
55.Clean threads of differential lock warning lamp
switch(es).
56.Up to 03 MY: Fit nut to switch head with
counterbore positioned towards switch head.
The nut acts as a spacer to ensure that
switch setting is correct. Always ensure
that nut is fully tightened to switch head (no
gap).
57.Apply Hylomar PL 32 sealant to threads of
differential warning lamp switch(es).
58.Up to 03 MY: Position switch into front output
housing until nut bottoms out on housing;
tighten nut to 11 Nm (8 lbf.ft)
59.03 MY onwards: Fit new sealing washers to
switches, fit switches in front output housing
and tighten to 25Nm (18 lbf.ft).
Note: Carry out the following operations for all
transfer boxes.
60.Apply sealant, Part No. STC 3254 to front
output shaft housing. 61.Position housing ensuring that output shaft and
dog clutch splines - if fitted are correctly
engaged.
62.Clean output housing bolt threads.
63.Apply Loctite 290 to threads of bolts.
64.Fit output shaft housing bolts and tighten in a
diagonal sequence to 45 Nm (33 lbf.ft).
65.Fit output flange, new felt washer, steel washer
and new retaining nut.
66.Using tool LRT-51-003 to restrain flange,
tighten output flange nut to 162 Nm (119 lbf.ft).
67. If fitted - Operate differential lock selector
lever and check that detent ball can be felt to
positively engage/disengage with grooves in
shaft. Screw plug in or out until setting is
correct.
68.Fit high/low selector shaft detent ball and
spring.
69.Apply Loctite 290 sealant to threads of high/low
selector shaft detent plug.
70.Fit and tighten plug, then loosen 2 complete
turns.
71. Operate high/low selector lever and check that
detent ball can be felt to positively engage/
disengage with grooves in shaft. Screw plug in
or out until setting is correct.
72.Fit intermediate gear cluster.
+ TRANSFER BOX - LT230SE,
OVERHAUL, Intermediate gear assembly.
Page 790 of 1672

TRANSFER BOX - LT230SE
OVERHAUL 41-57
Dog clutch - differential lock
$% 41.20.23
Disassembly
1.Remove 6 bolts securing high/low cross shaft
housing to front output shaft housing and
remove housing.
2.Note position of longest bolt and remove 8
bolts securing front output shaft housing to
main casing and remove housing.
3.Remove 3 bolts securing differential lock
selector housing and remove housing. 4.Remove and discard 'O' ring from selector
housing.
5.Remove differential warning lamp switch and
locknut.
Note: Locknut is only fitted to switches up to 03
MY, a modified switch and sealing washer is
fitted from 03 MY onwards..
6.03 MY onwards: Remove differential lock
warning lamp switch from end of front output
shaft housing, discard sealing washer.
7.Remove Allen plug and remove detent spring
and ball.
8.Compress differential lock selector fork spring
and remove retaining clips from each end of
spring.
9.Withdraw differential lock selector shaft from
front output housing, recover spring and
remove selector fork.
Page 791 of 1672
TRANSFER BOX - LT230SE
41-58 OVERHAUL
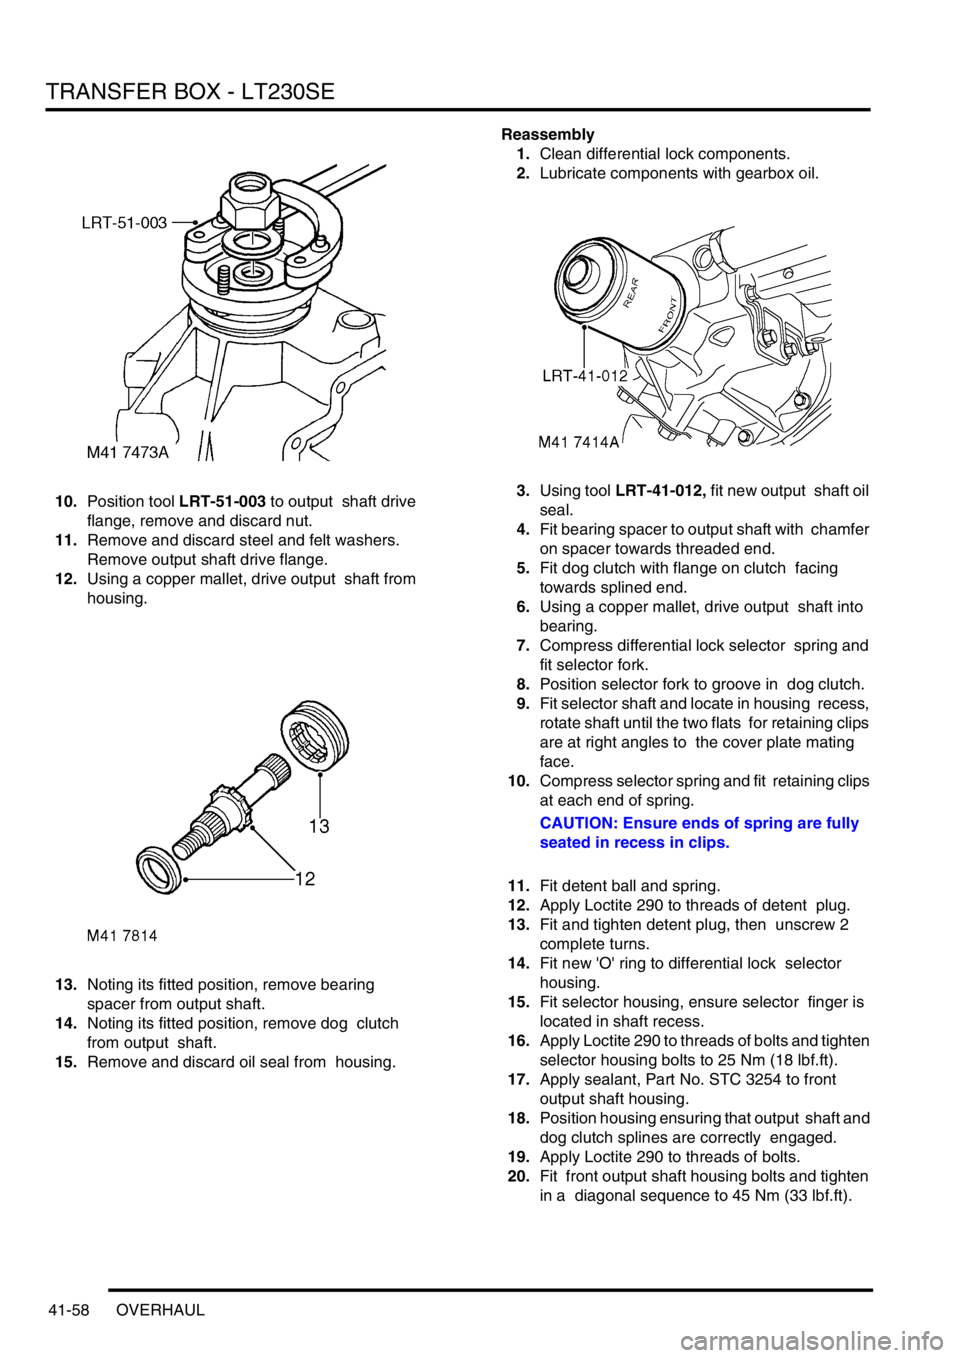
10.Position tool LRT-51-003 to output shaft drive
flange, remove and discard nut.
11.Remove and discard steel and felt washers.
Remove output shaft drive flange.
12.Using a copper mallet, drive output shaft from
housing.
13.Noting its fitted position, remove bearing
spacer from output shaft.
14.Noting its fitted position, remove dog clutch
from output shaft.
15.Remove and discard oil seal from housing. Reassembly
1.Clean differential lock components.
2.Lubricate components with gearbox oil.
3.Using tool LRT-41-012, fit new output shaft oil
seal.
4.Fit bearing spacer to output shaft with chamfer
on spacer towards threaded end.
5.Fit dog clutch with flange on clutch facing
towards splined end.
6.Using a copper mallet, drive output shaft into
bearing.
7.Compress differential lock selector spring and
fit selector fork.
8.Position selector fork to groove in dog clutch.
9.Fit selector shaft and locate in housing recess,
rotate shaft until the two flats for retaining clips
are at right angles to the cover plate mating
face.
10.Compress selector spring and fit retaining clips
at each end of spring.
CAUTION: Ensure ends of spring are fully
seated in recess in clips.
11.Fit detent ball and spring.
12.Apply Loctite 290 to threads of detent plug.
13.Fit and tighten detent plug, then unscrew 2
complete turns.
14.Fit new 'O' ring to differential lock selector
housing.
15.Fit selector housing, ensure selector finger is
located in shaft recess.
16.Apply Loctite 290 to threads of bolts and tighten
selector housing bolts to 25 Nm (18 lbf.ft).
17.Apply sealant, Part No. STC 3254 to front
output shaft housing.
18.Position housing ensuring that output shaft and
dog clutch splines are correctly engaged.
19.Apply Loctite 290 to threads of bolts.
20.Fit front output shaft housing bolts and tighten
in a diagonal sequence to 45 Nm (33 lbf.ft).
Page 884 of 1672
FRONT AXLE
REPAIRS 54-11
Constant velocity joint - drive shaft
$% 54.20.21
Remove
1.Remove wheel hub.
+ FRONT SUSPENSION, REPAIRS,
Wheel hub.
2.Place drive shaft in vice.
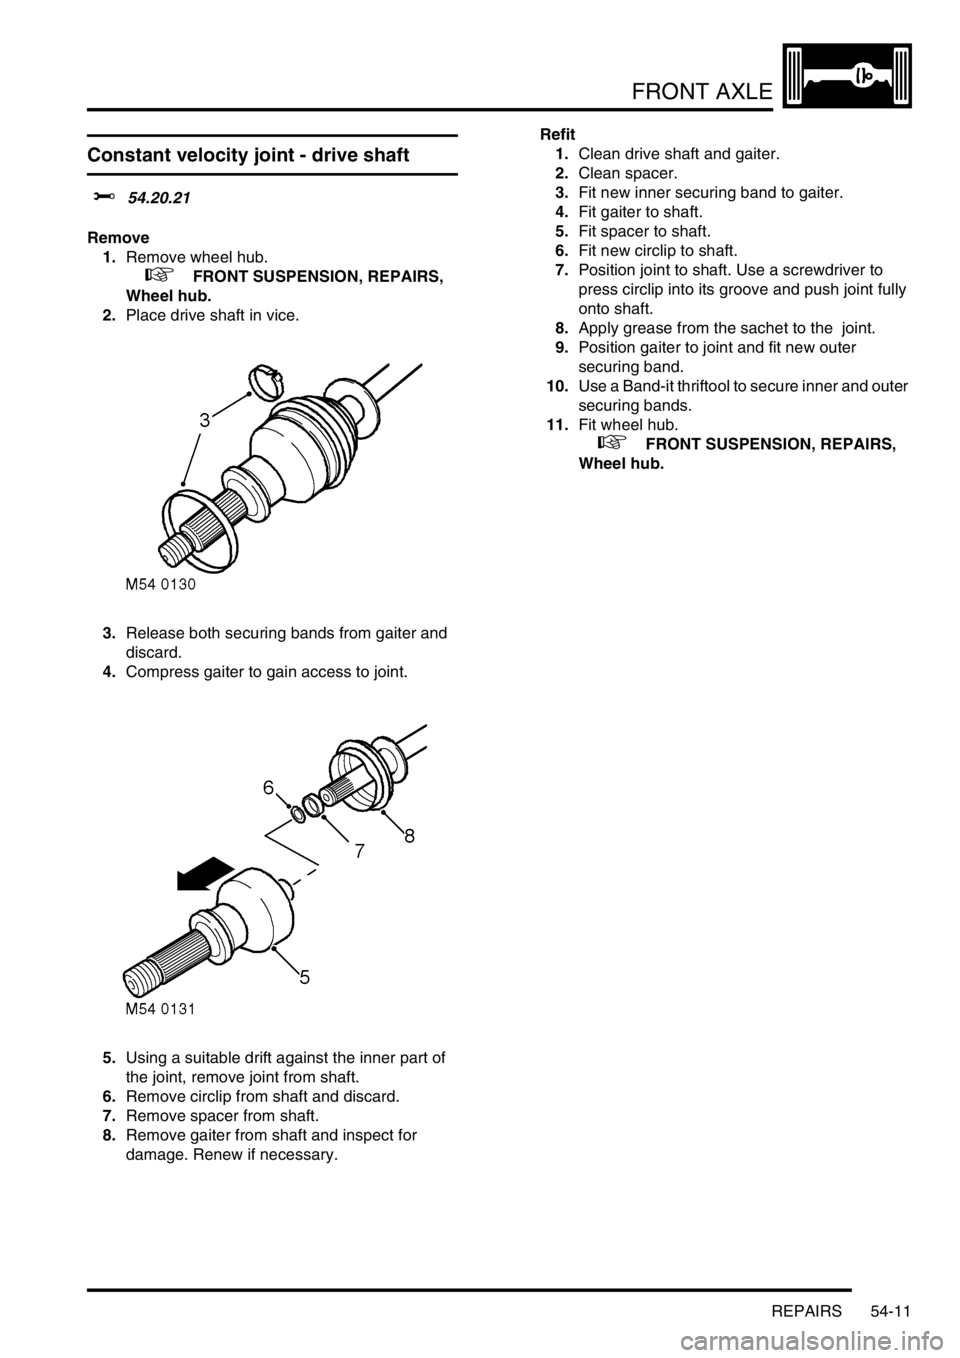
3.Release both securing bands from gaiter and
discard.
4.Compress gaiter to gain access to joint.
5.Using a suitable drift against the inner part of
the joint, remove joint from shaft.
6.Remove circlip from shaft and discard.
7.Remove spacer from shaft.
8.Remove gaiter from shaft and inspect for
damage. Renew if necessary. Refit
1.Clean drive shaft and gaiter.
2.Clean spacer.
3.Fit new inner securing band to gaiter.
4.Fit gaiter to shaft.
5.Fit spacer to shaft.
6.Fit new circlip to shaft.
7.Position joint to shaft. Use a screwdriver to
press circlip into its groove and push joint fully
onto shaft.
8.Apply grease from the sachet to the joint.
9.Position gaiter to joint and fit new outer
securing band.
10.Use a Band-it thriftool to secure inner and outer
securing bands.
11.Fit wheel hub.
+ FRONT SUSPENSION, REPAIRS,
Wheel hub.
Page 893 of 1672

STEERING
57-6 DESCRIPTION AND OPERATION
Tilt adjustment
The column tilt adjuster lever mechanism is located on the LH side of the steering column and allows the upper column
tube, nacelle and steering wheel assemblies to be tilted up or down a maximum of 7.5
° or 47 mm (NAS vehicles have
a smaller range of movement than the ROW vehicles).
The pawl of the mechanism is attached to the lower column and is allowed to pivot, a toothed quadrant is fixed to the
upper column tube.
When the lever on the LH side of the steering column is raised the mechanism releases the pawl from the toothed
quadrant, this allows the column to be moved. When the lever is released two return springs pull the pawl into
engagement with the toothed quadrant.
Steering column lock (All except NAS)
The steering column lock houses the ignition switch, ignition illumination light ring, key lock barrel and the alarm
passive coil. The steering lock is attached to the upper column with two shear bolts. The bolts are tightened to a
torque which shears off the heads of the bolts preventing easy removal of the steering lock.
The steering lock operates by a bolt, which emerges when the ignition key is turned to position 'O' and the ignition key
removed. The bolt engages in a lock collar located on the upper shaft in the upper column tube. The lock collar is
attached to the upper shaft by a 'wave form' interference ring. If a high torque is applied via the steering wheel with
the lock engaged, the lock collar will slip on the upper shaft. This prevents damage to the steering lock, yet still
prevents the vehicle from being driven.
Steering column lock (NAS only)
The steering column lock houses the ignition switch, ignition illumination light ring, key lock barrel and the alarm
passive coil. The steering lock is attached to the upper column with two shear bolts. The bolts are tightened to a
torque which shears off the heads of the bolts preventing easy removal of the steering lock.
The steering column lock operates by a bolt, which emerges when the ignition key is turned to position 'O' and the
ignition key removed. The bolt engages in a groove machined into the upper shaft in the column tube.
Steering wheel
The steering wheel comprises a cast centre and wire frame onto which the soft polyurethane foam is moulded. The
steering wheel is located on the upper column shaft by a spline and is secured with a nut. A remote radio control switch
(if fitted) is located on the LH side of the steering wheel, a cruise control switch may be located on the RH side. Horn
switches are located on each side of the centre of the steering wheel and protrude through the airbag module cover.
Both switches are connected by wires to the rotary coupler connector.
Intermediate shaft
One end of the intermediate shaft is attached to the steering column lower shaft by a splined universal joint and a bolt,
the universal joint is part of a rubber coupling assembly. The rubber coupling assembly is covered by a heat shield
and connects to the lower section of the intermediate shaft via a decouple joint. The rubber coupling reduces the
shocks felt by the driver through the steering wheel. A second universal joint on the other end of the intermediate shaft
is held in by a bolt. The universal joint is splined and engages with the splined rotor (input) shaft of the steering box.
The decouple joint consists of a metal plate that has open ended slots, the plate is bolted through the slots into the
other half of the decouple joint. The top half of the decouple joint has a slot that accepts the lower section of the
intermediate shaft. The slotted metal plate clamps the lower section of the intermediate shaft to the top section. An
indicator clip is installed between the slotted metal plate and the top half of the decouple joint.
If the intermediate shaft is compressed in an accident, the slotted metal plate in the decouple joint will disengage if
sufficient force is applied to the front end of the shaft. If the forces involved do not disengage the shaft, the red
indicator clip located in the decouple joint will break off if the shaft moves. The intermediate shaft cannot be repaired
and must be replaced as an assembly if accident damage occurs.
Page 927 of 1672

STEERING
57-40 REPAIRS
5. Models with A/C: Disconnect A/C compressor
multiplug. Remove 4 bolts securing A/C
compressor, release compressor and position
aside.
6.Remove 3 bolts securing PAS pump pulley and
remove pulley.
7.Position tray to catch spillage, release PAS
pump pressure pipe.
8.Remove clip and release PAS pump inlet hose.
CAUTION: Always fit plugs to open
connections to prevent contamination.9.Remove jockey pulley.
10.Remove bolt securing oil cooling pipe bracket
and release bracket from housing.
11.Remove two bolts securing PAS pump.
12.Remove 4 bolts and one nut securing auxiliary
housing. Pull housing forward and release
PAS pump. Remove PAS pump.
Page 928 of 1672
STEERING
REPAIRS 57-41
Refit
1.Position PAS pump to auxiliary housing and
locate housing to engine. Fit and tighten
auxiliary housing bolts to 40 Nm (30 lbf.ft).
2.Tighten auxiliary housing nut to 10 Nm (7 lbf.ft).
3.Fit bolts securing PAS pump and tighten to 22
Nm (16 lbf.ft).
4.Position PAS pump pipe bracket, fit and tighten
bolt to 22 Nm (16 lbf.ft).
5.Fit and tighten PAS pump pressure pipe.
6.Fit PAS pump inlet hose and secure with clip.
7.Position jockey pulley and tighten bolt to 50 Nm
(37 lbf.ft).
8.Clean PAS pump pulley mating faces.
9.Position PAS pump pulley, fit bolts and tighten
to 22 Nm (16 lbf.ft).
10. Models with ACE: Clean ACE pump dowels
and dowel holes. Position ACE pump, fit bolts
and tighten to 25 Nm (18 lbf.ft).
11. Models with A/C: Clean A/C compressor
dowels and dowel holes. Position A/C
compressor, fit bolts and tighten to 22 Nm (16
lbf.ft).
12.Position air intake hose and secure with clips.
13.Secure harness to air intake hose with new
cable tie.
14.Fit auxiliary drive belt.
+ CHARGING AND STARTING,
REPAIRS, Belt - auxiliary drive..
15.Bleed PAS system.
+ STEERING, ADJUSTMENTS,
Hydraulic system - bleed.
Pump - power steering - diesel
$% 57.20.14
Remove
1.Remove auxiliary drive belt.
+ CHARGING AND STARTING,
REPAIRS, Belt - auxiliary drive.
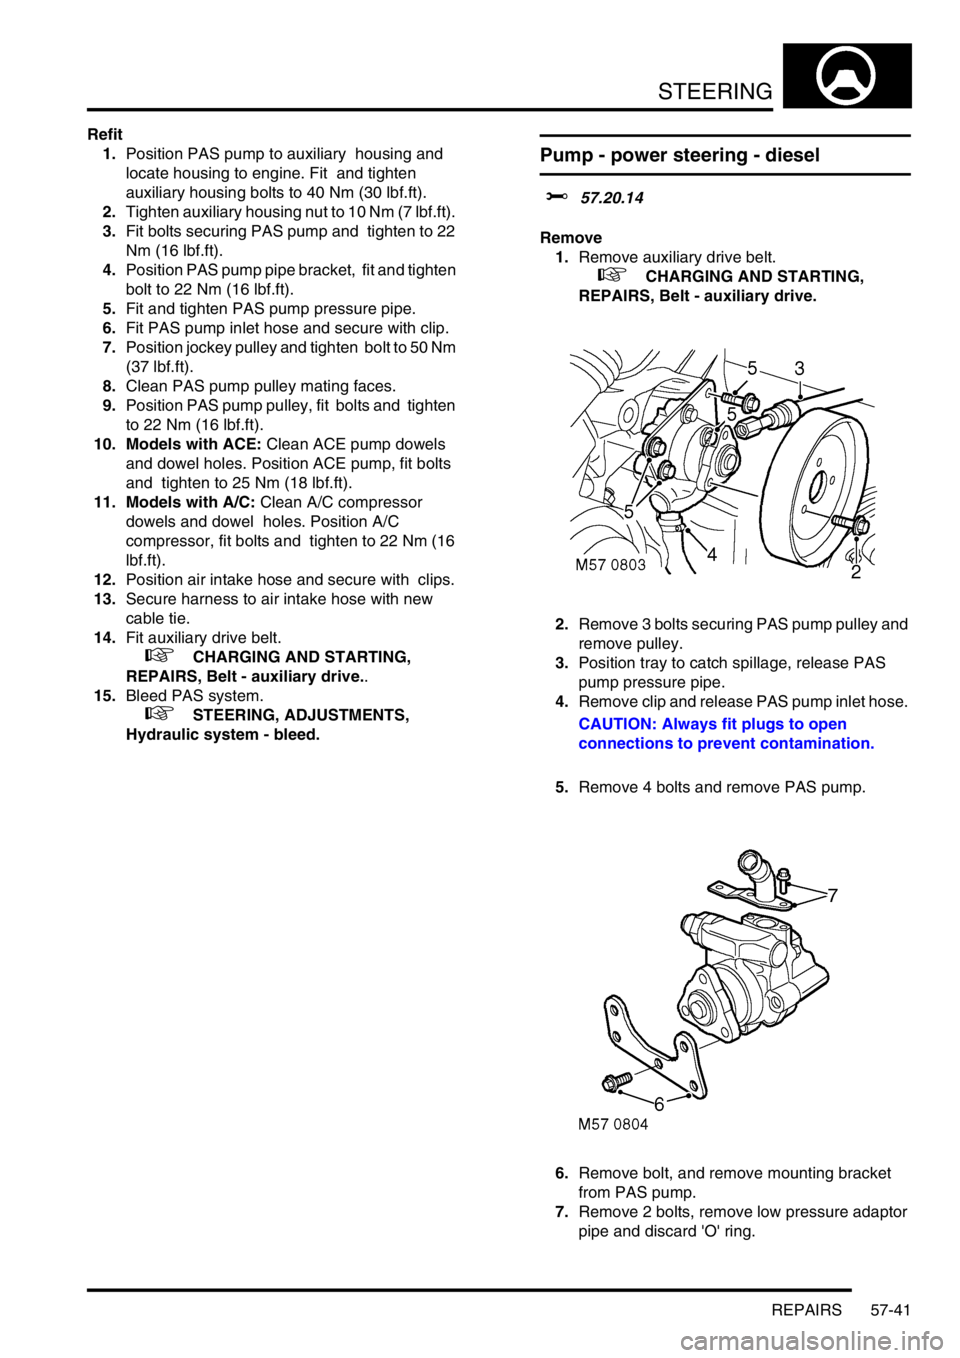
2.Remove 3 bolts securing PAS pump pulley and
remove pulley.
3.Position tray to catch spillage, release PAS
pump pressure pipe.
4.Remove clip and release PAS pump inlet hose.
CAUTION: Always fit plugs to open
connections to prevent contamination.
5.Remove 4 bolts and remove PAS pump.
6.Remove bolt, and remove mounting bracket
from PAS pump.
7.Remove 2 bolts, remove low pressure adaptor
pipe and discard 'O' ring.
Page 938 of 1672
STEERING
REPAIRS 57-51
Damper - steering
$% 57.55.21
Remove
1.Raise front of vehicle.
WARNING: Do not work on or under a
vehicle supported only by a jack. Always
support the vehicle on safety stands.
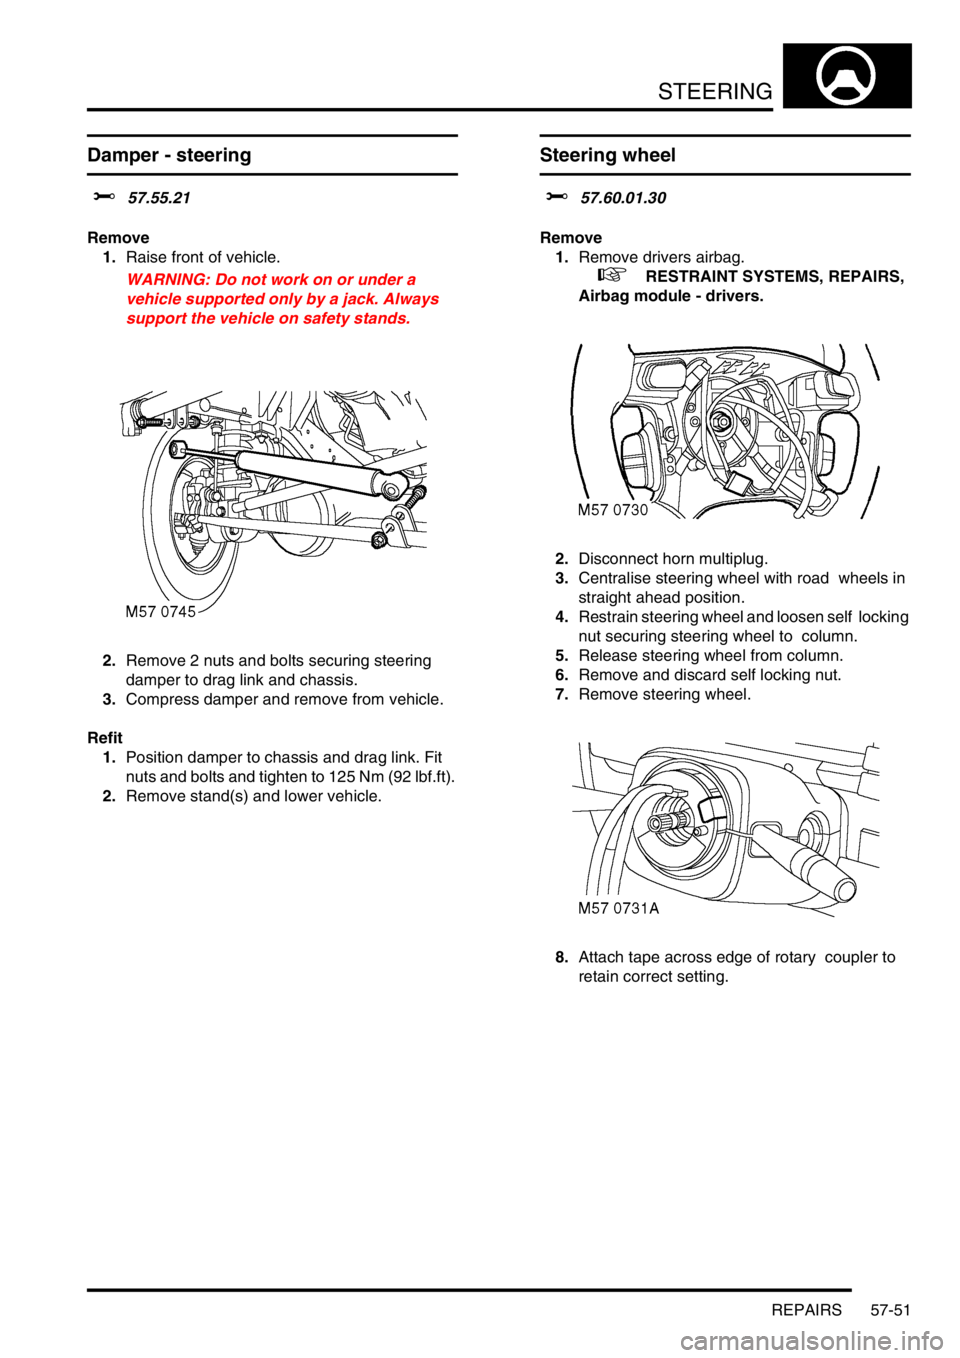
2.Remove 2 nuts and bolts securing steering
damper to drag link and chassis.
3.Compress damper and remove from vehicle.
Refit
1.Position damper to chassis and drag link. Fit
nuts and bolts and tighten to 125 Nm (92 lbf.ft).
2.Remove stand(s) and lower vehicle.
Steering wheel
$% 57.60.01.30
Remove
1.Remove drivers airbag.
+ RESTRAINT SYSTEMS, REPAIRS,
Airbag module - drivers.
2.Disconnect horn multiplug.
3.Centralise steering wheel with road wheels in
straight ahead position.
4.Restrain steering wheel and loosen self locking
nut securing steering wheel to column.
5.Release steering wheel from column.
6.Remove and discard self locking nut.
7.Remove steering wheel.
8.Attach tape across edge of rotary coupler to
retain correct setting.