charging LAND ROVER DISCOVERY 2002 Repair Manual
[x] Cancel search | Manufacturer: LAND ROVER, Model Year: 2002, Model line: DISCOVERY, Model: LAND ROVER DISCOVERY 2002Pages: 1672, PDF Size: 46.1 MB
Page 1416 of 1672

AIR CONDITIONING
REPAIRS 82-43
6.Loosen TXV pipe unions, release pipes and
remove TXV.
7.Remove and discard 'O' rings.
Refit
1.Lubricate new 'O' rings with clean refrigerant oil
and fit to TXV pipes.
2.Position TXV, align pipes and tighten unions.
3.Connect sensor and secure with clip.
4.Fit insulation to TXV valve and sensor.
5.Position seat support bracket, fit bolts and
tighten to 24 Nm (18 lbf.ft)
6.Repressurise air conditioning system.
+ AIR CONDITIONING, REFRIGERANT
RECOVERY, RECYCLING AND
RECHARGING, Refrigerant recovery,
recycling and recharging.
7.Fit rear lower trim casing .
+ INTERIOR TRIM COMPONENTS,
REPAIRS, Trim casing - side - loadspace.
Evaporator - rear
$% 82.26.20
Remove
1.Remove evaporator assembly.
+ AIR CONDITIONING, REPAIRS,
Evaporator and motor assembly - rear.
2.Remove insulation from TXV.
3.Release relay from support bracket.
4.Remove ducting seal.
5.Remove 4 screws securing lower part of
casing, release and remove lower casing.
Page 1417 of 1672
AIR CONDITIONING
82-44REPAIRS
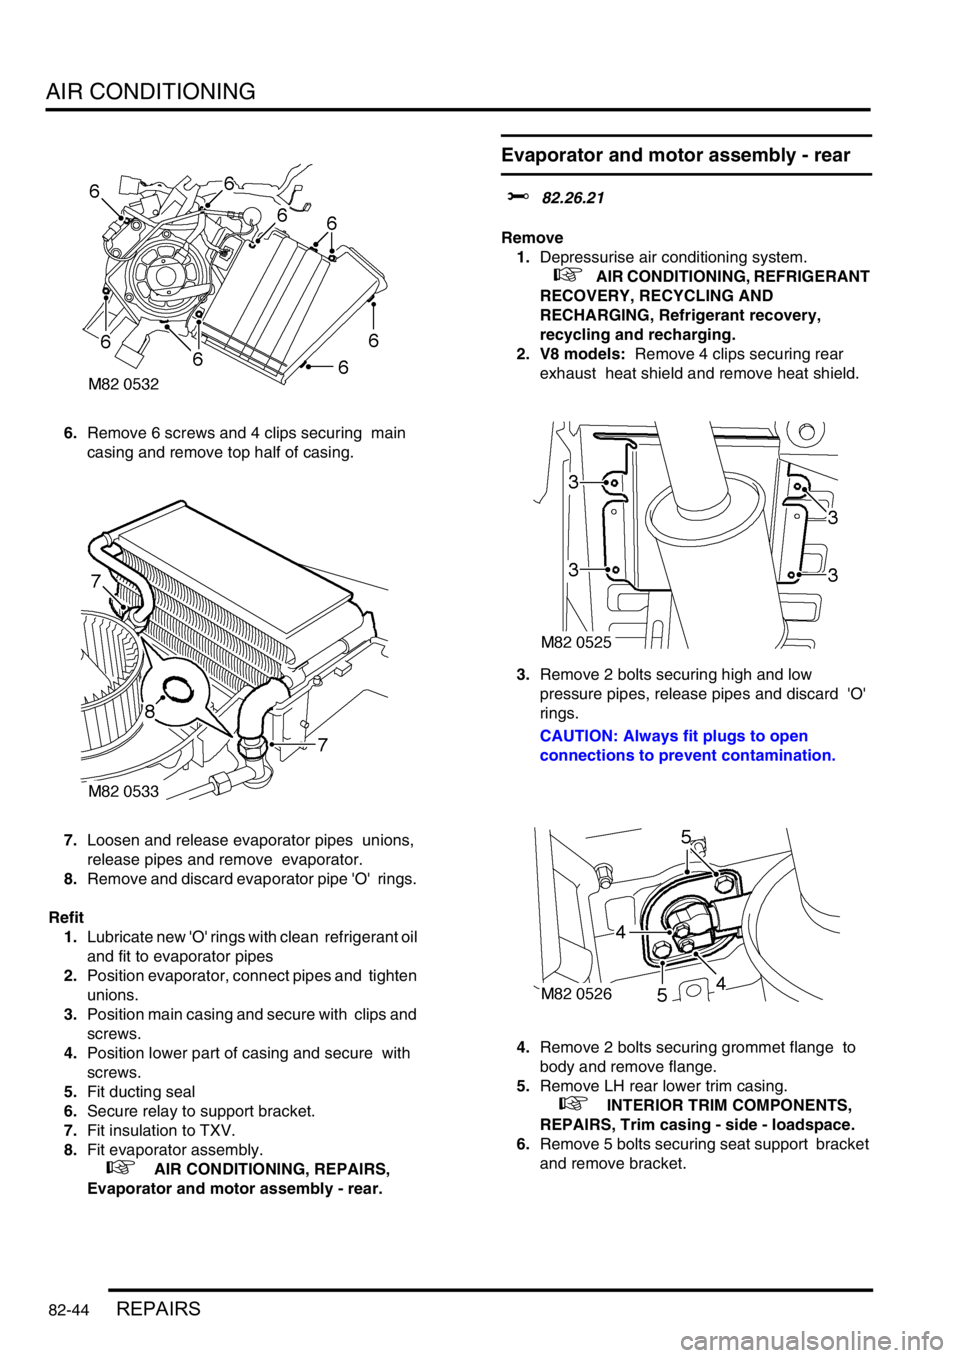
6.Remove 6 screws and 4 clips securing main
casing and remove top half of casing.
7.Loosen and release evaporator pipes unions,
release pipes and remove evaporator.
8.Remove and discard evaporator pipe 'O' rings.
Refit
1.Lubricate new 'O' rings with clean refrigerant oil
and fit to evaporator pipes
2.Position evaporator, connect pipes and tighten
unions.
3.Position main casing and secure with clips and
screws.
4.Position lower part of casing and secure with
screws.
5.Fit ducting seal
6.Secure relay to support bracket.
7.Fit insulation to TXV.
8.Fit evaporator assembly.
+ AIR CONDITIONING, REPAIRS,
Evaporator and motor assembly - rear.
Evaporator and motor assembly - rear
$% 82.26.21
Remove
1.Depressurise air conditioning system.
+ AIR CONDITIONING, REFRIGERANT
RECOVERY, RECYCLING AND
RECHARGING, Refrigerant recovery,
recycling and recharging.
2. V8 models: Remove 4 clips securing rear
exhaust heat shield and remove heat shield.
3.Remove 2 bolts securing high and low
pressure pipes, release pipes and discard 'O'
rings.
CAUTION: Always fit plugs to open
connections to prevent contamination.
4.Remove 2 bolts securing grommet flange to
body and remove flange.
5.Remove LH rear lower trim casing.
+ INTERIOR TRIM COMPONENTS,
REPAIRS, Trim casing - side - loadspace.
6.Remove 5 bolts securing seat support bracket
and remove bracket.
Page 1418 of 1672
AIR CONDITIONING
REPAIRS 82-45
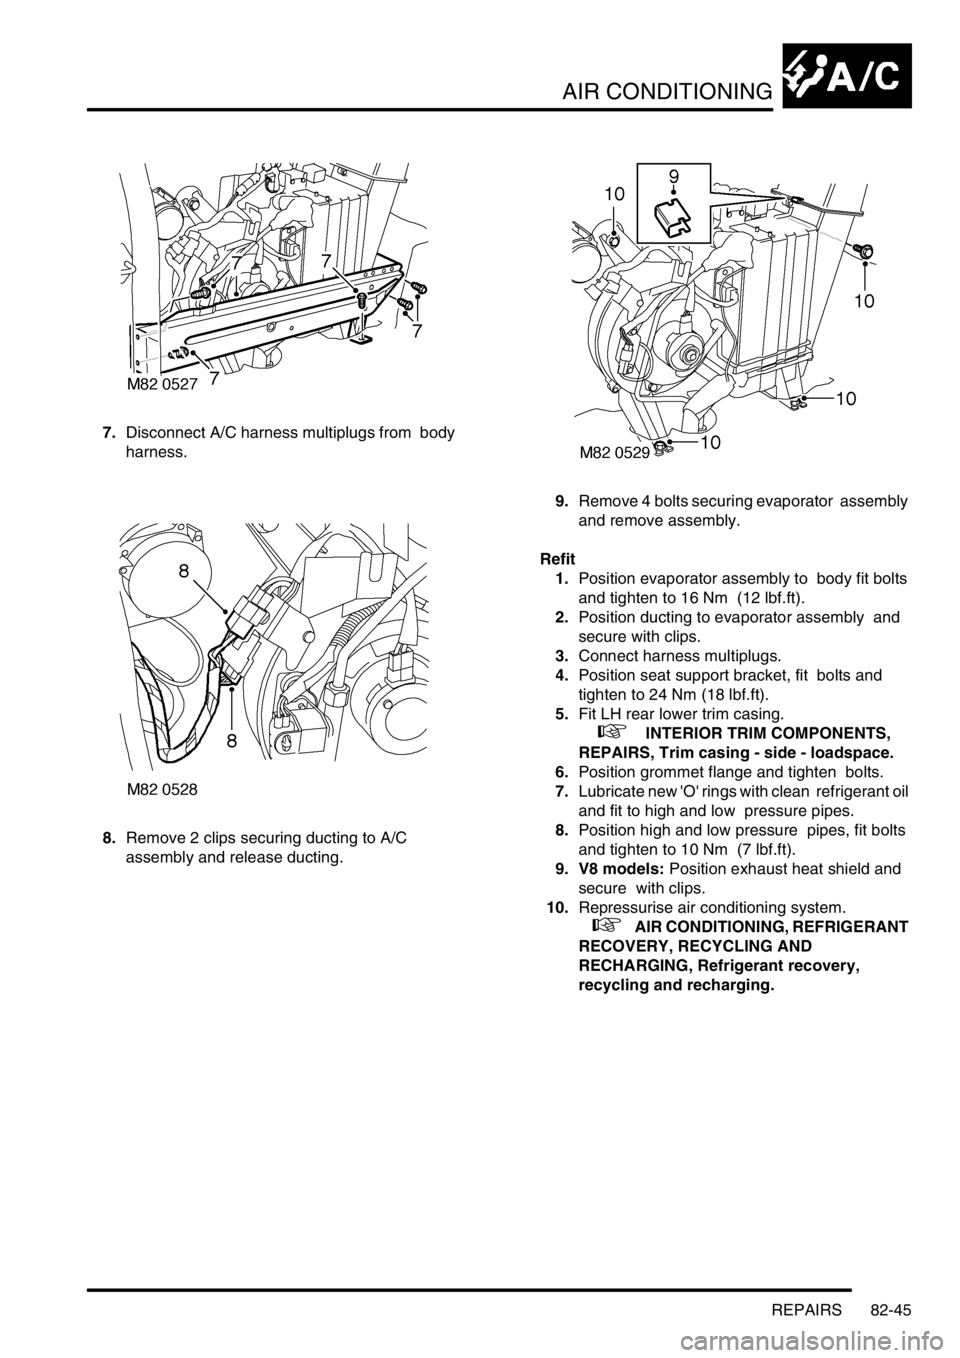
7.Disconnect A/C harness multiplugs from body
harness.
8.Remove 2 clips securing ducting to A/C
assembly and release ducting. 9.Remove 4 bolts securing evaporator assembly
and remove assembly.
Refit
1.Position evaporator assembly to body fit bolts
and tighten to 16 Nm (12 lbf.ft).
2.Position ducting to evaporator assembly and
secure with clips.
3.Connect harness multiplugs.
4.Position seat support bracket, fit bolts and
tighten to 24 Nm (18 lbf.ft).
5.Fit LH rear lower trim casing.
+ INTERIOR TRIM COMPONENTS,
REPAIRS, Trim casing - side - loadspace.
6.Position grommet flange and tighten bolts.
7.Lubricate new 'O' rings with clean refrigerant oil
and fit to high and low pressure pipes.
8.Position high and low pressure pipes, fit bolts
and tighten to 10 Nm (7 lbf.ft).
9. V8 models: Position exhaust heat shield and
secure with clips.
10.Repressurise air conditioning system.
+ AIR CONDITIONING, REFRIGERANT
RECOVERY, RECYCLING AND
RECHARGING, Refrigerant recovery,
recycling and recharging.
Page 1450 of 1672

CHARGING AND STARTING
REPAIRS 86-1-1
CHARGING AND STARTING REPAIRS
Alternator - diesel
$% 86.10.02
Remove
1.Remove auxiliary drive belt.
+ CHARGING AND STARTING,
REPAIRS, Belt - auxiliary drive.
2.Release cover and remove nut securing lead
to alternator.
3.Disconnect alternator multiplug.
4.Remove bolt (LH thread) and remove auxiliary
drive belt tensioner. 5.Remove bolt securing support stay to
alternator.
6.Release clip and disconnect oil drain hose from
vacuum pump.
7.Disconnect vacuum pump oil supply pipe from
cylinder head and discard 'O' ring.
8.Remove bolt securing alternator and release
from mounting bracket.
9.Disconnect vacuum hose from vacuum pump.
10.Remove alternator. Take care not to damage
radiator cooling fins.
11.Remove 4 bolts, and remove vacuum pump
from alternator.
CAUTION: Always fit plugs to open
connections to prevent contamination.
Page 1451 of 1672
CHARGING AND STARTING
86-1-2 REPAIRS
Refit
1.Clean mating faces of alternator and vacuum
pump.
2.Fit vacuum pump to alternator and tighten
bolts to 8 Nm (6 lbf.ft).
3.Position alternator to engine and connect
multiplug.
4.Connect vacuum hose and oil drain hose to
vacuum pump and secure clips.
5.With assistance align alternator to mounting
bracket and fit but do not tighten bolt.
6.Fit bolt securing support stay to alternator and
tighten to 25 Nm (18 lbf.ft) .
7.Tighten bolt securing alternator to mounting
bracket to 45 Nm (33 lbf.ft).
8.Using new 'O' ring, connect oil supply pipe to
cylinder head and tighten to 10 Nm (7 lbf.ft).
9.Connect lead to alternator and tighten nut to 6
Nm (4.4 lbf.ft).
10.Fit auxiliary drive belt tensioner and tighten bolt
to 50 Nm (37 lbf.ft).
11.Fit auxiliary drive belt.
+ CHARGING AND STARTING,
REPAIRS, Belt - auxiliary drive.
Alternator - V8
$% 86.10.02
Remove
1.Remove auxiliary drive belt.
+ CHARGING AND STARTING,
REPAIRS, Belt - auxiliary drive.
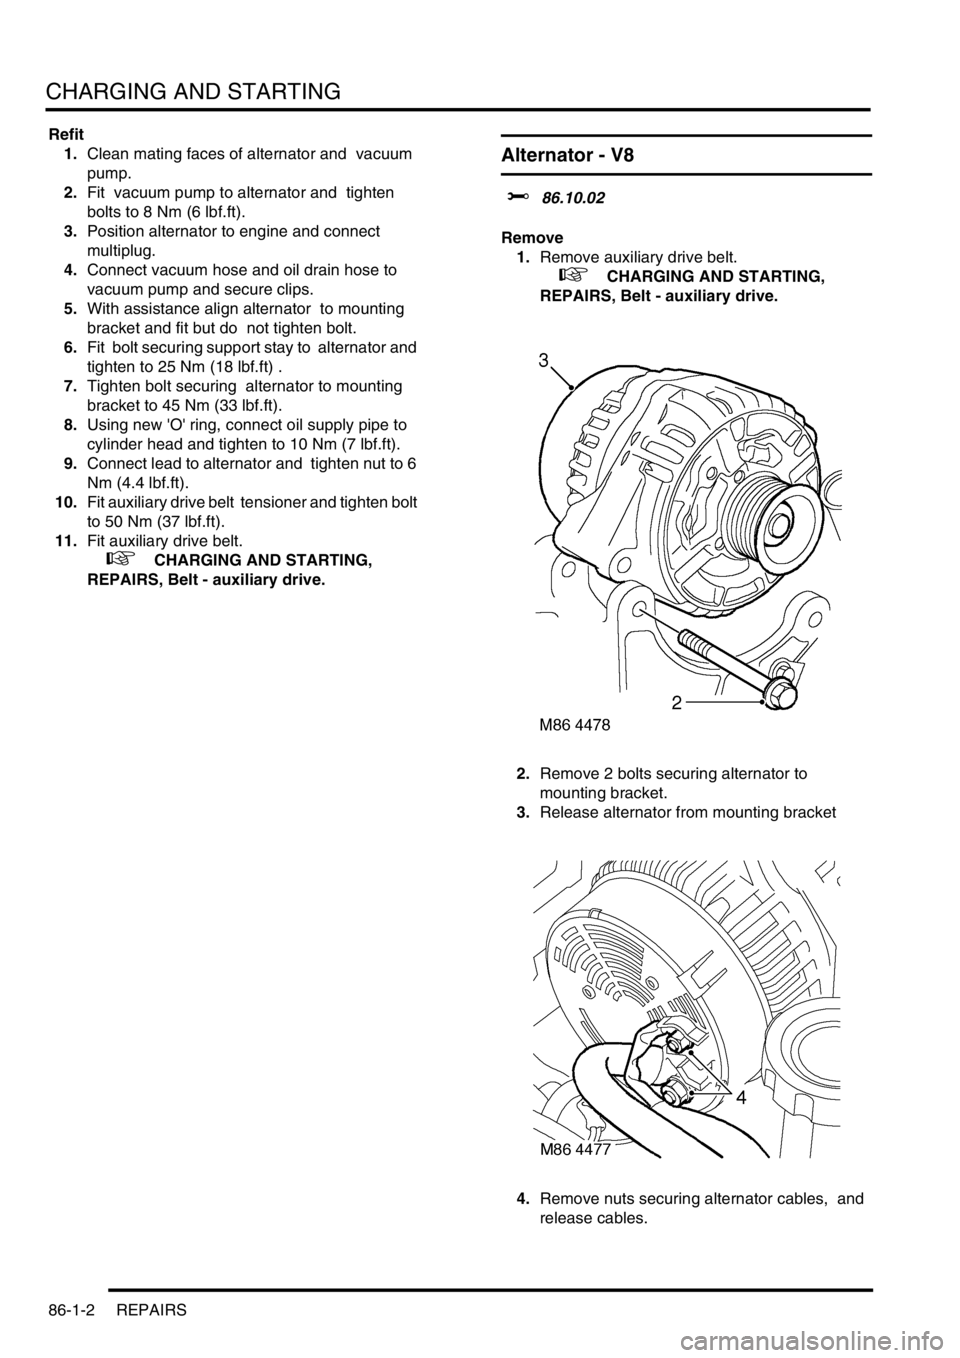
2.Remove 2 bolts securing alternator to
mounting bracket.
3.Release alternator from mounting bracket
4.Remove nuts securing alternator cables, and
release cables.
Page 1452 of 1672

CHARGING AND STARTING
REPAIRS 86-1-3
5.Remove alternator from mounting bracket.
6.Remove pulley from alternator.
Refit
1.Fit alternator pulley and tighten nut to 80 Nm
(59 lbf.ft).
2.Position alternator to mounting bracket.
3.Connect alternator cables and tighten B+ nut to
18 Nm (13 lbf.ft), and D+ nut to 5 Nm (3.7 lbf.ft).
4.Locate alternator in mounting bracket.
5.Fit alternator mounting bolts and tighten to 45
Nm (33 lbf.ft).
6.Fit auxiliary drive belt.
+ CHARGING AND STARTING,
REPAIRS, Belt - auxiliary drive.
Belt - auxiliary drive
$% 86.10.03
Remove
1.Remove viscous fan:
l
+ COOLING SYSTEM - V8,
REPAIRS, Fan - viscous.
l
+ COOLING SYSTEM - Td5,
REPAIRS, Fan - viscous.
2.Turn drive belt tensioner using a 15 mm ring
spanner and release belt from pulleys.
Refit
1.Clean drive belt pulley grooves and ensure
grooves are not damaged.
2.Fit new drive belt around pulleys, ensure belt is
correctly aligned in pulley grooves.
3.With assistance, hold tensioner fully clockwise
and fit drive belt around remaining pulley.
Release tensioner.
4.Fit viscous fan:
l
+ COOLING SYSTEM - Td5,
REPAIRS, Fan - viscous.
l
+ COOLING SYSTEM - V8,
REPAIRS, Fan - viscous.
Page 1453 of 1672
CHARGING AND STARTING
86-1-4 REPAIRS
Battery
$% 86.15.01
Remove
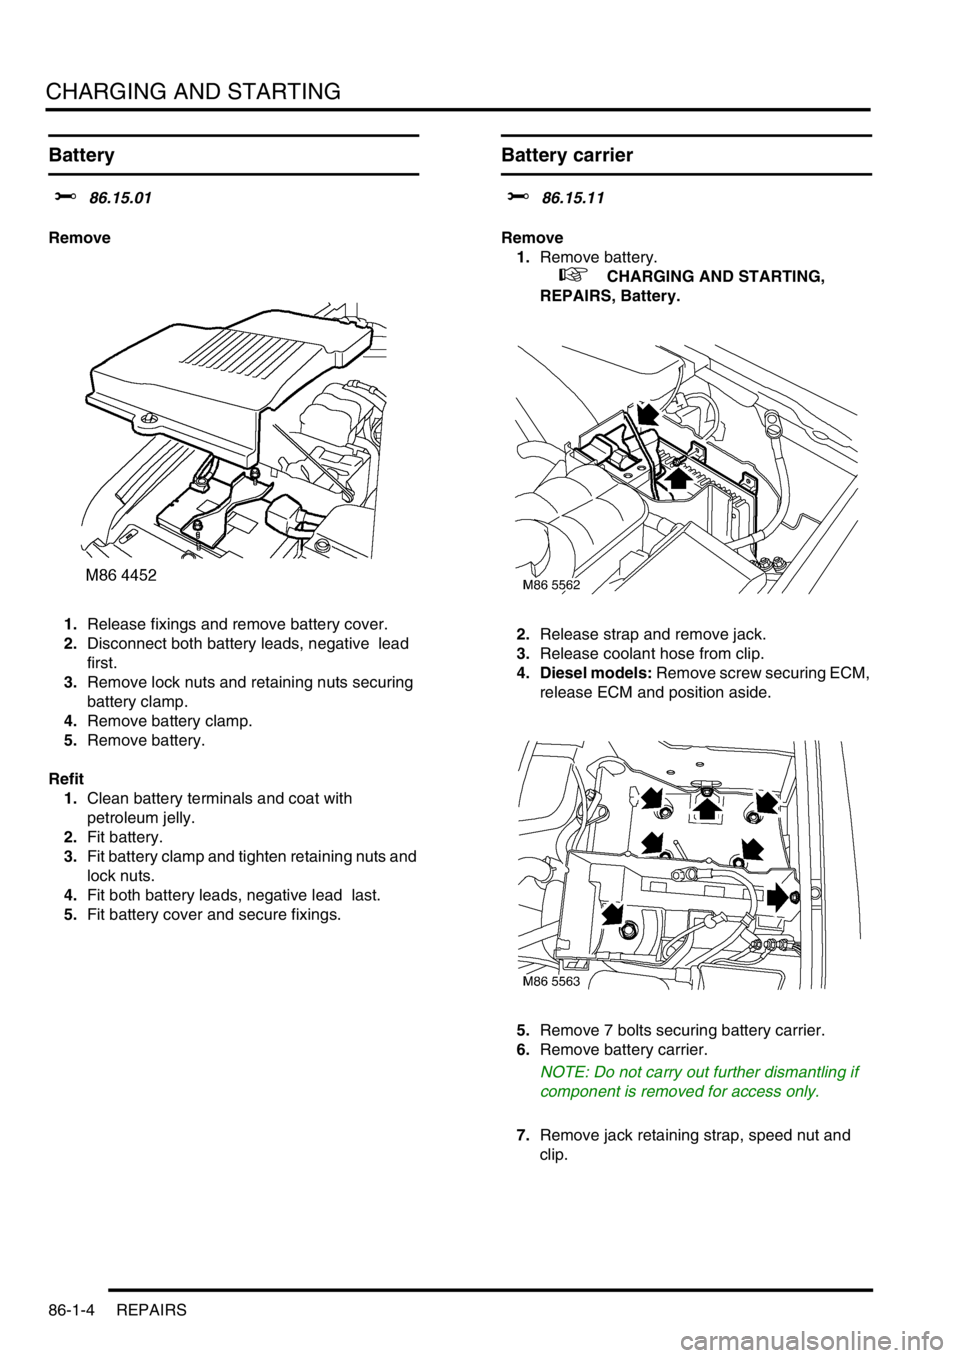
1.Release fixings and remove battery cover.
2.Disconnect both battery leads, negative lead
first.
3.Remove lock nuts and retaining nuts securing
battery clamp.
4.Remove battery clamp.
5.Remove battery.
Refit
1.Clean battery terminals and coat with
petroleum jelly.
2.Fit battery.
3.Fit battery clamp and tighten retaining nuts and
lock nuts.
4.Fit both battery leads, negative lead last.
5.Fit battery cover and secure fixings.
Battery carrier
$% 86.15.11
Remove
1.Remove battery.
+ CHARGING AND STARTING,
REPAIRS, Battery.
2.Release strap and remove jack.
3.Release coolant hose from clip.
4. Diesel models: Remove screw securing ECM,
release ECM and position aside.
5.Remove 7 bolts securing battery carrier.
6.Remove battery carrier.
NOTE: Do not carry out further dismantling if
component is removed for access only.
7.Remove jack retaining strap, speed nut and
clip.
Page 1454 of 1672

CHARGING AND STARTING
REPAIRS 86-1-5
Refit
1.Fit jack retaining strap, speed nut and clip.
2.Fit battery carrier, fit bolts and tighten to 28 Nm
(21 lbf.ft).
3. Diesel models: Fit ECM and secure with
screw.
4.Secure coolant hose.
5.Fit and secure jack.
6.Fit battery.
+ CHARGING AND STARTING,
REPAIRS, Battery.
Starter motor - diesel
$% 86.60.01
Remove
1.Release fixings and remove battery cover.
2.Disconnect battery earth lead.
3.Raise front of vehicle.
WARNING: Do not work on or under a
vehicle supported only by a jack. Always
support the vehicle on safety stands.
4.Remove underbelly panel.
+ EXTERIOR FITTINGS, REPAIRS,
Panel - underbelly.
5.Disconnect Lucar connector from starter
solenoid.
6.Remove nut and disconnect battery lead from
starter solenoid.
7.Remove nut and 2 bolts securing starter motor
and remove starter motor from engine.
Refit
1.Clean starter motor and mating face on engine.
2.Fit starter motor and tighten nut and 2 bolts to
27 Nm (20 lbf.ft).
3.Connect lead to starter solenoid and tighten nut
to 10 Nm (7 lbf.ft).
4.Connect Lucar connector to starter solenoid.
5.Fit underbelly panel.
+ EXTERIOR FITTINGS, REPAIRS,
Panel - underbelly.
6.Remove stand(s) and lower vehicle.
7.Connect battery earth lead.
8.Fit battery cover and secure the fixings.
Page 1455 of 1672
CHARGING AND STARTING
86-1-6 REPAIRS
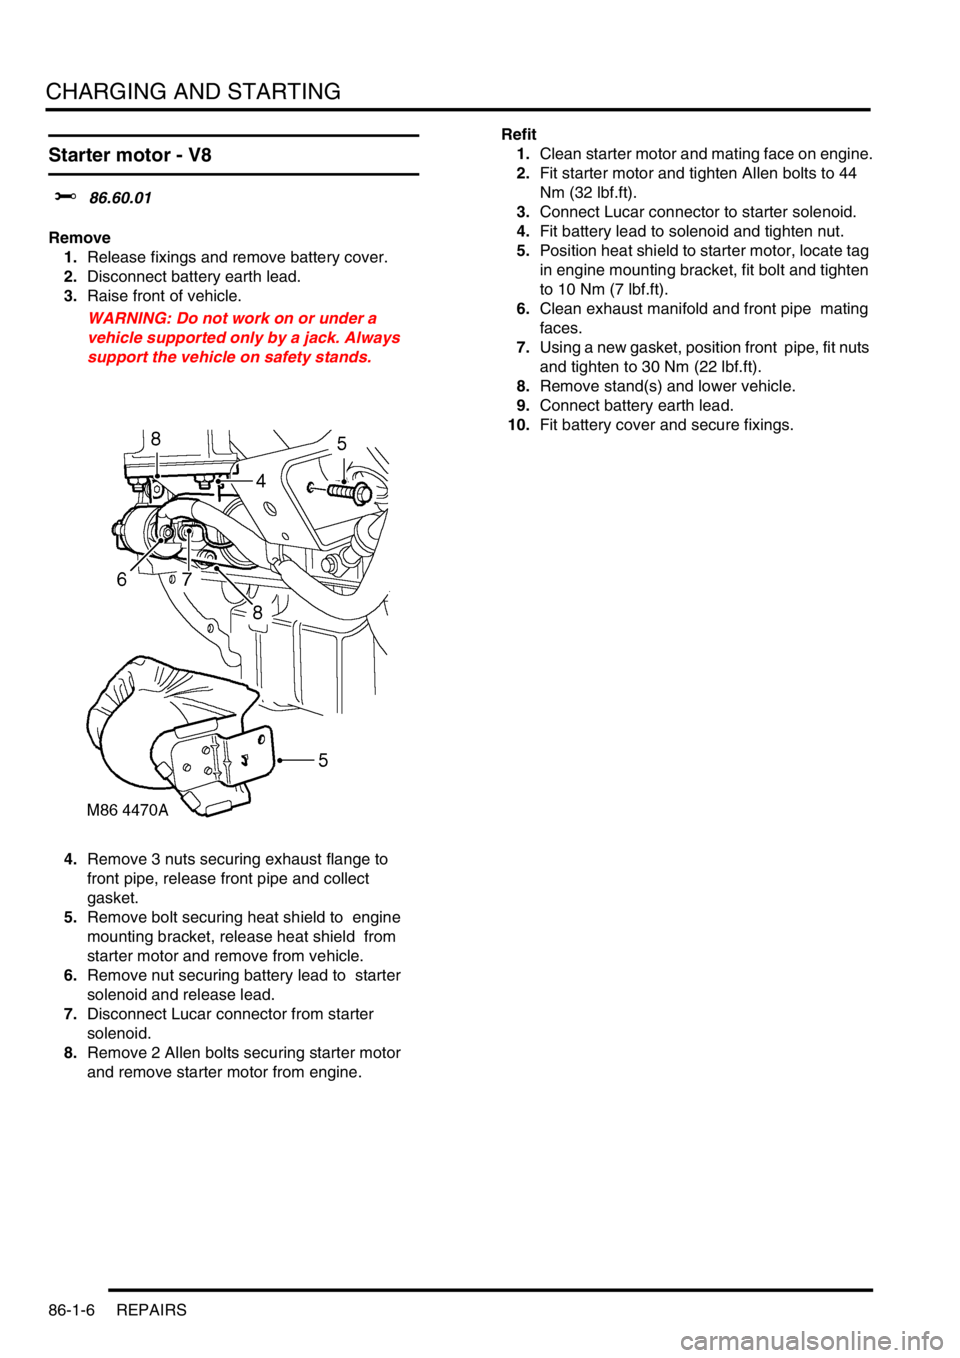
Starter motor - V8
$% 86.60.01
Remove
1.Release fixings and remove battery cover.
2.Disconnect battery earth lead.
3.Raise front of vehicle.
WARNING: Do not work on or under a
vehicle supported only by a jack. Always
support the vehicle on safety stands.
4.Remove 3 nuts securing exhaust flange to
front pipe, release front pipe and collect
gasket.
5.Remove bolt securing heat shield to engine
mounting bracket, release heat shield from
starter motor and remove from vehicle.
6.Remove nut securing battery lead to starter
solenoid and release lead.
7.Disconnect Lucar connector from starter
solenoid.
8.Remove 2 Allen bolts securing starter motor
and remove starter motor from engine. Refit
1.Clean starter motor and mating face on engine.
2.Fit starter motor and tighten Allen bolts to 44
Nm (32 lbf.ft).
3.Connect Lucar connector to starter solenoid.
4.Fit battery lead to solenoid and tighten nut.
5.Position heat shield to starter motor, locate tag
in engine mounting bracket, fit bolt and tighten
to 10 Nm (7 lbf.ft).
6.Clean exhaust manifold and front pipe mating
faces.
7.Using a new gasket, position front pipe, fit nuts
and tighten to 30 Nm (22 lbf.ft).
8.Remove stand(s) and lower vehicle.
9.Connect battery earth lead.
10.Fit battery cover and secure fixings.
Page 1584 of 1672

HARNESSES
REPAIRS 86-7-13
Harness - engine - diesel
$% 86.70.17
Remove
1.Remove engine acoustic cover.
2.Remove battery carrier.
+ CHARGING AND STARTING,
REPAIRS, Battery carrier.
3.Remove engine compartment fuse box cover.
4.Remove bolts securing battery and alternator
leads to fuse box.
5.Remove bolt securing heater plug lead to fuse
box.
6.Disconnect 2 engine harness multiplugs from
fuse box. 7.Disconnect 2 engine harness multiplugs from
ECM and main harness.
8.Disconnect multiplug from EGR solenoid.
9.Disconnect multiplug from oil pressure switch.