Pg1 LAND ROVER FREELANDER 2001 User Guide
[x] Cancel search | Manufacturer: LAND ROVER, Model Year: 2001, Model line: FREELANDER, Model: LAND ROVER FREELANDER 2001Pages: 1007, PDF Size: 23.47 MB
Page 165 of 1007
MAINTENANCE
10-18 MAINTENANCE
Intermediate Reduction Drive - NAS
models
Check and Top-up Fluid
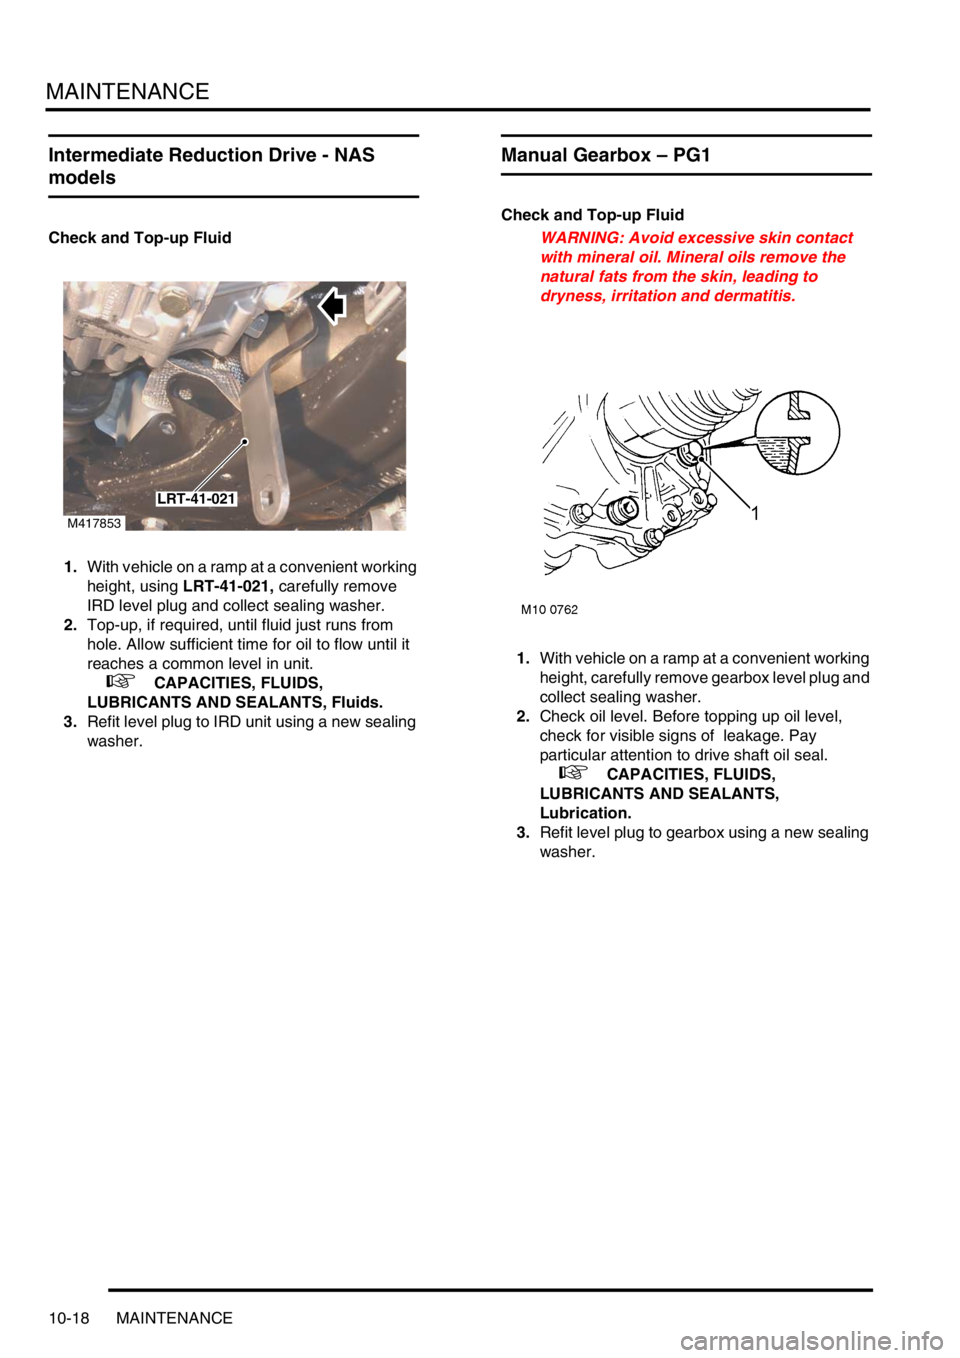
1.With vehicle on a ramp at a convenient working
height, using LRT-41-021, carefully remove
IRD level plug and collect sealing washer.
2.Top-up, if required, until fluid just runs from
hole. Allow sufficient time for oil to flow until it
reaches a common level in unit.
+ CAPACITIES, FLUIDS,
LUBRICANTS AND SEALANTS, Fluids.
3.Refit level plug to IRD unit using a new sealing
washer.
Manual Gearbox – PG1
Check and Top-up Fluid
WARNING: Avoid excessive skin contact
with mineral oil. Mineral oils remove the
natural fats from the skin, leading to
dryness, irritation and dermatitis.
1.With vehicle on a ramp at a convenient working
height, carefully remove gearbox level plug and
collect sealing washer.
2.Check oil level. Before topping up oil level,
check for visible signs of leakage. Pay
particular attention to drive shaft oil seal.
+ CAPACITIES, FLUIDS,
LUBRICANTS AND SEALANTS,
Lubrication.
3.Refit level plug to gearbox using a new sealing
washer.
M417853
LRT-41-021
Page 410 of 1007
INTERMEDIATE REDUCTION DRIVE
REPAIRS 41-7
Intermediate reduction drive (IRD) unit -
K1.8
$% 41.25.01.99
Remove
1.Disconnect battery earth lead.
2.Remove rear beam.
+ FRONT SUSPENSION, REPAIRS,
Rear beam.
3.Remove exhaust front pipe.
+ MANIFOLDS & EXHAUST SYSTEMS
- K SERIES 1.8, REPAIRS, Exhaust pipe -
front.
4.Drain fluid from IRD.
+ INTERMEDIATE REDUCTION
DRIVE, ADJUSTMENTS, Intermediate
reduction drive (IRD) fluid - drain & refill -
Non NAS.
5.Drain gearbox oil.
+ MANUAL GEARBOX - PG1,
ADJUSTMENTS, Gearbox oil - drain and
refill.
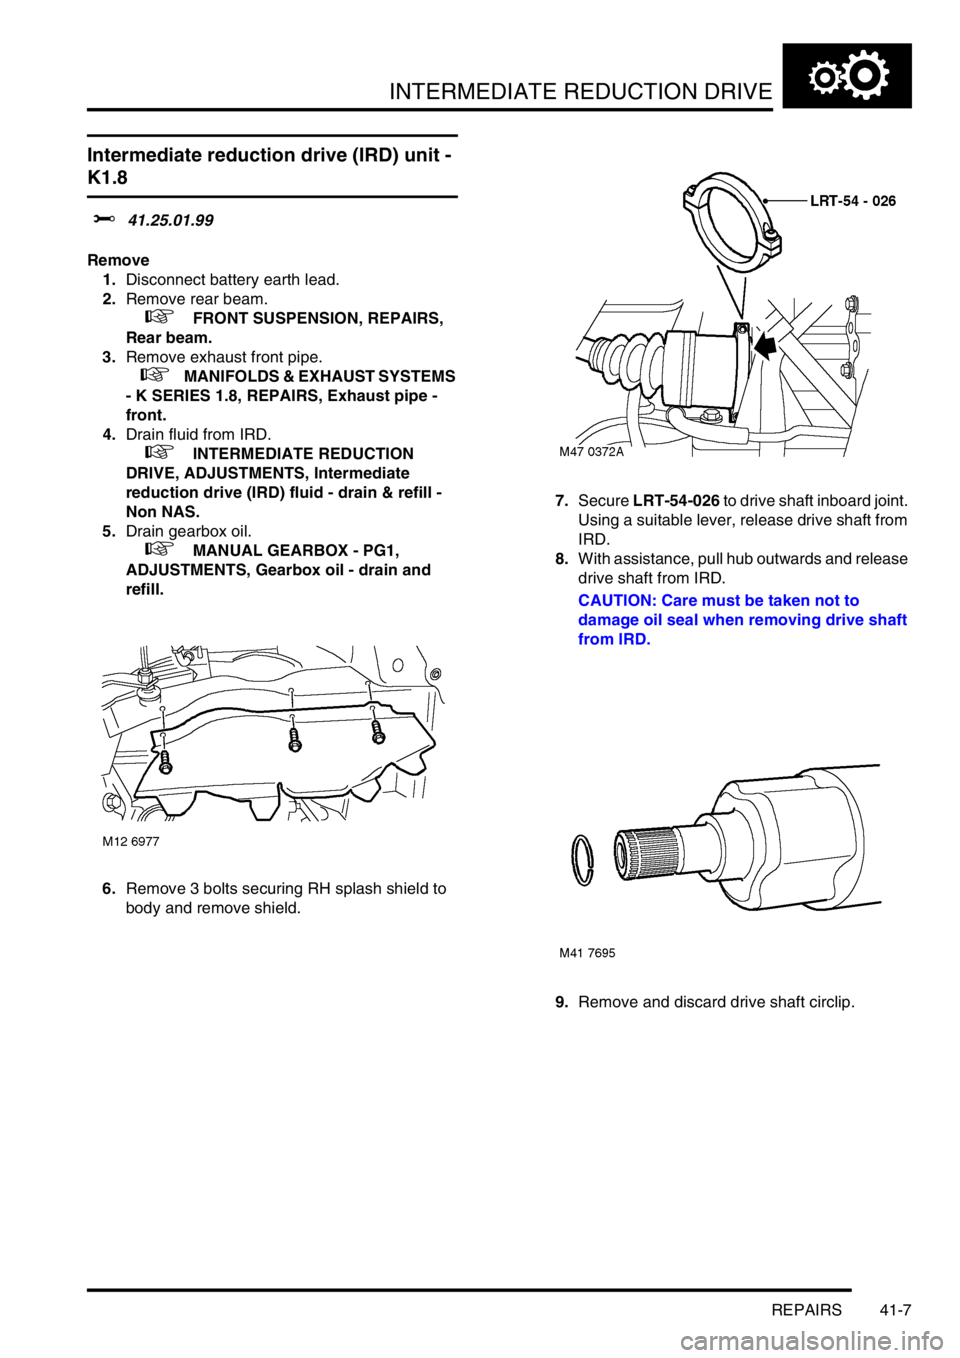
6.Remove 3 bolts securing RH splash shield to
body and remove shield.7.Secure LRT-54-026 to drive shaft inboard joint.
Using a suitable lever, release drive shaft from
IRD.
8.With assistance, pull hub outwards and release
drive shaft from IRD.
CAUTION: Care must be taken not to
damage oil seal when removing drive shaft
from IRD.
9.Remove and discard drive shaft circlip.
Page 412 of 1007
INTERMEDIATE REDUCTION DRIVE
REPAIRS 41-9
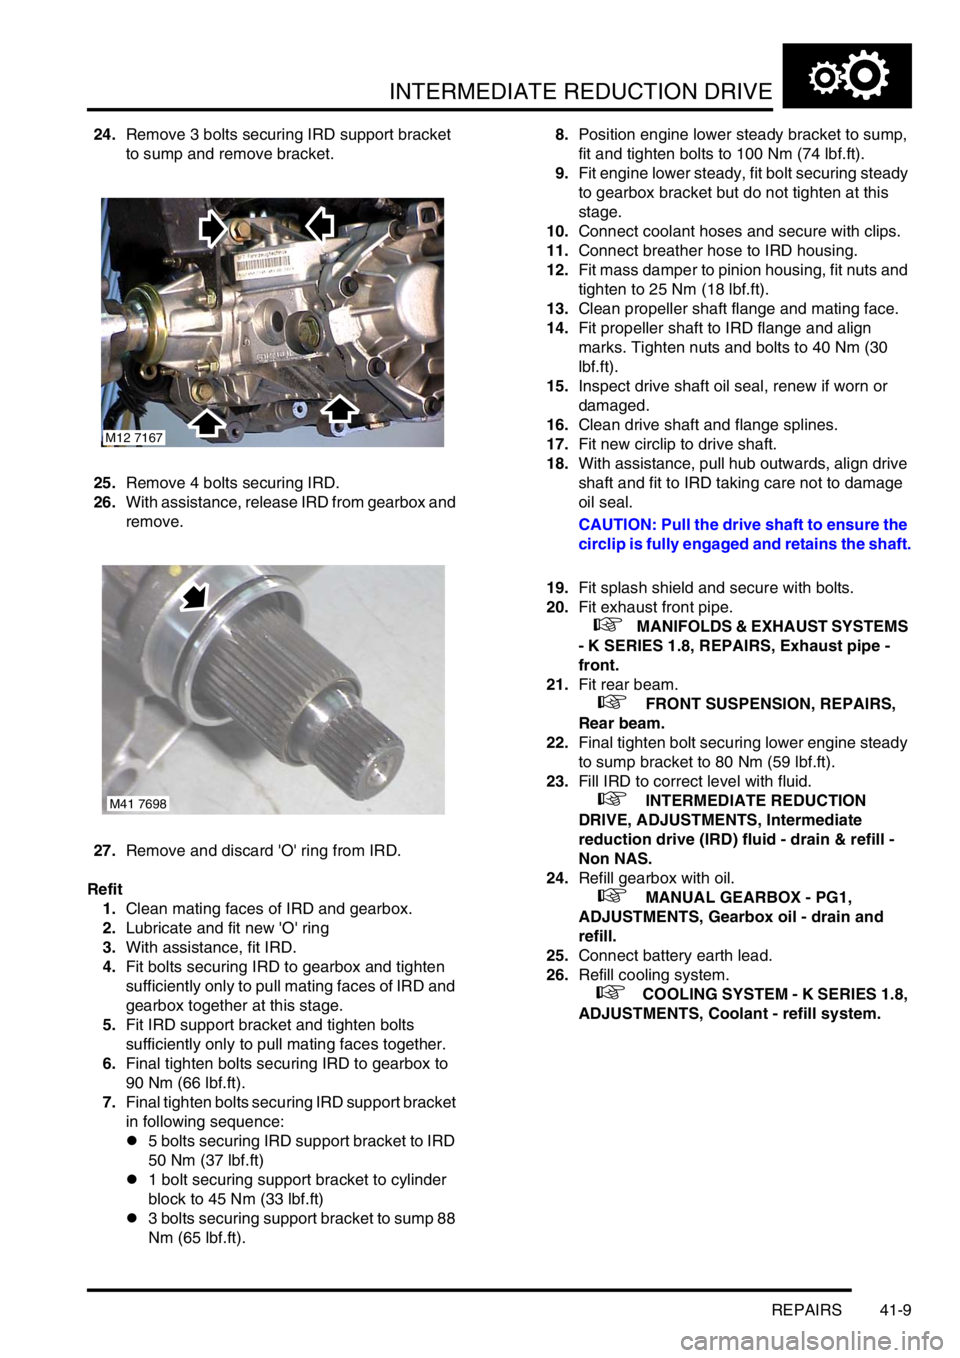
24.Remove 3 bolts securing IRD support bracket
to sump and remove bracket.
25.Remove 4 bolts securing IRD.
26.With assistance, release IRD from gearbox and
remove.
27.Remove and discard 'O' ring from IRD.
Refit
1.Clean mating faces of IRD and gearbox.
2.Lubricate and fit new 'O' ring
3.With assistance, fit IRD.
4.Fit bolts securing IRD to gearbox and tighten
sufficiently only to pull mating faces of IRD and
gearbox together at this stage.
5.Fit IRD support bracket and tighten bolts
sufficiently only to pull mating faces together.
6.Final tighten bolts securing IRD to gearbox to
90 Nm (66 lbf.ft).
7.Final tighten bolts securing IRD support bracket
in following sequence:
l5 bolts securing IRD support bracket to IRD
50 Nm (37 lbf.ft)
l1 bolt securing support bracket to cylinder
block to 45 Nm (33 lbf.ft)
l3 bolts securing support bracket to sump 88
Nm (65 lbf.ft).8.Position engine lower steady bracket to sump,
fit and tighten bolts to 100 Nm (74 lbf.ft).
9.Fit engine lower steady, fit bolt securing steady
to gearbox bracket but do not tighten at this
stage.
10.Connect coolant hoses and secure with clips.
11.Connect breather hose to IRD housing.
12.Fit mass damper to pinion housing, fit nuts and
tighten to 25 Nm (18 lbf.ft).
13.Clean propeller shaft flange and mating face.
14.Fit propeller shaft to IRD flange and align
marks. Tighten nuts and bolts to 40 Nm (30
lbf.ft).
15.Inspect drive shaft oil seal, renew if worn or
damaged.
16.Clean drive shaft and flange splines.
17.Fit new circlip to drive shaft.
18.With assistance, pull hub outwards, align drive
shaft and fit to IRD taking care not to damage
oil seal.
CAUTION: Pull the drive shaft to ensure the
circlip is fully engaged and retains the shaft.
19.Fit splash shield and secure with bolts.
20.Fit exhaust front pipe.
+ MANIFOLDS & EXHAUST SYSTEMS
- K SERIES 1.8, REPAIRS, Exhaust pipe -
front.
21.Fit rear beam.
+ FRONT SUSPENSION, REPAIRS,
Rear beam.
22.Final tighten bolt securing lower engine steady
to sump bracket to 80 Nm (59 lbf.ft).
23.Fill IRD to correct level with fluid.
+ INTERMEDIATE REDUCTION
DRIVE, ADJUSTMENTS, Intermediate
reduction drive (IRD) fluid - drain & refill -
Non NAS.
24.Refill gearbox with oil.
+ MANUAL GEARBOX - PG1,
ADJUSTMENTS, Gearbox oil - drain and
refill.
25.Connect battery earth lead.
26.Refill cooling system.
+ COOLING SYSTEM - K SERIES 1.8,
ADJUSTMENTS, Coolant - refill system.
M12 7167
M41 7698
Page 469 of 1007
DRIVESHAFTS
47-2 REPAIRS
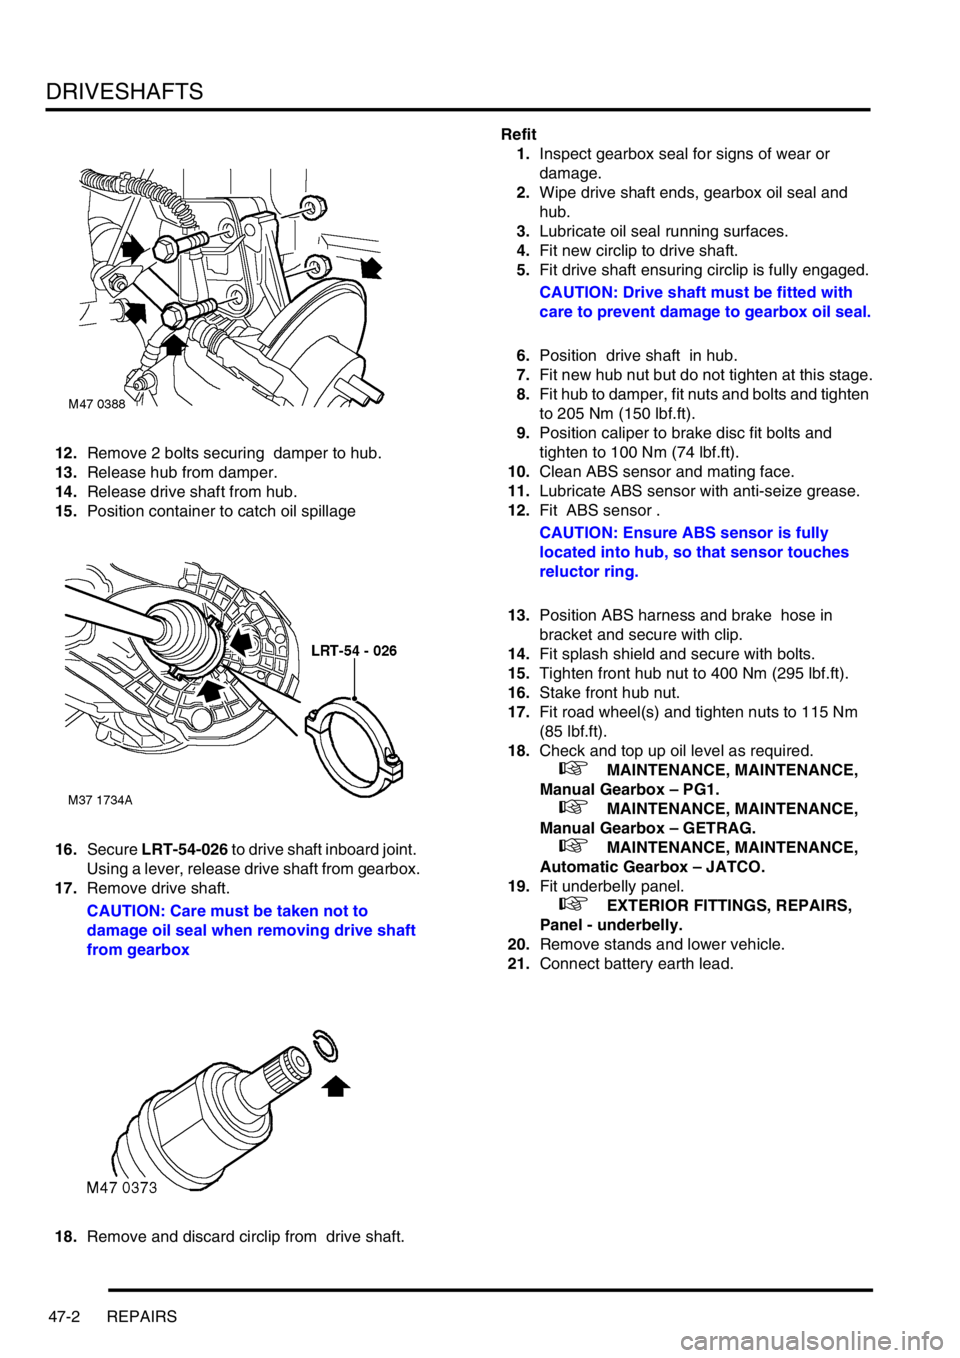
12.Remove 2 bolts securing damper to hub.
13.Release hub from damper.
14.Release drive shaft from hub.
15.Position container to catch oil spillage
16.Secure LRT-54-026 to drive shaft inboard joint.
Using a lever, release drive shaft from gearbox.
17.Remove drive shaft.
CAUTION: Care must be taken not to
damage oil seal when removing drive shaft
from gearbox
18.Remove and discard circlip from drive shaft.Refit
1.Inspect gearbox seal for signs of wear or
damage.
2.Wipe drive shaft ends, gearbox oil seal and
hub.
3.Lubricate oil seal running surfaces.
4.Fit new circlip to drive shaft.
5.Fit drive shaft ensuring circlip is fully engaged.
CAUTION: Drive shaft must be fitted with
care to prevent damage to gearbox oil seal.
6.Position drive shaft in hub.
7.Fit new hub nut but do not tighten at this stage.
8.Fit hub to damper, fit nuts and bolts and tighten
to 205 Nm (150 lbf.ft).
9.Position caliper to brake disc fit bolts and
tighten to 100 Nm (74 lbf.ft).
10.Clean ABS sensor and mating face.
11.Lubricate ABS sensor with anti-seize grease.
12.Fit ABS sensor .
CAUTION: Ensure ABS sensor is fully
located into hub, so that sensor touches
reluctor ring.
13.Position ABS harness and brake hose in
bracket and secure with clip.
14.Fit splash shield and secure with bolts.
15.Tighten front hub nut to 400 Nm (295 lbf.ft).
16.Stake front hub nut.
17.Fit road wheel(s) and tighten nuts to 115 Nm
(85 lbf.ft).
18.Check and top up oil level as required.
+ MAINTENANCE, MAINTENANCE,
Manual Gearbox – PG1.
+ MAINTENANCE, MAINTENANCE,
Manual Gearbox – GETRAG.
+ MAINTENANCE, MAINTENANCE,
Automatic Gearbox – JATCO.
19.Fit underbelly panel.
+ EXTERIOR FITTINGS, REPAIRS,
Panel - underbelly.
20.Remove stands and lower vehicle.
21.Connect battery earth lead.