alarm LAND ROVER FREELANDER 2001 Workshop Manual
[x] Cancel search | Manufacturer: LAND ROVER, Model Year: 2001, Model line: FREELANDER, Model: LAND ROVER FREELANDER 2001Pages: 1007, PDF Size: 23.47 MB
Page 7 of 1007

CONTENTS
4CONTENTS
MAINTENANCE ........................................................................................ 10-1
MAINTENANCE
Td4 - Diesel Engine - Under Bonnet View ...................................................................................... 10-1
K1.8 – Petrol Engine – Under Bonnet View .................................................................................... 10-2
KV6 – Petrol Engine – Under Bonnet View .................................................................................... 10-3
Seats and Seat Belts ...................................................................................................................... 10-4
Lamps, Horns and Warning Indicators ........................................................................................... 10-4
Wipers and Washers ...................................................................................................................... 10-5
Handbrake ...................................................................................................................................... 10-5
Alarm Handset Battery.................................................................................................................... 10-6
Road Wheels .................................................................................................................................. 10-6
Tyres ............................................................................................................................................... 10-7
Brake Pads and Calipers ................................................................................................................ 10-7
Brake Fluid...................................................................................................................................... 10-9
Road Wheel Speed Sensors .......................................................................................................... 10-9
Fuel Filter - Petrol ........................................................................................................................... 10-10
Fuel Filter - Diesel........................................................................................................................... 10-10
Fuel Pump and Filter assembly - Diesel - 03 Model Year onwards ................................................ 10-10
Fuel Sedimenter - Diesel - 03 Model Year onwards ....................................................................... 10-10
Door Locks, Hinges, Check Straps and Bonnet Catch ................................................................... 10-11
Anti-freeze ...................................................................................................................................... 10-12
Cooling System and Intercooler...................................................................................................... 10-12
Vent filter - turbocharger boost control solenoid valve - Td4 .......................................................... 10-13
Spark Plugs – K1.8 ......................................................................................................................... 10-13
Spark Plugs – KV6.......................................................................................................................... 10-13
Air Cleaner – Petrol Models ............................................................................................................ 10-13
Ancillary Drive Belt – Td4 ............................................................................................................... 10-14
Ancillary Drive Belt – K1.8 .............................................................................................................. 10-14
Ancillary Drive Belt – KV6 ............................................................................................................... 10-15
Camshaft Timing Belt – K1.8 .......................................................................................................... 10-15
Camshaft Timing Belt – KV6........................................................................................................... 10-16
Brake/Clutch Reservoir ................................................................................................................... 10-16
PAS Fluid Level .............................................................................................................................. 10-17
Intermediate Reduction Drive - Non NAS models .......................................................................... 10-17
Intermediate Reduction Drive - NAS models .................................................................................. 10-18
Manual Gearbox – PG1 .................................................................................................................. 10-18
Manual Gearbox – GETRAG .......................................................................................................... 10-19
Automatic Gearbox – JATCO ......................................................................................................... 10-19
Rear Axle ........................................................................................................................................ 10-20
Clutch Pipes and Unions ................................................................................................................ 10-21
Windscreen and Rear Washer Reservoir ....................................................................................... 10-21
Battery ............................................................................................................................................ 10-21
Engine Oil and Filter – Td4 ............................................................................................................. 10-22
Engine Oil and Filter – K1.8 ............................................................................................................ 10-23
Engine Oil and Filter – KV6 ............................................................................................................ 10-24
Fuel Hoses and Pipes..................................................................................................................... 10-25
Brake Hoses and Pipes ................................................................................................................. 10-26
Check Exhaust System................................................................................................................... 10-26
Suspension ..................................................................................................................................... 10-27
Steering ......................................................................................................................................... 10-28
Road Test ....................................................................................................................................... 10-28
Endorse Service Record ................................................................................................................. 10-30
Report any Unusual Features ......................................................................................................... 10-30
Page 23 of 1007

CONTENTS
20 CONTENTS
LIGHTING.................................................................................................. 86-2-1
ADJUSTMENTS
Headlamps - pair - align beam - up to 04MY .................................................................................. 86-2-1
Headlamps - pair - align beam - from 04MY ................................................................................... 86-2-1
REPAIRS
Headlamp assembly - up to 04MY.................................................................................................. 86-2-3
Headlamp assembly - from 04MY .................................................................................................. 86-2-4
Lamp assembly - flasher side repeater - front ................................................................................ 86-2-5
Lamp assembly - tail ....................................................................................................................... 86-2-5
Lamp assembly - number plate ...................................................................................................... 86-2-6
Lamp assembly - fog/driving - from 04MY ...................................................................................... 86-2-6
Lamp assembly - rear ..................................................................................................................... 86-2-7
Lamp assembly - centre high mounted stop (CHMSL) ................................................................... 86-2-7
Lamp assembly - glove compartment ............................................................................................. 86-2-8
Lamp assembly - load space .......................................................................................................... 86-2-8
Switch - headlamp levelling ............................................................................................................ 86-2-9
Switch - glove compartment ........................................................................................................... 86-2-9
Switch - hazard warning ................................................................................................................. 86-2-10
Switch - combined direction indicator/headlight/horn ..................................................................... 86-2-10
Switch - rear fog lamp ..................................................................................................................... 86-2-11
CONTROL UNITS ..................................................................................... 86-3-1
REPAIRS
Control unit - window lift ................................................................................................................. 86-3-1
Relay - power folding mirrors - from 02MY ..................................................................................... 86-3-1
Central Control Unit (CCU) ............................................................................................................. 86-3-2
Control Unit - power fold mirrors - up to 02MY ............................................................................... 86-3-3
SECURITY................................................................................................. 86-4-1
REPAIRS
Solenoid/motor - taildoor................................................................................................................. 86-4-1
Switch/push - horn .......................................................................................................................... 86-4-2
Horn ................................................................................................................................................ 86-4-2
Immobilisation - electronic control unit (ECU) - ............................................................................. 86-4-3
Sensor - volumetric - alarm system - 3 door ................................................................................... 86-4-3
Module (ECU) - volumetric - alarm system - 5 door - without sunroof ........................................... 86-4-5
Module (ECU) - volumetric - alarm system - 5 door - with sunroof ................................................ 86-4-7
Receiver - alarm system ................................................................................................................. 86-4-10
Coil - passive immobilisation - alarm system .................................................................................. 86-4-10
Page 36 of 1007

GENERAL INFORMATION
03-5
Local issues
A number of environmental issues will be of
particular concern to residents and other neighbours
close to the site. The sensitivity of these issues will
depend on the proximity of the site and the layout
and amount of activity carried on at the site.
Noise is a major concern and therefore consideration
should be given to the time spent carrying out noisy
activities and the location of those activities that can
cause excessive noise.
Car alarm testing, panel beating, hammering and
other such noisy activities should, whenever
possible, be carried out indoors with doors and
windows shut, or as far away from houses as
possible.
Running vehicle engines may be an outside activity
which could cause nuisance to neighbours because
of both noise and smell.
Be sensitive to the time of day when these activities
are carried out and minimise the time of the noisy
operation, particularly in the early morning and late
evening.
Another local concern will be the smell from the
various materials used. Using less solvent, paint and
petrol could help prevent this annoyance.
Local residents and other business users will also be
concerned about traffic congestion, noise and
exhaust fumes, be sensitive to these concerns and
try to minimise inconvenience from deliveries,
customers and servicing operations.
Checklist
Always adhere to the following:
lidentify where the neighbours who are likely to
be affected are situated;
lminimise noise, smells and traffic nuisance;
lprevent litter by putting waste in the correct
containers;
lhave waste skips emptied regularly.Use of resource
Another environmental concern is the waste of
materials and energy that can occur in day to day
activities.
Electricity for heating, lighting and compressed air
uses resources and releases pollution during its
generation.
Fuel used for heating, running cars or vans and
mobile plant is another limited resource which
consumes large amounts of energy during its
extraction and refining processes.
Water has to be cleaned, piped to site and disposed
of, all of which creates more potential pollution;
Oil, spares, paint etc., have all produced pollution in
the process of manufacture and they become a
waste disposal problem if discarded.
Checklist
Always adhere to the following:
Electricity and heating –
lkeep doors and windows closed in the winter;
lswitch off machinery or lights when not needed;
luse energy efficient heating systems;
lswitch off computers and photocopiers when
not needed.
Fuel –
ldon't run engines unnecessarily;
lthink about whether journeys are necessary and
drive to conserve fuel.
Water –
ldon't leave taps and hose pipes running;
lmend leaks quickly, don't be wasteful.
Compressed air –
ldon't leave valves open;
lmend leaks quickly;
ldon't leave the compressor running when not
needed.
Use of environmentally damaging materials –
lcheck whether a less toxic material is available.
Handling and storage of materials –
lhave the correct facilities available for handling
liquids to prevent spillage and wastage as listed
above;
lprovide suitable locations for storage to prevent
frost damage or other deterioration.
Page 50 of 1007

GENERAL INFORMATION
03-19
Electrical precautions
General
The following guidelines are intended to ensure the
safety of the operator and ensure the prevention of
damage to the electrical and electronic components
fitted to the vehicle. Where necessary, specific
precautions are detailed in the individual procedures
of this manual.
Equipment
Prior to commencing any test procedure on the
vehicle, ensure that the relevant test equipment is
working correctly and any harness or connectors are
in good condition. It is particularly important to check
the condition of the lead and plugs of mains operated
equipment.
Polarity
Never reverse connect the vehicle battery and
always ensure the correct polarity when connecting
test equipment.
High Voltage Circuits
Whenever disconnecting live ht circuits, always use
insulated pliers and never allow the open end of the
ht lead to contact other components, particularly
ECU's.
Exercise caution when measuring the voltage on the
coil terminals while the engine is running, high
voltage spikes can occur on these terminals.
Connectors and harnesses
The engine compartment of a vehicle is a particularly
hostile environment for electrical components and
connectors:
lAlways ensure electrically related items are dry
and oil free before disconnecting and
connecting test equipment.
lEnsure disconnected multiplugs and sensors
are protected from being contaminated with oil,
coolant or other solutions. Contamination could
impair performance or result in catastrophic
failure.
lNever force connectors apart using tools to
prise apart or by pulling on the wiring harness.
lAlways ensure locking tabs are disengaged
before disconnection, and match orientation to
enable correct reconnection.
lEnsure that any protection (covers, insulation
etc.) is replaced if disturbed.Having confirmed a component to be faulty:
lSwitch off the ignition and disconnect the
battery.
lRemove the component and support the
disconnected harness.
lWhen replacing the component, keep oily hands
away from electrical connection areas and push
connectors home until any locking tabs fully
engage.
Battery disconnection
Before disconnecting the battery, disable the alarm
system and switch off all electrical equipment. If the
radio is to be serviced, ensure the security code has
been deactivated.
CAUTION: To prevent damage to electrical
components, always disconnect the battery
when working on the vehicle's electrical system.
The ground lead must be disconnected first and
reconnected last.
CAUTION: Always ensure that battery leads are
routed correctly and are not close to any
potential chafing points.
Battery charging
Only recharge the battery with it removed from the
vehicle. Always ensure any battery charging area is
well ventilated and that every precaution is taken to
avoid naked flames and sparks.
Ignition system safety precautions
The vehicle's ignition system produces high voltages
and the following precautions should be observed
before carrying out any work on the system:
WARNING: Before commencing work on an
ignition system, ensure all high tension
terminals, adapters and diagnostic equipment
are adequately insulated and shielded to prevent
accidental personal contacts and minimise the
risk of shock. Wearers of surgically implanted
pacemaker devices should not be in close
proximity of ignition circuits or diagnostic
equipment.
Page 153 of 1007

MAINTENANCE
10-6 MAINTENANCE
Alarm Handset Battery
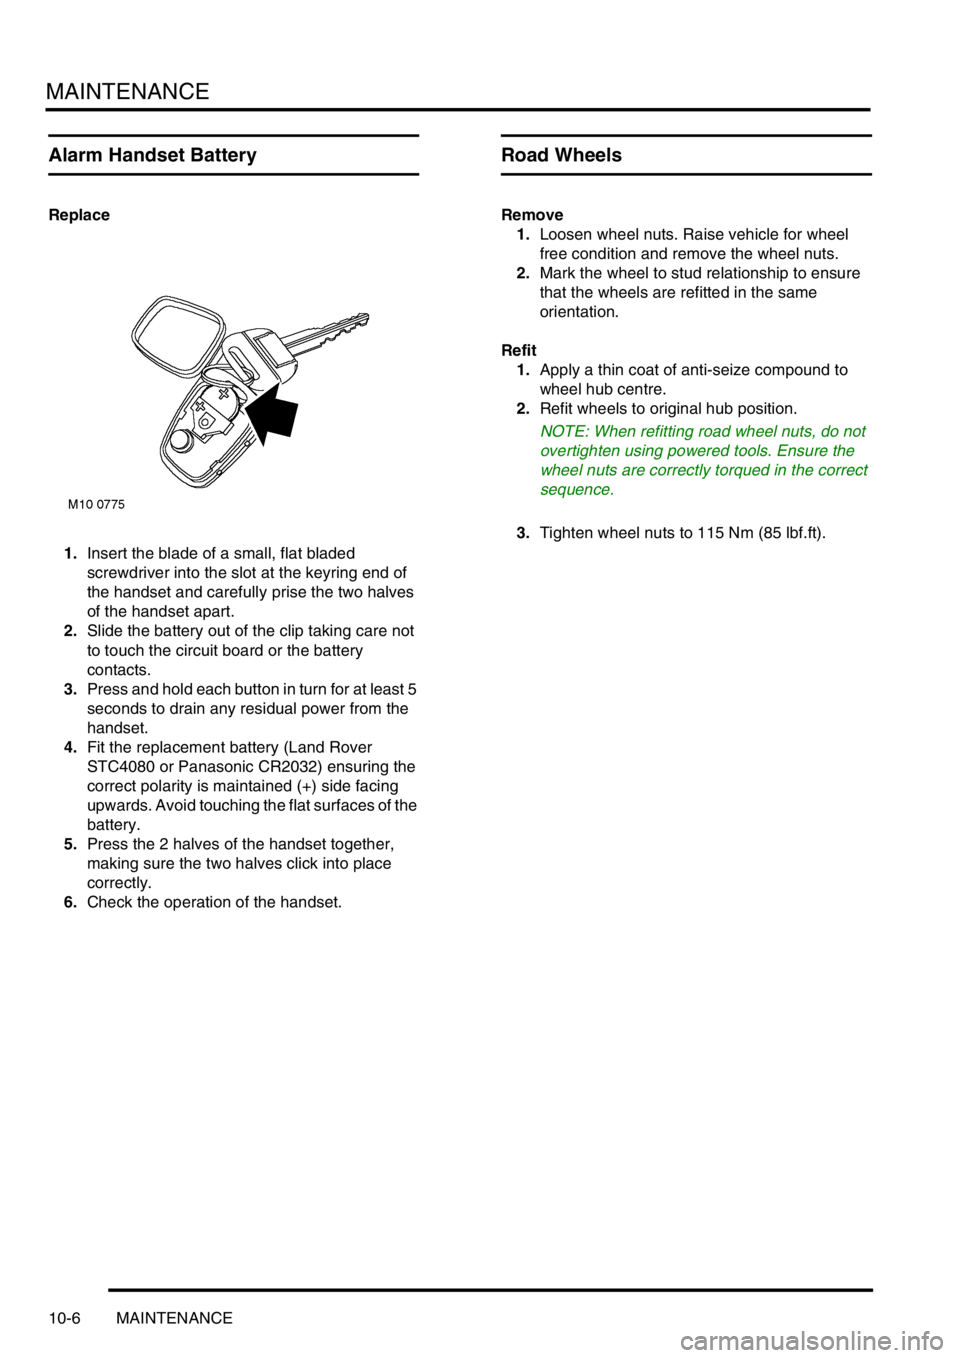
Replace
1.Insert the blade of a small, flat bladed
screwdriver into the slot at the keyring end of
the handset and carefully prise the two halves
of the handset apart.
2.Slide the battery out of the clip taking care not
to touch the circuit board or the battery
contacts.
3.Press and hold each button in turn for at least 5
seconds to drain any residual power from the
handset.
4.Fit the replacement battery (Land Rover
STC4080 or Panasonic CR2032) ensuring the
correct polarity is maintained (+) side facing
upwards. Avoid touching the flat surfaces of the
battery.
5.Press the 2 halves of the handset together,
making sure the two halves click into place
correctly.
6.Check the operation of the handset.
Road Wheels
Remove
1.Loosen wheel nuts. Raise vehicle for wheel
free condition and remove the wheel nuts.
2.Mark the wheel to stud relationship to ensure
that the wheels are refitted in the same
orientation.
Refit
1.Apply a thin coat of anti-seize compound to
wheel hub centre.
2.Refit wheels to original hub position.
NOTE: When refitting road wheel nuts, do not
overtighten using powered tools. Ensure the
wheel nuts are correctly torqued in the correct
sequence.
3.Tighten wheel nuts to 115 Nm (85 lbf.ft).
Page 950 of 1007

SECURITY
REPAIRS 86-4-3
Immobilisation - electronic control unit
(ECU) -
$% 86.77.07
Remove
1.Disconnect battery earth lead.
2.Remove fascia.
+ INTERIOR TRIM COMPONENTS,
REPAIRS, Fascia - up to 04MY.
3.Remove 2 plastic nuts securing immobilisation
ECU and disconnect multiplug. Remove
immobilisation ECU.
Refit
1.Connect multiplug to immobilisation ECU.
2.Position ECU, fit and tighten 2 plastic nuts.
3.Fit fascia.
+ INTERIOR TRIM COMPONENTS,
REPAIRS, Fascia - up to 04MY.
4.Connect battery earth lead.
5.Initiate using TestBook/T4.
Sensor - volumetric - alarm system - 3
door
$% 86.77.29
Remove
1.Remove roof lamp lens.
2.Remove 2 screws, release roof lamp and
disconnect multiplug.
3.Release headlining rear finisher from roof panel
and remove finisher.
M86 5633
Page 952 of 1007

SECURITY
REPAIRS 86-4-5
Module (ECU) - volumetric - alarm
system - 5 door - without sunroof
$% 86.77.29
Remove
1.Remove LH rear quarter upper trim casing.
+ INTERIOR TRIM COMPONENTS,
REPAIRS, Trim casing - rear quarter - upper
- 5 door.
2.Remove LH 'A' post upper finisher.
+ INTERIOR TRIM COMPONENTS,
REPAIRS, Trim finisher - 'A' post - upper -
renew.
3.Release front and rear LH door seals.
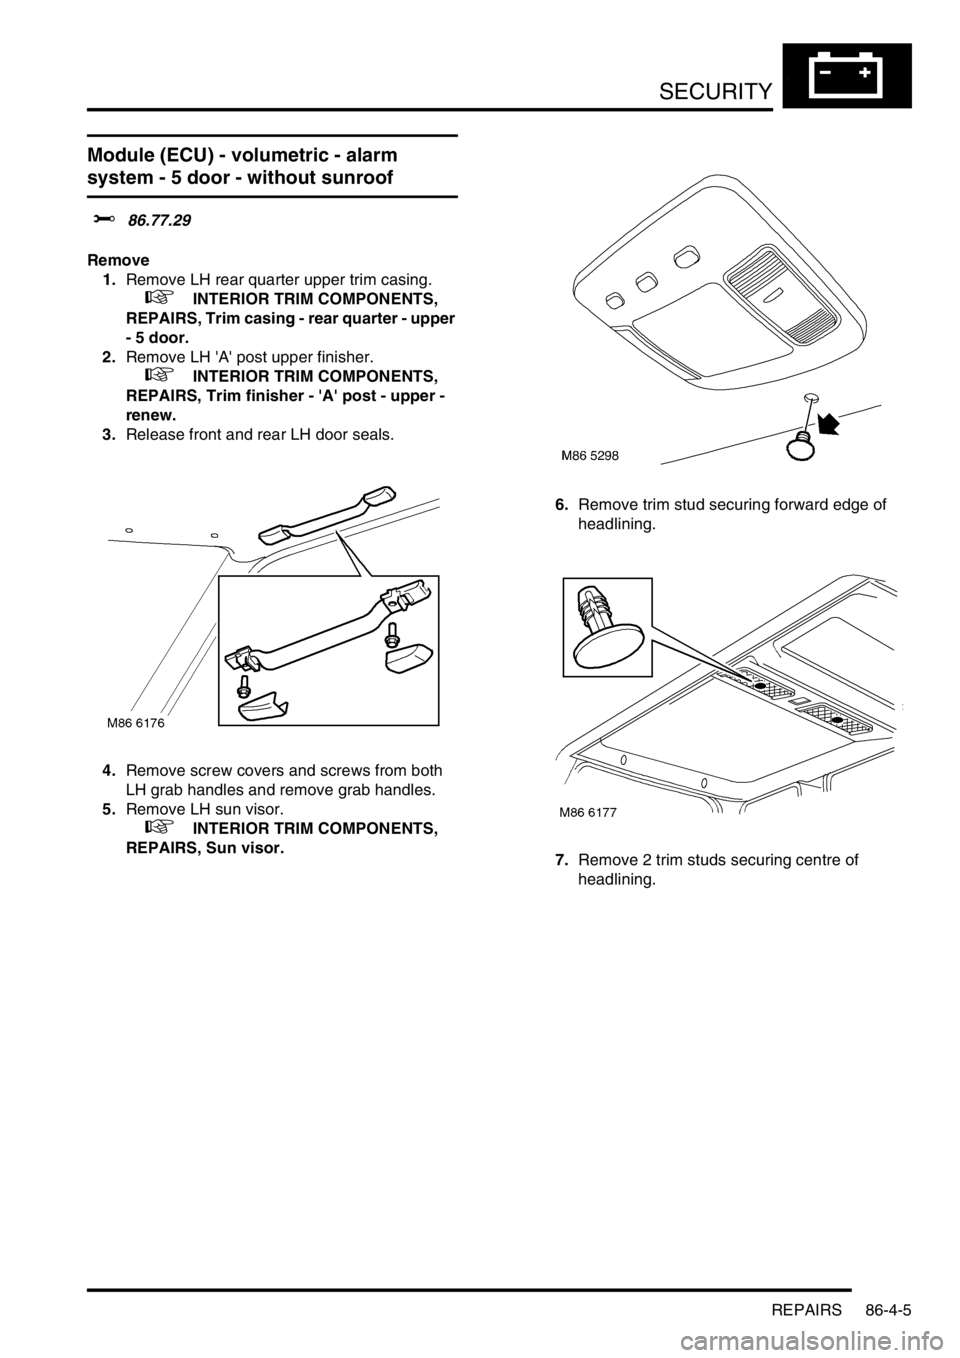
4.Remove screw covers and screws from both
LH grab handles and remove grab handles.
5.Remove LH sun visor.
+ INTERIOR TRIM COMPONENTS,
REPAIRS, Sun visor.6.Remove trim stud securing forward edge of
headlining.
7.Remove 2 trim studs securing centre of
headlining.
Page 954 of 1007

SECURITY
REPAIRS 86-4-7
Refit
1.Fit volumetric sensor and secure with screws.
2.Connect multiplug to sensor.
3.Raise headlining and secure with trim studs.
4. Up to 04MY: Position front interior lamp and
connect multiplug.
5. Up to 04MY: Fit Torx bolts securing interior
lamp and tighten to 6 Nm (4.4 lbf.ft).
6. Up to 04MY: Fit lens to front interior lamp.
7. From 04MY: Position front interior lamp and
connect multiplug.
8. From 04MY: Fit and secure front interior lamp
to headlining.
9.Position 'B/C' post upper finisher and secure
with clips.
10.Fit sun visor.
+ INTERIOR TRIM COMPONENTS,
REPAIRS, Sun visor.
11.Fit grab handles, tighten screws and fit screw
covers.
12.Fit 'A' post upper finisher.
+ INTERIOR TRIM COMPONENTS,
REPAIRS, Trim finisher - 'A' post - upper -
renew.
13.Fit rear quarter upper trim casing.
+ INTERIOR TRIM COMPONENTS,
REPAIRS, Trim casing - rear quarter - upper
- 5 door.
14.Secure front and rear door seals.
Module (ECU) - volumetric - alarm
system - 5 door - with sunroof
$% 86.77.29
Remove
1.Release front and rear door aperture seals.
2.Remove 'A' post upper finishers.
+ INTERIOR TRIM COMPONENTS,
REPAIRS, Trim finisher - 'A' post - upper -
renew.
3.Remove screw covers, remove 6 screws
securing front and both rear grab handles and
remove grab handles.
4.Remove grab handle blanking plugs.
Page 957 of 1007

SECURITY
86-4-10 REPAIRS
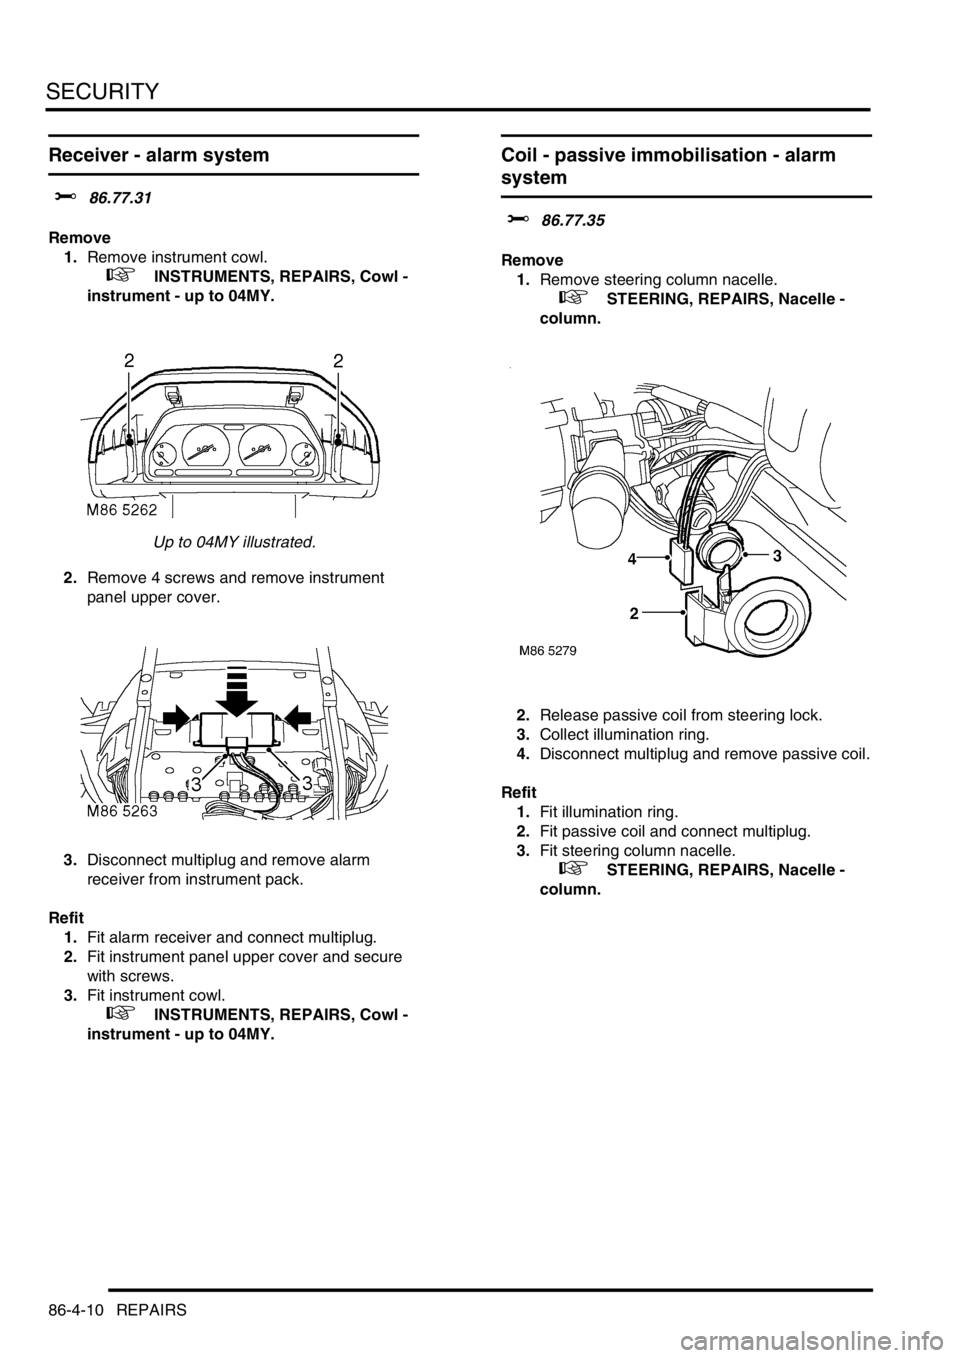
Receiver - alarm system
$% 86.77.31
Remove
1.Remove instrument cowl.
+ INSTRUMENTS, REPAIRS, Cowl -
instrument - up to 04MY.
Up to 04MY illustrated.
2.Remove 4 screws and remove instrument
panel upper cover.
3.Disconnect multiplug and remove alarm
receiver from instrument pack.
Refit
1.Fit alarm receiver and connect multiplug.
2.Fit instrument panel upper cover and secure
with screws.
3.Fit instrument cowl.
+ INSTRUMENTS, REPAIRS, Cowl -
instrument - up to 04MY.
Coil - passive immobilisation - alarm
system
$% 86.77.35
Remove
1.Remove steering column nacelle.
+ STEERING, REPAIRS, Nacelle -
column.
2.Release passive coil from steering lock.
3.Collect illumination ring.
4.Disconnect multiplug and remove passive coil.
Refit
1.Fit illumination ring.
2.Fit passive coil and connect multiplug.
3.Fit steering column nacelle.
+ STEERING, REPAIRS, Nacelle -
column.