fuel fill door release LAND ROVER FREELANDER 2001 Workshop Manual
[x] Cancel search | Manufacturer: LAND ROVER, Model Year: 2001, Model line: FREELANDER, Model: LAND ROVER FREELANDER 2001Pages: 1007, PDF Size: 23.47 MB
Page 804 of 1007
PANEL REPAIRS
REPAIRS 77-2-49
23.Remove rear quarter vent and seal.
+ EXTERIOR FITTINGS, REPAIRS,
Body quarter vent assembly - 3 door.
24.Remove rear damper.
+ REAR SUSPENSION, REPAIRS,
Damper.
25.Release vehicle harness from rear quarter and
position aside.
26. LH side: Remove tail door striker from 'E' post.
27. RH side: Remove tail door.
+ DOORS, REPAIRS, Door - tail
assembly - remove for access & refit.
28. RH side: Remove fuel filler neck.
+ FUEL DELIVERY SYSTEM -
PETROL, REPAIRS, Filler neck.
29. RH side: Remove fuel tank.
+ FUEL DELIVERY SYSTEM -
PETROL, REPAIRS, Tank - Non NAS.
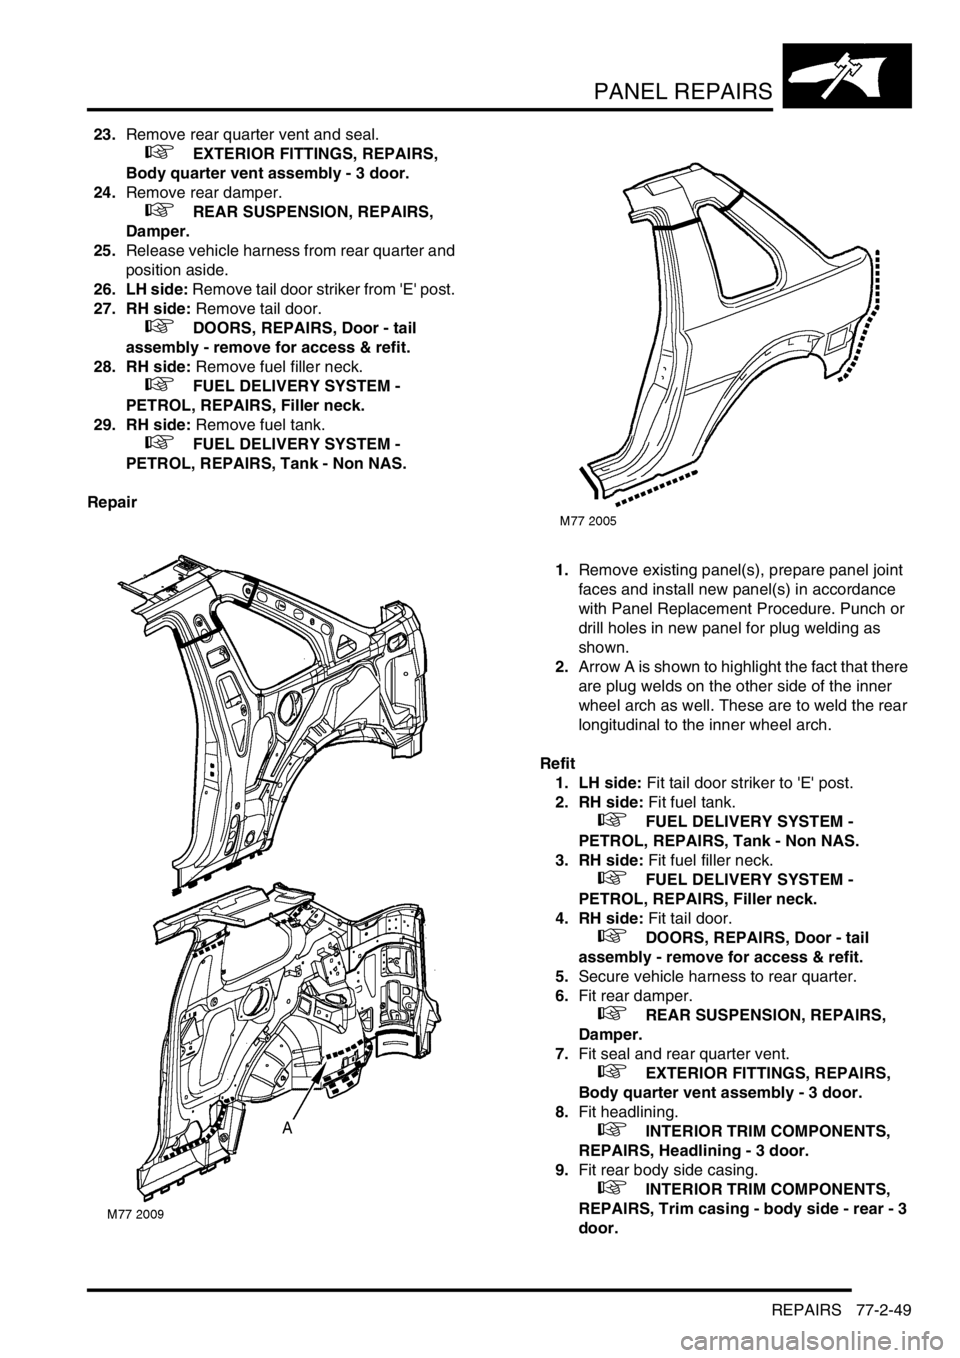
Repair
1.Remove existing panel(s), prepare panel joint
faces and install new panel(s) in accordance
with Panel Replacement Procedure. Punch or
drill holes in new panel for plug welding as
shown.
2.Arrow A is shown to highlight the fact that there
are plug welds on the other side of the inner
wheel arch as well. These are to weld the rear
longitudinal to the inner wheel arch.
Refit
1. LH side: Fit tail door striker to 'E' post.
2. RH side: Fit fuel tank.
+ FUEL DELIVERY SYSTEM -
PETROL, REPAIRS, Tank - Non NAS.
3. RH side: Fit fuel filler neck.
+ FUEL DELIVERY SYSTEM -
PETROL, REPAIRS, Filler neck.
4. RH side: Fit tail door.
+ DOORS, REPAIRS, Door - tail
assembly - remove for access & refit.
5.Secure vehicle harness to rear quarter.
6.Fit rear damper.
+ REAR SUSPENSION, REPAIRS,
Damper.
7.Fit seal and rear quarter vent.
+ EXTERIOR FITTINGS, REPAIRS,
Body quarter vent assembly - 3 door.
8.Fit headlining.
+ INTERIOR TRIM COMPONENTS,
REPAIRS, Headlining - 3 door.
9.Fit rear body side casing.
+ INTERIOR TRIM COMPONENTS,
REPAIRS, Trim casing - body side - rear - 3
door.
Page 806 of 1007
PANEL REPAIRS
REPAIRS 77-2-51
23.Remove rear body side glass.
+ SCREENS, REPAIRS, Glass - body
side - rear.
24.Remove rear damper.
+ REAR SUSPENSION, REPAIRS,
Damper.
25.Release vehicle harness from rear quarter and
position aside.
26. LH side: Remove tail door striker from 'E' post.
27. RH side: Remove tail door.
+ DOORS, REPAIRS, Door - tail
assembly - remove for access & refit.
28. RH side: Remove fuel filler neck.
+ FUEL DELIVERY SYSTEM -
PETROL, REPAIRS, Filler neck.
29. RH side: Remove fuel tank.
+ FUEL DELIVERY SYSTEM -
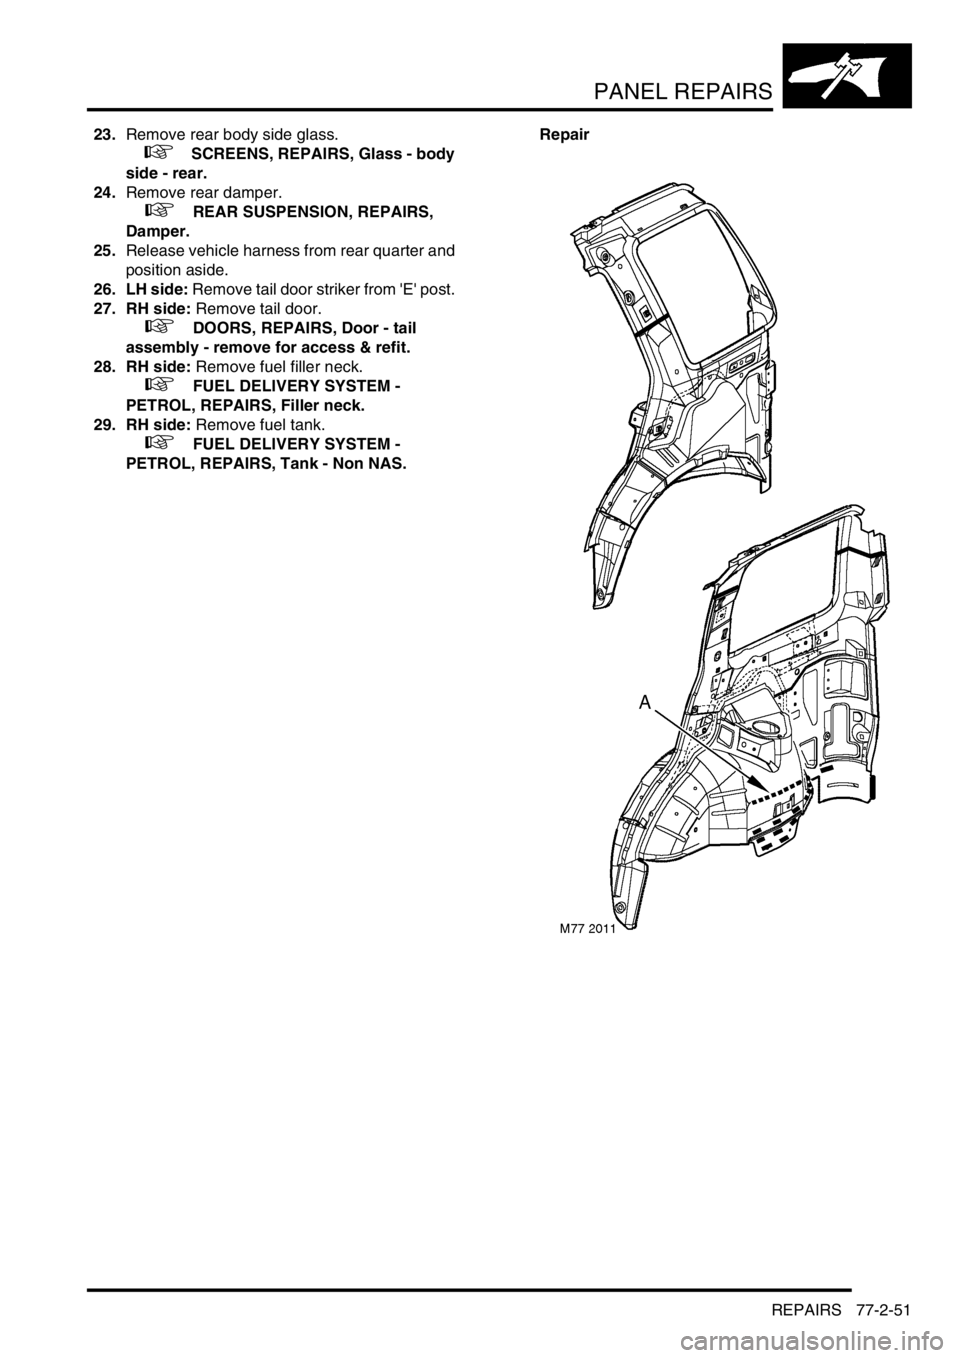
PETROL, REPAIRS, Tank - Non NAS.Repair
Page 810 of 1007
PANEL REPAIRS
REPAIRS 77-2-55
Inner 'e' post - 3 door
In this procedure, the rear outer body side panel and
the rear body side reinforcement assembly is
replaced in conjunction with the inner 'E' post
assembly.
Remove
1.Disconnect battery earth lead.
2.Disconnect alternator.
3.Disconnect all ECUs.
4.Remove road wheel(s).
5.Remove rear bumper valance.
+ EXTERIOR FITTINGS, REPAIRS,
Bumper valance - rear - up to 04MY.
6.Remove rear wheel arch liner.
7.Remove tail lamp.
+ LIGHTING, REPAIRS, Lamp
assembly - tail.
8.Remove soft/hard top.
9.Remove tail door aperture seal.
10.Remove rear quarter lower casing.
+ INTERIOR TRIM COMPONENTS,
REPAIRS, Trim casing - rear quarter - lower
- 3 door.
11.Remove loadspace carpet.
+ INTERIOR TRIM COMPONENTS,
REPAIRS, Carpet - luggage compartment.
12.Release vehicle harness from 'E' post and
position aside.
13. LH side: Remove tail door striker.
14. RH side: Remove tail door.
+ DOORS, REPAIRS, Door - tail
assembly - remove for access & refit.
15. RH side: Remove fuel filler neck.
+ FUEL DELIVERY SYSTEM -
PETROL, REPAIRS, Filler neck.
16. RH side: Remove fuel tank.
+ FUEL DELIVERY SYSTEM -
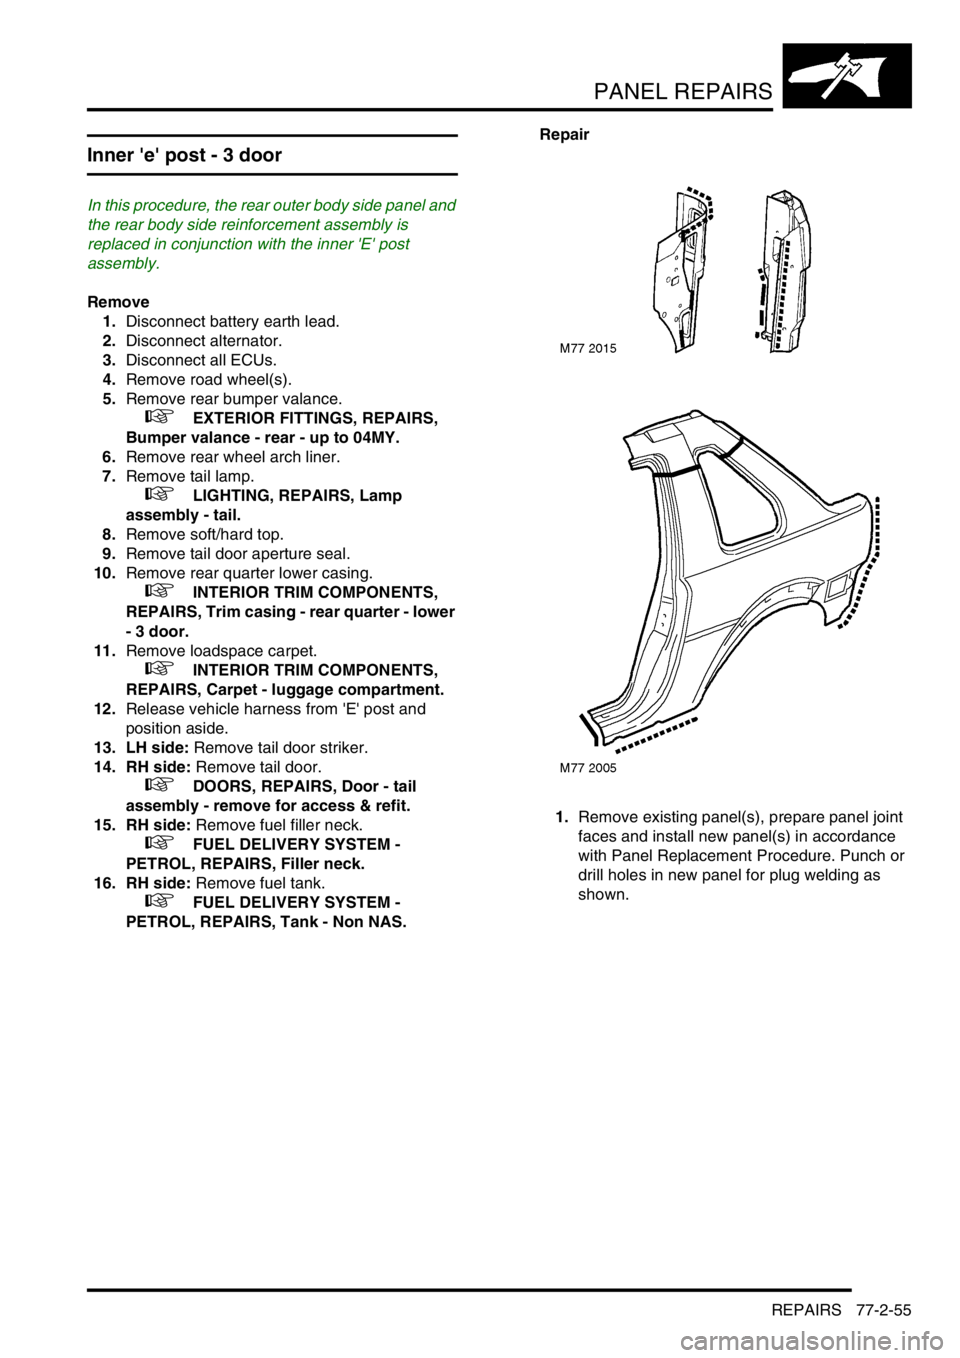
PETROL, REPAIRS, Tank - Non NAS.Repair
1.Remove existing panel(s), prepare panel joint
faces and install new panel(s) in accordance
with Panel Replacement Procedure. Punch or
drill holes in new panel for plug welding as
shown.
Page 811 of 1007
PANEL REPAIRS
77-2-56 REPAIRS
Refit
1. LH side: Fit tail door striker.
2. RH side: Fit fuel tank.
+ FUEL DELIVERY SYSTEM -
PETROL, REPAIRS, Tank - Non NAS.
3. RH side: Fit fuel filler neck.
+ FUEL DELIVERY SYSTEM -
PETROL, REPAIRS, Filler neck.
4. RH side: Fit tail door.
+ DOORS, REPAIRS, Door - tail
assembly - remove for access & refit.
5.Secure vehicle harness to 'E' post.
6.Fit loadspace carpet.
+ INTERIOR TRIM COMPONENTS,
REPAIRS, Carpet - luggage compartment.
7.Fit rear quarter lower casing.
+ INTERIOR TRIM COMPONENTS,
REPAIRS, Trim casing - rear quarter - lower
- 3 door.
8.Fit tail door aperture seal.
9.Fit soft/hard top.
10.Fit tail lamp.
+ LIGHTING, REPAIRS, Lamp
assembly - tail.
11.Fit rear wheel arch liner.
12.Fit rear bumper valance.
+ EXTERIOR FITTINGS, REPAIRS,
Bumper valance - rear - up to 04MY.
13.Fit road wheel(s) and tighten nuts to 115 Nm
(85 lbf.ft).
14.Connect all ECUs.
15.Connect alternator.
16.Connect battery earth lead.
Inner 'e' post - 5 door
In this procedure, the rear outer body side panel and
the rear body side reinforcement assembly is
replaced in conjunction with the inner 'E' post
assembly.
Remove
1.Disconnect battery earth lead.
2.Disconnect alternator.
3.Disconnect all ECUs.
4.Remove road wheel(s).
5.Remove rear bumper valance.
+ EXTERIOR FITTINGS, REPAIRS,
Bumper valance - rear - up to 04MY.
6.Remove rear wheel arch liner.
7.Remove tail lamp.
+ LIGHTING, REPAIRS, Lamp
assembly - tail.
8.Remove roof panel finisher.
+ DOORS, REPAIRS, Finisher - rear
screen - side - 5 door.
9.Remove tail door glass upper finisher.
10.Remove tail door glass side finisher.
+ DOORS, REPAIRS, Finisher - rear
screen - side - 5 door.
11.Remove tail door aperture seal.
12.Remove rear quarter lower casing.
+ INTERIOR TRIM COMPONENTS,
REPAIRS, Trim casing - rear quarter - lower
- 5 door.
13.Remove rear quarter upper casing.
+ INTERIOR TRIM COMPONENTS,
REPAIRS, Trim casing - rear quarter - upper
- 5 door.
14.Remove loadspace carpet.
+ INTERIOR TRIM COMPONENTS,
REPAIRS, Carpet - luggage compartment.
15.Remove rear body side glass.
+ SCREENS, REPAIRS, Glass - body
side - rear.
16.Release vehicle harness from 'E' post and
position aside.
17. LH side: Remove tail door striker.
18. RH side: Remove tail door.
+ DOORS, REPAIRS, Door - tail
assembly - remove for access & refit.
19. RH side: Remove fuel filler neck.
+ FUEL DELIVERY SYSTEM -
PETROL, REPAIRS, Filler neck.
20. RH side: Remove fuel tank.
+ FUEL DELIVERY SYSTEM -
PETROL, REPAIRS, Tank - Non NAS.
Page 1005 of 1007
INSTRUMENTS
88-6 REPAIRS
Sender unit - fuel tank gauge
$% 88.25.32
Remove
1.Disconnect battery earth lead.
2.Remove fuel pump assembly.
+ FUEL DELIVERY SYSTEM -
PETROL, REPAIRS, Pump - fuel.
+ FUEL DELIVERY SYSTEM - DIESEL,
REPAIRS, Pump - integral - fuel tank - rear -
up to 03MY.
WARNING: Fuel vapour is highly flammable
and in confined spaces is also explosive
and toxic. Always have a fire extinguisher
containing foam, CO
2, gas or powder close
at hand when handling or draining fuel.
3.Disconnect 2 Lucars from top of pump unit
assembly.
4.Release sprag clip securing sender to pump
unit assembly.
5.Remove sender unit.
Refit
1.Position sender to location slots and engage
sprag clip.
CAUTION: Ensure that each of the 4
location lugs on the sender are engaged
with corresponding slots in the tank unit.
2.Connect Lucars to top of pump unit assembly.
3.Fit fuel pump assembly.
+ FUEL DELIVERY SYSTEM -
PETROL, REPAIRS, Pump - fuel.
+ FUEL DELIVERY SYSTEM - DIESEL,
REPAIRS, Pump - integral - fuel tank - rear -
up to 03MY.
4.Connect battery earth lead.
Sender unit assembly - fuel tank - Td4
models - from 03MY
$% 88.25.37
Remove
1.Disconnect battery earth lead.
WARNING: Fuel vapour is highly flammable
and in confined spaces is also explosive
and toxic. Always have a fire extinguisher
containing foam, CO
2, gas or powder close
at hand when handling or draining fuel.
2.If fuel tank is full, using a fuel recovery
appliance, drain excess fuel from fuel filler neck
until a level below height of fuel pump is
obtained.
3.Open RH rear and tail doors.
4.Fold RH rear seat forward.
5.Remove 3 fasteners securing front and rear
carpets.
6.Pull back carpet from fuel tank sender
assembly access panel.
M88 0356