display Lexus CT200h 2012 Navigation Manual (in English)
[x] Cancel search | Manufacturer: LEXUS, Model Year: 2012, Model line: CT200h, Model: Lexus CT200h 2012Pages: 436, PDF Size: 28.25 MB
Page 226 of 436
226
2. SETUP
CT200h_Navi_OM76078E_(EE)
14.02.06 12:30
1Press the “MENU” button on the
Remote Touch. (See “Remote
Touch” on page 12.)
2Select “Setup” on the “Menu”
screen.
3Select “Bluetooth*” on the “Setup”
screen.
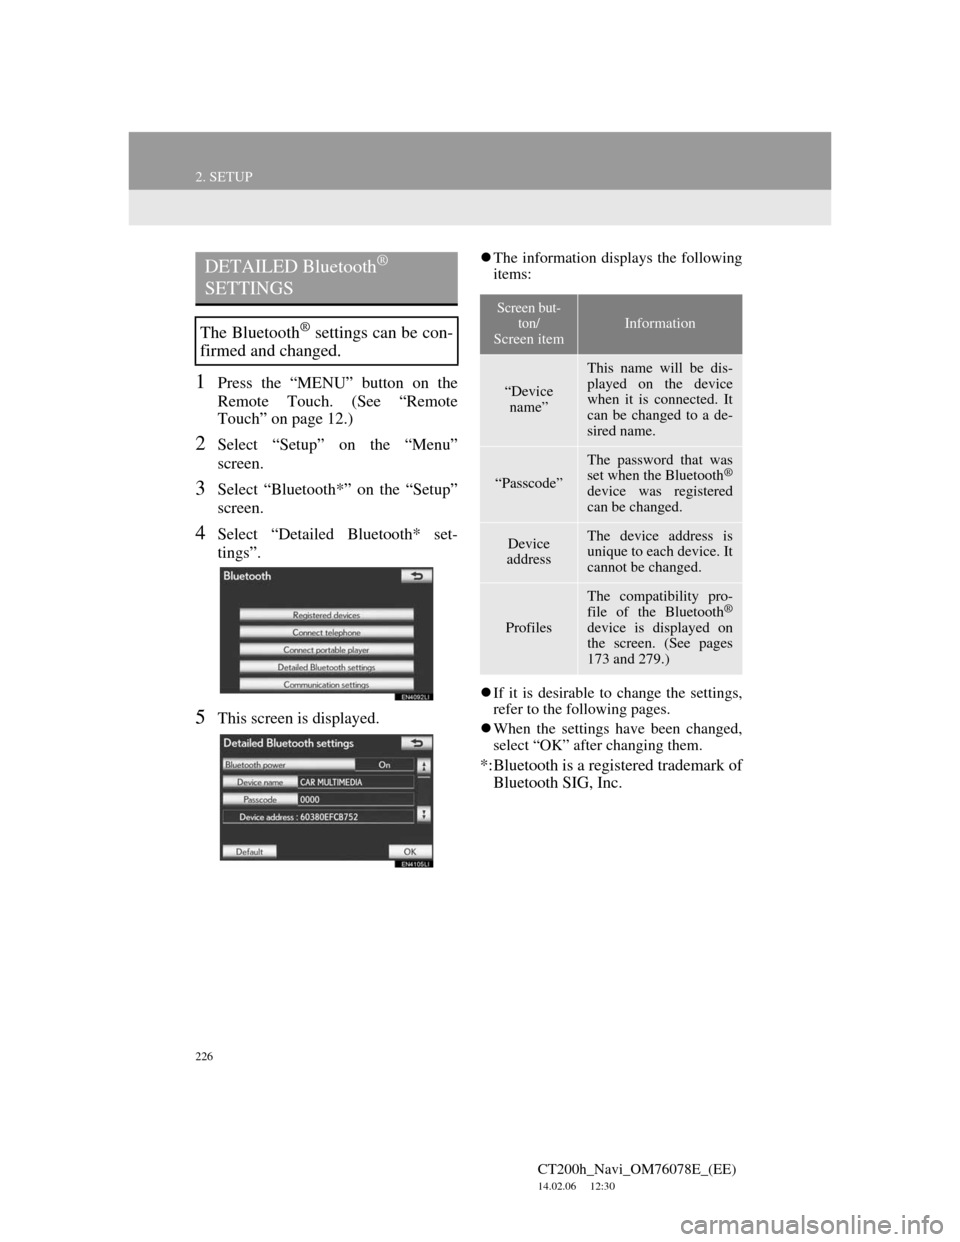
4Select “Detailed Bluetooth* set-
tings”.
5This screen is displayed.
The information displays the following
items:
If it is desirable to change the settings,
refer to the following pages.
When the settings have been changed,
select “OK” after changing them.
*:Bluetooth is a registered trademark of
Bluetooth SIG, Inc.
DETAILED Bluetooth®
SETTINGS
The Bluetooth® settings can be con-
firmed and changed.
Screen but-
ton/
Screen item
Information
“Device
name”
This name will be dis-
played on the device
when it is connected. It
can be changed to a de-
sired name.
“Passcode”
The password that was
set when the Bluetooth®
device was registered
can be changed.
Device
addressThe device address is
unique to each device. It
cannot be changed.
Profiles
The compatibility pro-
file of the Bluetooth®
device is displayed on
the screen. (See pages
173 and 279.)
Page 227 of 436
227
2. SETUP
4
TELEPHONE
CT200h_Navi_OM76078E_(EE)
14.02.06 12:30
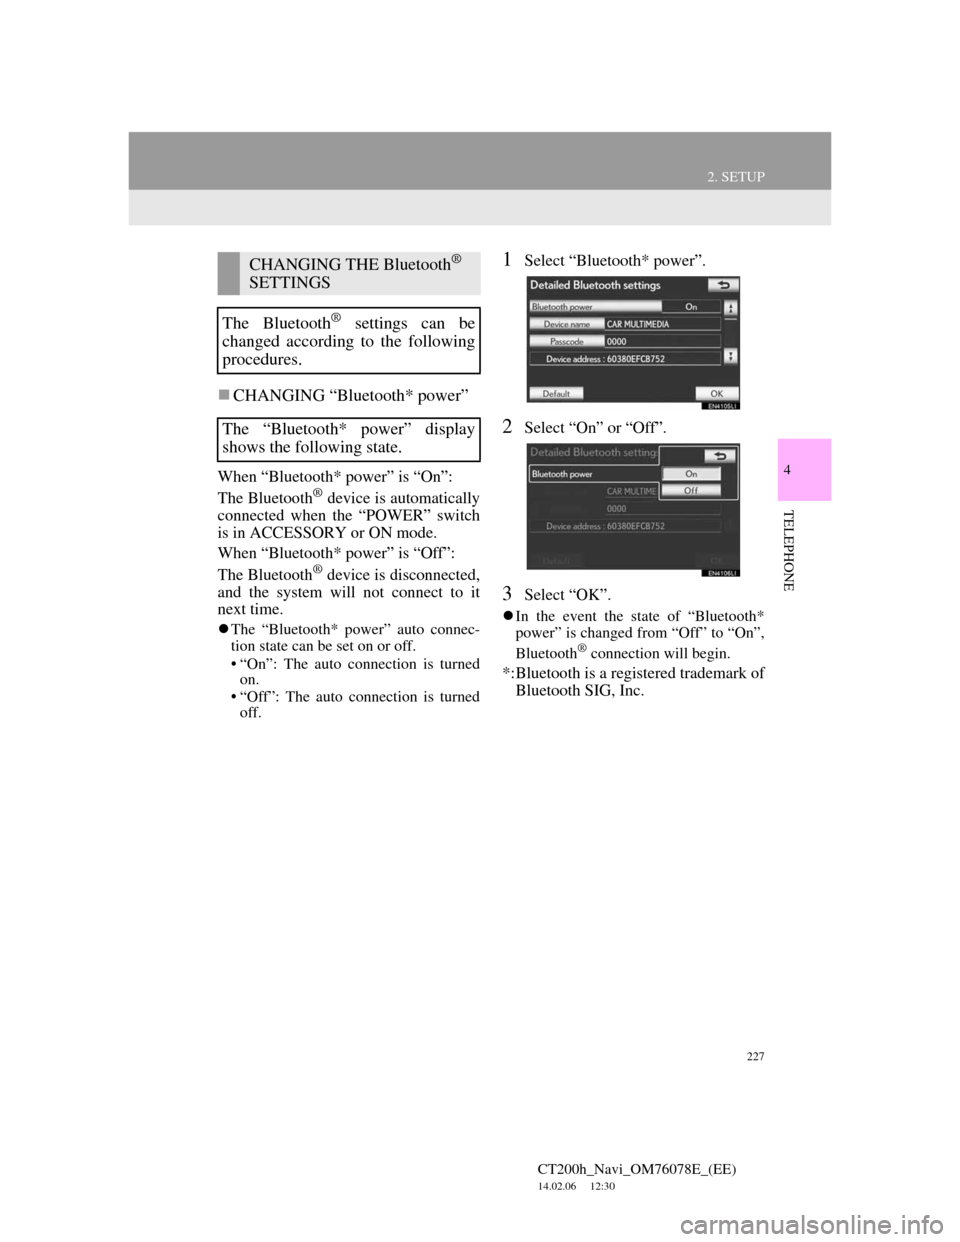
CHANGING “Bluetooth* power”
When “Bluetooth* power” is “On”:
The Bluetooth® device is automatically
connected when the “POWER” switch
is in ACCESSORY or ON mode.
When “Bluetooth* power” is “Off”:
The Bluetooth
® device is disconnected,
and the system will not connect to it
next time.
The “Bluetooth* power” auto connec-
tion state can be set on or off.
• “On”: The auto connection is turned
on.
• “Off”: The auto connection is turned
off.
1Select “Bluetooth* power”.
2Select “On” or “Off”.
3Select “OK”.
In the event the state of “Bluetooth*
power” is changed from “Off” to “On”,
Bluetooth
® connection will begin.
*:Bluetooth is a registered trademark of
Bluetooth SIG, Inc.
CHANGING THE Bluetooth®
SETTINGS
The Bluetooth
® settings can be
changed according to the following
procedures.
The “Bluetooth* power” display
shows the following state.
Page 229 of 436
229
2. SETUP
4
TELEPHONE
CT200h_Navi_OM76078E_(EE)
14.02.06 12:30
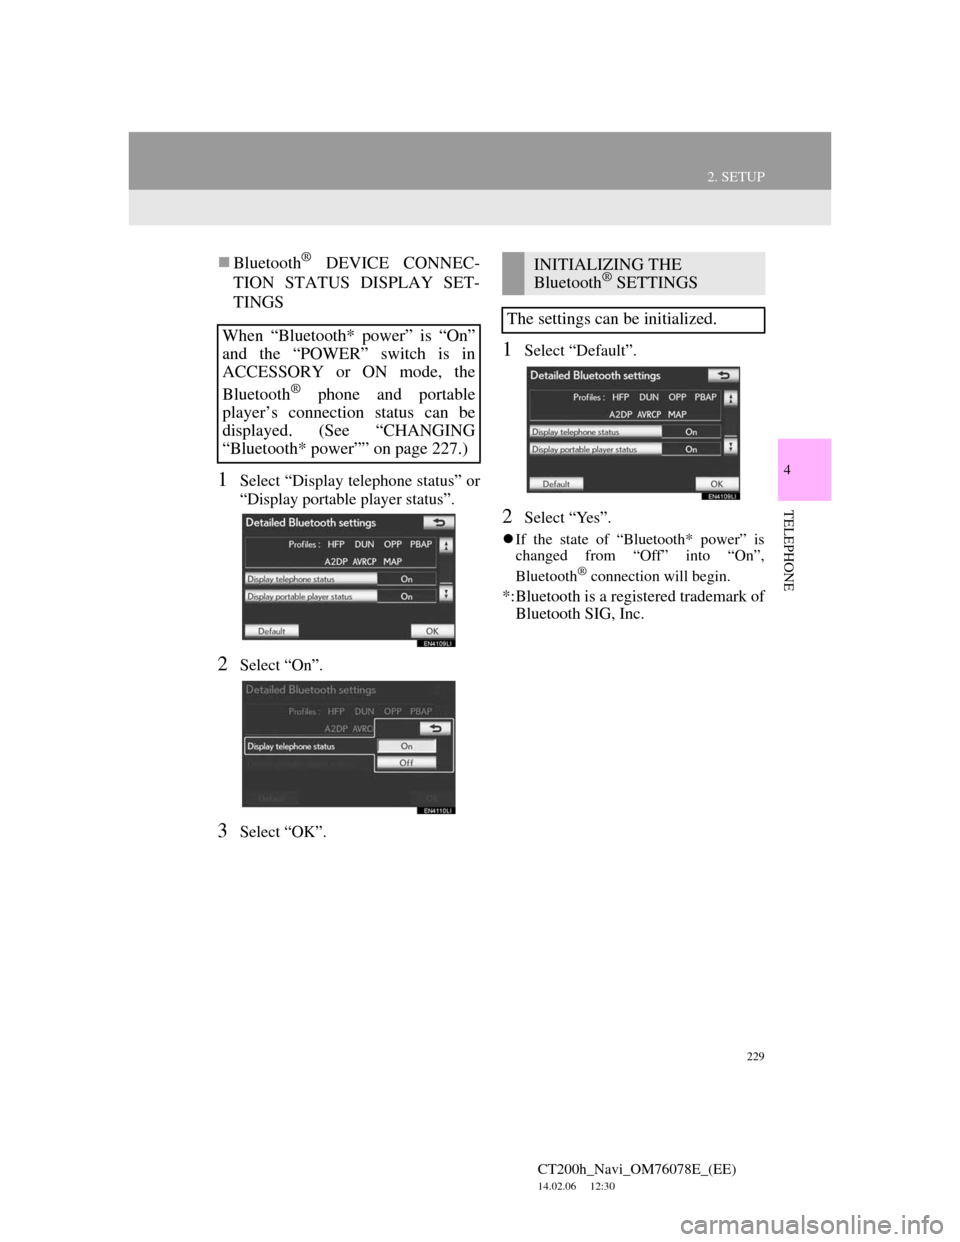
Bluetooth® DEVICE CONNEC-
TION STATUS DISPLAY SET-
TINGS
1Select “Display telephone status” or
“Display portable player status”.
2Select “On”.
3Select “OK”.
1Select “Default”.
2Select “Yes”.
If the state of “Bluetooth* power” is
changed from “Off” into “On”,
Bluetooth
® connection will begin.
*:Bluetooth is a registered trademark of
Bluetooth SIG, Inc.
When “Bluetooth* power” is “On”
and the “POWER” switch is in
ACCESSORY or ON mode, the
Bluetooth
® phone and portable
player’s connection status can be
displayed. (See “CHANGING
“Bluetooth* power”” on page 227.)
INITIALIZING THE
Bluetooth® SETTINGS
The settings can be initialized.
Page 232 of 436
232
CT200h_Navi_OM76078E_(EE)
14.02.06 12:30
1. AUDIO/VIDEO SYSTEM OPERATION
1. QUICK REFERENCE
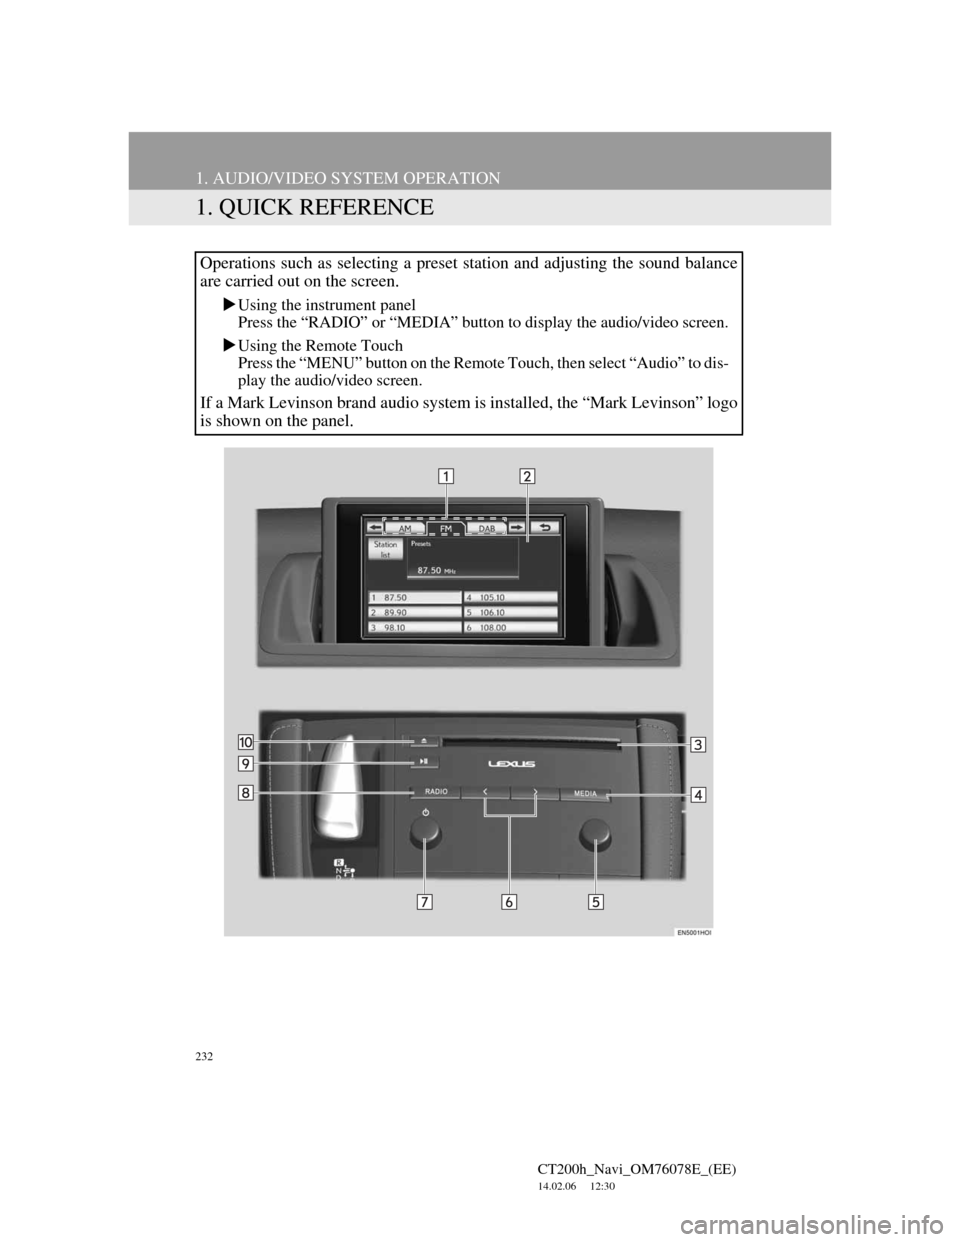
Operations such as selecting a preset station and adjusting the sound balance
are carried out on the screen.
Using the instrument panel
Press the “RADIO” or “MEDIA” button to display the audio/video screen.
Using the Remote Touch
Press the “MENU” button on the Remote Touch, then select “Audio” to dis-
play the audio/video screen.
If a Mark Levinson brand audio system is installed, the “Mark Levinson” logo
is shown on the panel.
Page 233 of 436
233
1. AUDIO/VIDEO SYSTEM OPERATION
5
AUDIO/VIDEO SYSTEM
CT200h_Navi_OM76078E_(EE)
14.02.06 12:30
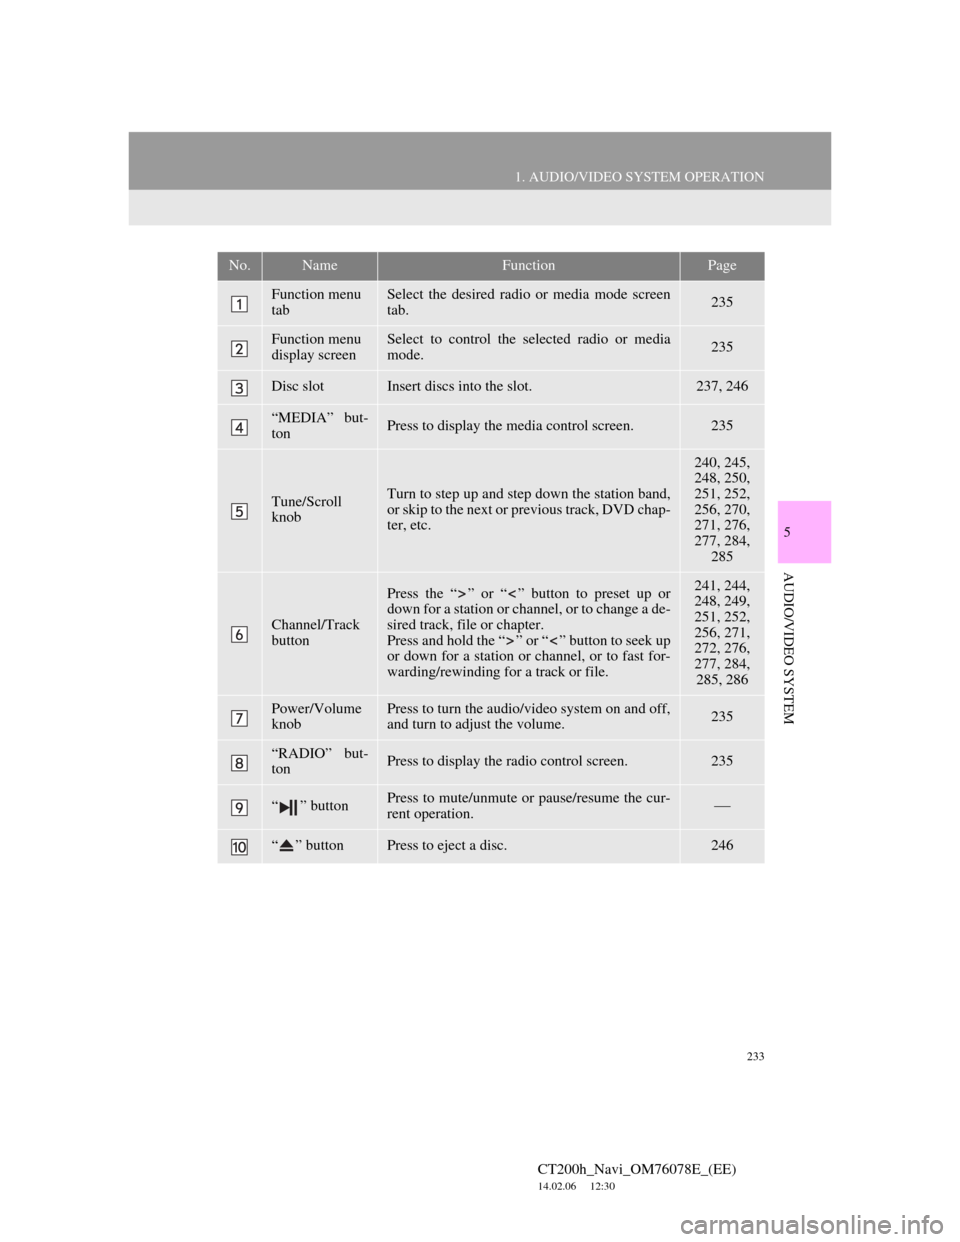
No.NameFunctionPage
Function menu
tabSelect the desired radio or media mode screen
tab.235
Function menu
display screenSelect to control the selected radio or media
mode.235
Disc slotInsert discs into the slot.237, 246
“MEDIA” but-
tonPress to display the media control screen.235
Tune/Scroll
knobTurn to step up and step down the station band,
or skip to the next or previous track, DVD chap-
ter, etc.
240, 245,
248, 250,
251, 252,
256, 270,
271, 276,
277, 284,
285
Channel/Track
button
Press the “ ” or “ ” button to preset up or
down for a station or channel, or to change a de-
sired track, file or chapter.
Press and hold the “ ” or “ ” button to seek up
or down for a station or channel, or to fast for-
warding/rewinding for a track or file.241, 244,
248, 249,
251, 252,
256, 271,
272, 276,
277, 284,
285, 286
Power/Volume
knobPress to turn the audio/video system on and off,
and turn to adjust the volume.235
“RADIO” but-
tonPress to display the radio control screen.235
“ ” buttonPress to mute/unmute or pause/resume the cur-
rent operation.
“ ” buttonPress to eject a disc.246
Page 235 of 436
235
1. AUDIO/VIDEO SYSTEM OPERATION
5
AUDIO/VIDEO SYSTEM
CT200h_Navi_OM76078E_(EE)
14.02.06 12:30
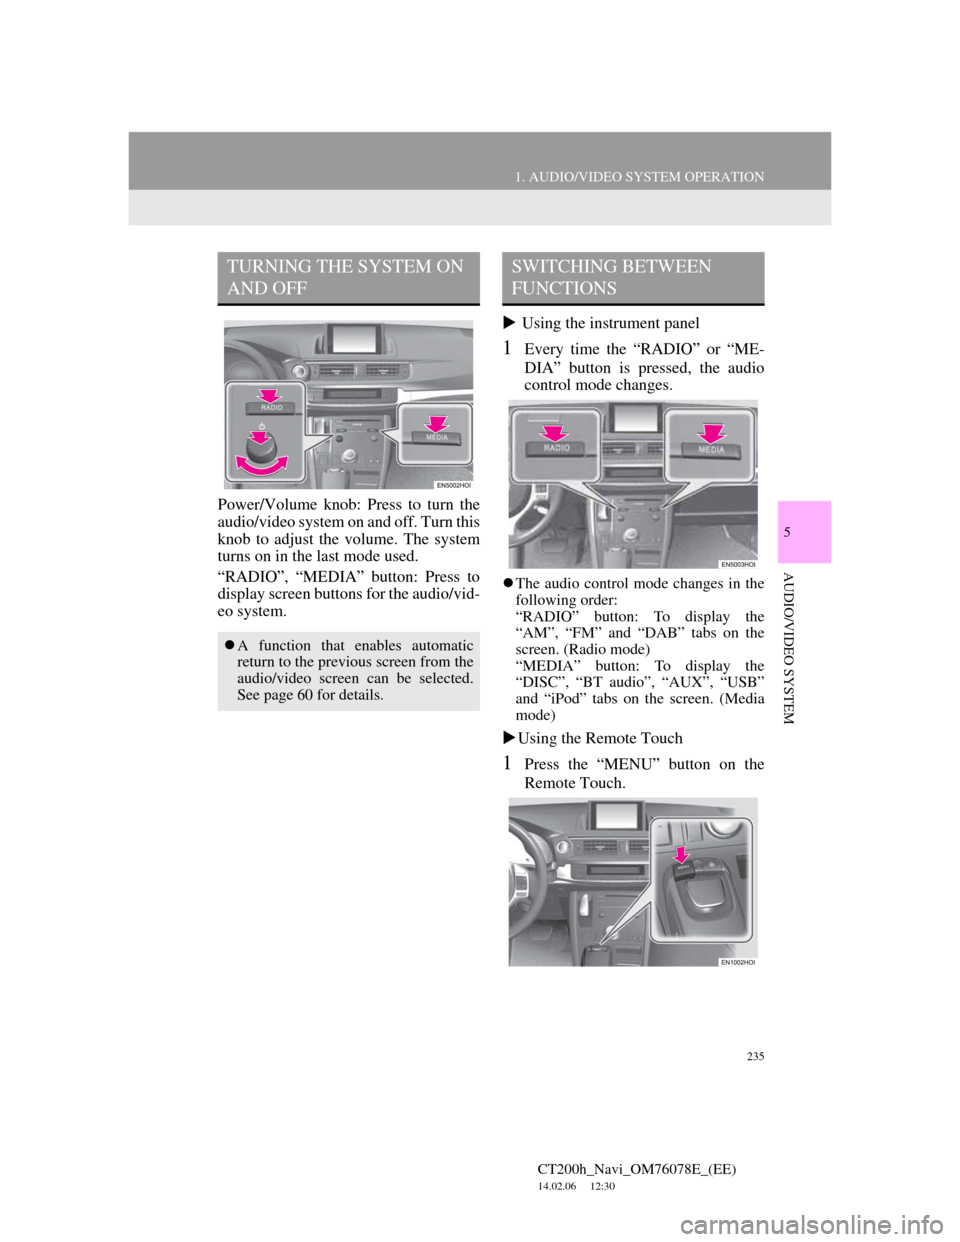
Power/Volume knob: Press to turn the
audio/video system on and off. Turn this
knob to adjust the volume. The system
turns on in the last mode used.
“RADIO”, “MEDIA” button: Press to
display screen buttons for the audio/vid-
eo system. Using the instrument panel
1Every time the “RADIO” or “ME-
DIA” button is pressed, the audio
control mode changes.
The audio control mode changes in the
following order:
“RADIO” button: To display the
“AM”, “FM” and “DAB” tabs on the
screen. (Radio mode)
“MEDIA” button: To display the
“DISC”, “BT audio”, “AUX”, “USB”
and “iPod” tabs on the screen. (Media
mode)
Using the Remote Touch
1Press the “MENU” button on the
Remote Touch.
TURNING THE SYSTEM ON
AND OFF
A function that enables automatic
return to the previous screen from the
audio/video screen can be selected.
See page 60 for details.
SWITCHING BETWEEN
FUNCTIONS
Page 236 of 436
236
1. AUDIO/VIDEO SYSTEM OPERATION
CT200h_Navi_OM76078E_(EE)
14.02.06 12:30
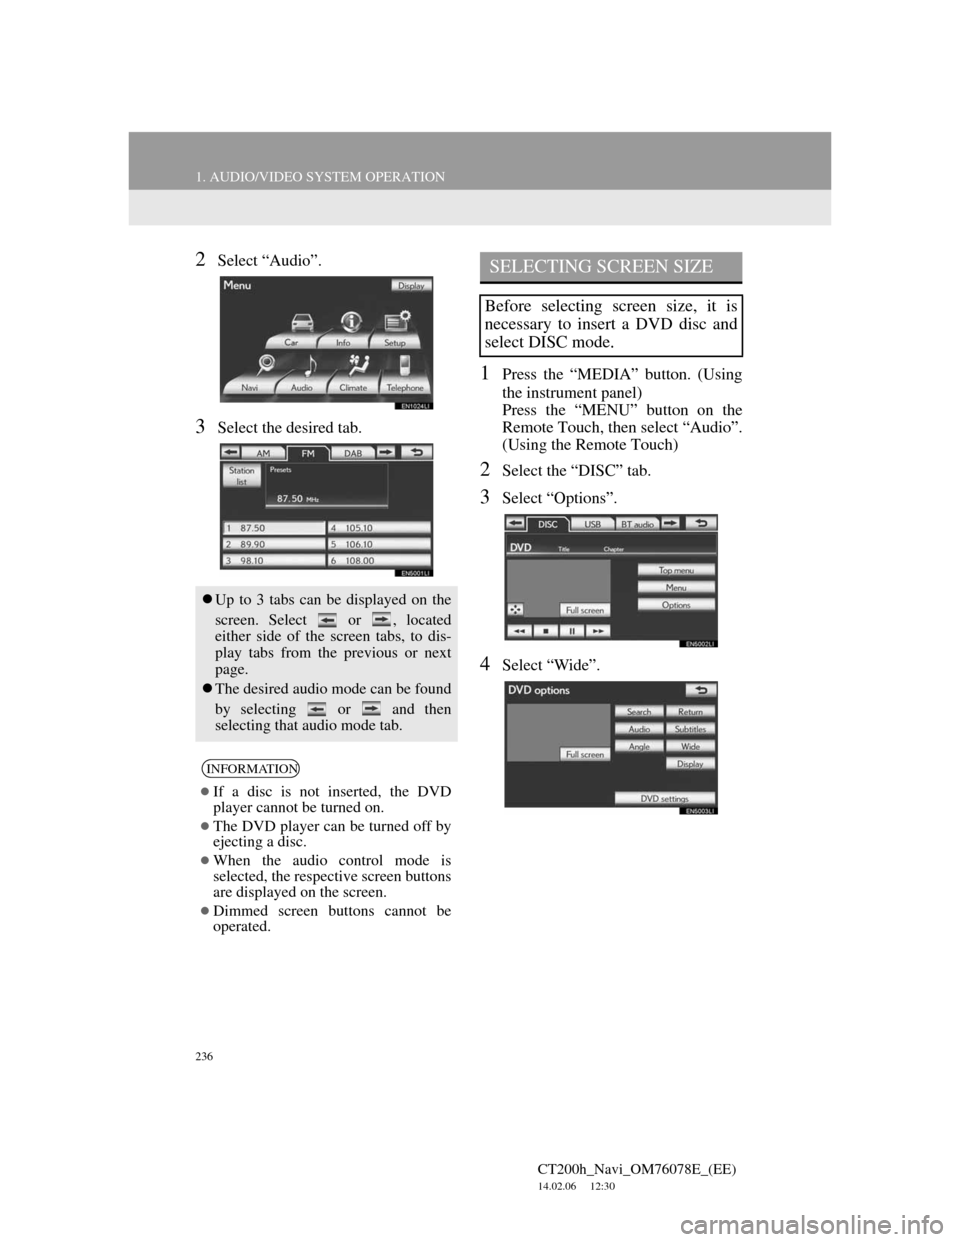
2Select “Audio”.
3Select the desired tab.
1Press the “MEDIA” button. (Using
the instrument panel)
Press the “MENU” button on the
Remote Touch, then select “Audio”.
(Using the Remote Touch)
2Select the “DISC” tab.
3Select “Options”.
4Select “Wide”.
Up to 3 tabs can be displayed on the
screen. Select or , located
either side of the screen tabs, to dis-
play tabs from the previous or next
page.
The desired audio mode can be found
by selecting or and then
selecting that audio mode tab.
INFORMATION
If a disc is not inserted, the DVD
player cannot be turned on.
The DVD player can be turned off by
ejecting a disc.
When the audio control mode is
selected, the respective screen buttons
are displayed on the screen.
Dimmed screen buttons cannot be
operated.
SELECTING SCREEN SIZE
Before selecting screen size, it is
necessary to insert a DVD disc and
select DISC mode.
Page 237 of 436
237
1. AUDIO/VIDEO SYSTEM OPERATION
5
AUDIO/VIDEO SYSTEM
CT200h_Navi_OM76078E_(EE)
14.02.06 12:30
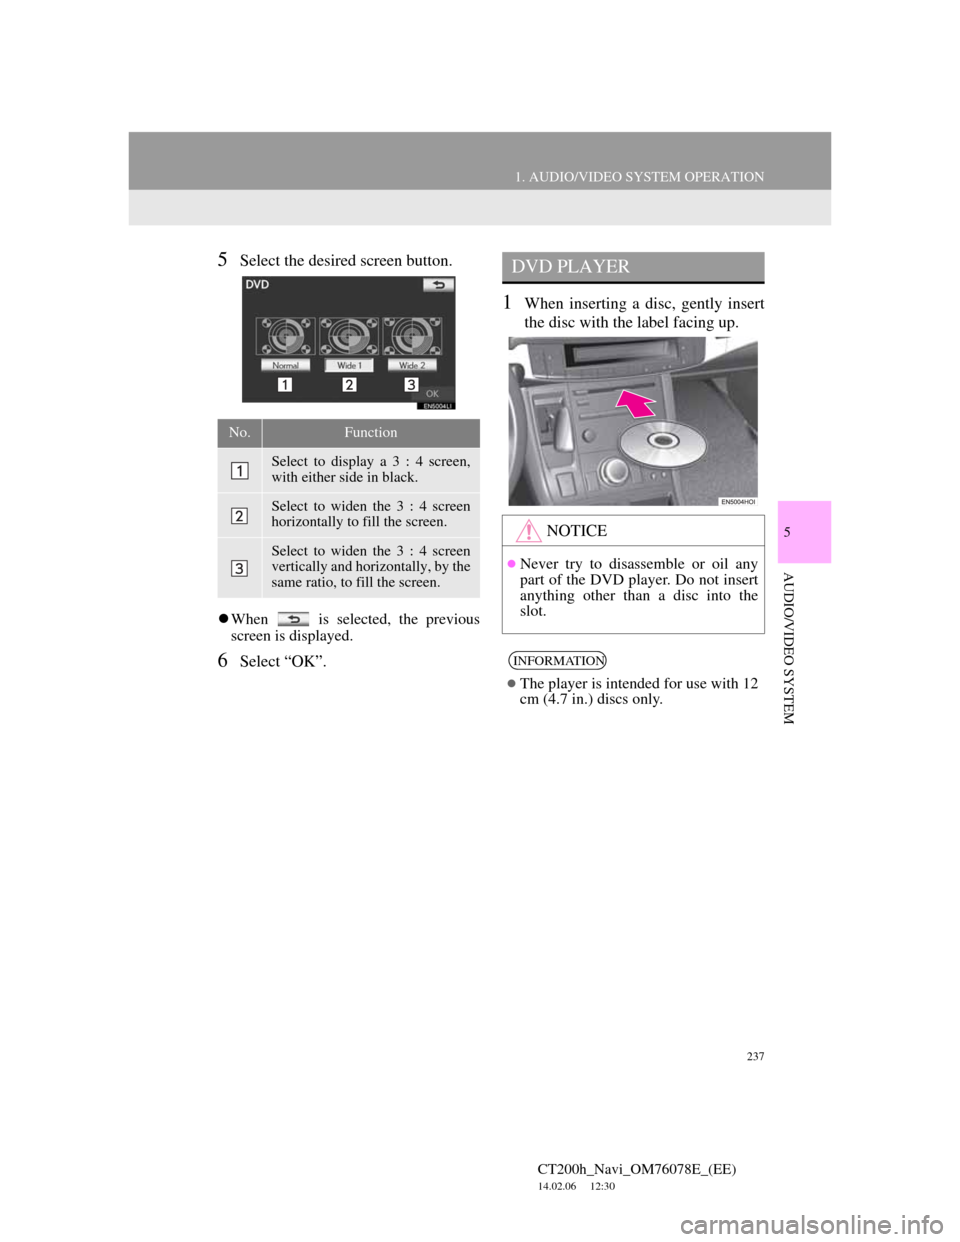
5Select the desired screen button.
When is selected, the previous
screen is displayed.
6Select “OK”.
1When inserting a disc, gently insert
the disc with the label facing up.
No.Function
Select to display a 3 : 4 screen,
with either side in black.
Select to widen the 3 : 4 screen
horizontally to fill the screen.
Select to widen the 3 : 4 screen
vertically and horizontally, by the
same ratio, to fill the screen.
DVD PLAYER
NOTICE
Never try to disassemble or oil any
part of the DVD player. Do not insert
anything other than a disc into the
slot.
INFORMATION
The player is intended for use with 12
cm (4.7 in.) discs only.
Page 239 of 436
239
1. AUDIO/VIDEO SYSTEM OPERATION
5
AUDIO/VIDEO SYSTEM
CT200h_Navi_OM76078E_(EE)
14.02.06 12:30
1Press the “MEDIA” button to
display the media control screen and
select the “USB” or “iPod” tab or
press the “MEDIA” button
repeatedly to change to USB
memory or iPod mode.
For the Remote Touch operation
method, see “SWITCHING
BETWEEN FUNCTIONS” on page
235.
USB PORT
A USB memory/iPod can be con-
nected to the USB port. For details,
see “CONNECTING A USB MEM-
ORY” on page 268 and “CON-
NECTING iPod” on page 274.
INFORMATION
When a USB memory/iPod is not
connected with the USB port, the tab
will be dimmed.
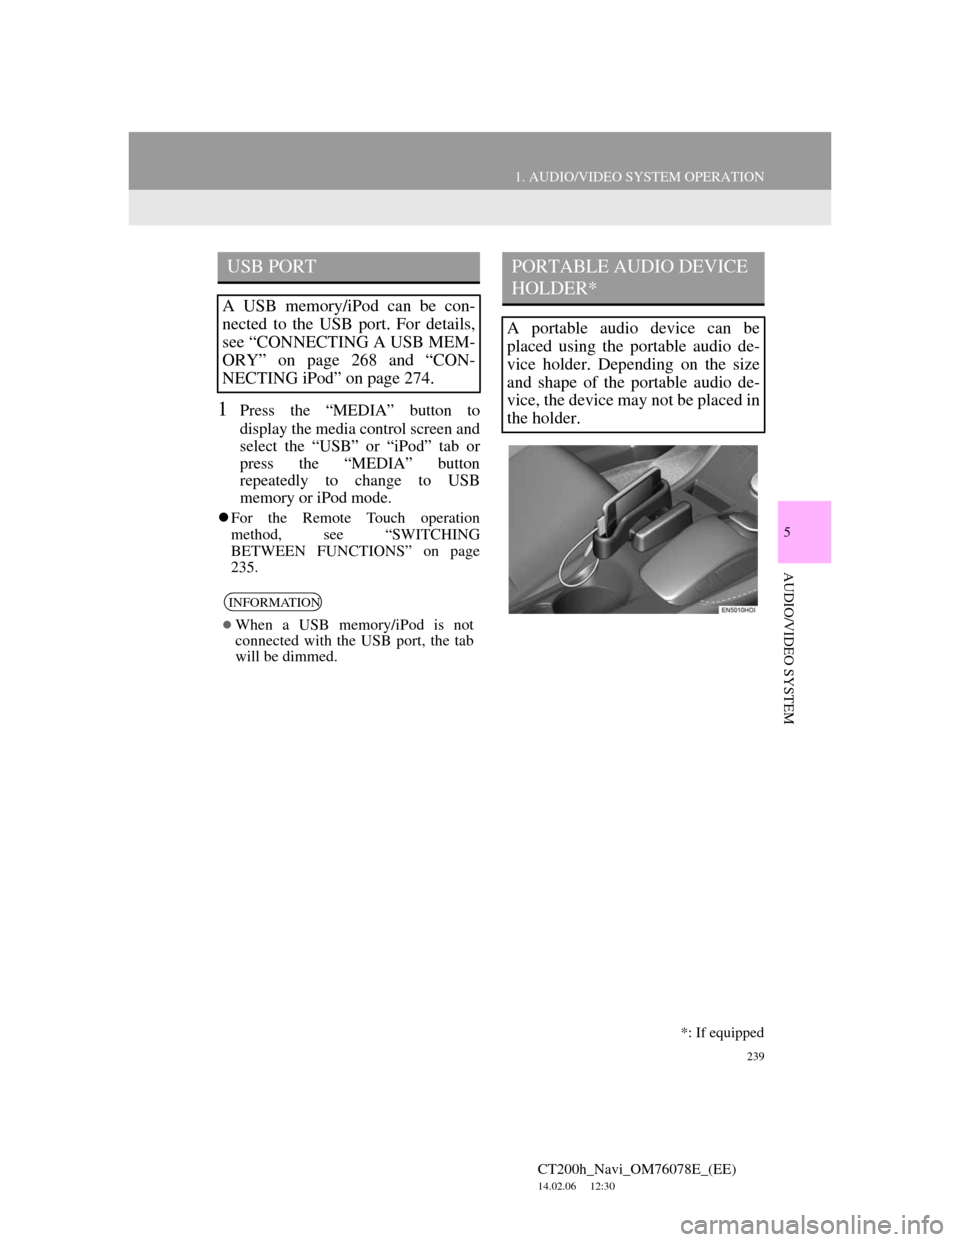
PORTABLE AUDIO DEVICE
HOLDER*
A portable audio device can be
placed using the portable audio de-
vice holder. Depending on the size
and shape of the portable audio de-
vice, the device may not be placed in
the holder.
*: If equipped
Page 241 of 436
241
1. AUDIO/VIDEO SYSTEM OPERATION
5
AUDIO/VIDEO SYSTEM
CT200h_Navi_OM76078E_(EE)
14.02.06 12:30
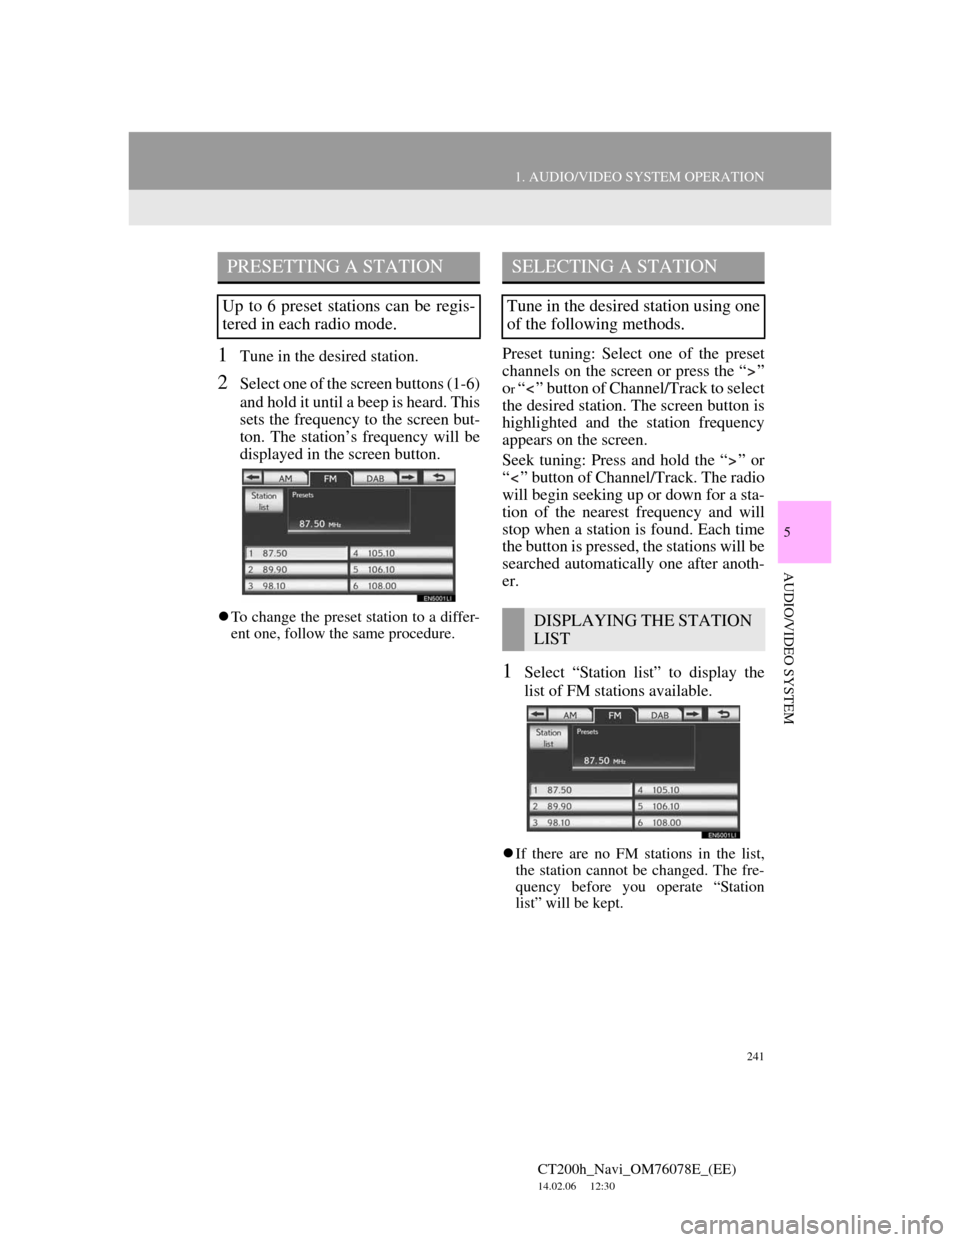
1Tune in the desired station.
2Select one of the screen buttons (1-6)
and hold it until a beep is heard. This
sets the frequency to the screen but-
ton. The station’s frequency will be
displayed in the screen button.
To change the preset station to a differ-
ent one, follow the same procedure.
Preset tuning: Select one of the preset
channels on the screen or press the “ ”
o
r “ ” button of Channel/Track to select
the desired station. The screen button is
highlighted and the station frequency
appears on the screen.
Seek tuning: Press and hold the “ ” or
“ ” button of Channel/Track. The radio
will begin seeking up or down for a sta-
tion of the nearest frequency and will
stop when a station is found. Each time
the button is pressed, the stations will be
searched automatically one after anoth-
er.
1Select “Station list” to display the
list of FM stations available.
If there are no FM stations in the list,
the station cannot be changed. The fre-
quency before you operate “Station
list” will be kept.
PRESETTING A STATION
Up to 6 preset stations can be regis-
tered in each radio mode.
SELECTING A STATION
Tune in the desired station using one
of the following methods.
DISPLAYING THE STATION
LIST