remote start Lexus CT200h 2012 Navigation Manual (in English)
[x] Cancel search | Manufacturer: LEXUS, Model Year: 2012, Model line: CT200h, Model: Lexus CT200h 2012Pages: 436, PDF Size: 28.25 MB
Page 94 of 436
94
1. DESTINATION SEARCH
CT200h_Navi_OM76078E_(EE)
14.02.06 12:29
1Press the “MENU” button on the
Remote Touch. (See “Remote
Touch” on page 12.)
2Select “Navi”, and select “Menu” if
the map screen is displayed.
3Select “Destination” on the naviga-
tion menu screen.
4Select “Intersection” on the second
page of the “Destination” screen.
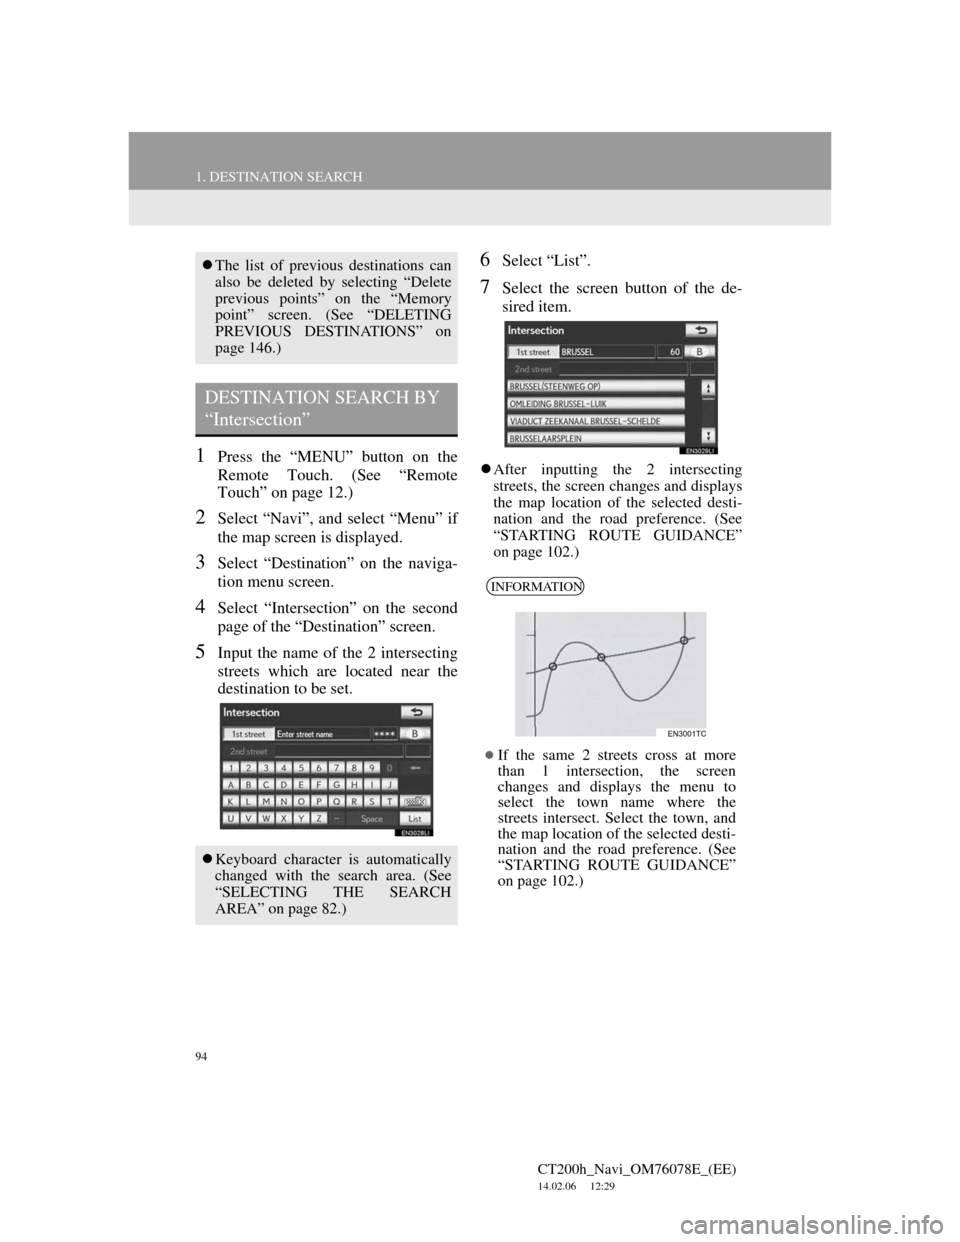
5Input the name of the 2 intersecting
streets which are located near the
destination to be set.
6Select “List”.
7Select the screen button of the de-
sired item.
After inputting the 2 intersecting
streets, the screen changes and displays
the map location of the selected desti-
nation and the road preference. (See
“STARTING ROUTE GUIDANCE”
on page 102.)
The list of previous destinations can
also be deleted by selecting “Delete
previous points” on the “Memory
point” screen. (See “DELETING
PREVIOUS DESTINATIONS” on
page 146.)
DESTINATION SEARCH BY
“Intersection”
Keyboard character is automatically
changed with the search area. (See
“SELECTING THE SEARCH
AREA” on page 82.)
INFORMATION
If the same 2 streets cross at more
than 1 intersection, the screen
changes and displays the menu to
select the town name where the
streets intersect. Select the town, and
the map location of the selected desti-
nation and the road preference. (See
“STARTING ROUTE GUIDANCE”
on page 102.)
Page 95 of 436
95
1. DESTINATION SEARCH
3
NAVIGATION SYSTEM
CT200h_Navi_OM76078E_(EE)
14.02.06 12:29
1Press the “MENU” button on the
Remote Touch. (See “Remote
Touch” on page 12.)
2Select “Navi”, and select “Menu” if
the map screen is displayed.
3Select “Destination” on the naviga-
tion menu screen.
4Select “Motorway ent./exit” on the
second page of the “Destination”
screen.
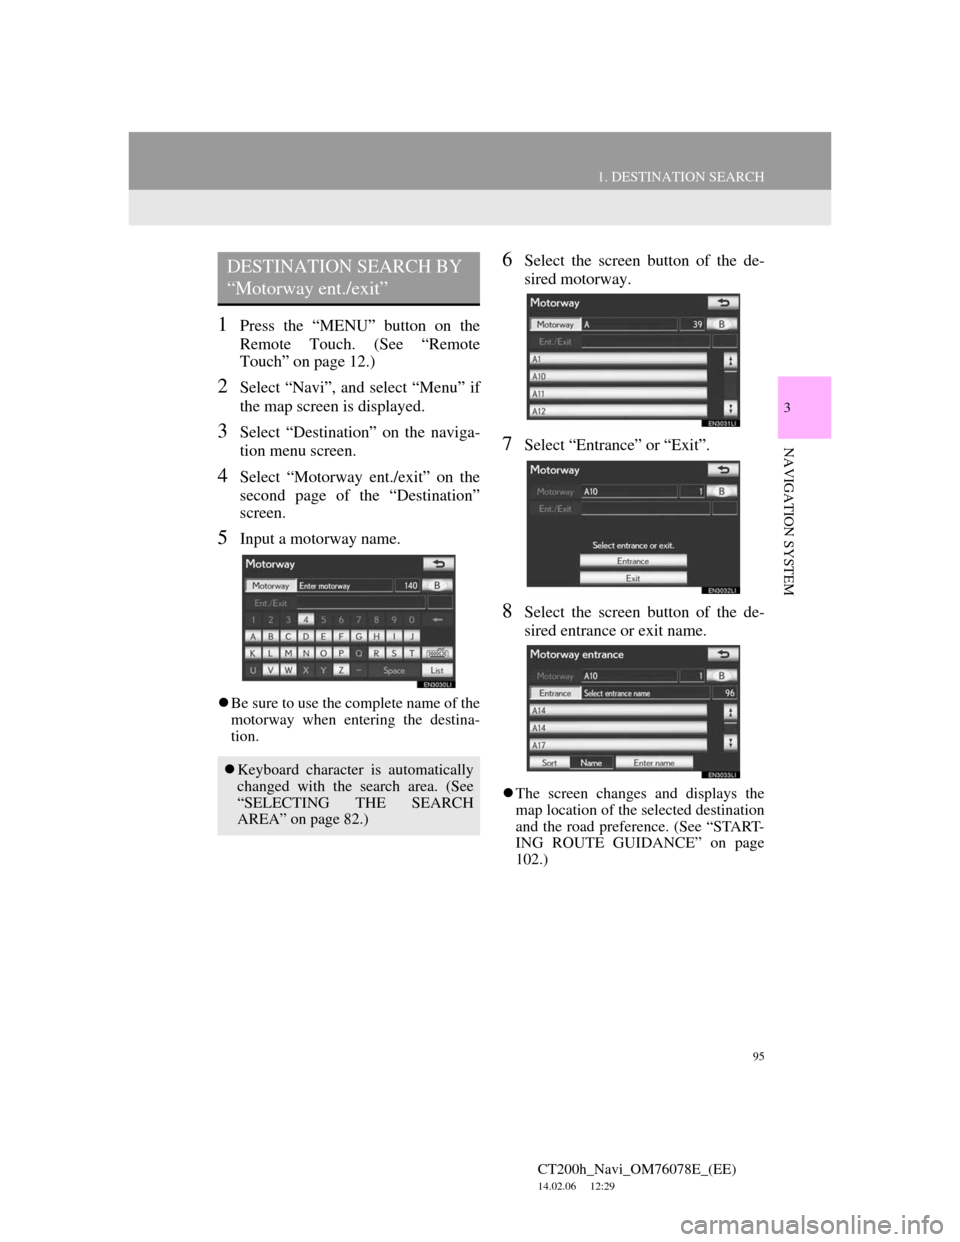
5Input a motorway name.
Be sure to use the complete name of the
motorway when entering the destina-
tion.
6Select the screen button of the de-
sired motorway.
7Select “Entrance” or “Exit”.
8Select the screen button of the de-
sired entrance or exit name.
The screen changes and displays the
map location of the selected destination
and the road preference. (See “START-
ING ROUTE GUIDANCE” on page
102.)
DESTINATION SEARCH BY
“Motorway ent./exit”
Keyboard character is automatically
changed with the search area. (See
“SELECTING THE SEARCH
AREA” on page 82.)
Page 96 of 436
96
1. DESTINATION SEARCH
CT200h_Navi_OM76078E_(EE)
14.02.06 12:29
1Press the “MENU” button on the
Remote Touch. (See “Remote
Touch” on page 12.)
2Select “Navi”, and select “Menu” if
the map screen is displayed.
3Select “Destination” on the naviga-
tion menu screen.
4Select “Coordinates” on the second
page of the “Destination” screen.
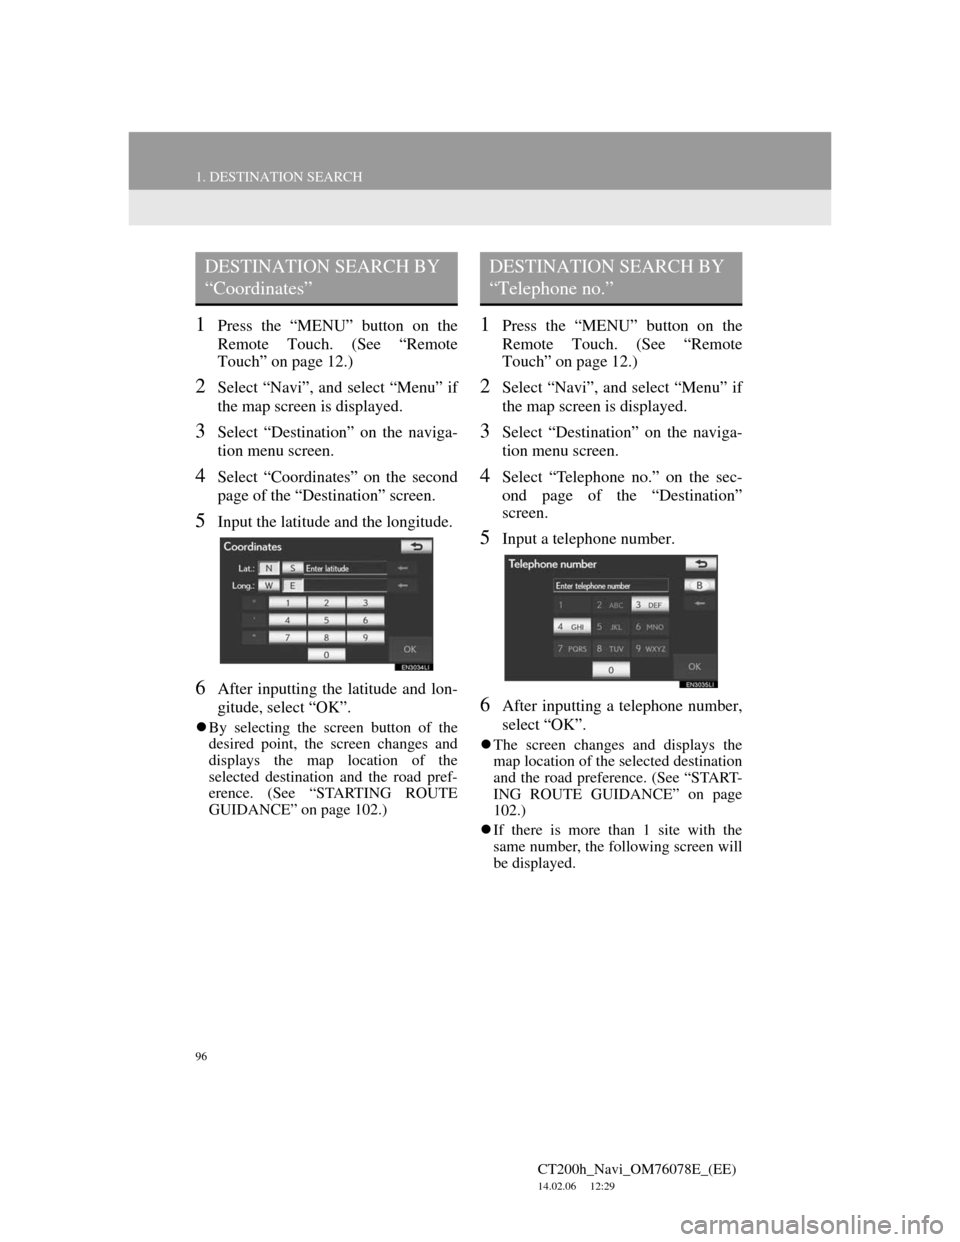
5Input the latitude and the longitude.
6After inputting the latitude and lon-
gitude, select “OK”.
By selecting the screen button of the
desired point, the screen changes and
displays the map location of the
selected destination and the road pref-
erence. (See “STARTING ROUTE
GUIDANCE” on page 102.)
1Press the “MENU” button on the
Remote Touch. (See “Remote
Touch” on page 12.)
2Select “Navi”, and select “Menu” if
the map screen is displayed.
3Select “Destination” on the naviga-
tion menu screen.
4Select “Telephone no.” on the sec-
ond page of the “Destination”
screen.
5Input a telephone number.
6After inputting a telephone number,
select “OK”.
The screen changes and displays the
map location of the selected destination
and the road preference. (See “START-
ING ROUTE GUIDANCE” on page
102.)
If there is more than 1 site with the
same number, the following screen will
be displayed.
DESTINATION SEARCH BY
“Coordinates”DESTINATION SEARCH BY
“Telephone no.”
Page 101 of 436
101
1. DESTINATION SEARCH
3
NAVIGATION SYSTEM
CT200h_Navi_OM76078E_(EE)
14.02.06 12:29
1Press the “MENU” button on the
Remote Touch. (See “Remote
Touch” on page 12.)
2Select “Navi”, and select “Menu” if
the map screen is displayed.
3Select “Destination” on the naviga-
tion menu screen.
4Select “UK Postal Code” on the sec-
ond page of the “Destination”
screen.
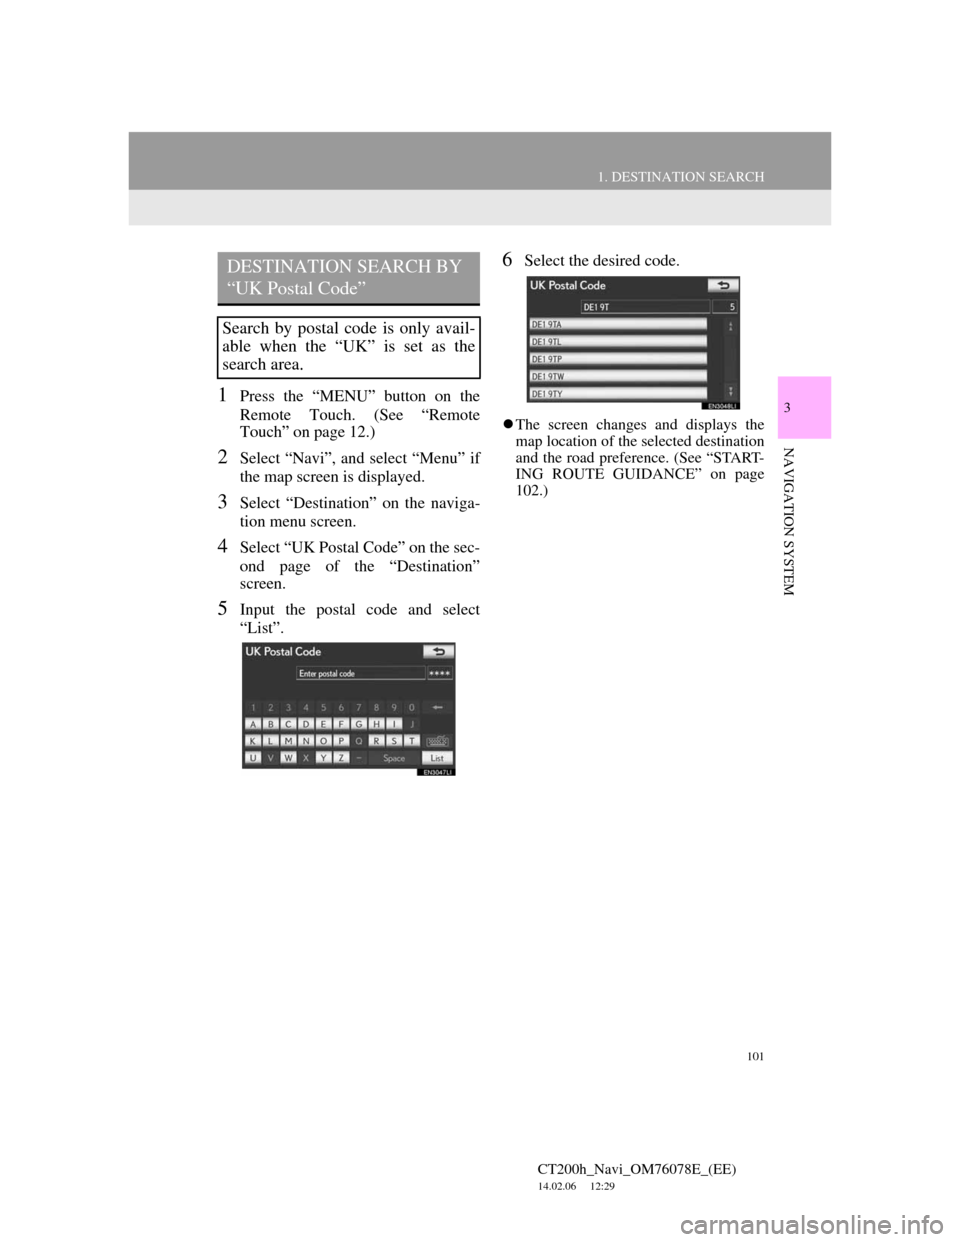
5Input the postal code and select
“List”.
6Select the desired code.
The screen changes and displays the
map location of the selected destination
and the road preference. (See “START-
ING ROUTE GUIDANCE” on page
102.)
DESTINATION SEARCH BY
“UK Postal Code”
Search by postal code is only avail-
able when the “UK” is set as the
search area.
Page 103 of 436
103
1. DESTINATION SEARCH
3
NAVIGATION SYSTEM
CT200h_Navi_OM76078E_(EE)
14.02.06 12:29
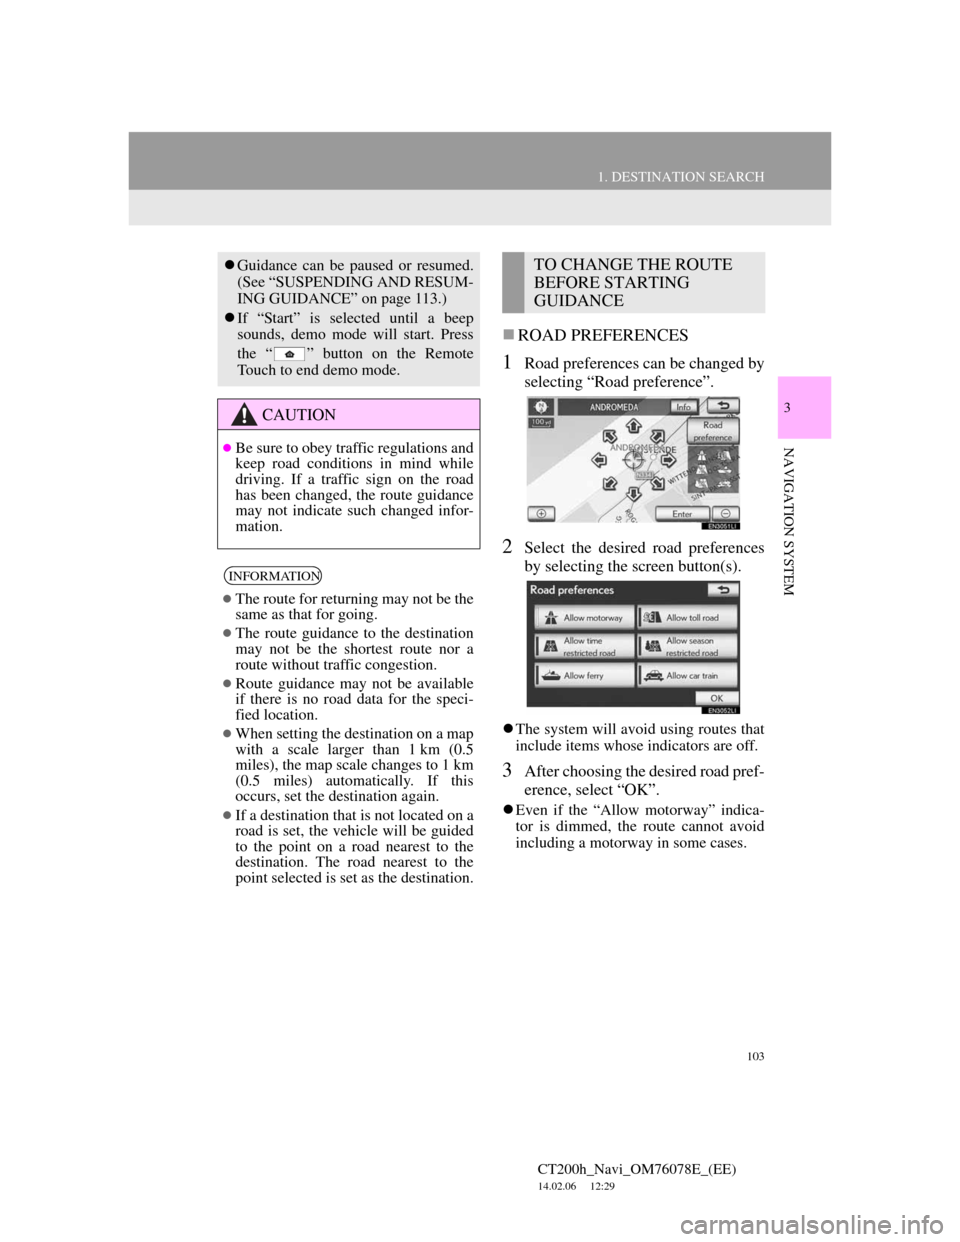
ROAD PREFERENCES
1Road preferences can be changed by
selecting “Road preference”.
2Select the desired road preferences
by selecting the screen button(s).
The system will avoid using routes that
include items whose indicators are off.
3After choosing the desired road pref-
erence, select “OK”.
Even if the “Allow motorway” indica-
tor is dimmed, the route cannot avoid
including a motorway in some cases.
Guidance can be paused or resumed.
(See “SUSPENDING AND RESUM-
ING GUIDANCE” on page 113.)
If “Start” is selected until a beep
sounds, demo mode will start. Press
the “ ” button on the Remote
Touch to end demo mode.
CAUTION
Be sure to obey traffic regulations and
keep road conditions in mind while
driving. If a traffic sign on the road
has been changed, the route guidance
may not indicate such changed infor-
mation.
INFORMATION
The route for returning may not be the
same as that for going.
The route guidance to the destination
may not be the shortest route nor a
route without traffic congestion.
Route guidance may not be available
if there is no road data for the speci-
fied location.
When setting the destination on a map
with a scale larger than 1 km (0.5
miles), the map scale changes to 1 km
(0.5 miles) automatically. If this
occurs, set the destination again.
If a destination that is not located on a
road is set, the vehicle will be guided
to the point on a road nearest to the
destination. The road nearest to the
point selected is set as the destination.
TO CHANGE THE ROUTE
BEFORE STARTING
GUIDANCE
Page 117 of 436
117
2. ROUTE GUIDANCE
CT200h_Navi_OM76078E_(EE)
14.02.06 12:29
3
NAVIGATION SYSTEM
1Press the “MENU” button on the
Remote Touch. (See “Remote
Touch” on page 12.)
2Select “Navi” on the “Menu” screen.
3Select “Menu” on the map screen.
4Select “Route” on the navigation
menu screen.
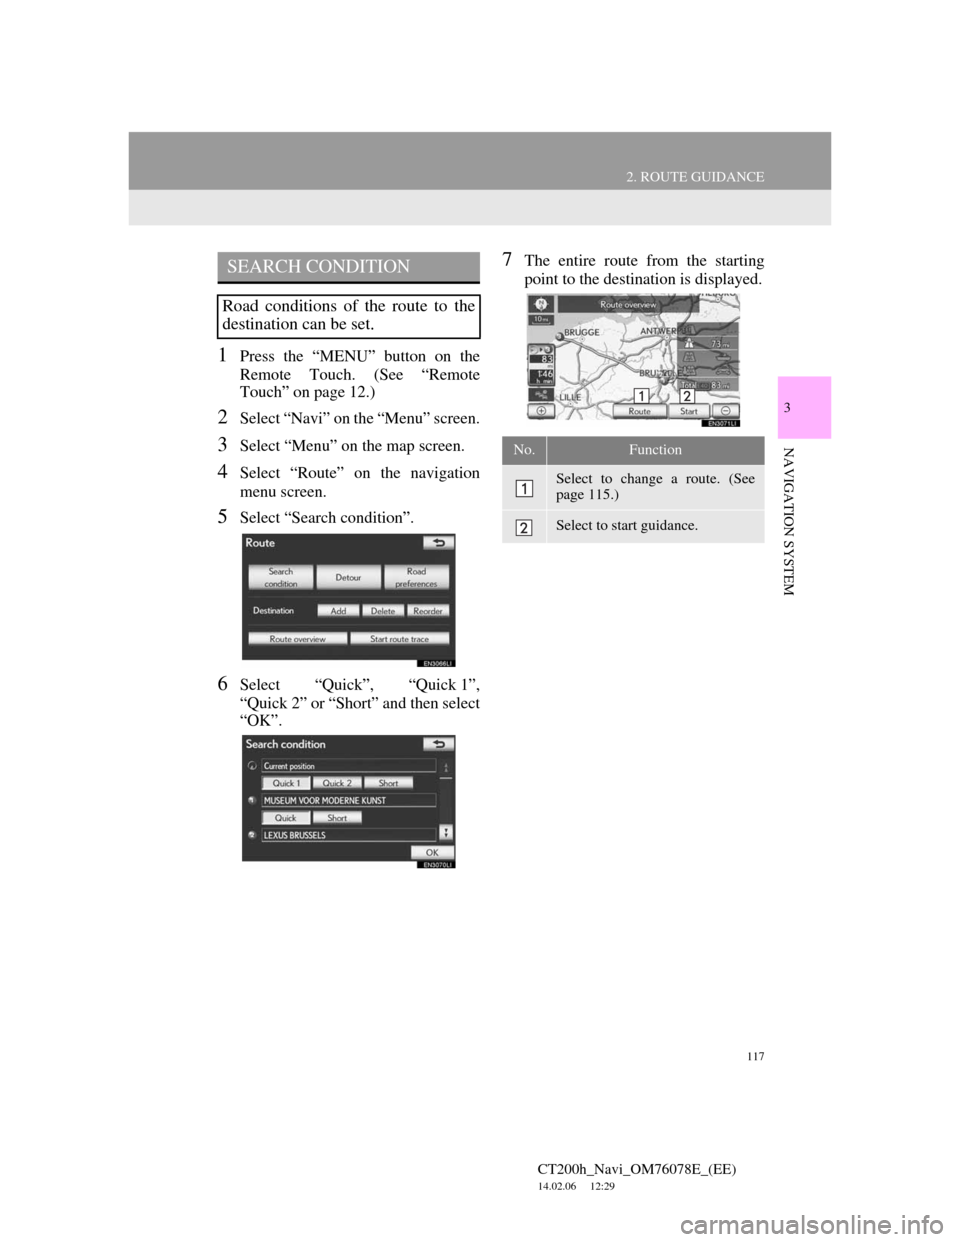
5Select “Search condition”.
6Select “Quick”, “Quick 1”,
“Quick 2” or “Short” and then select
“OK”.
7The entire route from the starting
point to the destination is displayed.SEARCH CONDITION
Road conditions of the route to the
destination can be set.
No.Function
Select to change a route. (See
page 115.)
Select to start guidance.
Page 118 of 436
118
2. ROUTE GUIDANCE
CT200h_Navi_OM76078E_(EE)
14.02.06 12:29
1Press the “MENU” button on the
Remote Touch. (See “Remote
Touch” on page 12.)
2Select “Navi” on the “Menu” screen.
3Select “Menu” on the map screen.
4Select “Route” on the navigation
menu screen.
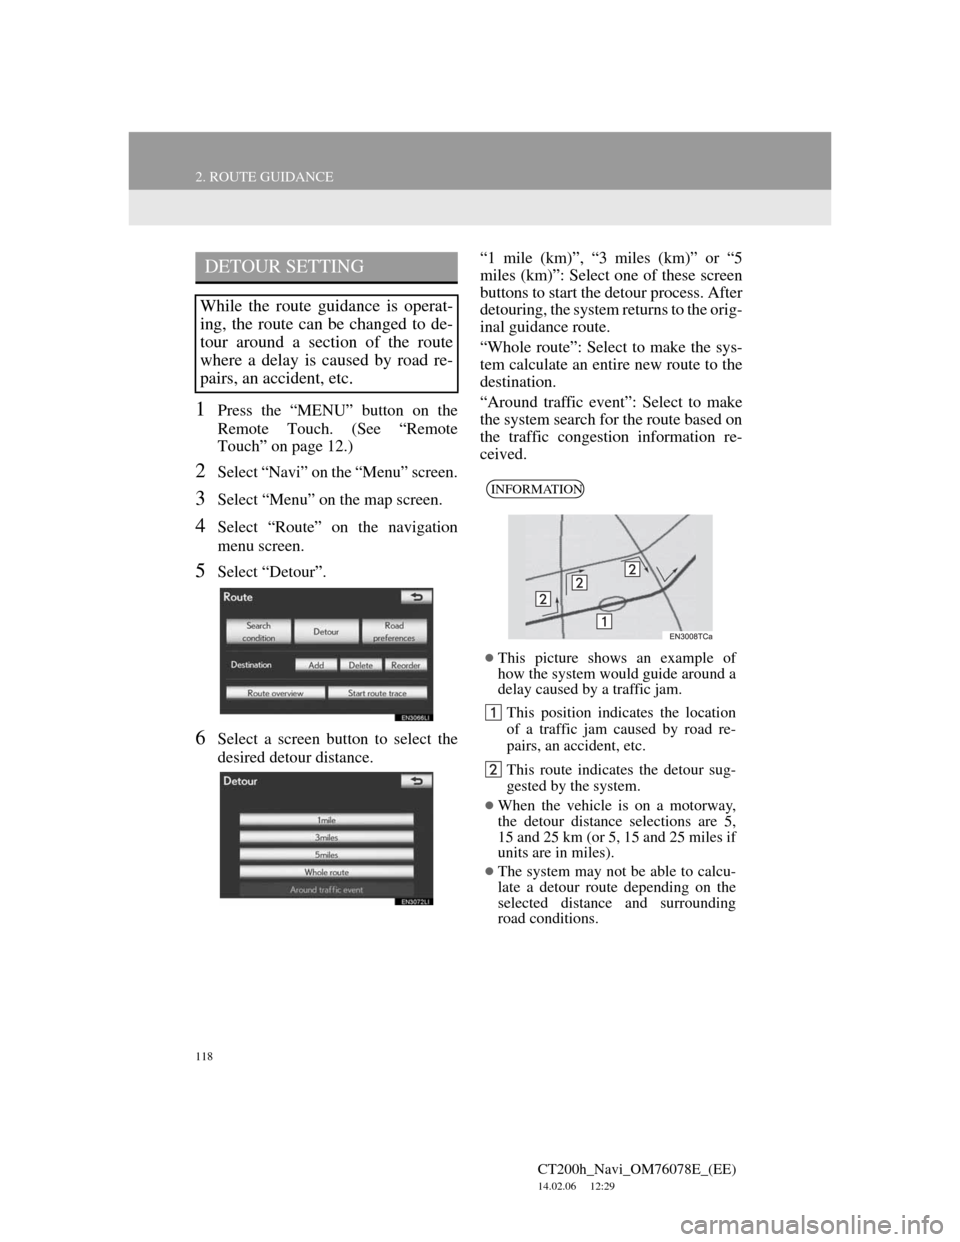
5Select “Detour”.
6Select a screen button to select the
desired detour distance.“1 mile (km)”, “3 miles (km)” or “5
miles (km)”: Select one of these screen
buttons to start the detour process. After
detouring, the system returns to the orig-
inal guidance route.
“Whole route”: Select to make the sys-
tem calculate an entire new route to the
destination.
“Around traffic event”: Select to make
the system search for the route based on
the traffic congestion information re-
ceived.
DETOUR SETTING
While the route guidance is operat-
ing, the route can be changed to de-
tour around a section of the route
where a delay is caused by road re-
pairs, an accident, etc.
INFORMATION
This picture shows an example of
how the system would guide around a
delay caused by a traffic jam.
This position indicates the location
of a traffic jam caused by road re-
pairs, an accident, etc.
This route indicates the detour sug-
gested by the system.
When the vehicle is on a motorway,
the detour distance selections are 5,
15 and 25 km (or 5, 15 and 25 miles if
units are in miles).
The system may not be able to calcu-
late a detour route depending on the
selected distance and surrounding
road conditions.
Page 121 of 436
121
2. ROUTE GUIDANCE
CT200h_Navi_OM76078E_(EE)
14.02.06 12:29
3
NAVIGATION SYSTEM
1Press the “MENU” button on the
Remote Touch.
2Select “Navi”, and select “Menu” if
the map screen is displayed.
3Select “Route” on the navigation
menu screen.
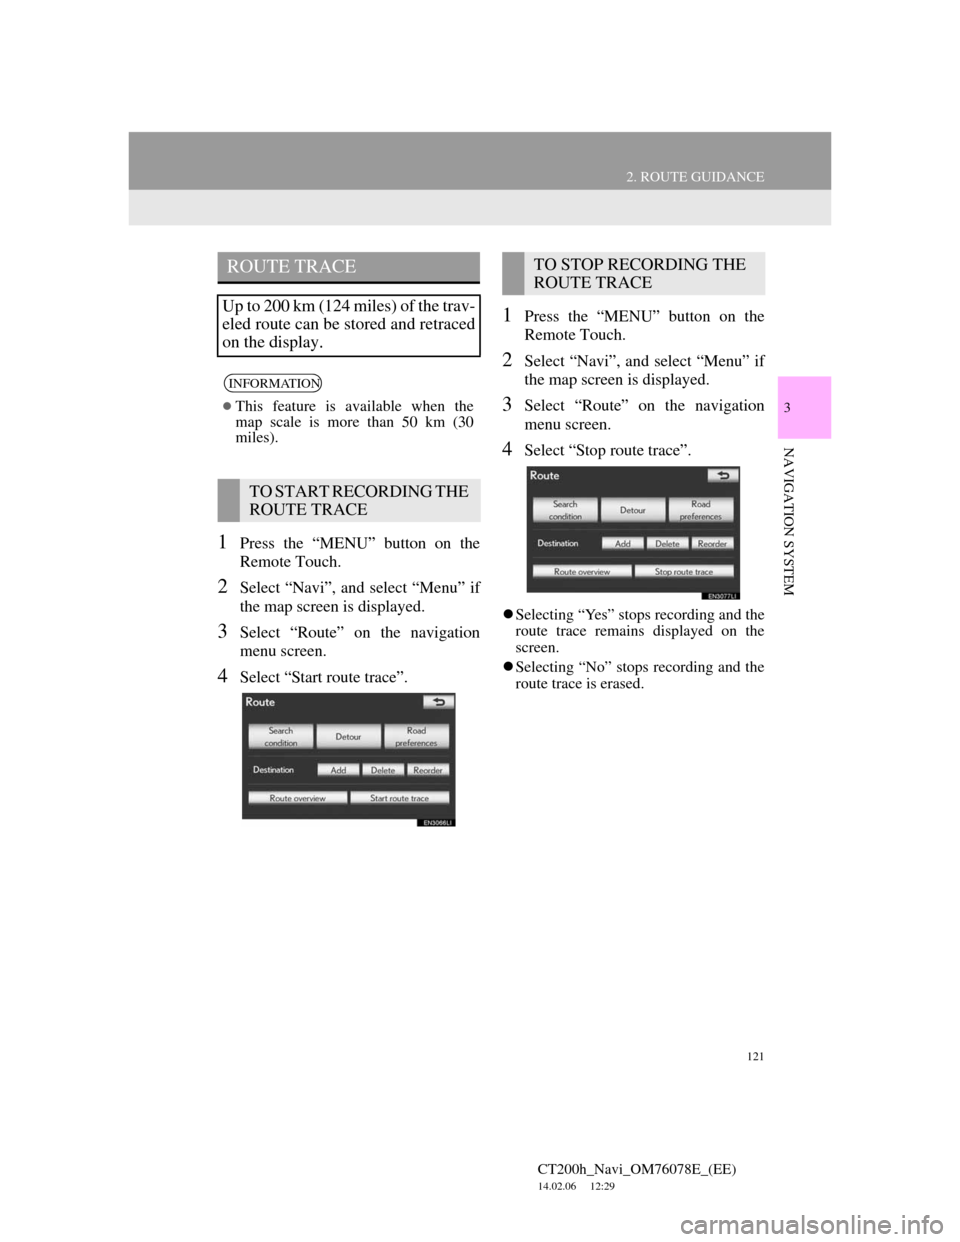
4Select “Start route trace”.
1Press the “MENU” button on the
Remote Touch.
2Select “Navi”, and select “Menu” if
the map screen is displayed.
3Select “Route” on the navigation
menu screen.
4Select “Stop route trace”.
Selecting “Yes” stops recording and the
route trace remains displayed on the
screen.
Selecting “No” stops recording and the
route trace is erased.
ROUTE TRACE
Up to 200 km (124 miles) of the trav-
eled route can be stored and retraced
on the display.
INFORMATION
This feature is available when the
map scale is more than 50 km (30
miles).
TO START RECORDING THE
ROUTE TRACE
TO STOP RECORDING THE
ROUTE TRACE
Page 147 of 436
147
3. MEMORY POINTS
CT200h_Navi_OM76078E_(EE)
14.02.06 12:29
3
NAVIGATION SYSTEM
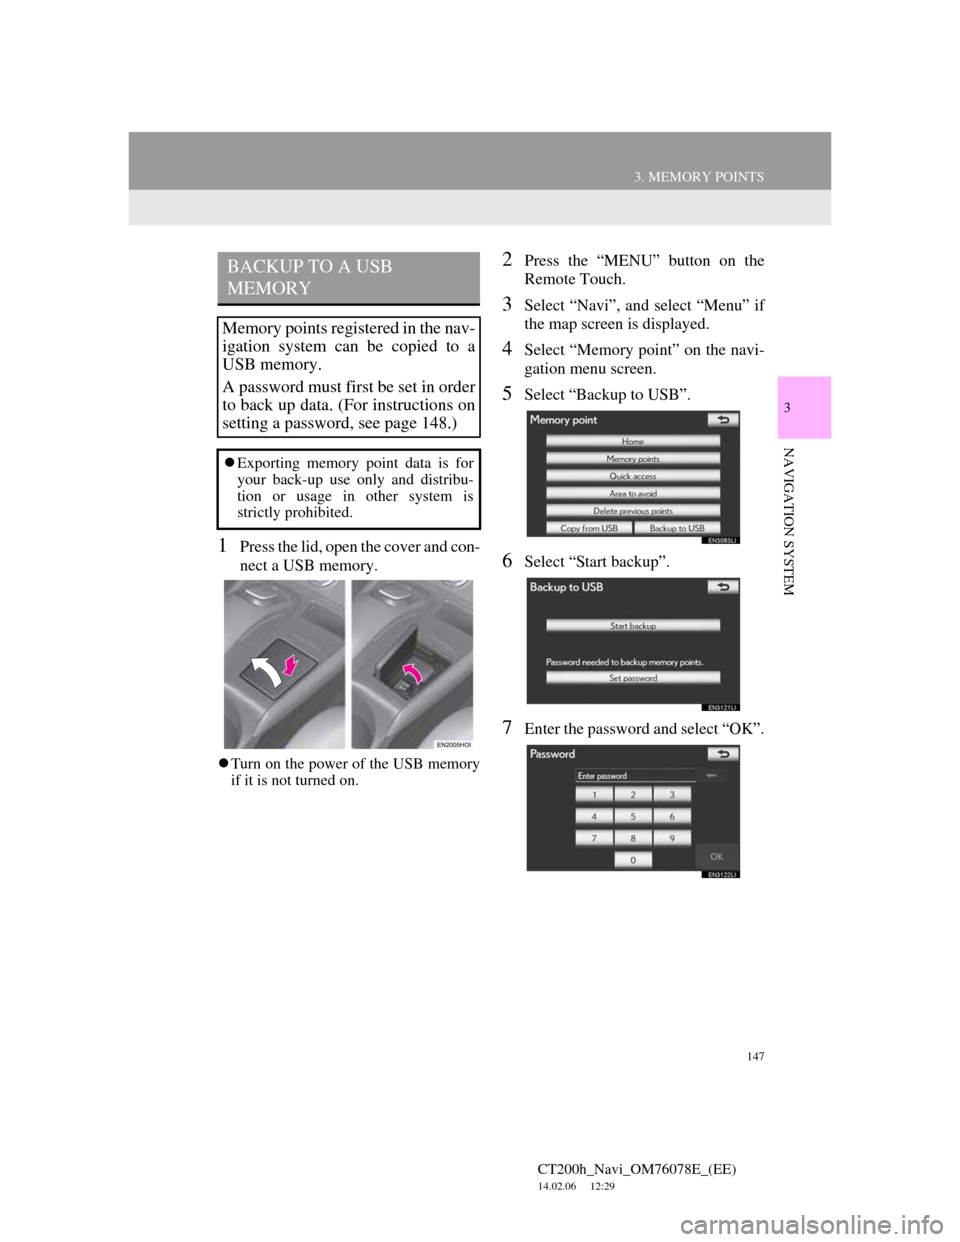
1Press the lid, open the cover and con-
nect a USB memory.
Turn on the power of the USB memory
if it is not turned on.
2Press the “MENU” button on the
Remote Touch.
3Select “Navi”, and select “Menu” if
the map screen is displayed.
4Select “Memory point” on the navi-
gation menu screen.
5Select “Backup to USB”.
6Select “Start backup”.
7Enter the password and select “OK”.
BACKUP TO A USB
MEMORY
Memory points registered in the nav-
igation system can be copied to a
USB memory.
A password must first be set in order
to back up data. (For instructions on
setting a password, see page 148.)
Exporting memory point data is for
your back-up use only and distribu-
tion or usage in other system is
strictly prohibited.
Page 148 of 436
148
3. MEMORY POINTS
CT200h_Navi_OM76078E_(EE)
14.02.06 12:29
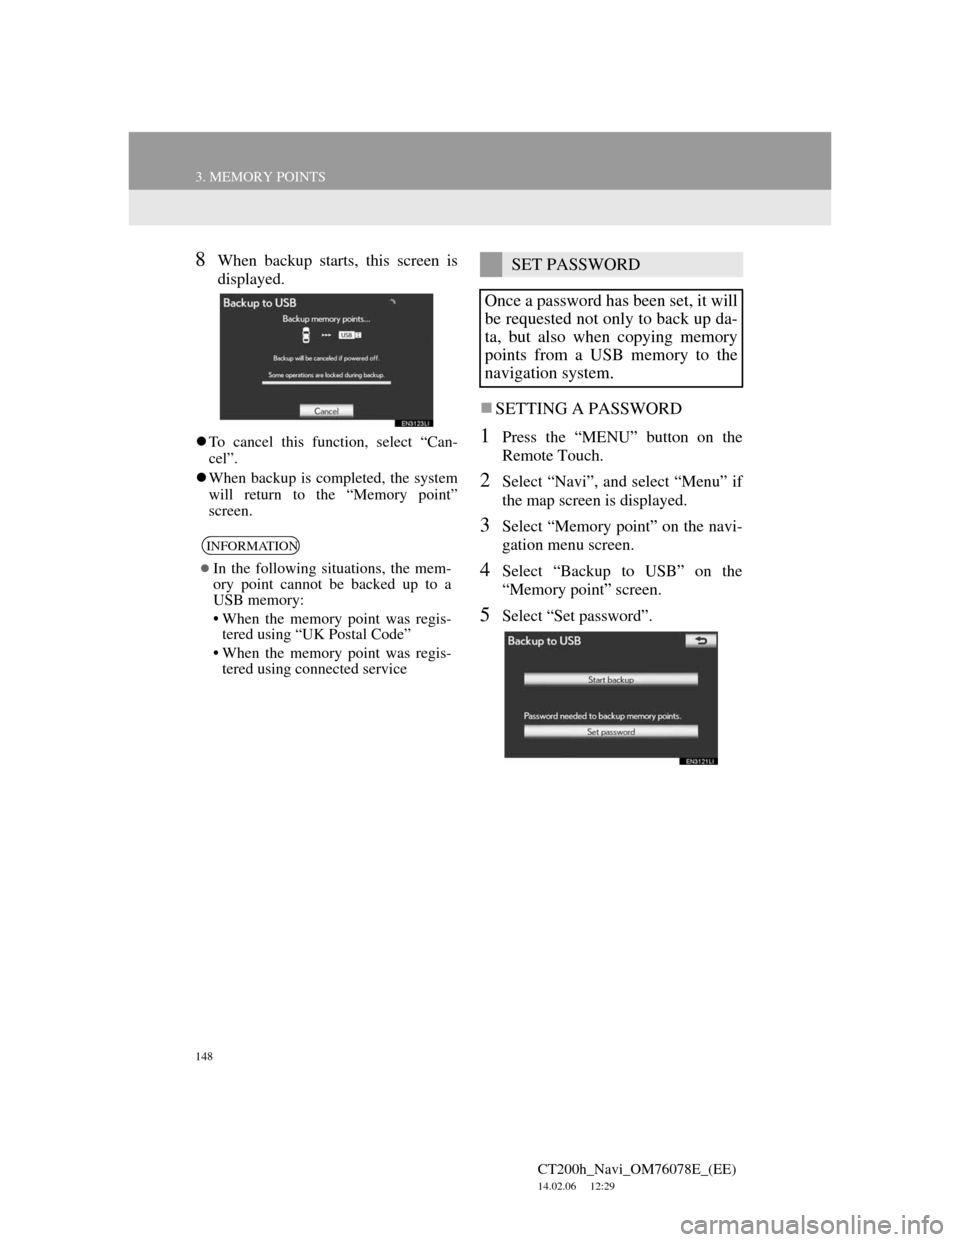
8When backup starts, this screen is
displayed.
To cancel this function, select “Can-
cel”.
When backup is completed, the system
will return to the “Memory point”
screen.
SETTING A PASSWORD
1Press the “MENU” button on the
Remote Touch.
2Select “Navi”, and select “Menu” if
the map screen is displayed.
3Select “Memory point” on the navi-
gation menu screen.
4Select “Backup to USB” on the
“Memory point” screen.
5Select “Set password”.
INFORMATION
In the following situations, the mem-
ory point cannot be backed up to a
USB memory:
• When the memory point was regis-
tered using “UK Postal Code”
• When the memory point was regis-
tered using connected service
SET PASSWORD
Once a password has been set, it will
be requested not only to back up da-
ta, but also when copying memory
points from a USB memory to the
navigation system.