wheel Lexus CT200h 2013 (in English) Workshop Manual
[x] Cancel search | Manufacturer: LEXUS, Model Year: 2013, Model line: CT200h, Model: Lexus CT200h 2013Pages: 688
Page 422 of 688
4185-19. Bluetooth® Phone (Lexus Display Audio System)
CT200h_OM_OM76102E_(EE)
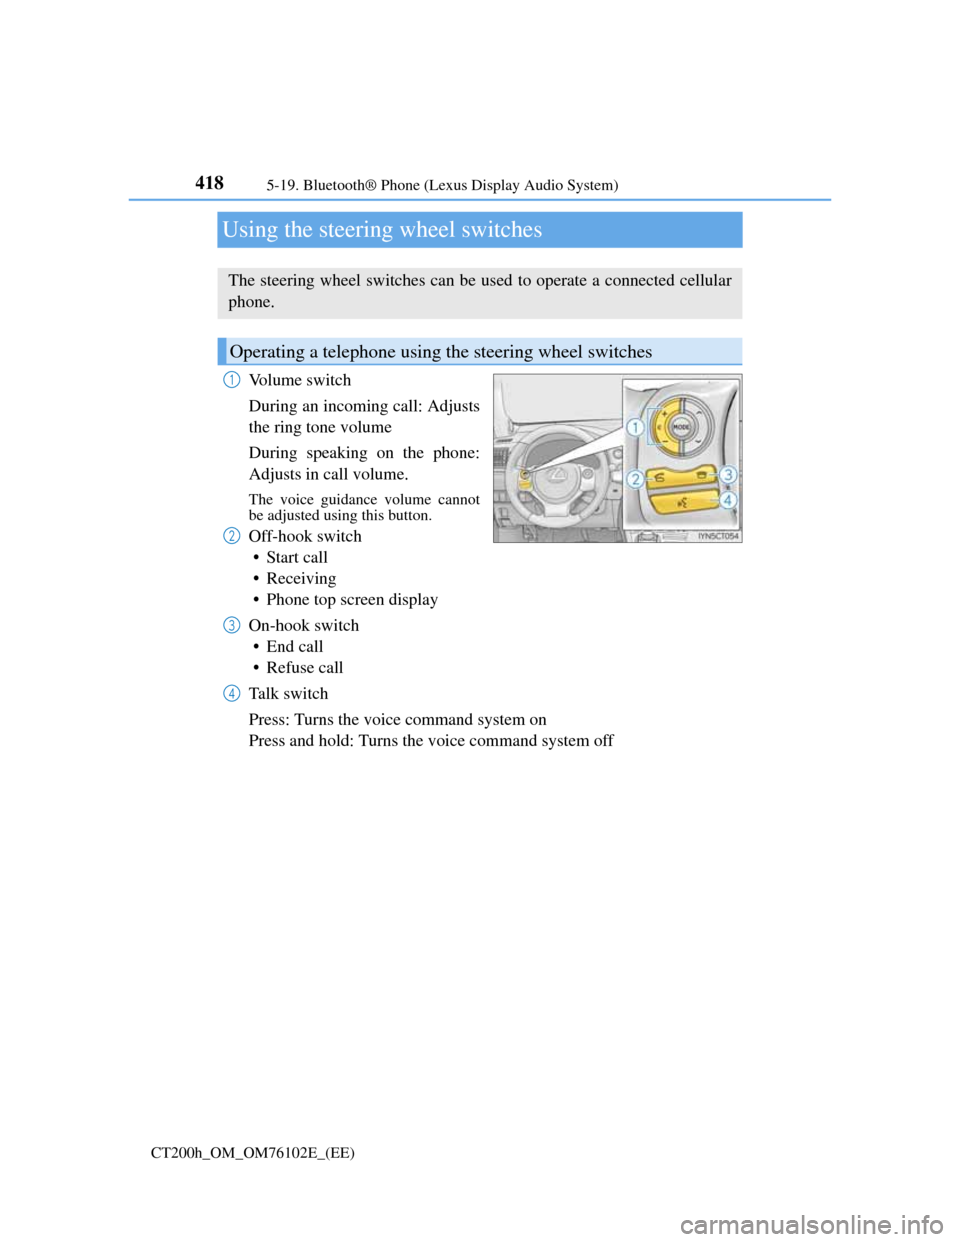
Using the steering wheel switches
Volume switch
During an incoming call: Adjusts
the ring tone volume
During speaking on the phone:
Adjusts in call volume.
The voice guidance volume cannot
be adjusted using this button.
Off-hook switch
• Start call
• Receiving
• Phone top screen display
On-hook switch
•End call
• Refuse call
Talk switch
Press: Turns the voice command system on
Press and hold: Turns the voice command system off
The steering wheel switches can be used to operate a connected cellular
phone.
Operating a telephone using the steering wheel switches
1
2
3
4
Page 443 of 688
439
5 5-22. Other function (Lexus Display Audio System)
Audio system
CT200h_OM_OM76102E_(EE)
Speech command system
You can register desired contacts to enable the speech command system.
Up to 50 contacts per phone can be registered.
Go to “Voice tags”: “MENU” button “Setup” “Telephone”
“Contact/call history settings” “Voice tag” “New” or “Edit”
Select the desired contact.
Move the controller to the left and then select “REC”.
Say the registered voice tag.
To play the registered voice, select “Play”.
Deleting a voice tag
Display the “Voice tags” screen.
Select “Delete” and then the desired contact.
Move the controller to the left and then select “Delete”.
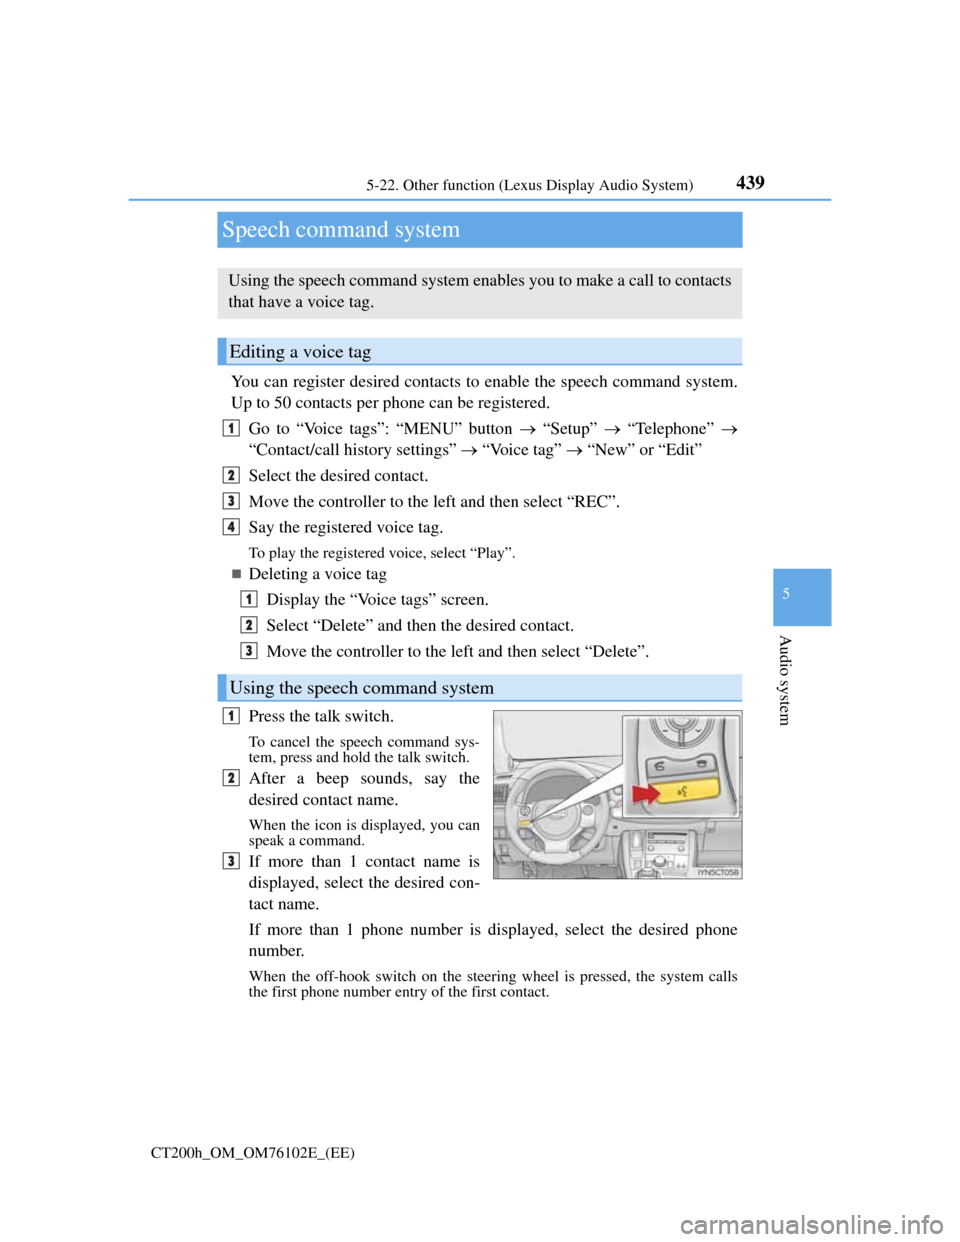
Press the talk switch.
To cancel the speech command sys-
tem, press and hold the talk switch.
After a beep sounds, say the
desired contact name.
When the icon is displayed, you can
speak a command.
If more than 1 contact name is
displayed, select the desired con-
tact name.
If more than 1 phone number is displayed, select the desired phone
number.
When the off-hook switch on the steering wheel is pressed, the system calls
the first phone number entry of the first contact.
Using the speech command system enables you to make a call to contacts
that have a voice tag.
Editing a voice tag
Using the speech command system
1
2
3
4
1
2
3
1
2
3
Page 445 of 688

441
6Interior features
CT200h_OM_OM76102E_(EE)
6-1. Using the air conditioning
system and defogger
Automatic air conditioning
system (Vehicles with
a navigation system or
Lexus Display Audio
System) ........................... 442
Automatic air conditioning
system (Vehicles without
a navigation system or
Lexus Display Audio
System) ........................... 452
Heated steering wheel/
seat heaters ...................... 459
• Heated steering wheel... 460
• Seat heaters ................... 4606-2. Using the interior lights
Interior lights list .............. 461
• Personal/interior light
main switch .................. 462
• Front personal/
interior lights ................ 462
• Rear interior light ......... 462
6-3. Using the storage features
List of storage features ..... 464
• Glove box ..................... 465
• Console box .................. 465
•Cup holders/
bottle holders/
door pockets ................. 466
• Auxiliary boxes ............ 468
Luggage compartment
features ........................... 470
6-4. Other interior features
Other interior features....... 473
• Sun visors ..................... 473
• Vanity mirrors............... 473
• Clock ............................ 474
• Power outlet.................. 475
• Assist grips ................... 477
Page 463 of 688
459
6 6-1. Using the air conditioning system and defogger
Interior features
CT200h_OM_OM76102E_(EE)
Heated steering wheel/seat heaters
: If equipped
Heated steering wheel and seat heaters heat the side grips of the steering
wheel and seats, respectively.
WA R N I N G
Care should be taken to prevent injury if anyone in the following categories
comes in contact with the steering wheel and seats when the heater is on:
• Babies, small children, the elderly, the sick and the physically challenged
• Persons with sensitive skin
• Persons who are fatigued
• Persons who have taken alcohol or drugs that induce sleep (sleeping drugs,
cold remedies, etc.)
Observe the following precautions to prevent minor burns or overheating:
• Do not cover the seat with a blanket or cushion when using the seat heater.
• Do not use seat heater more than necessary.
NOTICE
Do not put heavy objects that have an uneven surface on the seat and do not
stick sharp objects (needles, nails, etc.) into the seat.
To prevent 12-volt battery discharge, do not use the functions when the hybrid
system is off.
Page 464 of 688
4606-1. Using the air conditioning system and defogger
CT200h_OM_OM76102E_(EE)
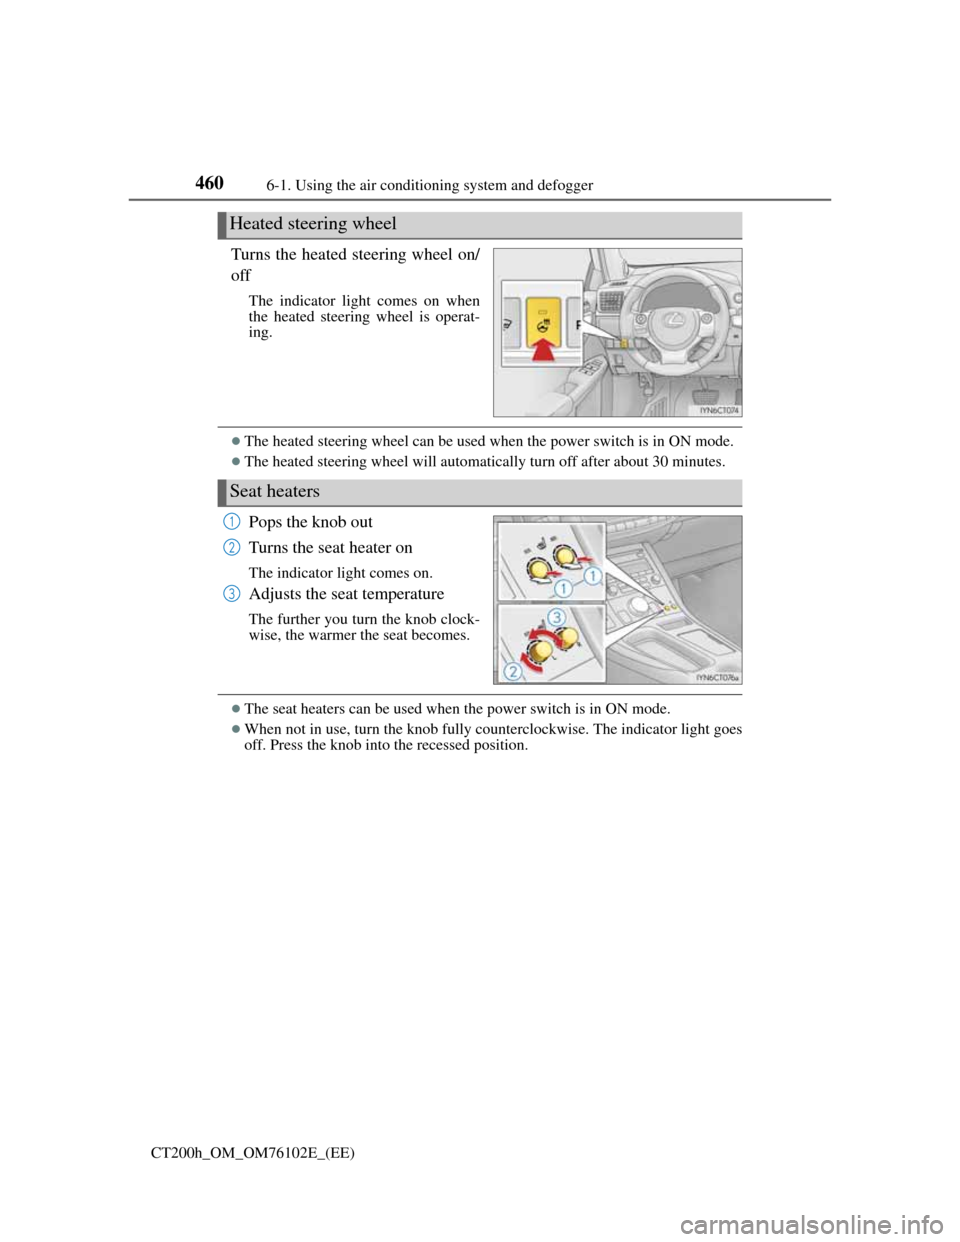
Turns the heated steering wheel on/
off
The indicator light comes on when
the heated steering wheel is operat-
ing.
The heated steering wheel can be used when the power switch is in ON mode.
The heated steering wheel will automatically turn off after about 30 minutes.
Pops the knob out
Turns the seat heater on
The indicator light comes on.
Adjusts the seat temperature
The further you turn the knob clock-
wise, the warmer the seat becomes.
The seat heaters can be used when the power switch is in ON mode.
When not in use, turn the knob fully counterclockwise. The indicator light goes
off. Press the knob into the recessed position.
Heated steering wheel
Seat heaters
1
2
3
Page 483 of 688

479
7Maintenance and care
CT200h_OM_OM76102E_(EE)
7-1. Maintenance and care
Cleaning and protecting the
vehicle exterior ............... 480
Cleaning and protecting the
vehicle interior ................ 484
7-2. Maintenance
Maintenance
requirements ................... 487
7-3. Do-it-yourself maintenance
Do-it-yourself service
precautions...................... 490
Hood ................................. 492
Positioning a floor jack ..... 494
Engine compartment ......... 495
12-volt battery................... 504
Tires .................................. 510
Tire inflation pressure ....... 523
Wheels .............................. 525
Air conditioning filter ....... 527
Electronic key battery ....... 530
Checking and replacing
fuses ................................ 534
Light bulbs ........................ 538
Page 484 of 688

4807-1. Maintenance and care
CT200h_OM_OM76102E_(EE)
Cleaning and protecting the vehicle exterior
Working from top to bottom, liberally apply water to the vehicle body,
wheel wells and underside of the vehicle to remove any dirt and dust.
Wash the vehicle body using a sponge or soft cloth, such as a chamois.
For hard-to-remove marks, use car wash soap and rinse thoroughly
with water.
Wipe away any water.
Wax the vehicle when the waterproof coating deteriorates.
If water does not bead on a clean surface, apply wax when the vehicle body is
cool.
Self-restoring coat
The vehicle body has a self-restoring coating that is resistant to small surface
scratches caused in a car wash etc.
The coating lasts for 5 to 8 years after the coating has been performed.
The restoration time differs depending on the depth of the scratch and outside
temperature. The restoration time may become shorter when the coating is
warmed by applying warm water.
Deep scratches caused by keys or coins cannot be restored.
Do not use wax that contain abrasives.
Automatic car washes
Fold the mirrors before washing the vehicle. Start washing from the front of the
vehicle. Make sure to extend the mirrors before driving.
Brushes used in automatic car washes may scratch the vehicle surface and harm
your vehicle’s paint.
Rear spoiler may not be washable in some automatic car washes. There may
also be an increased risk of damage to vehicle.
High pressure car washes
Do not allow the nozzles of the car wash to come within close proximity of the
windows.
Before using the car wash, check that the fuel filler door on your vehicle is
closed properly.
Perform the following to protect the vehicle and maintain it in prime con-
dition:
Page 485 of 688

4817-1. Maintenance and care
7
Maintenance and care
CT200h_OM_OM76102E_(EE)
Note for a smart entry & start system (if equipped)
If the door handle becomes wet while the electronic key is within the effective
range, the door may lock and unlock repeatedly. Place the key in a position 2 m
(6 ft.) or more separate from the vehicle while the vehicle is being washed. (Take
care to ensure that the key is not stolen.)
Aluminum wheels
Remove any dirt immediately by using a neutral detergent. Do not use hard
brushes or abrasive cleaners. Do not use strong or harsh chemical cleaners.
Use the same mild detergent and wax as used on the paint.
Do not use detergent on the wheels when they are hot, for example after driving
for long distance in the hot weather.
Wash detergent from the wheels immediately after use.
Bumpers
Do not scrub with abrasive cleaners.
Front side windows water-repellent coating
The following precautions can extend the effectiveness of the water-repellent
coating.
• Remove any dirt, etc. from the front side windows regularly.
• Do not allow dirt and dust to accumulate on the windows for a long period.
Clean the windows with a soft, damp cloth as soon as possible.
• Do not use wax or glass cleaners that contain abrasives when cleaning the
windows.
• Do not use any metallic objects to remove condensation build up.
When the water-repellent performance has become insufficient, the coating can
be repaired. Contact any authorized Lexus dealer or repairer, or another duly
qualified and equipped professional.
Restoration work for rain clearing effect of the rain clearing mirror (if equipped)
The rain clearing effect on the mirror surface will gradually recover after expo-
sure to sunlight (P. 176). However, if you want to restore the effect immedi-
ately, conduct the following procedures:
Apply water to the mirror surface to wash the dirt away from it.
Remove the dirt by using a clean, soft and wet cloth.
Clean the mirror surface with glass cleaner or detergent. When detergent is
used, rinse the mirror surface with a lot of water.
Wipe water on the mirror surface by using a clean and soft cloth, ect.
Park your vehicle outdoors to expose the mirror surface to sunlight for about 5
hours. (The restoration time differs depending on the amount and type of dirt.)
1
2
3
4
5
Page 487 of 688

4837-1. Maintenance and care
7
Maintenance and care
CT200h_OM_OM76102E_(EE)
NOTICE
To prevent paint deterioration and corrosion on the body and components (alu-
minum wheels etc.)
Wash the vehicle immediately in the following cases:
• After driving near the sea coast
• After driving on salted roads
• If coal tar or tree sap is present on the paint surface
• If dead insects, insect droppings or bird droppings are present on the paint
surface
• After driving in an area contaminated with soot, oily smoke, mine dust,
iron powder or chemical substances
• If the vehicle becomes heavily soiled with dust or mud
• If liquids such as benzene and gasoline are spilled on the paint surface
If the paint is chipped or scratched, have it repaired immediately.
To prevent the wheels from corroding, remove any dirt and store in a place
with low humidity when storing the wheels.
Cleaning the exterior lights
Wash carefully. Do not use organic substances or scrub with a hard brush.
This may damage the surfaces of the lights.
Do not apply wax to the surfaces of the lights.
Wax may cause damage to the lenses.
To prevent damage to the windshield wiper arms
When lifting the wiper arms away from the windshield, pull the driver side
wiper arm upward first, and repeat for the passenger side. When returning the
wipers to their original position, do so from the passenger side first.
When using an automatic car wash (vehicles with rain-sensing windshield wip-
ers)
Set the wiper switch to the off position.
If the wiper switch is in “AUTO”, the wipers may operate and the wiper blades
may be damaged.
Page 515 of 688

5117-3. Do-it-yourself maintenance
CT200h_OM_OM76102E_(EE)
7
Maintenance and care
Your vehicle is equipped with a tire pressure warning system that uses tire
pressure warning valves and transmitters to detect low tire inflation pres-
sure before serious problems arise.
If the tire pressure drops below a predetermined level, the driver is
warned by a warning light. (P. 571)
Installing tire pressure warning valves and transmitters
When replacing tires or wheels, tire pressure warning valves and trans-
mitters must also be installed.
When new tire pressure warning valves and transmitters are installed,
new ID codes must be registered in the tire pressure warning computer
and the tire pressure warning system must be initialized. Have tire
pressure warning valve and transmitter ID codes registered by any
authorized Lexus dealer or repairer, or another duly qualified and
equipped professional. (P. 512)
Initializing the tire pressure warning system
The tire pressure warning system must be initialized in the following
circumstances:
Vehicles with 17 inch tires: When rotating front and rear tires which
have different tire inflation pressures
When the tire inflation pressure is changed such as when changing
traveling speed or load weight.
When changing the tire size
When the tire pressure warning system is initialized, the current tire
inflation pressure is set as the benchmark pressure.
Tire pressure warning system (if equipped)