steering Lexus CT200h 2015 (in English) Repair Manual
[x] Cancel search | Manufacturer: LEXUS, Model Year: 2015, Model line: CT200h, Model: Lexus CT200h 2015Pages: 634
Page 469 of 634
468
CT200h_OM_OM76174U_(U)7-2. Maintenance
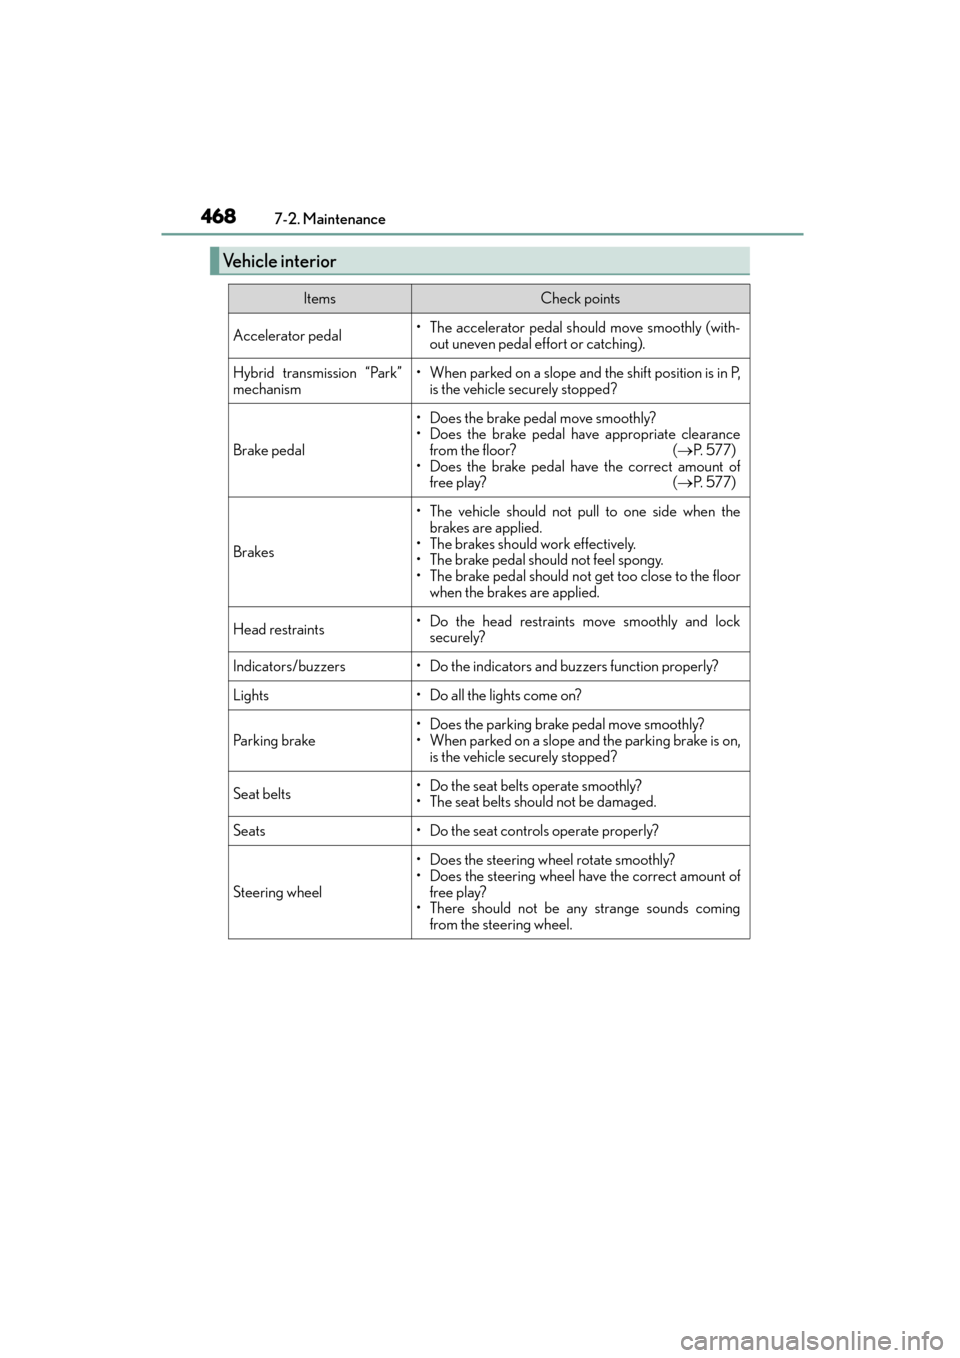
Vehicle interior
ItemsCheck points
Accelerator pedal• The accelerator pedal should move smoothly (with-
out uneven pedal effort or catching).
Hybrid transmission “Park”
mechanism• When parked on a slope and the shift position is in P,is the vehicle securely stopped?
Brake pedal
• Does the brake pedal move smoothly?
• Does the brake pedal have appropriate clearance
from the floor? ( →P. 577)
• Does the brake pedal have the correct amount of free play? (→ P. 577)
Brakes
• The vehicle should not pull to one side when the
brakes are applied.
• The brakes should work effectively.
• The brake pedal should not feel spongy.
• The brake pedal should not get too close to the floor when the brakes are applied.
Head restraints• Do the head restraints move smoothly and locksecurely?
Indicators/buzzers• Do the indicators and buzzers function properly?
Lights• Do all the lights come on?
Parking brake
• Does the parking brake pedal move smoothly?
• When parked on a slope and the parking brake is on,is the vehicle securely stopped?
Seat belts• Do the seat belts operate smoothly?
• The seat belts should not be damaged.
Seats• Do the seat controls operate properly?
Steering wheel
• Does the steering wheel rotate smoothly?
• Does the steering wheel have the correct amount offree play?
• There should not be any strange sounds coming
from the steering wheel.
Page 522 of 634

521
CT200h_OM_OM76174U_(U)
8
When trouble arises
8-1. Essential information
If your vehicle has to be stopped in an emergency
Steadily step on the brake pedal with both feet and firmly depress it.
Do not pump the brake pedal repeatedly as this will increase the effort required to
slow the vehicle.
Shift the shift position to N.
�XIf the shift position is shifted to N
After slowing down, stop the vehicle in a safe place by the road.
Stop the hybrid system.
�XIf the shift position cannot be shifted to N
Keep depressing the brake pedal with both feet to reduce vehicle speed as
much as possible.
To stop the hybrid system, press and
hold the power switch for 2 consec-
utive seconds or more, or press it
briefly 3 times or more in succes-
sion.
Stop the vehicle in a safe place by the road.
Only in an emergency, such as if it becomes impossible to stop the vehicle in
the normal way, stop the vehicle using the following procedure:
1
2
3
4
3
Press and hold for 2 seconds or more,
or press briefly for 3 times or more
4
WA R N I N G
■If the hybrid system has to be turned off while driving
Power assist for the steering wheel will be lost, making the steering wheel heavier to
turn. Decelerate as much as possible before turning off the hybrid system.
5
Page 524 of 634

5238-2. Steps to take in an emergency
CT200h_OM_OM76174U_(U)
8
When trouble arises
If your Lexus is transported by a flat bed
truck, it should be tied down at the
locations shown in the illustration.
If you use chains or cables to tie down
your vehicle, the angles shaded in black
must be 45 °.
Do not overly tighten the tie downs or
the vehicle may be damaged.
If a tow truck is not available in an emergency, your vehicle may be temporarily
towed using a cable or chain secured to the emergency towing eyelet. This
should only be attempted on hard surfaced roads for short distances at low
speeds.
A driver must be in the vehicle to steer and operate the brakes. The vehicle’s
wheels, drive train, axles, steering and brakes must be in good condition.
Towing with a wheel-lift type truck
�XFrom the front �XFrom the rear
Release the parking brake. Use a towing dolly under the front
wheels.
Using a flat bed truck
Emergency towing
Page 526 of 634

5258-2. Steps to take in an emergency
CT200h_OM_OM76174U_(U)
8
When trouble arises
■While towing
If the hybrid system is off, the power assist for the brakes and steering will not function,
making steering and braking more difficult.
■Wheel nut wrench
Wheel nut wrench is installed in luggage compartment. ( →P. 5 4 8 )
WA R N I N G
Observe the following precautions.
Failure to do so may result in death or serious injury.
■When towing the vehicle
■While towing
●When towing using cables or chains, avoid sudden starts, etc. which place excessive
stress on the eyelet, cables or chains. The towing eyelet, cables or chains may
become damaged, broken debris may hit people and cause serious damage.
●Do not turn the power switch off.
This may lead to an accident as the front wheels will be locked by the parking lock.
■Installing towing eyelet to the vehicle
Make sure that towing eyelet is installed securely.
If not securely installed, towing eyelet may come loose during towing.
NOTICE
■To prevent damage to the vehicle when towing using a wheel-lift type truck
When raising the vehicle, ensure adequate ground clearance for towing at the oppo-
site end of the raised vehicle. Without adequate clearance, the vehicle could be dam-
aged while being towed.
■To prevent body damage when towing with a sling-type truck
Do not tow with a sling-type truck, either from the front or rear.
Be sure to transport the vehicle with the front
wheels raised or with all four wheels raised off
the ground. If the vehicle is towed with the front
wheels contacting the ground, the drivetrain
and related parts may be damaged or electric-
ity generated by the operation of the motor
may cause a fire to occur depending on the
nature of the damage or malfunction.
Page 529 of 634
5288-2. Steps to take in an emergency
CT200h_OM_OM76174U_(U)
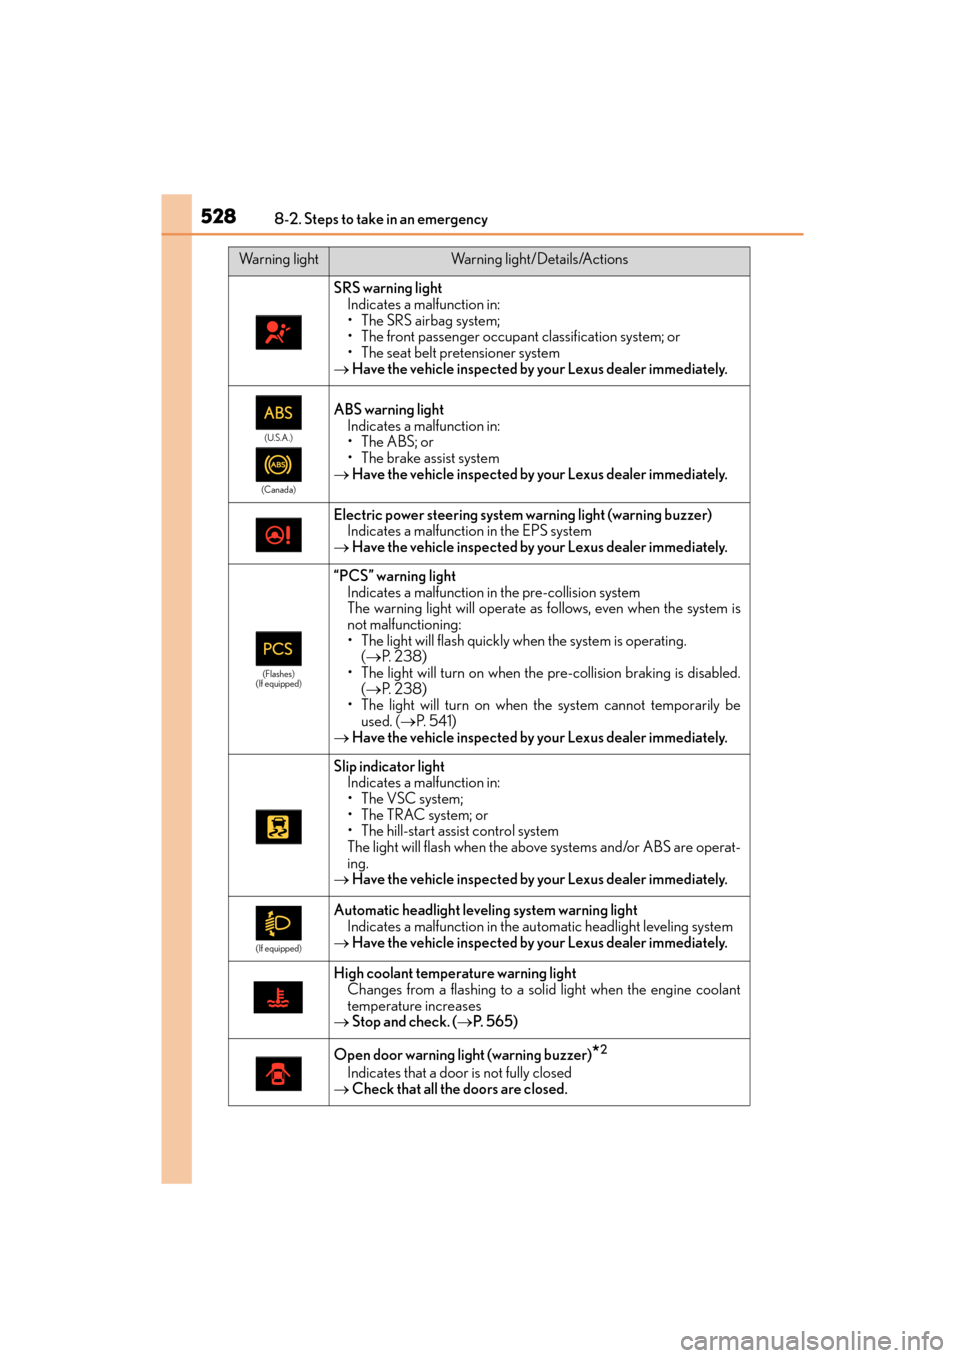
SRS warning lightIndicates a malfunction in:
• The SRS airbag system;
• The front passenger occupant classification system; or
• The seat belt pr etensioner system
→ Have the vehicle inspected by your Lexus dealer immediately.
(U.S.A.)
(Canada)
ABS warning light Indicates a malfunction in:
•The ABS; or
• The brake assist system
→ Have the vehicle inspected by your Lexus dealer immediately.
Electric power steering system warning light (warning buzzer)
Indicates a malfunction in the EPS system
→ Have the vehicle inspected by your Lexus dealer immediately.
(Flashes)
(If equipped)
“PCS” warning light Indicates a malfunction in the pre-collision system
The warning light will operate as follows, even when the system is
not malfunctioning:
• The light will flash quickly when the system is operating. (→ P. 2 3 8 )
• The light will turn on when the pre-collision braking is disabled. (→ P. 2 3 8 )
• The light will turn on when the system cannot temporarily be
used. ( →P. 5 4 1 )
→ Have the vehicle inspected by your Lexus dealer immediately.
Slip indicator light
Indicates a malfunction in:
• The VSC system;
•The TRAC system; or
• The hill-start assist control system
The light will flash when the abov e systems and/or ABS are operat-
ing.
→ Have the vehicle inspected by your Lexus dealer immediately.
(If equipped)
Automatic headlight leveling system warning light
Indicates a malfunction in the au tomatic headlight leveling system
→ Have the vehicle inspected by your Lexus dealer immediately.
High coolant temperature warning light
Changes from a flashing to a solid light when the engine coolant
temperature increases
→ Stop and check. ( →P. 5 6 5 )
Open door warning light (warning buzzer)*2
Indicates that a door is not fully closed
→ Check that all the doors are closed.
Warning lightWarning light/Details/Actions
Page 531 of 634
5308-2. Steps to take in an emergency
CT200h_OM_OM76174U_(U)
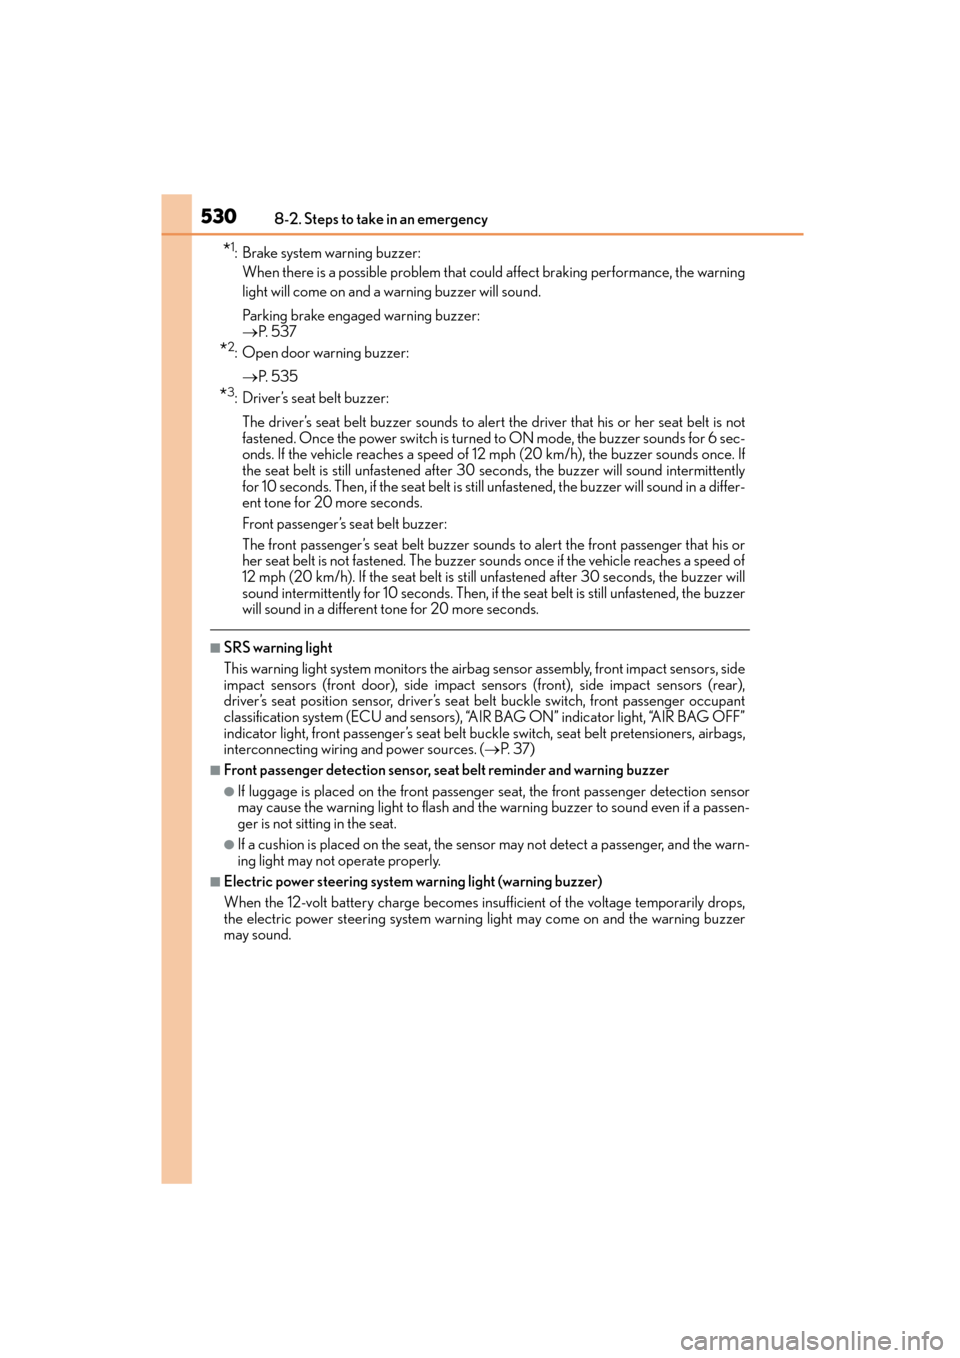
*1: Brake system warning buzzer:When there is a possible problem that coul d affect braking performance, the warning
light will come on and a warning buzzer will sound.
Parking brake engaged warning buzzer:
→ P. 5 3 7
*2: Open door warning buzzer:
→ P. 5 3 5
*3: Driver’s seat belt buzzer:
The driver’s seat belt buzzer sounds to alert the driver that his or her seat belt is not
fastened. Once the power switch is turned to ON mode, the buzzer sounds for 6 sec-
onds. If the vehicle reaches a speed of 12 mph (20 km/h), the buzzer sounds once. If
the seat belt is still unfastened after 30 seconds, the buzzer will sound intermittently
for 10 seconds. Then, if the seat belt is st ill unfastened, the buzzer will sound in a differ-
ent tone for 20 more seconds.
Front passenger’s seat belt buzzer:
The front passenger’s seat belt buzzer sounds to alert the front passenger that his or
her seat belt is not fastened. The buzzer sounds once if the vehicle reaches a speed of
12 mph (20 km/h). If the seat belt is still unfastened after 30 seconds, the buzzer will
sound intermittently for 10 seconds. Then, if the seat belt is still unfastened, the buzzer
will sound in a different tone for 20 more seconds.
■SRS warning light
This warning light system monitors the airbag sensor assembly, front impact sensors, side
impact sensors (front door), side impact sensors (front), side impact sensors (rear),
driver’s seat position sensor, driver’s seat belt buckle switch, front passenger occupant
classification system (ECU and sensors), “AIR BAG ON” indicator light, “AIR BAG OFF”
indicator light, front passenger’s seat belt buck le switch, seat belt pretensioners, airbags,
interconnecting wiring and power sources. (→ P. 3 7 )
■Front passenger detection sensor, seat belt reminder and warning buzzer
●If luggage is placed on the front passenger seat, the front passenger detection sensor
may cause the warning light to flash and the warning buzzer to sound even if a passen-
ger is not sitting in the seat.
●If a cushion is placed on the seat, the sensor may not detect a passenger, and the warn-
ing light may not operate properly.
■Electric power steering system warning light (warning buzzer)
When the 12-volt battery charge becomes insufficient of the voltage temporarily drops,
the electric power steering system warning light may come on and the warning buzzer
may sound.
Page 533 of 634

5328-2. Steps to take in an emergency
CT200h_OM_OM76174U_(U)
WA R N I N G
■If both the ABS and the brake system warning lights remain on
Stop your vehicle in a safe place immediately and contact your Lexus dealer. The vehi-
cle will become extremely unstable during braking, and the ABS system may fail, which
could cause an accident resulting in death or serious injury.
■When the electric power steering system warning light comes on
The steering wheel may become extremely heavy.
If the steering wheel becomes heavier than usual when operating, hold firmly and oper-
ate using more force than usual.
■If the tire pressure warning light comes on
Be sure to observe the following precautions. Failure to do so could cause a loss of
vehicle control and result in death or serious injury.
●Stop your vehicle in a safe place as soon as possible. Adjust the tire inflation pressure
immediately.
●If the tire pressure warning light comes on even after tire inflation pressure adjust-
ment, it is probable that you have a flat tire. Check the tires. If a tire is flat, change it
with the spare tire and have the flat tire repaired by the nearest Lexus dealer.
●Avoid abrupt maneuvering and braking. If the vehicle tires deteriorate, you could lose
control of the steering wheel or the brakes.
■If a blowout or sudden air leakage should occur
The tire pressure warning system may not activate immediately.
Page 556 of 634
5558-2. Steps to take in an emergency
CT200h_OM_OM76174U_(U)
8
When trouble arises
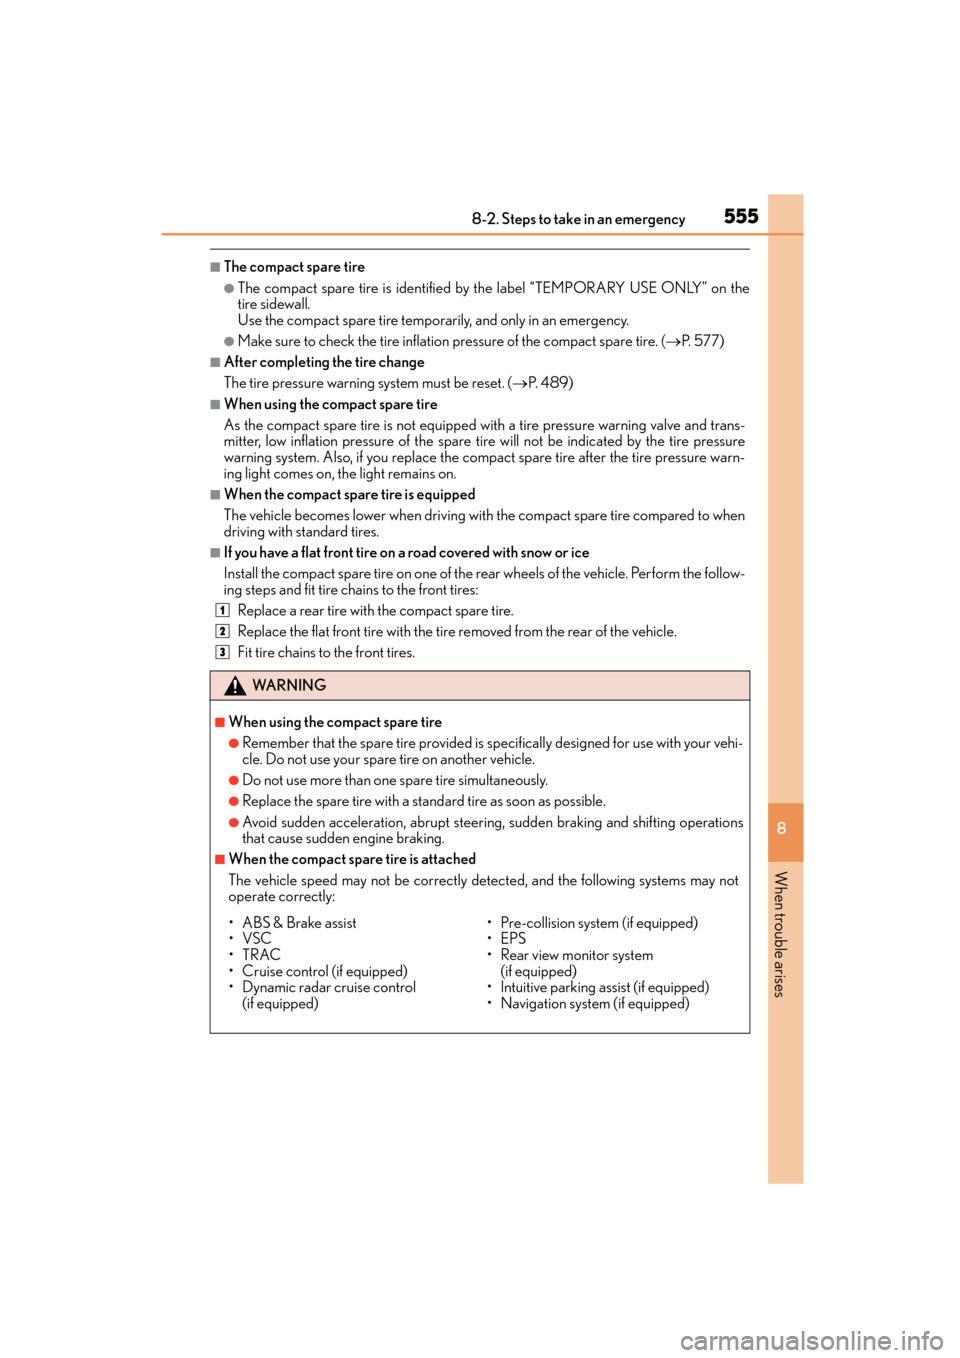
■The compact spare tire
●The compact spare tire is identified by the label “TEMPORARY USE ONLY” on the
tire sidewall.
Use the compact spare tire temporarily, and only in an emergency.
●Make sure to check the tire inflation pressure of the compact spare tire. ( →P. 577)
■After completing the tire change
The tire pressure warning system must be reset. ( →P. 4 8 9 )
■When using the compact spare tire
As the compact spare tire is not equipped with a tire pressure warning valve and trans-
mitter, low inflation pressure of the spare tire will not be indicated by the tire pressure
warning system. Also, if you replace the compact spare tire after the tire pressure warn-
ing light comes on, the light remains on.
■When the compact spare tire is equipped
The vehicle becomes lower when driving with the compact spare tire compared to when
driving with standard tires.
■If you have a flat front tire on a road covered with snow or ice
Install the compact spare tire on one of the rear wheels of the vehicle. Perform the follow-
ing steps and fit tire chains to the front tires:
Replace a rear tire with the compact spare tire.
Replace the flat front tire with the tire removed from the rear of the vehicle.
Fit tire chains to the front tires.
WA R N I N G
■When using the compact spare tire
●Remember that the spare tire provided is specifically designed for use with your vehi-
cle. Do not use your spare tire on another vehicle.
●Do not use more than one spare tire simultaneously.
●Replace the spare tire with a standard tire as soon as possible.
●Avoid sudden acceleration, abrupt steering, sudden braking and shifting operations
that cause sudden engine braking.
■When the compact spare tire is attached
The vehicle speed may not be correctly detected, and the following systems may not
operate correctly:
1
2
3
• ABS & Brake assist
•VSC
•TRAC
• Cruise control (if equipped)
• Dynamic radar cruise control (if equipped) • Pre-collision system (if equipped)
•EPS
• Rear view monitor system
(if equipped)
• Intuitive parking assist (if equipped)
• Navigation system (if equipped)
Page 578 of 634
CT200h_OM_OM76174U_(U)
5779-1. Specifications
9
Vehicle specifications
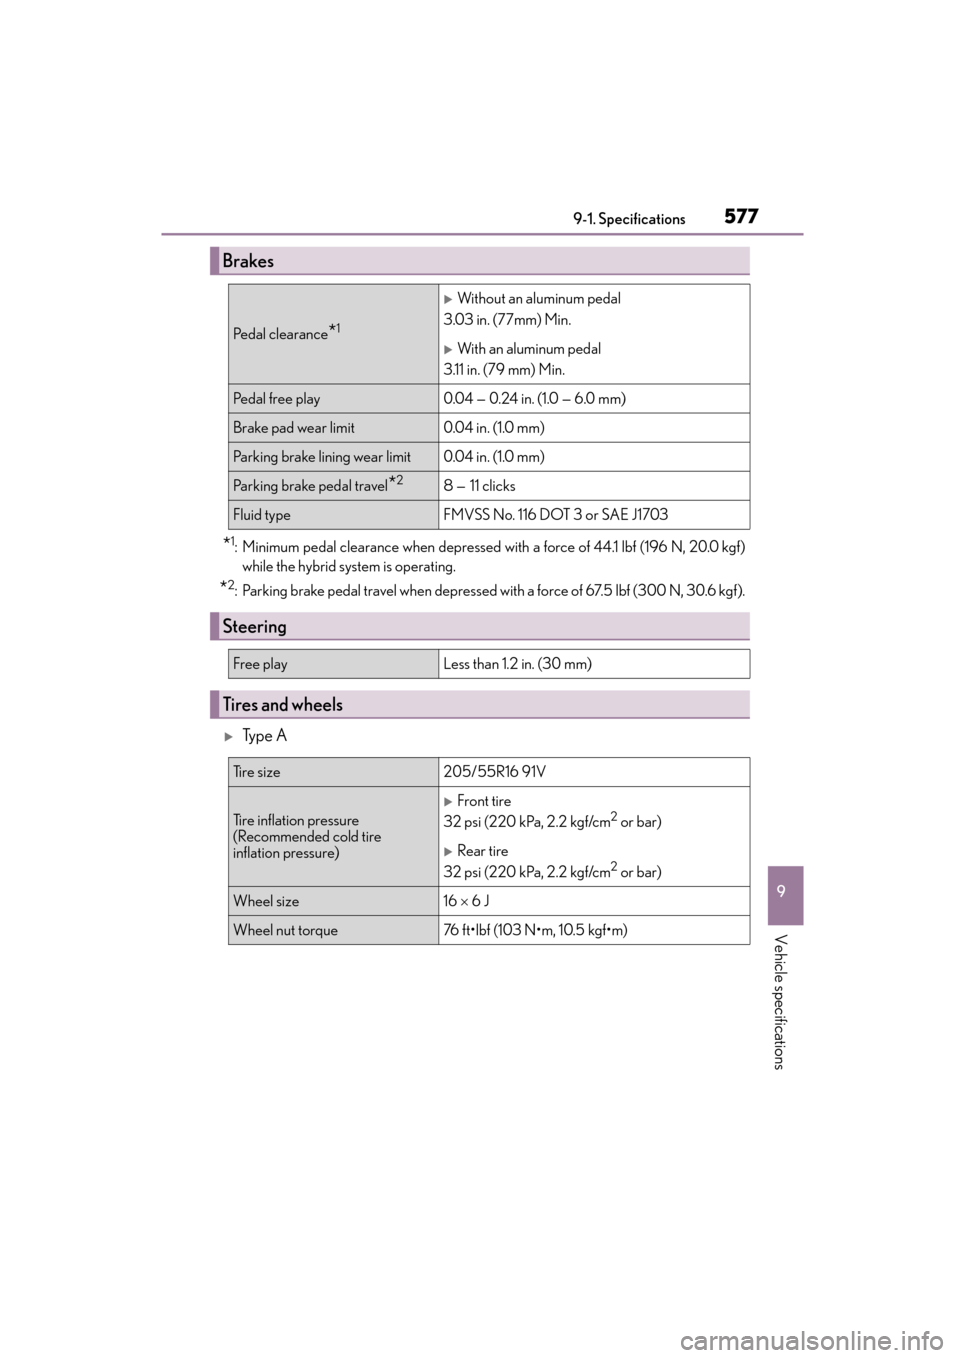
*1: Minimum pedal clearance when depressed with a force of 44.1 lbf (196 N, 20.0 kgf)while the hybrid system is operating.
*2: Parking brake pedal travel when depressed with a force of 67.5 lbf (300 N, 30.6 kgf).
�XTy p e A
Brakes
Pe d a l c l e a r a n c e*1
�XWithout an aluminum pedal
3.03 in. (77mm) Min.
�XWith an aluminum pedal
3.11 in. (79 mm) Min.
Pedal free play0.04 — 0.24 in. (1.0 — 6.0 m m)
Brake pad wear limit0.04 in. (1.0 mm )
Parking brake lining wear limit0.04 in. (1.0 mm )
Parking brake pedal travel*28 — 11 clicks
Fluid typeFMVSS No. 116 DOT 3 or SAE J1703
Steering
Free playLess than 1.2 in. (30 mm)
Tires and wheels
Ti r e s i z e205/55R16 91V
Tire inflation pressure
(Recommended cold tire
inflation pressure)
�XFront tire
32 psi (220 kPa, 2.2 kgf/cm2 or bar)
�XRear tire
32 psi (220 kPa, 2.2 kgf/cm2 or bar)
Wheel size16 × 6 J
Wheel nut torque76 ft•lbf (103 N•m, 10.5 kgf•m)
Page 587 of 634
586
CT200h_OM_OM76174U_(U)9-1. Spec
ifications
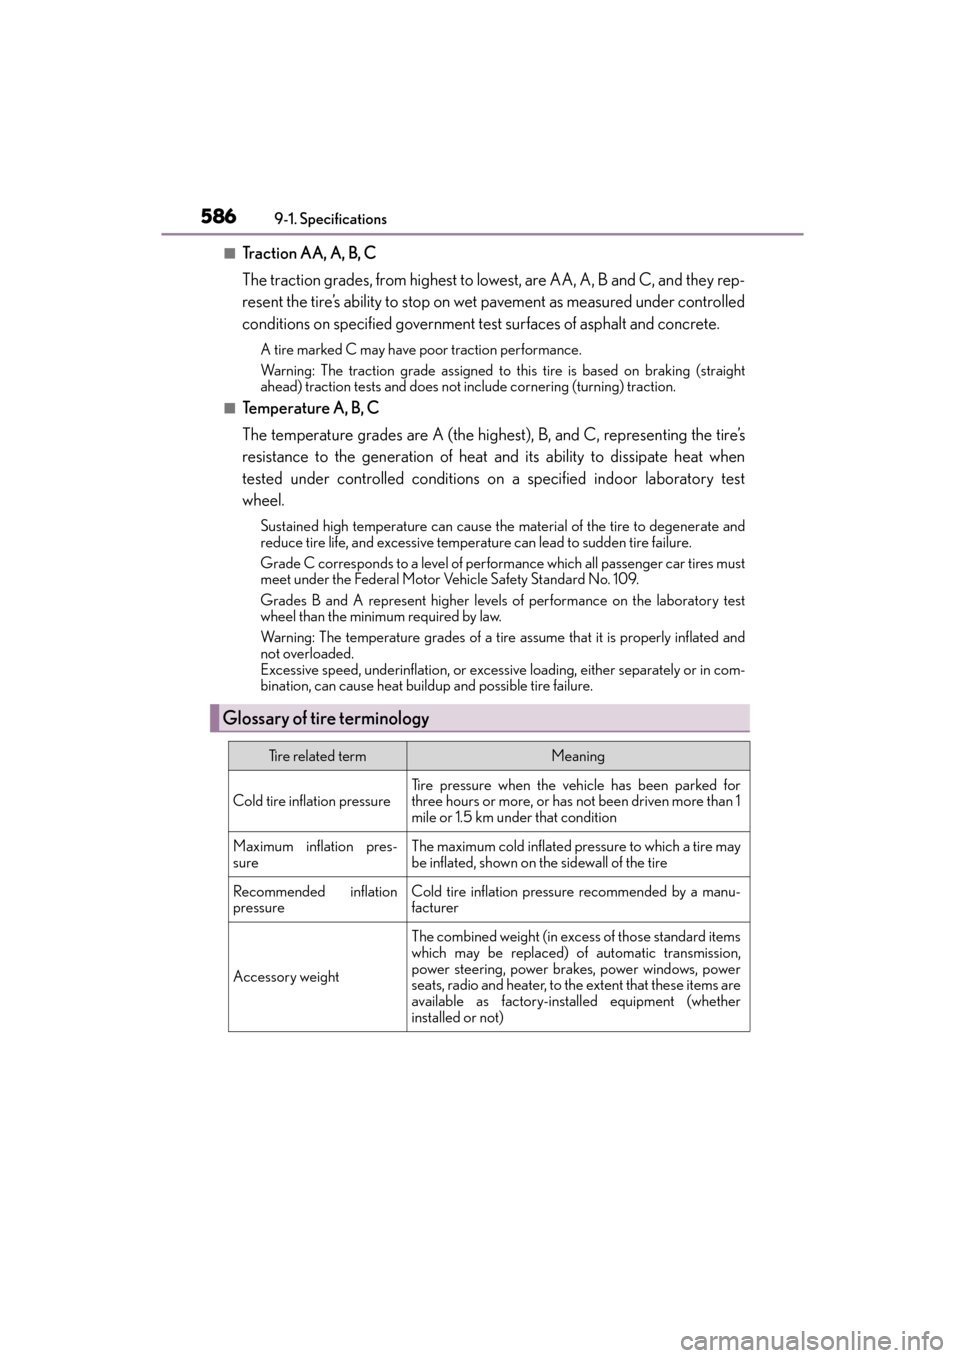
■Traction AA, A, B, C
The traction grades, from highest to lowest, are AA, A, B and C, and they rep-
resent the tire’s ability to stop on wet pavement as measured under controlled
conditions on specified government test surfaces of asphalt and concrete.
A tire marked C may have poor traction performance.
Warning: The traction grade assigned to th is tire is based on braking (straight
ahead) traction tests and does not include cornering (turning) traction.
■Temperature A, B, C
The temperature grades are A (the highest), B, and C, representing the tire’s
resistance to the generation of heat and its ability to dissipate heat when
tested under controlled conditions on a specified indoor laboratory test
wheel.
Sustained high temperature can cause the material of the tire to degenerate and
reduce tire life, and excessive temperature can lead to sudden tire failure.
Grade C corresponds to a level of performance which all passenger car tires must
meet under the Federal Motor Vehicle Safety Standard No. 109.
Grades B and A represent higher levels of performance on the laboratory test
wheel than the minimum required by law.
Warning: The temperature grades of a tire assume that it is properly inflated and
not overloaded.
Excessive speed, underinflation, or excessive loading, either separately or in com-
bination, can cause heat buildup and possible tire failure.
Glossary of tire terminology
Tire related termMeaning
Cold tire inflation pressureTire pressure when the vehicle has been parked for
three hours or more, or has not been driven more than 1
mile or 1.5 km under that condition
Maximum inflation pres-
sureThe maximum cold inflated pressure to which a tire may
be inflated, shown on the sidewall of the tire
Recommended inflation
pressureCold tire inflation pressure recommended by a manu-
facturer
Accessory weight
The combined weight (in excess of those standard items
which may be replaced) of automatic transmission,
power steering, power brakes, power windows, power
seats, radio and heater, to the extent that these items are
available as factory-installed equipment (whether
installed or not)