Lexus CT200h 2016 Owner's Manual (in English)
Manufacturer: LEXUS, Model Year: 2016, Model line: CT200h, Model: Lexus CT200h 2016Pages: 632, PDF Size: 8.5 MB
Page 221 of 632
CT200h_OM_OM76197U_(U)
2214-5. Using the driving support systems
4
Driving
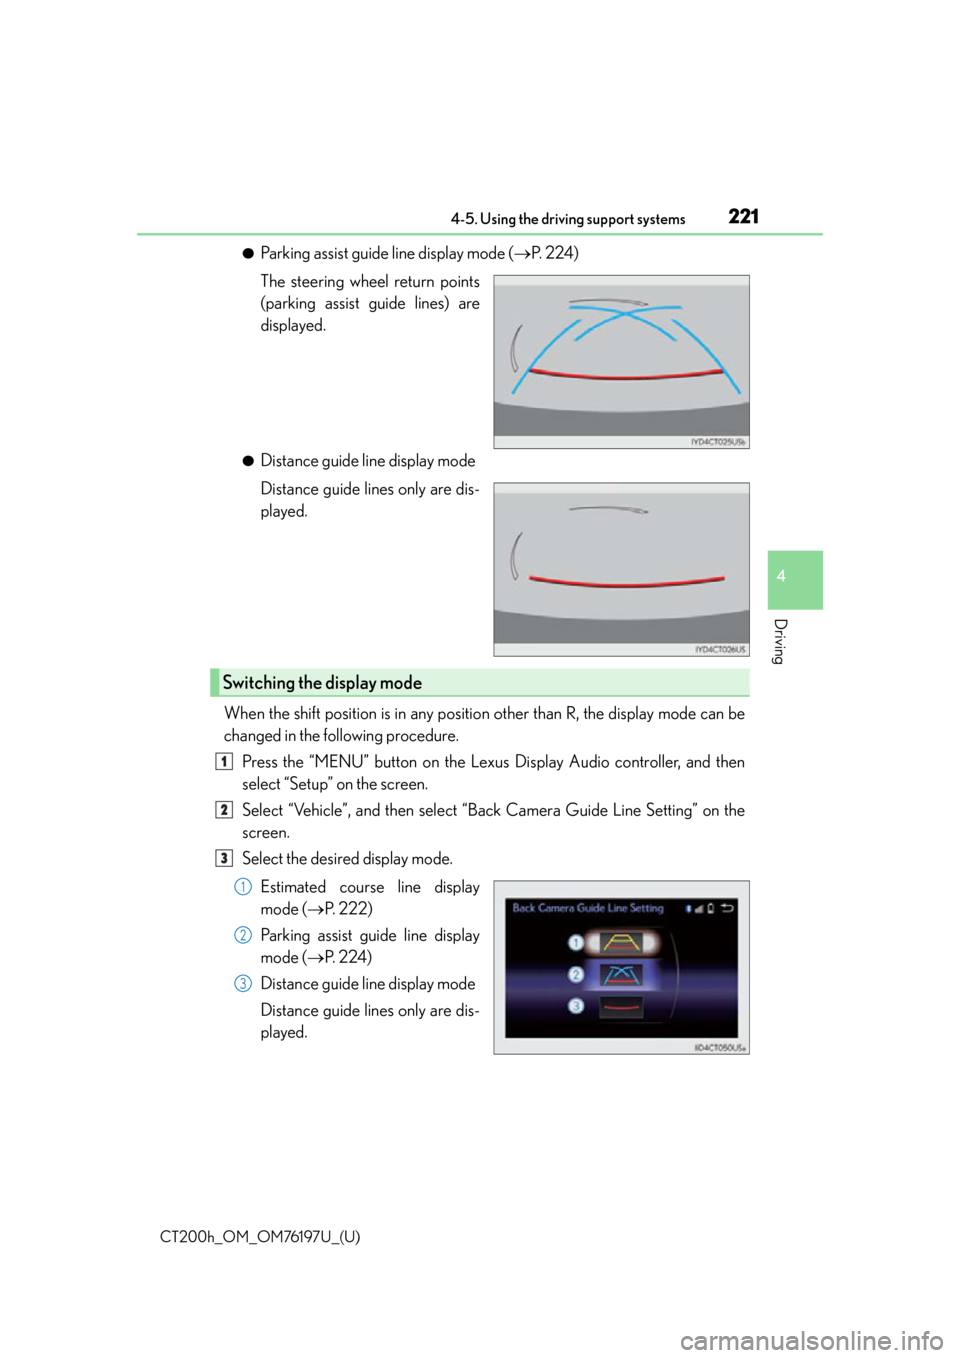
●Parking assist guide line display mode (P. 2 2 4 )
The steering wheel return points
(parking assist guide lines) are
displayed.
●Distance guide line display mode
Distance guide lines only are dis-
played.
When the shift position is in any position other than R, the display mode can be
changed in the following procedure. Press the “MENU” button on the Lexus Display Audio controller, and then
select “Setup” on the screen.
Select “Vehicle”, and then select “B ack Camera Guide Line Setting” on the
screen.
Select the desired display mode.
Estimated course line display
mode ( P. 222)
Parking assist guide line display
mode ( P. 2 2 4 )
Distance guide line display mode
Distance guide lines only are dis-
played.
Switching the display mode
1
2
3
1
2
3
Page 222 of 632
222
CT200h_OM_OM76197U_(U)4-5. Using the driving support systems
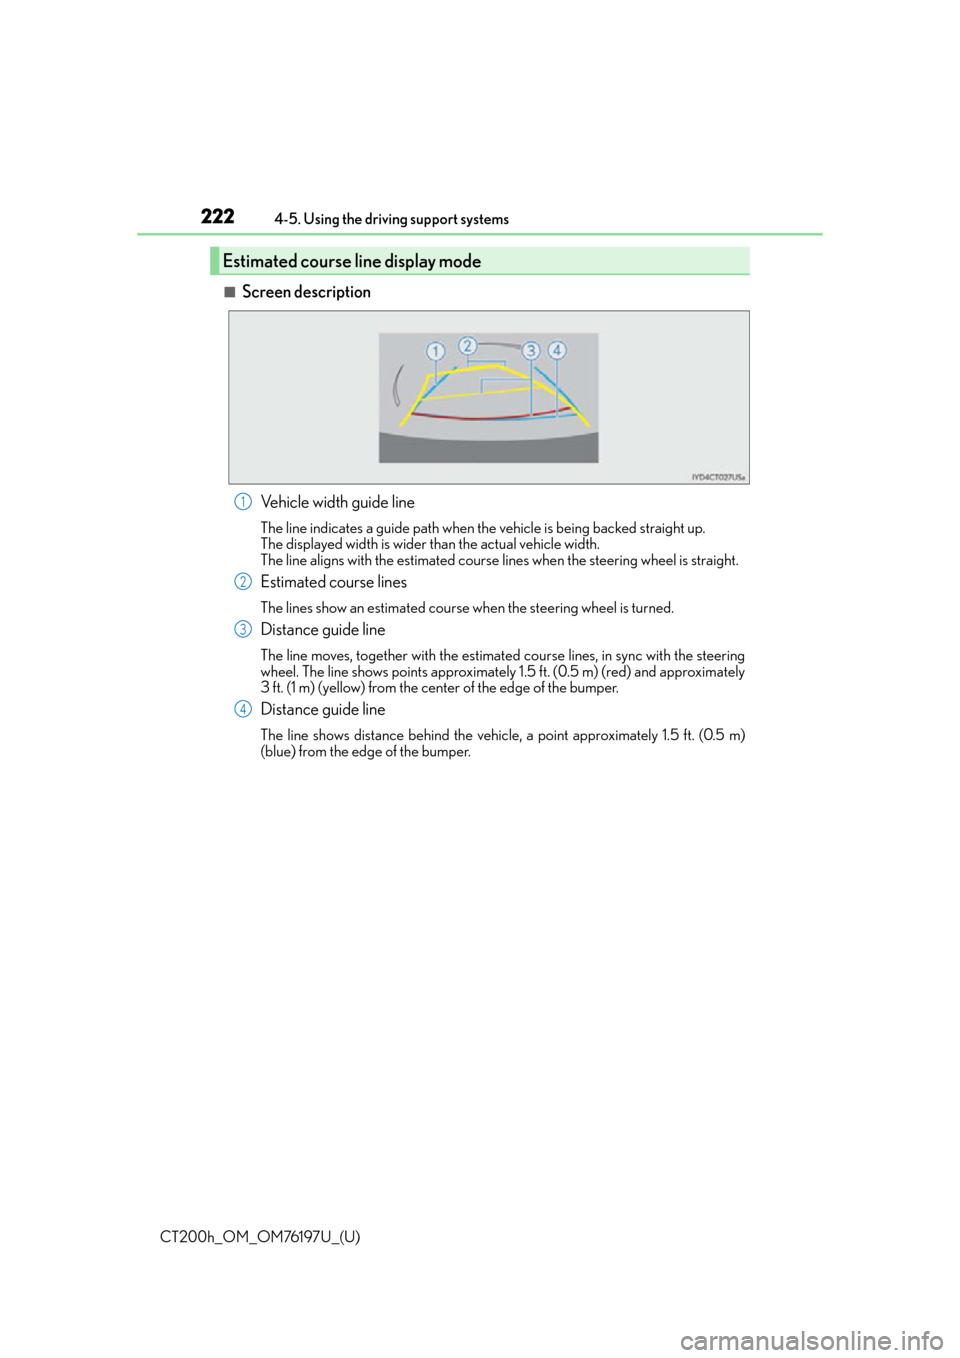
■Screen description
Vehicle width guide line
The line indicates a guide path when the vehicle is being backed straight up.
The displayed width is wider than the actual vehicle width.
The line aligns with the estimated course lines when the steering wheel is straight.
Estimated course lines
The lines show an estimated course when the steering wheel is turned.
Distance guide line
The line moves, together with the estimated course lines, in sync with the steering
wheel. The line shows points approximately 1.5 ft. (0.5 m) (red) and approximately
3 ft. (1 m) (yellow) from the center of the edge of the bumper.
Distance guide line
The line shows distance behind the vehicle, a point approximately 1.5 ft. (0.5 m)
(blue) from the edge of the bumper.
Estimated course line display mode
1
2
3
4
Page 223 of 632
CT200h_OM_OM76197U_(U)
2234-5. Using the driving support systems
4
Driving
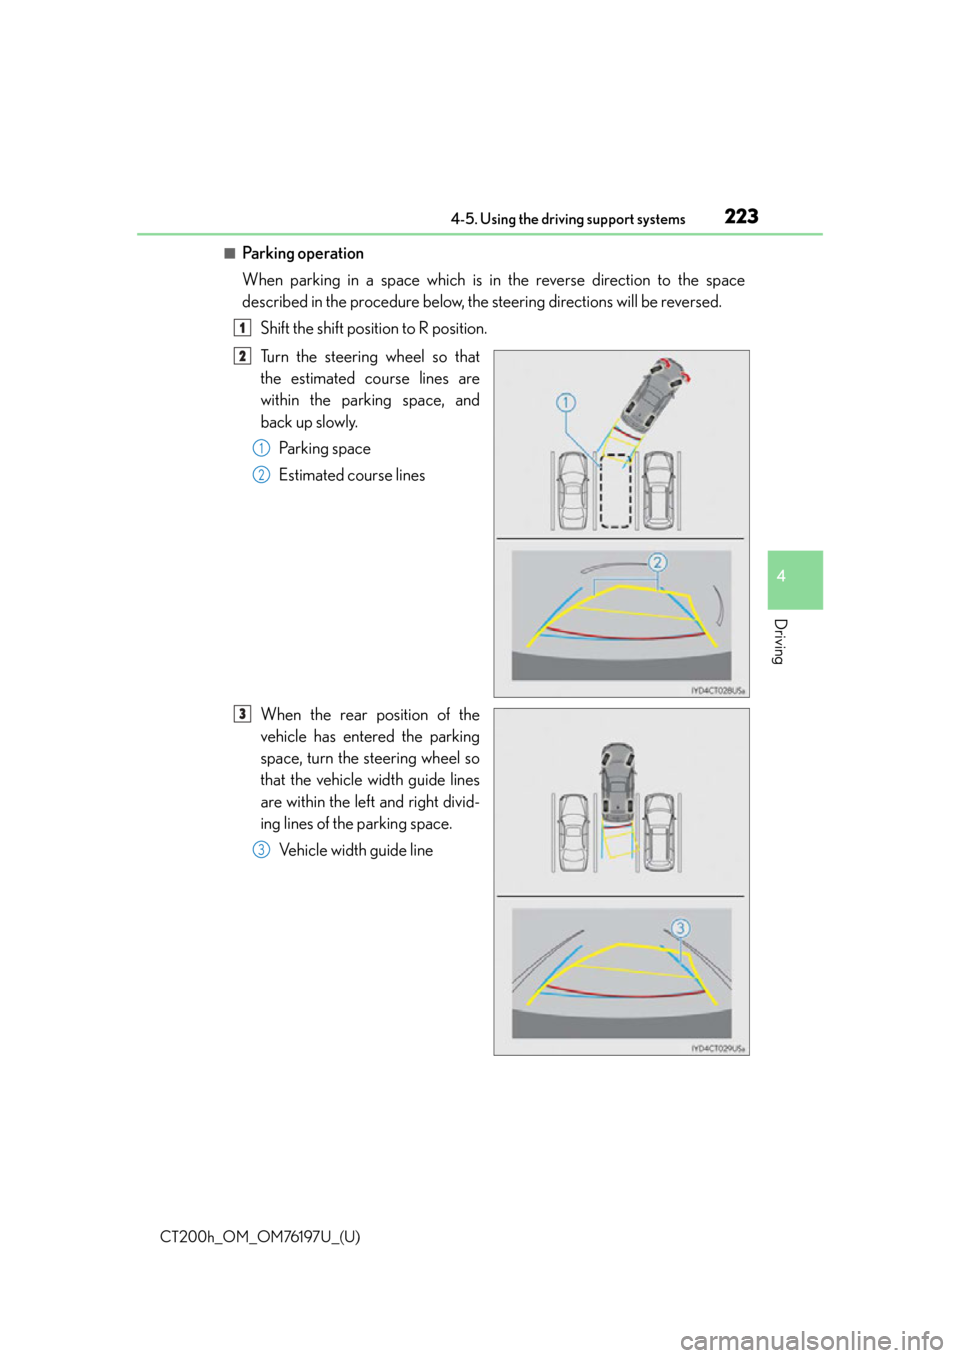
■Pa r k i n g o p e ra t i o n
When parking in a space which is in the reverse direction to the space
described in the procedure below, the steering directions will be reversed.Shift the shift position to R position.
Turn the steering wheel so that
the estimated course lines are
within the parking space, and
back up slowly.Parking space
Estimated course lines
When the rear position of the
vehicle has entered the parking
space, turn the steering wheel so
that the vehicle width guide lines
are within the left and right divid-
ing lines of the parking space. Vehicle width guide line
1
2
1
2
3
3
Page 224 of 632
224
CT200h_OM_OM76197U_(U)4-5. Using the driving support systems
Once the vehicle width guide lines and the parking space lines are parallel,
straighten the steering wheel and back up slowly until the vehicle has com-
pletely entered the parking space.
Stop the vehicle in an appropri
ate place, and finish parking.
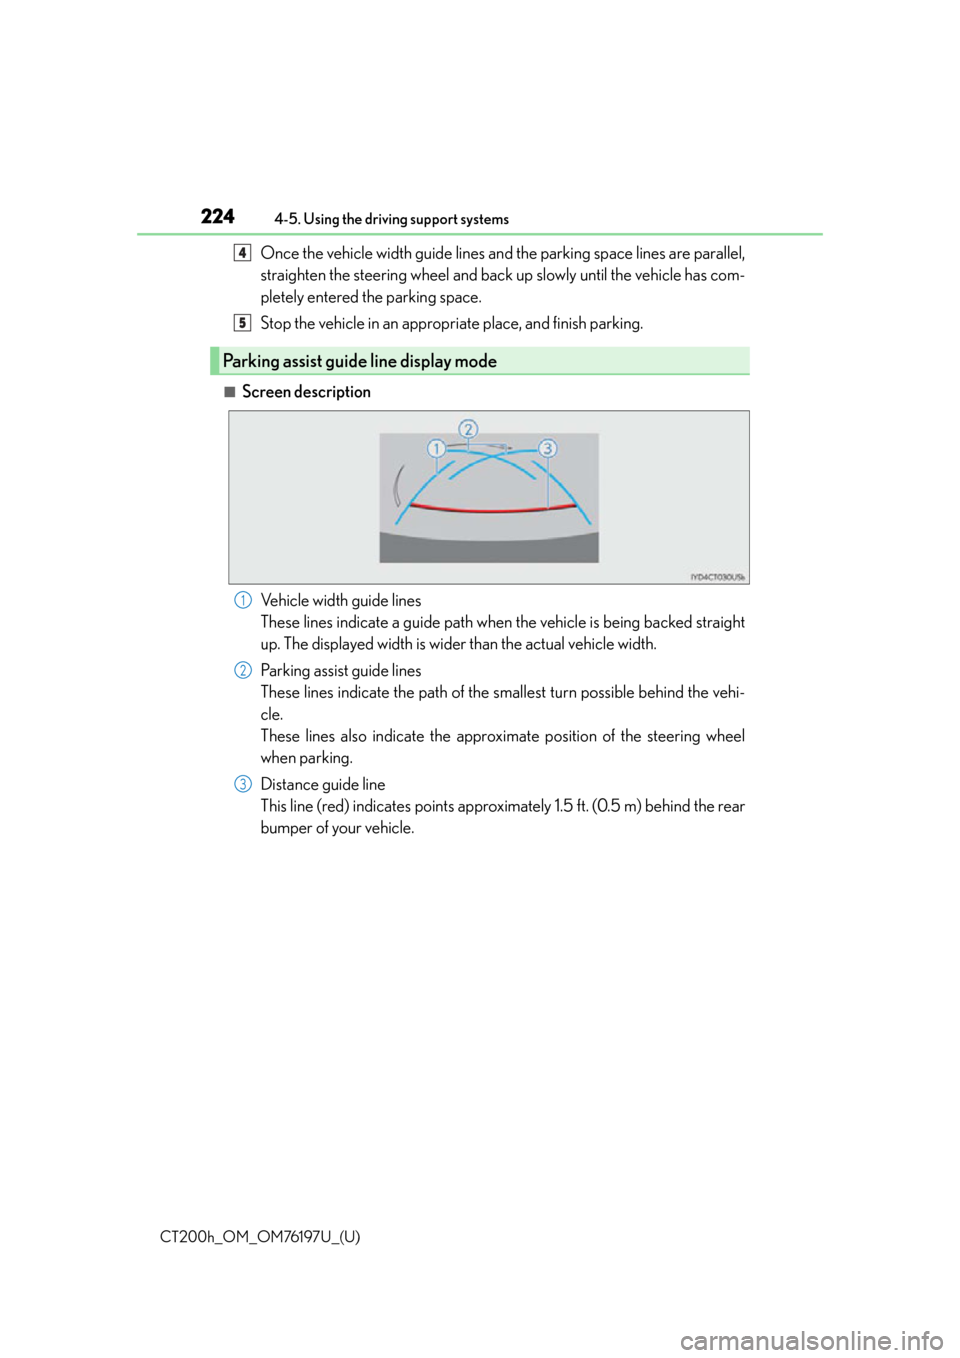
■Screen description
Vehicle width guide lines
These lines indicate a guide path when the vehicle is being backed straight
up. The displayed width is wider than the actual vehicle width.
Parking assist guide lines
These lines indicate the path of the smallest turn possible behind the vehi-
cle.
These lines also indicate the approximate position of the steering wheel
when parking.
Distance guide line
This line (red) indicates points approxim ately 1.5 ft. (0.5 m) behind the rear
bumper of your vehicle.
Parking assist guide line display mode
4
5
1
2
3
Page 225 of 632
CT200h_OM_OM76197U_(U)
2254-5. Using the driving support systems
4
Driving
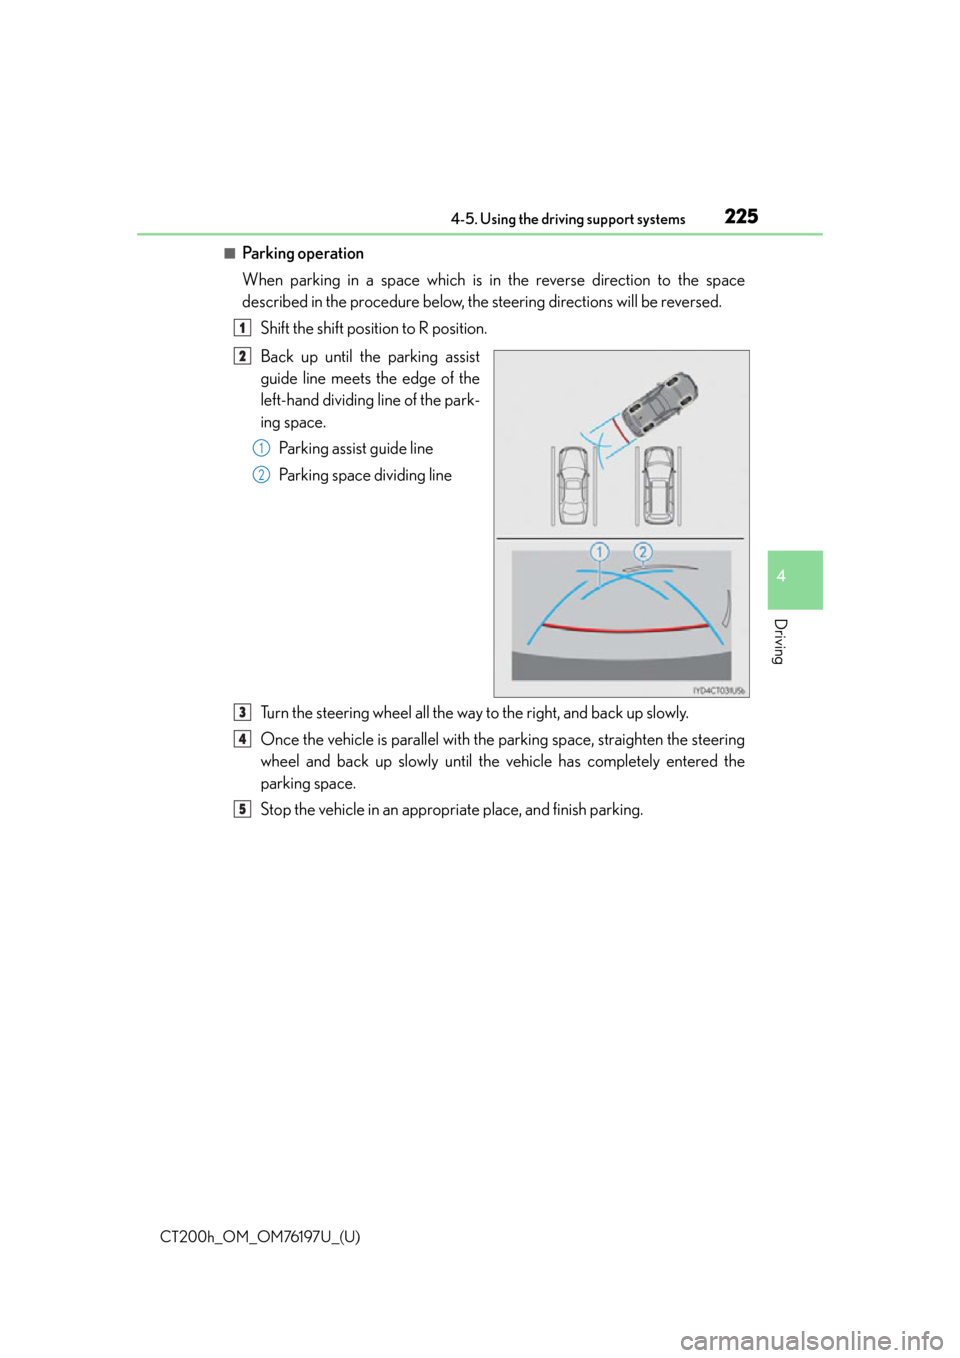
■Pa r k i n g o p e ra t i o n
When parking in a space which is in the reverse direction to the space
described in the procedure below, the steering directions will be reversed.Shift the shift position to R position.
Back up until the parking assist
guide line meets the edge of the
left-hand dividing line of the park-
ing space.Parking assist guide line
Parking space dividing line
Turn the steering wheel all the way to the right, and back up slowly.
Once the vehicle is parallel with the parking space, straighten the steering
wheel and back up slowly until the vehicle has completely entered the
parking space.
Stop the vehicle in an appropri ate place, and finish parking.
1
2
1
2
3
4
5
Page 226 of 632
226
CT200h_OM_OM76197U_(U)4-5. Using the driving support systems
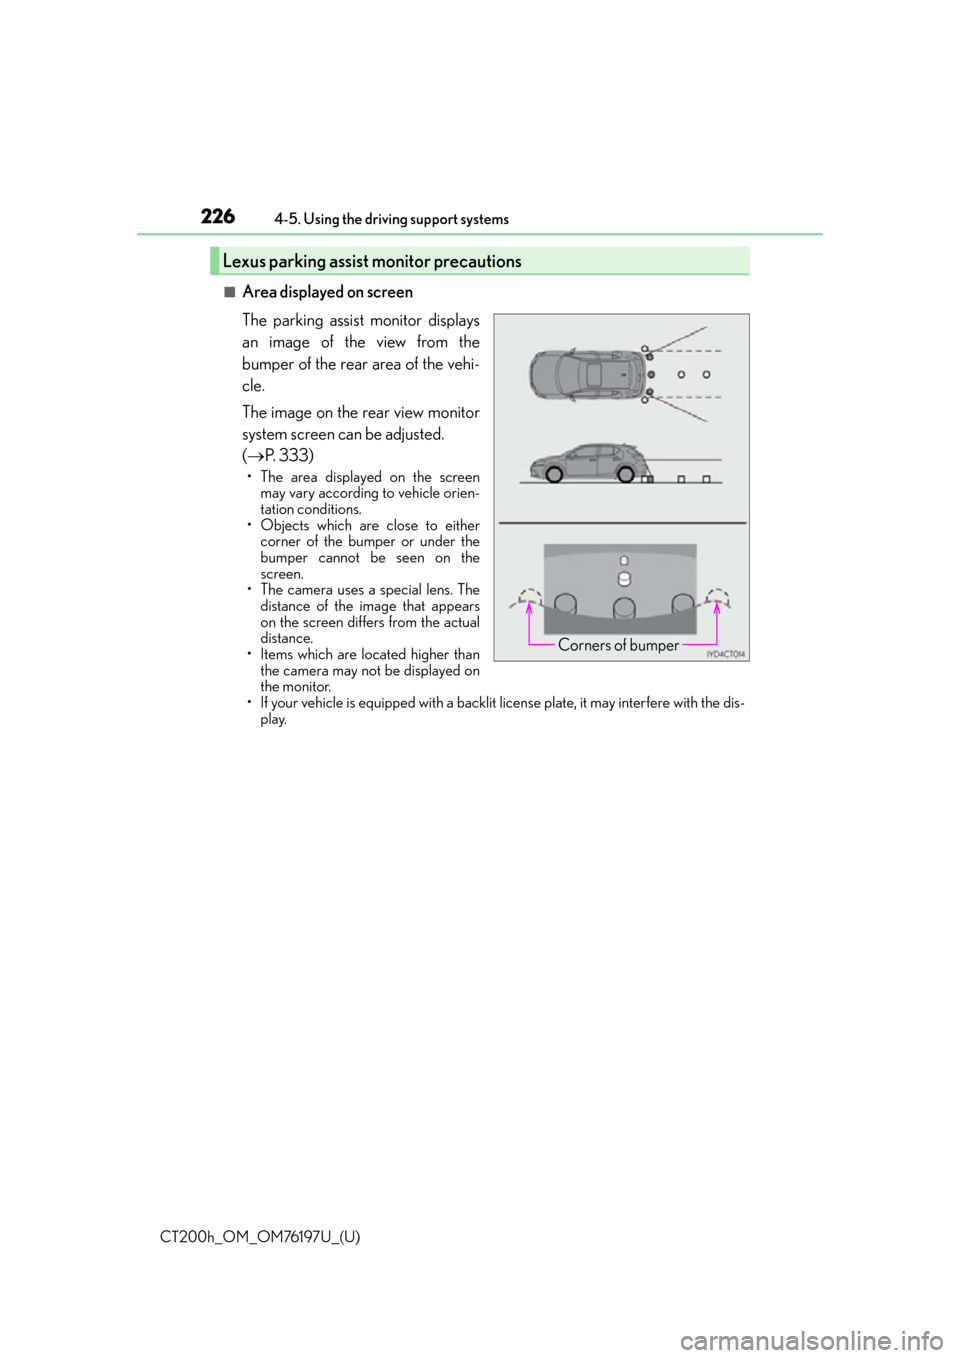
■Area displayed on screen
The parking assist monitor displays
an image of the view from the
bumper of the rear area of the vehi-
cle.
The image on the rear view monitor
system screen can be adjusted.
(
P. 333)
• The area displayed on the screen
may vary according to vehicle orien-
tation conditions.
• Objects which are close to either corner of the bumper or under the
bumper cannot be seen on the
screen.
• The camera uses a special lens. The
distance of the image that appears
on the screen differs from the actual
distance.
• Items which are located higher than the camera may not be displayed on
the monitor.
• If your vehicle is equipped with a backlit license plate, it may interfere with the dis-
play.
Lexus parking assist monitor precautions
Corners of bumper
Page 227 of 632
CT200h_OM_OM76197U_(U)
2274-5. Using the driving support systems
4
Driving
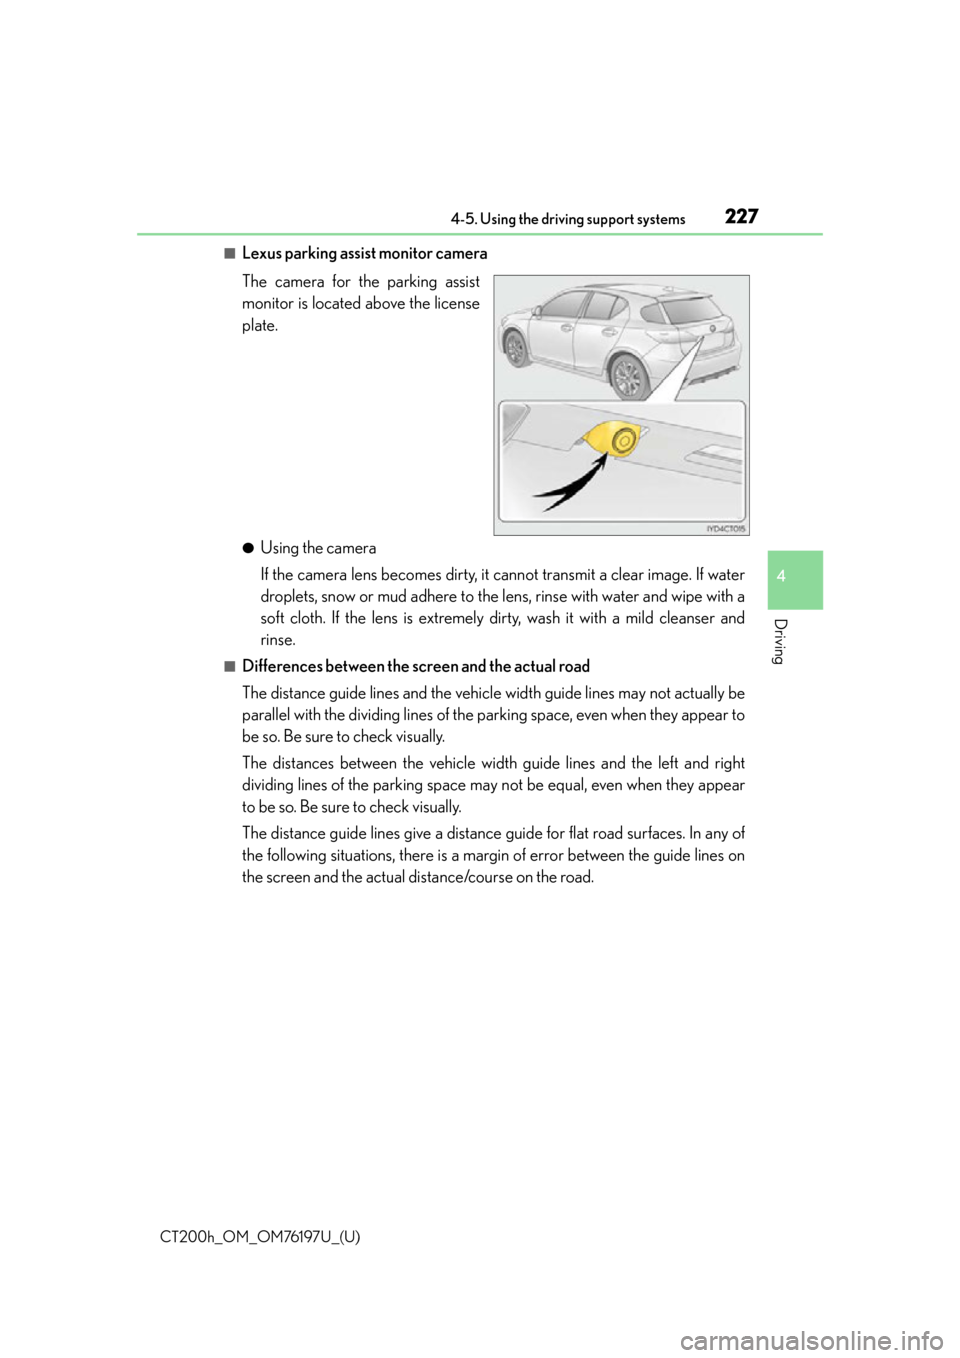
■Lexus parking assist monitor camera
The camera for the parking assist
monitor is located above the license
plate.
●Using the camera
If the camera lens becomes dirty, it cannot transmit a clear image. If water
droplets, snow or mud adhere to the lens, rinse with water and wipe with a
soft cloth. If the lens is extremely dirty, wash it with a mild cleanser and
rinse.
■Differences between the screen and the actual road
The distance guide lines and the vehicle width guide lines may not actually be
parallel with the dividing lines of the parking space, even when they appear to
be so. Be sure to check visually.
The distances between the vehicle width guide lines and the left and right
dividing lines of the parking space may not be equal, even when they appear
to be so. Be sure to check visually.
The distance guide lines give a distance guide for flat road surfaces. In any of
the following situations, there is a margin of error between the guide lines on
the screen and the actual di stance/course on the road.
Page 228 of 632
228
CT200h_OM_OM76197U_(U)4-5. Using the driving support systems
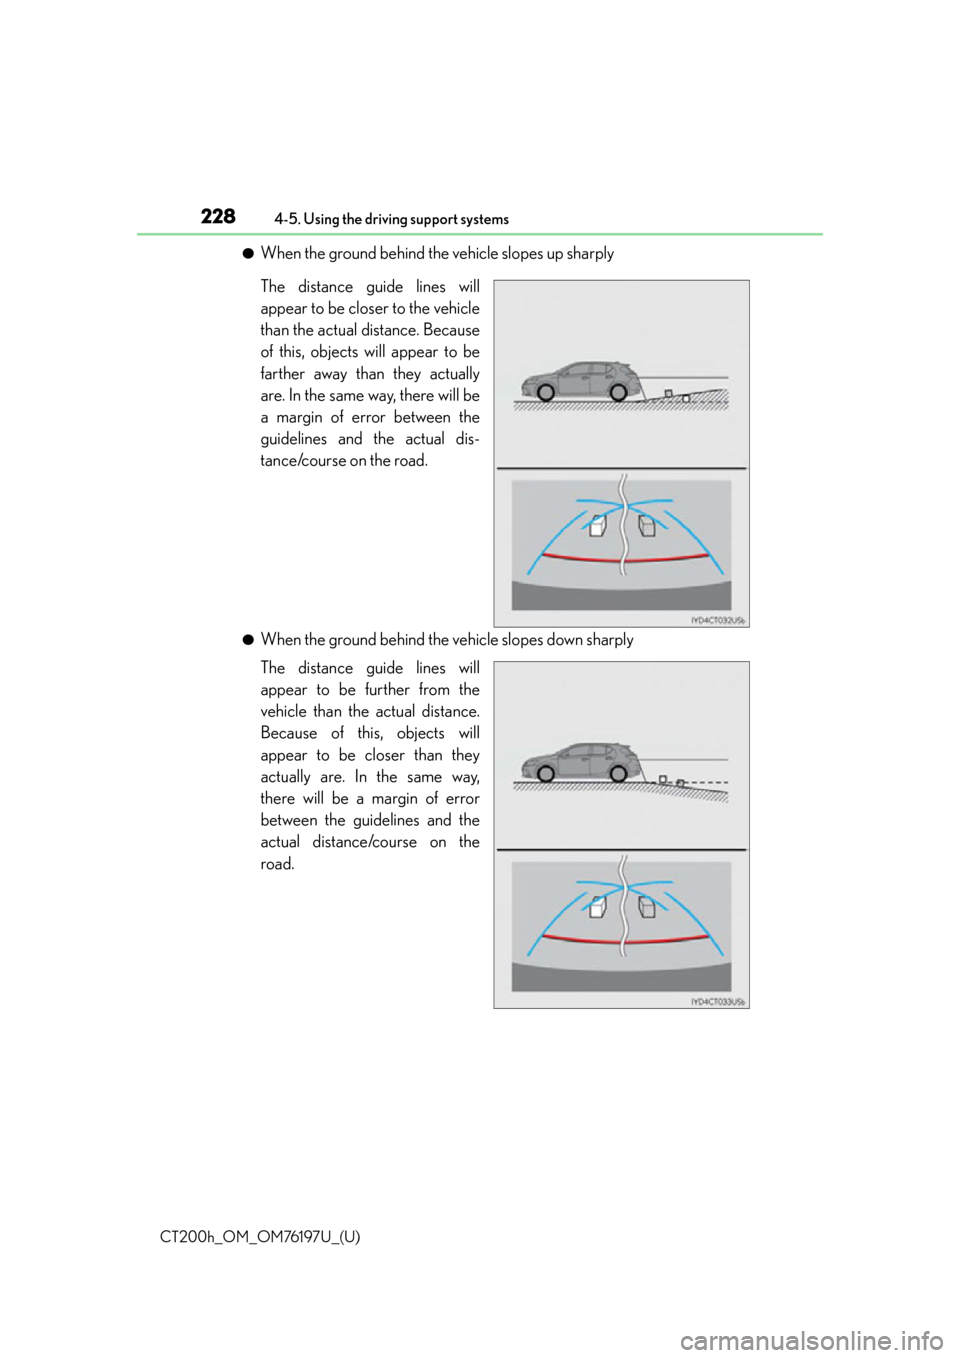
●When the ground behind the vehicle slopes up sharply
The distance guide lines will
appear to be closer to the vehicle
than the actual distance. Because
of this, objects will appear to be
farther away than they actually
are. In the same way, there will be
a margin of error between the
guidelines and the actual dis-
tance/course on the road.
●When the ground behind the vehicle slopes down sharply
The distance guide lines will
appear to be further from the
vehicle than the actual distance.
Because of this, objects will
appear to be closer than they
actually are. In the same way,
there will be a margin of error
between the guidelines and the
actual distance/course on the
road.
Page 229 of 632
CT200h_OM_OM76197U_(U)
2294-5. Using the driving support systems
4
Driving
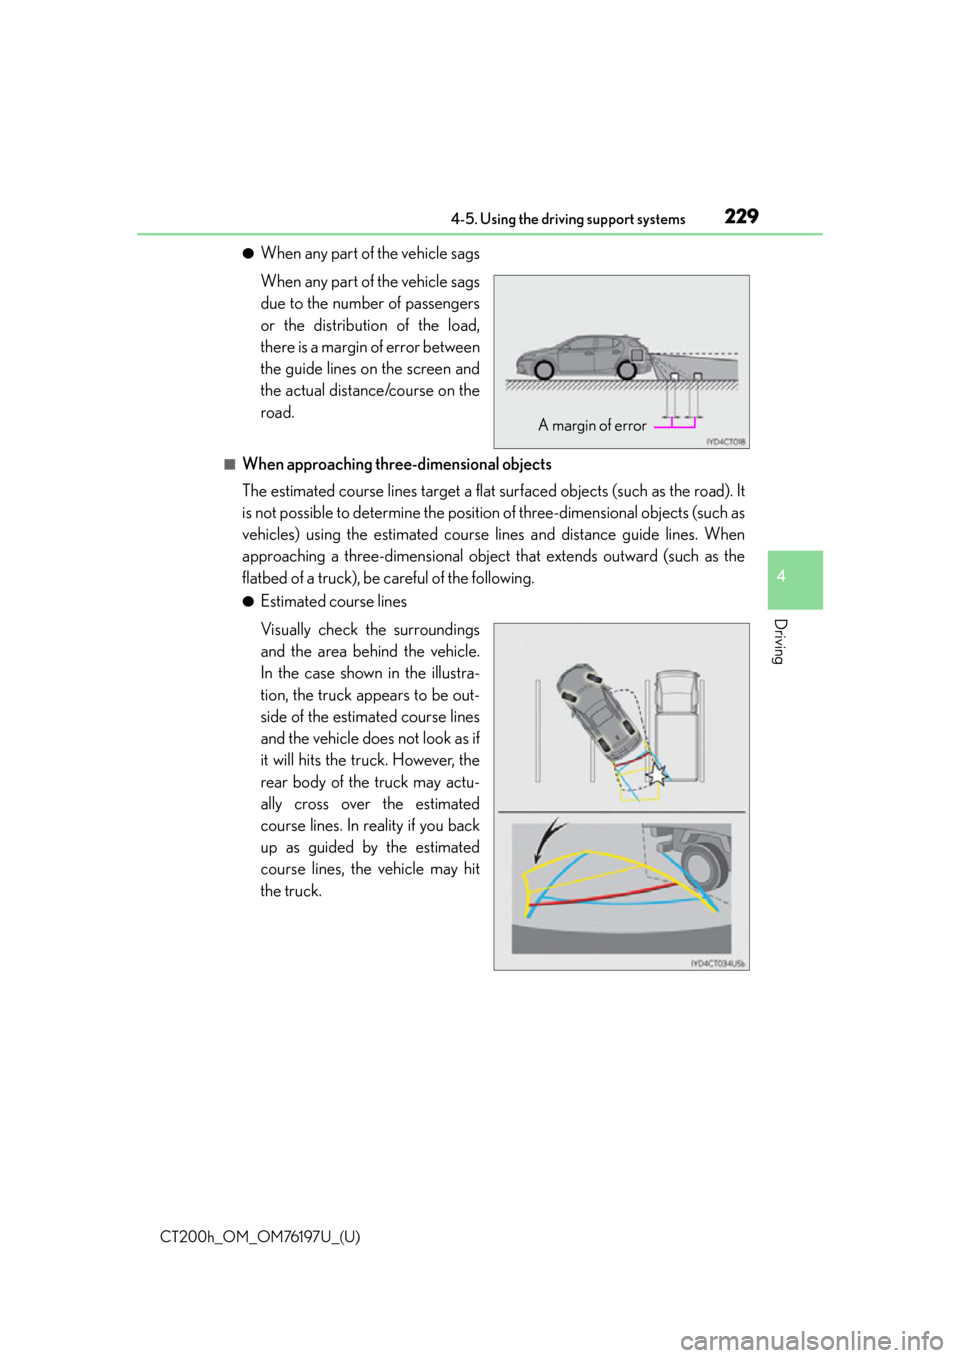
●When any part of the vehicle sags
When any part of the vehicle sags
due to the number of passengers
or the distribution of the load,
there is a margin of error between
the guide lines on the screen and
the actual distance/course on the
road.
■When approaching three-dimensional objects
The estimated course lines target a flat surfaced objects (such as the road). It
is not possible to determine the position of three-dimensional objects (such as
vehicles) using the estimated course lines and distance guide lines. When
approaching a three-dimensional object that extends outward (such as the
flatbed of a truck), be careful of the following.
●Estimated course lines
Visually check the surroundings
and the area behind the vehicle.
In the case shown in the illustra-
tion, the truck appears to be out-
side of the estimated course lines
and the vehicle does not look as if
it will hits the truck. However, the
rear body of the truck may actu-
ally cross over the estimated
course lines. In reality if you back
up as guided by the estimated
course lines, the vehicle may hit
the truck.
A margin of error
Page 230 of 632
230
CT200h_OM_OM76197U_(U)4-5. Using the driving support systems
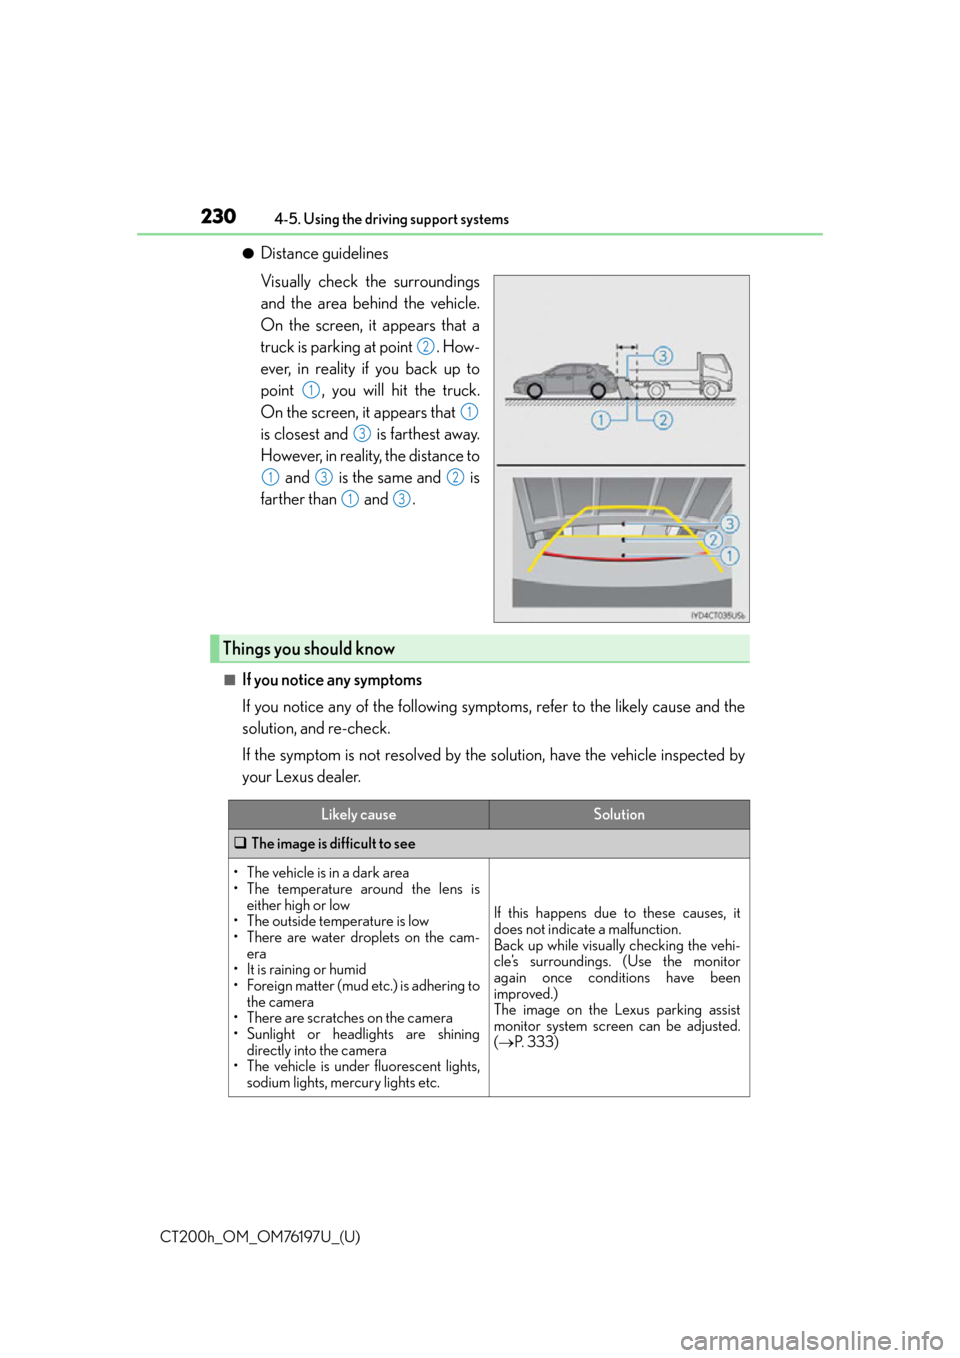
●Distance guidelines
Visually check the surroundings
and the area behind the vehicle.
On the screen, it appears that a
truck is parking at point . How-
ever, in reality if you back up to
point , you will hit the truck.
On the screen, it appears that
is closest and is farthest away.
However, in reality, the distance to
and is the same and is
farther than and .
■If you notice any symptoms
If you notice any of the following symp toms, refer to the likely cause and the
solution, and re-check.
If the symptom is not resolved by the solution, have the vehicle inspected by
your Lexus dealer.
2
1
1
3
132
13
Things you should know
Likely causeSolution
The image is difficult to see
• The vehicle is in a dark area
• The temperature around the lens is
either high or low
• The outside temperature is low
• There are water droplets on the cam-
era
• It is raining or humid
• Foreign matter (mud etc.) is adhering to
the camera
• There are scratches on the camera
• Sunlight or headlights are shining
directly into the camera
• The vehicle is under fluorescent lights,
sodium lights, mercury lights etc.
If this happens due to these causes, it
does not indicate a malfunction.
Back up while visually checking the vehi-
cle’s surroundings. (Use the monitor
again once conditions have been
improved.)
The image on the Lexus parking assist
monitor system screen can be adjusted.
( P. 3 3 3 )